Sony F8332 Скачать руководство пользователя страница 25

To activate the screen

Briefly press the power key  .

To lock the screen

1

When the screen is active, briefly press the power key  .

2

Alternatively, double tap any empty area on the Home screen. To enable this

function, touch and hold any area on your Home screen until the device

vibrates, then tap   and tap the slider beside Double-tap to sleep.

Home screen

The Home screen is the starting point for using your device. It's similar to the desktop

on a computer screen. Your Home screen can have up to twenty panes, which

extend beyond the regular screen display width. The number of Home screen panes

is represented by a series of dots at the lower part of the Home screen. The

highlighted dot shows the pane that is currently displayed.
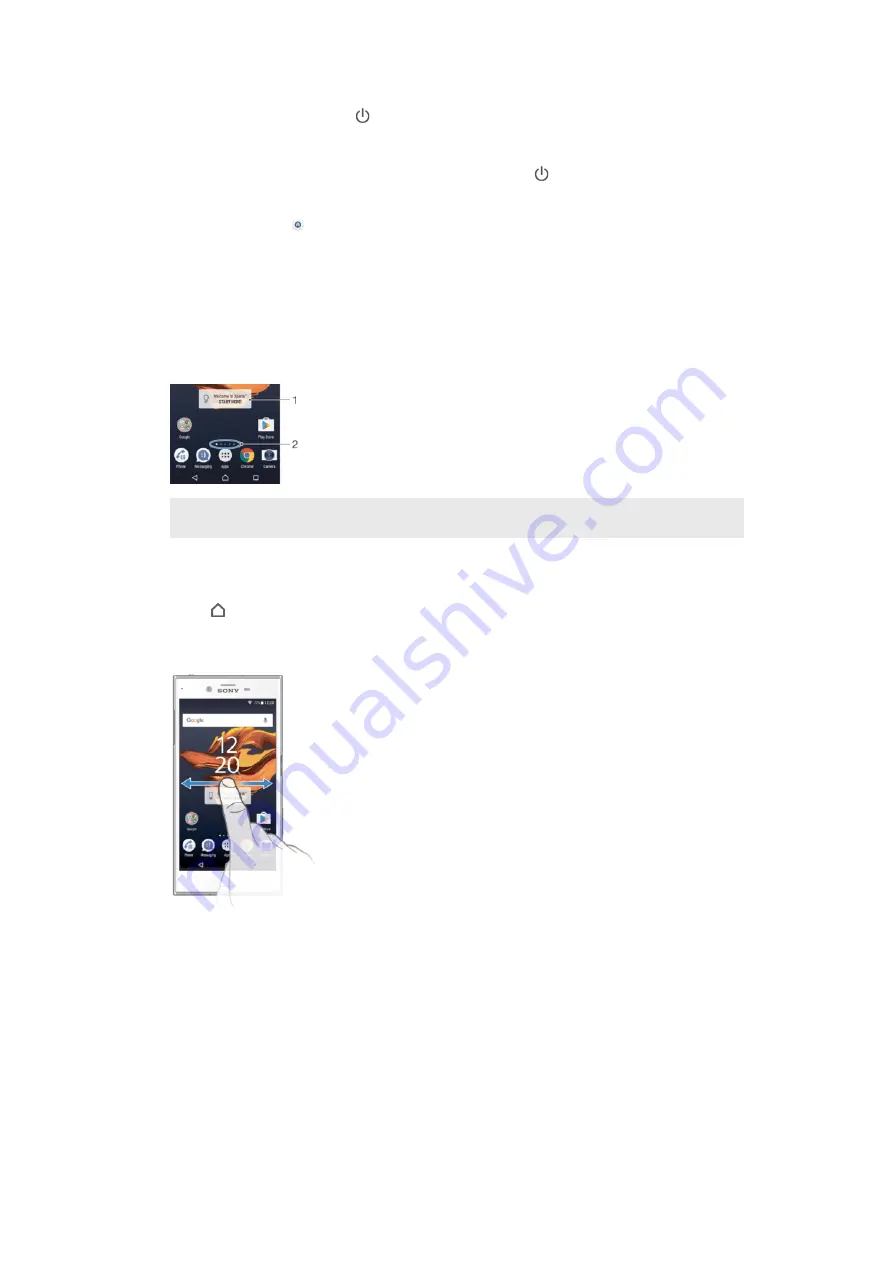
1

Welcome to Xperia™ widget — Tap to open the widget and select a task such as copying content

from your old device or setting up Xperia™ services

2

Dots — Represents the number of Home screen panes

To go to the Home screen

Press  .

To browse the Home screen

Home screen panes

You can add new panes to your Home screen (up to a maximum of twenty panes)

and delete panes. You can also set the pane that you want to use as the main Home

screen pane.

25

This is an Internet version of this publication. © Print only for private use.

Содержание F8332

Страница 1: ...User guide Xperia XZ F8332 ...

Страница 2: ...21 Learning the basics 23 Using the touchscreen 23 Locking and unlocking the screen 24 Home screen 25 Application screen 26 Navigating applications 28 Widgets 28 Shortcuts and folders 29 Background and themes 30 Battery and power management 30 Taking a screenshot 32 Notifications 32 Icons in the status bar 34 Applications overview 36 Downloading applications 38 Downloading applications from Google...

Страница 3: ...55 Date and time 55 X Reality for mobile 55 Super vivid mode 55 Enhancing the sound output 56 Noise cancellation 56 Multiple user accounts 57 Typing text 59 On screen keyboard 59 Editing text 60 Calling 61 Making calls 61 Receiving calls 62 Smart call handling 63 Ongoing calls 64 Using the call log 64 Forwarding calls 65 Restricting calls 65 Multiple calls 66 Conference calls 67 Voicemail 67 Emerg...

Страница 4: ... music 83 Music menu 84 Playlists 85 Sharing music 86 Enhancing the sound 86 Camera 87 Taking photos and recording videos 87 General camera settings 88 Still camera settings 92 Video camera settings 95 Photos and videos in Album 97 Viewing photos and videos 97 Sharing and managing photos and videos 98 Editing photos with the Photo editor application 99 Editing videos with the Video editor applicat...

Страница 5: ...gation 116 Using data traffic when travelling 117 Airplane mode 117 Clock and Calendar 118 Calendar 118 Clock 118 Accessibility 121 Magnification gestures 121 Large text 121 Colour correction 121 TalkBack 121 TTY Teletypewriter mode 122 Support and maintenance 123 Support for your device 123 Computer tool 123 Updating your device 124 Storage and memory 125 Managing files using a computer 126 USB C...

Страница 6: ... your device is running you can check it in the Settings menu For more information about software updates see Updating your device on page 124 To check the current software version of your device 1 From your Home screen tap 2 Find Settings About phone Android version Overview 6 This is an Internet version of this publication Print only for private use ...

Страница 7: ...parate slots in the same holder Make sure you don t confuse the two The combined SIM Memory card slot allows you to use either a memory card or an additional SIM card To prevent data loss make sure you turn off your device or unmount the memory card before you drag out the holder to remove the nano SIM card or cards or memory card from the device To insert one or two nano SIM cards 1 Using your fi...

Страница 8: ... memory card 1 Either turn off the device or unmount the memory card under Settings Storage memory Advanced Storage next to SD card 2 With the screen facing down open the nano SIM Memory card slot cover 3 Drag out the nano SIM Memory card tray using your fingernail 4 Remove the memory card then gently push the tray back into the slot until it fits into place Screen protection Before using your dev...

Страница 9: ...droid platform developed by Google A range of Google applications and services is available on your device when you purchase it for example Gmail Google Maps YouTube and the Play Store application which gives you access to the Google Play online store for downloading Android applications To get the most out of these services you need a Google account For example a Google account enables you to do ...

Страница 10: ...gle account any security features that are linked to your Google account will no longer be available Charging your device Your device has an embedded rechargeable battery that can only be replaced by an authorised Sony repair centre You should never try to open or take apart the device yourself Doing so can cause damage and void your warranty It is recommended that you charge the battery for at le...

Страница 11: ...t is important to use the USB Type C cable provided when charging your device as other types of USB cables can damage your device If the battery is completely depleted it may take a few minutes before the notification light illuminates and the charging icon appears Battery notification light status Green The battery is charging and the battery charge level is greater than 90 Orange The battery is ...

Страница 12: ...iated with the service The device must be connected to the Internet before the setup process can be completed Otherwise you will not be able to use your device after the reset Android Device Manager If you remotely reset your device using this service you must enter the username and password for a Google account The device must be connected to the Internet before the setup process can be completed...

Страница 13: ...attern 1 From your Home screen tap 2 Find and tap Settings Lock screen security Screen lock 3 Draw your screen unlock pattern 4 Tap Pattern and follow the instructions on your device To create a screen lock PIN 1 From your Home screen tap 2 Find and tap Settings Lock screen security Screen lock PIN 3 Enter a numeric PIN then tap Continue 4 Re enter and confirm your PIN then tap OK To create a scre...

Страница 14: ...r device 4 Click the picture of your device under Your devices 5 Select Lock or Change PIN2 to replace the current screen lock with a new PIN code 6 Follow the on screen instructions provided by Protection by my Xperia Depending on your security settings your device may lock after a screen lock reset You then need to enter your Google account username and password in order to use the device Finger...

Страница 15: ... to date Google Play services app ensures that you can use the latest Smart Lock features Enable Smart Lock Set when you want your device to unlock automatically The Smart Lock feature is developed by Google and the exact functionality may change over time due to updates from Google The Smart Lock feature may not be available in every market country or region To enable Smart Lock 1 Set a pattern P...

Страница 16: ...n the security of your connection you may need to manually unlock your device before the trusted device can keep it unlocked To remove a trusted Bluetooth device 1 From your Home screen tap 2 Find and tap Settings Lock screen security Smart Lock Trusted devices 3 Tap the device that you want to remove 4 Tap Remove trusted device Making sure you re secure when using trusted devices Different Blueto...

Страница 17: ...o edit your home location 1 From your Home screen tap 2 Find and tap Settings Location then tap the slider to enable location services 3 Tap Mode then choose High accuracy or Battery saving Location mode 4 From your Home screen tap 5 Find and tap Settings Lock screen security Smart Lock Trusted places 6 Select your home location 7 Tap Edit 8 In the search bar enter the location that you want to us...

Страница 18: ...ustom place 1 From your Home screen tap 2 Find and tap Settings Location then tap the slider to enable location services 3 Tap Mode then choose High accuracy or Battery saving Location mode 4 From your Home screen tap 5 Find and tap Settings Lock screen security Smart Lock Trusted places 6 Select the place that you want to remove 7 Tap Delete Keeping your device unlocked while you re carrying it U...

Страница 19: ...e you restart the device To change the SIM card PIN 1 From the Home screen tap 2 Find and tap Settings Lock screen security Set up SIM card lock 3 Select a SIM card 4 Tap Change SIM PIN 5 Enter the old SIM card PIN and tap OK 6 Enter the new SIM card PIN and tap OK 7 Re type the new SIM card PIN and tap OK To unlock a blocked SIM card using the PUK code 1 Enter the PUK code and tap 2 Enter a new P...

Страница 20: ...t the phone to switch SIM cards automatically at a set time That way all communications are made from the SIM card you select during the hours you want To set the phone to switch SIM cards automatically 1 From the Home screen tap 2 Find and tap Settings Dual SIM 3 Mark the SMS messages and Data traffic checkboxes 4 Tap a SIM card and set the time period Finding the identification number of your de...

Страница 21: ...ed on this device the next time you turn on the device The Protection by my Xperia service may not be available in all countries or regions To activate Protection by my Xperia 1 Make sure you have an active data connection and enable location services on your device 2 From your Home screen tap 3 Find and tap Settings Lock screen security Protection by my Xperia Activate 4 Mark the checkbox to agre...

Страница 22: ...th multiple users make sure that you are logged in as the owner 2 Make sure that you have an active data connection and that location services are enabled 3 From your Home screen tap 4 Find and tap Settings Google Security 5 Tap the sliders beside Remotely locate this device and Allow remote lock and erase to enable both functions 6 If prompted agree to the terms and conditions by tapping Activate...

Страница 23: ... keyboard Touching and holding Move an item Activate an item specific menu Activate selection mode for example to select several items from a list Pinching and spreading Zoom in or out on web pages photos and maps and when you re taking photos or shooting videos 23 This is an Internet version of this publication Print only for private use ...

Страница 24: ...s on and left idle for a set period of time the screen darkens to save battery power and locks automatically This lock prevents unwanted actions on the touchscreen when you are not using it When you buy your device a basic screen swipe lock is already set This means that you have to swipe left or upwards on the screen to unlock it You can change the security settings later and add other kinds of l...

Страница 25: ...eyond the regular screen display width The number of Home screen panes is represented by a series of dots at the lower part of the Home screen The highlighted dot shows the pane that is currently displayed 1 Welcome to Xperia widget Tap to open the widget and select a task such as copying content from your old device or setting up Xperia services 2 Dots Represents the number of Home screen panes T...

Страница 26: ... 2 Flick left or right to browse to the pane that you want to delete then tap on the top right corner of the pane Home screen settings To disable or uninstall an application from the Home screen Disabling a pre installed app deletes all data but the app can be enabled again from Settings Apps Only downloaded apps can be fully uninstalled 1 Touch and hold any area on your Home screen until the devi...

Страница 27: ...plication screen is open tap 2 Tap Sort apps then select an option To add an application shortcut to the Home screen 1 On the Application screen touch and hold an application icon until the device vibrates then drag the icon to the top of the screen The Home screen opens 2 Drag the icon to the desired location on the Home screen then release it To move an application on the Application screen 1 Wh...

Страница 28: ...on and go back to the Home screen 4 Back key Go back to the previous screen within an application or close the application To open the recently used applications window Press To close all the recently used applications Tap and then tap To open a menu in an application While using the application tap A menu is not available in all applications Widgets Widgets are small applications that you can use...

Страница 29: ...tions To add an application shortcut to your Home screen 1 Touch and hold an empty area on your Home screen 2 In the customisation menu tap Widgets Shortcuts 3 Scroll through the list and select an application The selected application gets added to the Home screen To move an item on the Home screen Touch and hold the item until the device vibrates then drag the item to the new location To remove a...

Страница 30: ...y last longer To view your battery consumption and estimated battery time 1 From your Home screen tap 2 Find and tap Settings Battery An overview appears showing the battery percentage and an estimated battery time 3 Tap SHOW BATTERY USAGE to view a list of features and services that have consumed battery power since the last charging cycle Tap any of them to see details of its energy consumption ...

Страница 31: ... From your Home screen tap 2 Find and tap Settings Battery 3 Tap STAMINA mode and select the preferred option appears in the status bar when STAMINA mode is active You can adjust the Auto start percentage according to your preferences To activate Ultra STAMINA mode 1 From your Home screen tap 2 Find and tap Settings Battery 3 Tap Ultra STAMINA mode and then tap Activate 4 Confirm to activate Your ...

Страница 32: ... as new messages and calendar notifications as well as activities in progress such as file downloads Notifications appear in the following places The status bar The Notification panel The lock screen To open or close the Notification panel 1 To open the Notification panel drag the status bar downwards or simply double tap it 2 To close the Notification panel drag or flick the panel upwards To take...

Страница 33: ...must have a PIN password or pattern set up as your screen lock in order for this setting to be available Contents hidden is displayed on the lock screen when sensitive notifications arrive For example you ll get a notification for an incoming email or chat but the content won t be visible on your lock screen Don t show notifications at all You won t get any notifications on the lock screen Setting...

Страница 34: ...ing LTE data Sending and downloading GPRS data Sending and downloading EDGE data Sending and downloading 3G data Sending and downloading HSPA data A Wi Fi connection is enabled and data is being transmitted A Wi Fi connection is enabled but there is no Internet connection This icon also appears when you are trying to connect to a secured Wi Fi network After a successful login the exclamation mark ...

Страница 35: ...rding is turned on New voicemail message New email message Downloading data Uploading data Mobile data is disabled Perform a basic setup of your device A software update is available System updates are available Downloading system updates Tap to install the downloaded system updates STAMINA mode is activated Ultra STAMINA mode is activated Battery Care is activated Noise cancelling is on Screensho...

Страница 36: ... view web pages manage bookmarks text and images Use the Clock application to set various kinds of alarms and timers Use the Contacts application to manage phone numbers email addresses and other information related to your contacts Create edit and collaborate with others on documents Access your downloaded applications documents and pictures Save your documents and files for easy access from any ...

Страница 37: ...n to find applications to buy or download free Stay connected with your gaming friends and the games you love to play shop on the PlayStation Store and more Optimise settings to suit your own requirements Create edit and collaborate with others on spreadsheets Use the Sketch application to create and explore images then share them with your friends Create edit and collaborate with others on presen...

Страница 38: ...ing the application under Settings Apps Downloading applications from other sources When your device is set to allow downloads from sources other than Google Play you can download applications directly from other websites by following the relevant download instructions Installing applications of unknown or unreliable origin can damage your device Download applications only from reliable sources Co...

Страница 39: ... and MMS settings again If you cannot access the Internet over a mobile network or if multimedia messaging is not working even though the Internet and MMS settings have been downloaded successfully to your device refer to the troubleshooting tips for your device at www sonymobile com support for network coverage mobile data and MMS issues If STAMINA mode is activated to save power all mobile data ...

Страница 40: ...tor for more information Available Wi Fi networks may be open or secured Open networks are indicated by next to the Wi Fi network name Secured networks are indicated by next to the Wi Fi network name Some Wi Fi networks do not show up in the list of available networks because they do not broadcast their network name SSID If you know the network name you can add it manually to your list of availabl...

Страница 41: ... highlighted area in the illustration Wi Fi settings When you are connected to a Wi Fi network or when there are Wi Fi networks available in your vicinity you can view the status of these networks You can also enable your device to notify you whenever an open Wi Fi network is detected To enable or disable Wi Fi network notifications 1 Turn on Wi Fi if it is not already on 2 From your Home screen t...

Страница 42: ...Entry 5 On the WPS supported device enter the PIN that appears on your device Sharing your mobile data connection You can share your mobile data connection with other devices in several ways USB tethering share your mobile data connection with a single computer using a USB Type C Bluetooth tethering share your mobile data connection with up to four other devices via Bluetooth Portable Wi Fi hotspo...

Страница 43: ...screen tap 2 Find and tap Settings More Tethering portable hotspot 3 Tap Portable Wi Fi hotspot settings Configure Wi Fi hotspot 4 Enter the Network name SSID information 5 To select a security type tap the Security field If required enter a password 6 Tap Save 7 Tap then tap the Portable Wi Fi hotspot slider to enable the function 8 If prompted tap OK to confirm appears in the status bar once the...

Страница 44: ... Home screen tap 3 Find and tap Settings Data usage 4 Tap the Mobile tab 5 Select a SIM card 6 Tap the slider beside Set mobile data limit to enable the function then tap OK 7 To set the mobile data usage limit drag the data limit line to the desired value You can also set the data limit manually by tapping on the number displayed beside the line Once your mobile data usage reaches the set limit m...

Страница 45: ...tomatically between mobile networks depending on which mobile networks are available where you are You can also manually set your device to use a particular mobile network mode for each SIM card for example WCDMA or GSM Different status icons are displayed in the status bar depending on the type or mode of network that you are connected to Refer to Status icon on page 34 to see what the different ...

Страница 46: ...private network contact the network administrator of your company or organisation If you are using a device with multiple users you may need to log in as the owner that is the primary user to adjust the settings for VPN To add a virtual private network 1 From your Home screen tap 2 Find and tap Settings More VPN 3 Tap 4 Select the type of VPN to add 5 Enter your VPN settings 6 Tap Save To connect ...

Страница 47: ... Exchange ActiveSync account you can access your corporate email messages calendar appointments and contacts directly on your device After setup you can find your information in the Email Calendar and Contacts applications To set up an EAS account for synchronisation 1 From your Home screen tap 2 Tap Settings Accounts sync Add account Exchange ActiveSync 3 Enter your corporate email address and pa...

Страница 48: ... Off peak time settings tap Check frequency and select an interval option To remove an EAS account 1 From your Home screen tap Settings Accounts sync 2 Tap Exchange ActiveSync then select the EAS account that you want to remove 3 Tap then tap Remove account 4 Tap Remove account again to confirm 48 This is an Internet version of this publication Print only for private use ...

Страница 49: ...the screen touch and hold the icon for the quick setting that you want to add then drag and drop it into the lower part of the screen To rearrange the Quick settings panel 1 Drag the status bar fully downwards then tap Edit 2 Touch and hold an icon then move it to the desired position Volume settings You can adjust the ringtone volume for incoming calls and notifications as well as for music and v...

Страница 50: ...and decide how long your device will be in Do not disturb mode manually You can also preset when your device will be in Do not disturb mode automatically To activate Do not disturb mode 1 Drag the status bar fully downwards to access the Quick settings panel 2 Find and tap 3 Select an option then tap Done To quickly shift between Do not disturb Vibrate Sound mode 1 Press the volume key up or down ...

Страница 51: ... brightness slider to disable this function if it is not already disabled 3 Tap Brightness level 4 Drag the slider to adjust the brightness Lowering the brightness level helps the battery last longer To enable or disable vibrate on touch 1 From your Home screen tap 2 Find and tap Settings Sound notification Other sounds 3 Tap the Vibrate on touch slider to enable or disable the function To adjust ...

Страница 52: ... You can also use this feature when you lend your device to another person to make it harder for them to access more than one application For example you can lend your device to somebody to take a photo and pin the screen to the Camera application so that the person can t easily use other apps such as Email Screen pinning is not a security feature and does not fully prevent other users from unpinn...

Страница 53: ...s this dialog tap OK To deny a permission To deny a permission tap Deny when the dialog is shown Some applications can still be used even if you have denied permissions Critical permissions Some permissions are mandatory for apps to work as intended In such cases a dialog will inform you To allow critical permissions 1 To allow a permission tap Continue App info Permission 2 Find the critical perm...

Страница 54: ...ault setting 1 From your Home screen tap 2 Find and tap Settings Apps 3 Select an application or service then tap Open by default CLEAR DEFAULTS The option to clear the application default setting is not available for every application or service Daydream Daydream is an interactive screen saver that automatically displays colours photos or a slideshow while your device is docked or charging and th...

Страница 55: ... Find and tap Settings Date time 3 Disable the Automatic date time function by tapping the slider 4 Tap Set time 5 Select the relevant values for the hour and minute 6 Tap OK To set the time zone 1 From your Home screen tap 2 Find and tap Settings Date time 3 Disable the Automatic time zone function by tapping the slider 4 Tap Select time zone 5 Select an option X Reality for mobile Sony s X Reali...

Страница 56: ... The manual adjustment of sound output settings has no effect on voice communication applications For example there is no change in the voice call sound quality To minimise volume differences using the Dynamic normaliser 1 From your Home screen tap 2 Find and tap Settings Sound notification Audio settings 3 Disable the DSEE HX function by tapping the slider if it is enabled 4 Enable the Dynamic no...

Страница 57: ...le or lend your device to someone to use for a while The user who sets up the device for the first time becomes the owner of the device Only the owner can manage the accounts of other users Apart from the owner account there are two different types of accounts Regular User This account type is suitable for someone who regularly uses your device Guest User Enable the guest account option for someon...

Страница 58: ...ur Home screen tap 3 Find and tap Settings Users 4 Find and tap Remove guest 5 Tap Remove You can also clear the guest session from the status bar on any screen as long as you are logged in to the guest account Just drag the status bar downwards and tap the user icon then tap Remove guest Switching between multiple user accounts To switch between multiple user accounts 1 To view the list of users ...

Страница 59: ... adjust the settings in some applications to enable landscape orientation To enter text character by character 1 To enter a character visible on the keyboard tap the character 2 To enter a character variant touch and hold a regular keyboard character to get a list of available options then select from the list For example to enter é touch and hold e until other options appear then while keeping yo...

Страница 60: ...ears when you have text saved on the clipboard To select text 1 Double tap a word to highlight it 2 You can drag the tabs on both sides of the highlighted word to select more text To edit text 1 Double tap a word to make the application bar appear 2 Select the text that you want to edit then use the application bar to make your desired changes To use the magnifier When you enter text tap and hold ...

Страница 61: ...mber 3 Dialpad 4 Call button To open the dialpad 1 From your Home screen tap 2 Find and tap 3 If the dialpad does not appear tap To dial a phone number 1 From your Home screen tap 2 Find and tap 3 If the call log appears tap to display the dialpad 4 Enter the phone number and tap or To delete a number entered by mistake tap To make a call using smart dial 1 From your Home screen tap 2 Find and tap...

Страница 62: ...ll when the device is in sleep mode or the screen is locked the phone application opens in fullscreen format with a SIM icon indicating which SIM card the call is for If you receive an incoming call when the screen is active the incoming call is displayed as a floating notification that is in a minimised window that floats at the top of whatever screen is open with SIM1 or SIM2 indicating which SI...

Страница 63: ...ject a call with a text message when the screen is active 1 When an incoming call arrives tap the upper part of the heads up notification window where the phone number or the name of the contact is displayed 2 Tap Response options 3 Select a predefined message or tap Write new message To reject a second call with a text message 1 When you hear repeated beeps during a call tap Response options 2 Se...

Страница 64: ...alls 1 When you have missed a call appears in the status bar Drag the status bar downwards 2 Tap Missed call To call a number from your call log 1 From your Home screen tap 2 Find and tap The call log is displayed 3 To call a number directly from the call log tap the number and select a SIM card To edit a number before calling touch and hold the number then tap Edit number before call To add a num...

Страница 65: ...Dual SIM reachability function does not work after you enable it check that you have entered the phone numbers correctly for each SIM card In some cases the numbers are detected automatically during setup Otherwise you are prompted to enter them manually Restricting calls You can block all or certain categories of incoming and outgoing calls If you have received a PIN2 code from your service provi...

Страница 66: ...e All calls to voicemail 6 Tap SAVE Multiple calls If you have activated call waiting you can handle multiple calls at the same time When it is activated you will be notified by a beep if you receive another call To activate or deactivate call waiting 1 From your Home screen tap 2 Find and tap Settings Call 3 Select a SIM card 4 Tap Additional settings 5 To activate or deactivate call waiting tap ...

Страница 67: ...ce 2 Tap next to the participant you want to release To end a conference call During the conference call tap Voicemail If your subscription includes a voicemail service callers can leave voice messages for you when you can t answer calls Your voicemail service number is normally saved on your SIM card If not you can get the number from your service provider and enter it manually To enter your voic...

Страница 68: ...ard is locked 1 Tap Emergency call 2 Enter the emergency number and tap To make an emergency call while the screen is locked 1 If the active screen lock type is Swipe tap to display the dialpad then enter the emergency number and select a SIM card 2 If your screen is locked with a pattern PIN or password tap Emergency call then enter the emergency number and tap 68 This is an Internet version of t...

Страница 69: ... sonymobile com tools xperia companion mac if the software is not already installed 2 Using a USB Type C cable connect your device to the computer 3 After successful installation open the Xperia Companion software if it is not automatically launched then click Xperia Transfer and follow the relevant instructions to transfer your contacts Transferring contacts using an online account If you sync th...

Страница 70: ...contacts from a SIM card You may lose information or get multiple contact entries if you transfer contacts using a SIM card 1 From your Home screen tap then tap 2 Tap then tap Import contacts 3 Select a SIM card 4 Select where to store your contacts 5 To import an individual contact find and tap the contact To import all contacts tap Import all Searching and viewing contacts 1 Search for contacts ...

Страница 71: ...ntact s phone number you do not have to edit the number again when you make calls from abroad To edit a contact 1 From your Home screen tap then tap 2 Tap the contact that you want to edit then tap 3 Edit the desired information 4 When you are finished tap SAVE Some synchronisation services do not allow you to edit contact details To add a picture to a contact 1 From your Home screen tap then tap ...

Страница 72: ...After setup your ICE information can be accessed from the security lock screen This means that even if the screen is locked for example by a PIN pattern or password emergency personnel can still retrieve your ICE information 1 Go back to the main Contacts screen 2 View more options 3 Show your medical and personal information as part of the ICE information 4 Medical information 5 ICE contact list ...

Страница 73: ...can only see the phone number of the ICE contacts even if there is other information entered in the Contacts application To make your ICE information visible from the security lock screen 1 From your Home screen tap then tap 2 Tap ICE In Case of Emergency 3 Tap then tap Settings 4 Mark the ICE in lock screen checkbox Your ICE information is visible from the security lock screen by default To enabl...

Страница 74: ...the Contacts application If you synchronise your contacts with a new account or import contact information in other ways you could end up with duplicate entries in the Contacts application If this happens you can join such duplicates to create a single entry And if you join entries by mistake you can separate them again later To link contacts 1 From your Home screen tap then tap 2 Tap the contact ...

Страница 75: ...cards 1 From your Home screen tap then tap 2 Press then tap Export contacts 3 Select a SIM card 4 Mark the contacts you want to export or tap Mark all if you want to export all your contacts 5 Tap Export 6 Select Add contacts if you want to add the contacts to the existing contact list on your SIM card or select Replace all contacts if you want to replace the existing contact list on your SIM card...

Страница 76: ...your Home screen tap then find and tap 2 Tap 3 Enter the recipient s name or phone number or other contact information that you have saved about the recipient then select from the list that appears If the recipient is not listed as a contact enter the recipient s number manually 4 If you want to send a group message repeat the procedure described above to add more recipients 5 Tap Write message an...

Страница 77: ...ages To delete a message 1 From your Home screen tap then find and tap 2 Tap the conversation containing the message that you want to delete 3 Touch and hold the message that you want to delete then tap Delete message Delete To delete conversations 1 From your Home screen tap then find and tap 2 Tap then tap Delete conversations 3 Mark the checkboxes for the conversations that you want to delete t...

Страница 78: ...r disable the function After delivery reports are turned on a check mark is displayed in messages that have been successfully delivered Instant messaging and video chat You can use the Google Hangouts instant messaging and video chat application on your device to chat with friends who also use the application on computers Android devices and other devices You can turn any conversation into a video...

Страница 79: ...d and tap Email 3 Tap then tap Settings Add account 4 Follow the on screen instructions If the settings for the email account cannot be downloaded automatically complete the setup manually 5 When you are finished tap Next Sending and receiving email messages 1 View a list of all email accounts and recent folders 2 Search for email messages 3 Access settings and options 4 List of email messages 5 W...

Страница 80: ... forward then tap Forward 2 Enter the recipient s name or email address then select one or more recipients from the drop down list 3 Enter your message text then tap To view an email message attachment 1 Find and tap the email message containing the attachment that you want to view Email messages with attachments are indicated by 2 After the email message opens tap Load The attachment starts to do...

Страница 81: ...age that you want to move to the left 2 Tap Move then select a folder Email account settings To remove an email account from your device 1 From your Home screen tap 2 Find and tap Email 3 Press then tap Settings 4 Select the account you want to remove 5 Tap Delete account OK To change the inbox check frequency 1 From your Home screen tap 2 Find and tap Email 3 Tap then tap Settings 4 Select the de...

Страница 82: ... Search for email messages 3 List of email messages 4 Write an email message To learn more about Gmail When the Gmail application is open tap then find and tap Help feedback 82 This is an Internet version of this publication Print only for private use ...

Страница 83: ...ats For more information about supported file formats and the use of multimedia audio image and video files download the White paper for your device at www sonymobile com support Listening to music Use the Music application to listen to your favourite music and audio books 1 Minimise the full screen player 2 Search all songs saved to your device 3 View the current play queue 4 Album art if availab...

Страница 84: ...an include videos on YouTube song lyrics and artist information on Wikipedia To edit music information 1 From the Music application tap the Album art and then tap Edit music info 2 Edit the information as desired 3 When you are finished tap Save To adjust the audio volume Press the volume key up or down To minimise the Music application When a song is playing tap to go to the Home screen The Music...

Страница 85: ...2 Touch and hold the song title then tap Delete in the list that appears 3 Tap Delete again to confirm Playlists On the Music home screen you can create your own playlists from the music that is saved on your device To create your own playlists 1 From the Music home screen touch and hold the name of the album or song that you want to add to a playlist 2 In the menu that opens tap Add to playlist C...

Страница 86: ...elete again to confirm You cannot delete smart playlists Sharing music To share a song 1 From the Music home screen browse to the song or album that you want to share 2 Touch and hold the song title then tap Share 3 Select an application from the list then follow the on screen instructions You can also share albums and playlists in the same way Enhancing the sound To improve the sound quality usin...

Страница 87: ... camera opens tap You can activate the camera when the screen is locked and inactive To do this press the camera key fully Press again to take a photo To take a photo using the camera key 1 Activate the camera 2 Press the camera key fully down To take a selfie using the front camera 1 Activate the camera 2 Tap 3 To take the photo press the camera key To use the still camera flash 1 When the camera...

Страница 88: ...tos and videos To delete a photo or video 1 Find the photo or video that you want to delete 2 Tap the screen to display the toolbar 3 Tap 4 Tap Delete to confirm General camera settings Capturing modes Manual Manually adjust camera settings such as resolution white balance and ISO Superior auto Optimise your settings to suit any scene Video camera Manually adjust video settings such as resolution ...

Страница 89: ...e 4 To add more styles tap More 5 Select the style that you want to apply then tap to take a photo To use the Magic beam feature 1 Activate the camera 2 Swipe screen to select then tap 3 To apply an inside eye spotlight effect select a customised pattern Downloading camera applications You can download free or paid camera applications from Google Play or other sources Before you start downloading ...

Страница 90: ...2 Switch to the front camera by tapping 3 Tap 4 Tap More 5 Find and tap Auto capturing Hand Shutter Saving a photo s geographic location Enable the Save location function to geotag your photos saving the approximate geographical location as you shoot The geographical location is determined by wireless networks and GPS technology When appears on the camera screen Saving location is turned on but th...

Страница 91: ...l make a series of beeps to mark the countdown You can choose to turn these sounds on or off Data storage You can choose to save your data either to a removable SD card or to your device s internal storage Internal storage Photos or videos are saved on the device memory SD card Photos or videos are saved on the SD card Grid lines Choose to turn on or turn off the grid lines in your camera viewfind...

Страница 92: ...scent Adjust the colour balance for fluorescent lighting Daylight Adjust the colour balance for sunny outdoor conditions Cloudy Adjust the colour balance for a cloudy sky Focus AF Adjust focus automatically Focus MF Adjust focus manually SS auto Adjust shutter speed automatically SS 1 8 Adjust shutter speed manually Still camera settings To adjust the still camera settings 1 Activate the camera 2 ...

Страница 93: ...e photo is taken as soon as you tap the shutter button or press the camera key Object tracking When you select an object by touching it in the viewfinder the camera tracks it for you HDR Use the HDR High Dynamic Range setting to take a photo against strong back light or in conditions where the contrast is sharp HDR compensates for the loss of detail and produces a picture that is representative of...

Страница 94: ...ected scene ensuring the best possible photo Off The Scene selection feature is off and you can take photos manually Soft Skin Take portraits using an enhanced beauty effect Soft snap Use for shooting photos against a soft background Anti motion blur Use for minimising camera shake when shooting a slightly dark scene Landscape Use for landscape photos The camera focuses on distant objects Backligh...

Страница 95: ...tuations using pre programmed video scenes Each scene setting is designed to produce the best quality video possible in a specific recording environment Auto Scene selection is automatic Off The Scene selection feature is off and you can shoot videos manually Soft snap Use for shooting videos against soft backgrounds Landscape Use for videos of landscapes The camera focuses on distant objects Nigh...

Страница 96: ...tter video 1 Activate the camera 2 Tap 3 Find and tap Auto capturing video Smile Shutter SteadyShot When recording a video it can be difficult to hold the device steady The stabiliser helps by compensating for the small movements of your hand Intelligent active Activate to compensate for major and minor camera shakes Standard Activate to remove the high frequency camera shakes Off The stabiliser i...

Страница 97: ...ht to view the previous photo or video To set the screen to rotate automatically when turned sideways tap Rotate the contents of the screen under Settings Display When device is rotated The Album application may not support all file formats For more information about supported file formats and the use of multimedia audio image and video files download the White paper for your device at www sonymob...

Страница 98: ...re space on your device See Managing files using a computer on page 126 You might not be able to copy send or transfer copyright protected items Also some items may not send if the file size is too large To share a photo or video 1 In Album find and tap the photo or video that you want to share 2 Tap the screen to display the toolbars then tap 3 Tap the application that you want to use to share th...

Страница 99: ...dges disappear drag inward or outward to resize the frame 6 To resize all sides of the crop frame at the same time touch and hold one of the four corners When the circles at the edges disappear drag the corner accordingly 7 To move the crop frame to another area of the photo touch and hold inside the frame then drag it to the desired position 8 Tap 9 To save a copy of the cropped photo tap Save To...

Страница 100: ...lect an option then touch and hold the edge of the timeline and drag it to the desired position and tap Apply 5 To save a copy of the edited video tap Save To capture a photo from a video 1 In the Album find and tap the video that you want to play 2 Tap the screen to display the toolbars then tap 3 If prompted select Video Editor then tap Photo Capture 4 With the help of the arrows or by dragging ...

Страница 101: ...videos on devices in the same network 8 Open the settings menu for the Album application 9 Open web support 10 Scroll up or down to view content To view photos from online services in Album 1 From your Home screen tap 2 Find and tap Album then tap 3 Tap the desired online service then follow the on screen instructions to get started All available online albums that you have uploaded to the service...

Страница 102: ... the toolbars 2 Tap then tap Add geotag or Edit geotag to open the map screen 3 Tap on the map to set the location for the photo 4 To reset the location for the photo tap the new location on the map 5 When you are finished tap OK To view geotagged photos on a map 1 From your Home screen tap 2 Find and tap Album 3 Tap then tap Places 4 Tap the photo that you want to view on a map To view geotagged ...

Страница 103: ... library Popular programmes On Air programmes TV Series Films and Recommended programmes 7 Drag the left edge of the screen to the right to open the menu browse content and adjust settings 8 Tap a programme to get detailed information and related content To use your device as a remote controller To use your device as a remote controller with another compatible home network device you first need to...

Страница 104: ...e several ways to transfer your content For Windows only Connect your device to a computer using a USB Type C cable and drag and drop the video files directly using the file manager application on the computer See Managing files using a computer on page 126 If you have a PC or an Apple Mac computer use Xperia Companion to organise content and transfer video files to your device Managing video cont...

Страница 105: ...o enable or disable the function To manually create a Highlight Movie 1 From your Home screen tap 2 Find and tap Movie Creator 3 Tap Create new 4 Select the desired photos or videos by tapping them 5 Tap Create If you want to edit a Highlight Movie tap View story then use the toolbar to edit as desired To create a Highlight Movie from Facebook events 1 From your Home screen tap 2 Find and tap Movi...

Страница 106: ...nect then tap OK Sharing content with DLNA Certified devices You can view or play media content saved to your device on other devices such as a TV or a computer These devices must be on the same wireless network and can be Sony TVs or speakers or products that are DLNA Certified by the Digital Living Network Alliance You can also view or play content from other DLNA Certified devices on your devic...

Страница 107: ...vices Devices that are waiting for access permission are listed as pending devices To set up file sharing with other DLNA Certified devices 1 Connect your device to a Wi Fi network 2 From your Home screen tap then find and tap Settings Device connection Media server 3 Tap the slider beside Share media 4 Use your computer or other DLNA client devices on the same Wi Fi network to connect to your dev...

Страница 108: ...les of DMR devices The steps for playing shared media may vary depending on the client device Refer to the user guide of the DMR device for more information Content secured with Digital Rights Management DRM cannot be played on a Digital Media Renderer device using DLNA technology To find devices to share content with using Cast 1 Make sure that the device you want to share content with is connect...

Страница 109: ... connecting a USB Type C cable To access content on a USB mass storage device using a USB Type C Host adapter 1 Attach the USB Type C Host adapter to your device then connect the adapter to the USB mass storage device 2 From your Home screen tap 3 Find and tap Settings Device connection USB Connectivity Detect USB device 4 To access files and folders on the USB storage device use a file manager ap...

Страница 110: ...h other devices such as videos photos web page addresses music files or contacts You can also use NFC to scan tags that give you more information about a product or service as well as tags that activate certain functions on your device NFC is a wireless technology with a maximum range of one centimetre so the devices sharing data must be held close to each other Before you can use NFC you must fir...

Страница 111: ... screen To share a photo or video with another device using NFC 1 Make sure that both devices have the NFC function turned on and that both screens are active and unlocked 2 To view photos and videos on your device go to your Home screen tap then find and tap Album 3 Tap the photo or video that you want to share 4 Hold your device and the receiving device close to each other so that the NFC detect...

Страница 112: ...luetooth settings and the changes affect all users To turn the Bluetooth function on or off 1 From your Home screen tap 2 Find and tap Settings Bluetooth 3 Tap the Bluetooth slider to enable or disable the function Naming your device You can give your device a name This name is shown to other devices after you have turned on the Bluetooth function and your device is set to visible To give your dev...

Страница 113: ...ct to To unpair a Bluetooth device 1 From your Home screen tap 2 Find and tap Settings Bluetooth 3 Under Paired devices tap beside the name of the device that you want to unpair 4 Tap Forget Sending and receiving items using Bluetooth technology Use Bluetooth technology to share items with other Bluetooth compatible devices such as phones or computers You can send and receive the following kinds o...

Страница 114: ...ur device drag the status bar downwards and tap the notification to accept the file transfer 5 Tap Accept to start the file transfer 6 To view the progress of the transfer drag the status bar downwards 7 To open a received item drag the status bar downwards and tap the relevant notification To view files you have received using Bluetooth 1 From your Home screen tap 2 Find and tap Settings Bluetoot...

Страница 115: ...g the News Suite application News Suite is a two in one news app featuring a new two tab concept switch between the News tab where you can find out about all the latest current affairs and the My Feeds tab where you can read up on all the news that s most relevant to your own interests The News Suite application is not available in all markets To open the News Suite application 1 From your Home sc...

Страница 116: ... in your device it can take a few minutes for your location to be found To help the search make sure you have a clear view of the sky Stand still and don t cover the GPS antenna the highlighted area in the image GPS signals can pass through clouds and plastic but not through most solid objects such as buildings and mountains If your location isn t found after a few minutes move to another location...

Страница 117: ...ings More Mobile networks 3 Select a SIM card 4 Tap the Data roaming slider to enable or disable the function You can t activate data roaming while mobile data traffic is turned off Airplane mode In Airplane mode the network and radio transceivers are turned off to prevent disturbance to sensitive equipment However you can still play games listen to music watch videos and other content as long as ...

Страница 118: ...u 1 Access settings select a view type and the calendars that you want to view 2 Return to the current date 3 Access other options 4 Flick left or right to browse more quickly 5 Add a calendar event To learn more about Calendar When the Calendar application is open tap then find and tap Help feedback Clock You can set one or several alarms and use any sound file saved on your device as the alarm s...

Страница 119: ... Clock then tap the slider for the alarm you want to turn on or off To delete an alarm 1 Find and tap Clock then touch and hold the alarm that you want to delete 2 Tap Delete alarm then tap Yes To set the sound for an alarm 1 Find and tap Clock then tap the alarm that you want to edit 2 Tap Alarm sound and select an option or tap and select a music file 3 Tap Done then tap Save For more informatio...

Страница 120: ...brate checkbox 3 Tap Save To set the side keys behaviour 1 Find and tap Clock then select the alarm that you want to edit 2 Tap Side keys behaviour then select the desired behaviour of side keys when they are pressed during the alarm 3 Tap Save 120 This is an Internet version of this publication Print only for private use ...

Страница 121: ...your device To enable or disable Large text 1 From your Home screen tap 2 Find and tap Settings Accessibility 3 Tap the slider beside Large text Colour correction The Colour correction setting adjusts how colours are displayed on the screen for users who are colour blind or have difficulty distinguishing between colours To enable Colour correction 1 From your Home screen tap 2 Find and tap Setting...

Страница 122: ...ble tap Settings Accessibility TalkBack by scrolling through the list with two or more fingers 3 Tap the slider then tap any place of the screen twice 4 Tap OK then tap twice anywhere on the screen TTY Teletypewriter mode The TTY Teletypewriter feature on your device allows people who are deaf hard of hearing or who have speech or language disabilities to communicate using a TTY device or a relay ...

Страница 123: ...ive anonymous bug reports and statistics that help improve our software None of the information gathered includes personal data To allow the sending of usage info 1 From your Home screen tap 2 Find and tap Settings About phone Usage info settings 3 Mark the Send usage info checkbox if it is not already marked 4 Tap Agree Computer tool Xperia Companion is available to help you connect your device t...

Страница 124: ...ew software 1 If you are using a device with multiple users make sure you are logged in as the owner 2 From your Home screen tap 3 Find and tap Settings About phone Software update If no new software is available it s possible that you may not have enough free memory on your device If your Xperia device has less than 500 MB of free internal memory available you do not receive any information about...

Страница 125: ...tions The internal storage is about 64 GB and is used to store downloaded or transferred content along with personal settings and data Some examples of data saved to the internal storage are alarm volume and language settings emails bookmarks calendar events photos videos and music You can use a removable memory card with a storage capacity of up to 256 GB to get more storage space Media files and...

Страница 126: ...mory Transfer data 4 Mark the files that you want to transfer to the memory card 5 Tap Transfer To stop applications and services from running 1 From your Home screen tap 2 Find and tap Settings Apps 3 Select an application or service then tap FORCE STOP OK To format the memory card 1 From your Home screen tap 2 Find and tap Settings Storage memory 3 Tap then tap Advanced Storage SD Card then tap ...

Страница 127: ...harging only 3 Tap Transfer files MTP Power supply or MIDI to enable the desired mode Backing up and restoring content Generally you should not save photos videos and other personal content solely on the internal memory of your device If your device is damaged lost or stolen the data stored on its internal memory may be impossible to recover It is recommended to use the Xperia Companion software t...

Страница 128: ...tion you can make an online backup or a local backup of data For example you can back up data manually or turn on the automatic backup function to save data periodically The Xperia Backup restore application is recommended for backing up data before you do a factory data reset With this application you can back up the following types of data to an online account an SD card or to an external USB st...

Страница 129: ... back up 6 Tap Back up 7 After the data is backed up tap Finish To edit a backup file 1 From your Home screen tap 2 Find and tap Settings Backup reset 3 Under Xperia Backup Restore tap More 4 Tap Edit backup file then select a backup source and the data types that you want to delete 5 Tap Delete data 6 Tap OK to confirm 7 After the data is deleted tap Finish To restore backed up content 1 If you a...

Страница 130: ...stics option is not available under Settings About phone you can download a light version using the Play Store application To run a specific diagnostic test 1 From your Home screen tap 2 Find and tap Settings About phone Diagnostics Test 3 Select a test from the list 4 Follow the instructions and tap Yes or No to confirm whether a feature works To run all diagnostic tests 1 From your Home screen t...

Страница 131: ... screen tap 3 Find and tap Settings Backup reset Factory data reset 4 Tap Reset phone 5 If required draw your screen unlock pattern or enter your screen unlock password or PIN to continue 6 To confirm tap Erase everything To avoid permanent damage to your device do not interrupt factory data reset procedure After the factory data reset you will lose access to all the encrypted files on your SD car...

Страница 132: ...imited to restriction under applicable copyright laws You and not Sony are entirely responsible for additional content that you download to or forward from your mobile device Prior to your use of any additional content please verify that your intended use is properly licensed or is otherwise authorized Sony does not guarantee the accuracy integrity or quality of any additional content or any other...

Отзывы: