background image

40

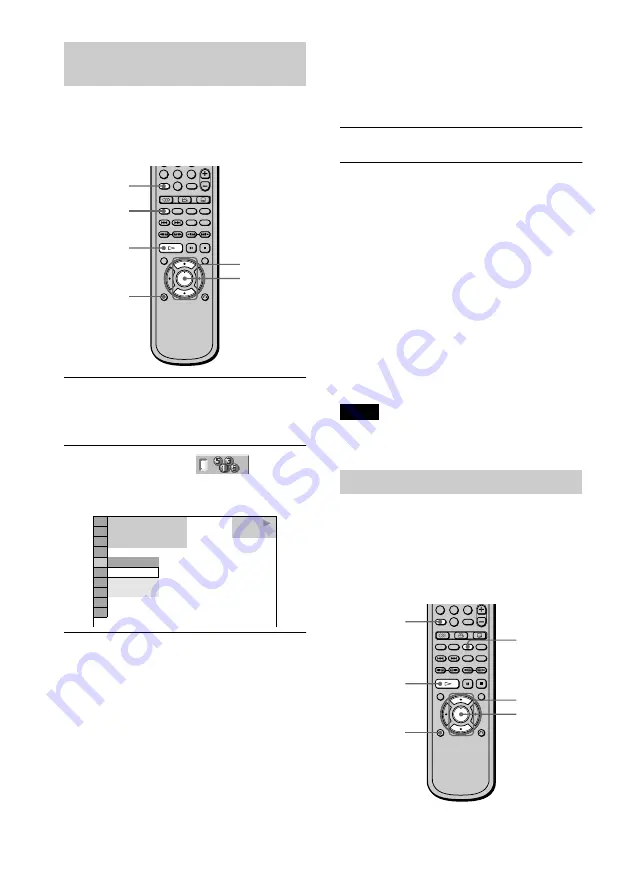
You can have the player “shuffle” titles, 
chapters or tracks and play them in a random 
order. Subsequent “shuffling” may produce a 
different playing order.

1

Press DISPLAY twice during playback 
(When playing a CD, press once).

The Control Menu appears.

2

Press 

X

/

to select 


(SHUFFLE), then press ENTER.

The options for SHUFFLE appear.

3

Press 

X

/

x

 to select the item.

x

When playing a DVD (and when 

Programme Play is set to OFF)

TITLE

: shuffle titles and plays them 

in a random order.

CHAPTER

: shuffle chapters and 

plays them in a random order.

x

When playing a VIDEO CD or CD 

(Programme Play is set to OFF)

TRACK

: shuffle tracks and plays 

them in a random order.

x

When playing a VIDEO CD, CD or 

DVD (Programme Play is set to ON)

ON

: shuffle titles or tracks selected 

in Programme Play and plays them in 
a random order.

4

Press ENTER.

To return to normal play

Press CLEAR or select “OFF” in Step 3.

To turn off the Control Menu

Press DISPLAY repeatedly until the Control 
Menu is turned off.

z

You can set Shuffle Play while the player is 

stopped. After selecting the “SHUFFLE” option, press 

H

. Shuffle Play starts.

z

You can select SHUFFLE directly by pressing 

SHUFFLE.

Note

Up to 200 chapters in a disc can be played in random 
order when “CHAPTER” is selected.

You can play all of the titles or tracks on a 
disc or a single title, chapter or track 
repeatedly.
You can use a combination of Shuffle or 
Program Play modes.

Playing in random order (Shuffle 
Play)

7

8

0

9

DISPLAY

H

X

/

x

ENTER

SHUFFLE

CLEAR

1 8 ( 3 4 )

1 2 ( 2 7 )

T      1 : 3 2 : 5 5

OFF

CHAPTER

TITLE

OFF

DVD        

Playing repeatedly (Repeat Play)

4

5

6

7

8

0

9

H

ENTER

X

/

x

DISPLAY

REPEAT

CLEAR

Содержание DVP-NS400D

Страница 1: ...3 067 120 41 4 CD DVD Player Operating Instructions DVP NS400D 2001 Sony Corporation ...

Страница 2: ...ower supply If anything falls into the cabinet unplug the unit and have it checked by qualified personnel before operating it any further The unit is not disconnected from the mains as long as it is connected to the mains outlet even if the unit itself has been turned off Unplug the unit from the wall outlet if you do not intend to use it for an extended period of time To disconnect the cord pull ...

Страница 3: ...d to a warm location or is placed in a very damp room moisture may condense on the lenses inside the player Should this occur the player may not operate properly In this case remove the disc and leave the player turned on for about half an hour until the moisture evaporates When you move the player take out any discs If you don t the disc may be damaged On adjusting volume Do not turn up the volum...

Страница 4: ...ep 1 Connecting the Video Cords 18 Step 2 Connecting the Audio Cords 21 Step 3 Connecting the Mains Lead 28 Step 4 Quick Setup 28 Playing Discs 33 Playing Discs 33 Resuming Playback from the Point Where You Stopped the Disc Resume Play 35 Using the DVD s Menu 36 Playing VIDEO CDs with PBC Functions PBC Playback 37 Various Play Mode Functions Programme Play Shuffle Play Repeat Play A B Repeat Play ...

Страница 5: ...Functions 61 Locking Discs CUSTOM PARENTAL CONTROL PARENTAL CONTROL 61 Operation Sound Effects Sound Feedback 65 Controlling Your TV or AV Amplifier Receiver with the Supplied Remote 66 Settings and Adjustments 68 Using the Setup Display 68 Setting the Display or Sound Track Language LANGUAGE SETUP 69 Settings for the Display SCREEN SETUP 70 Custom Settings CUSTOM SETUP 71 Settings for the Sound A...

Страница 6: ... format CD Rs Data part of CD Extras DVD ROMs DVD Audio discs HD layer on SACDs Also the player cannot play the following discs A DVD with a different region code page 82 A disc that has a non standard shape e g card heart A disc with paper or stickers on it A disc that has the adhesive of cellophane tape or a sticker still left on it Note Some CD Rs or CD RWs cannot be played on this player depen...

Страница 7: ...on Corporation and is intended for home and other limited viewing uses only unless otherwise authorized by Macrovision Corporation Reverse engineering or disassembly is prohibited Notes about the Discs On handling discs To keep the disc clean handle the disc by its edge Do not touch the surface Do not expose the disc to direct sunlight or heat sources such as hot air ducts or leave it in a car par...

Страница 8: ...Digital or MPEG audio signals the disc is not inserted 3 BNR Block Noise Reduction button indicator 59 4 SURROUND button indicator 53 5 Disc tray 33 6 A open close button 33 7 previous next buttons 34 8 C X x c ENTER buttons 28 9 TITLE button 36 q DVD MENU button 36 qa O RETURN button 37 qs DISPLAY button 12 qd x stop button 33 qf X pause button 34 65 qg H play button 33 qh Front panel display 9 q...

Страница 9: ...ent play mode 38 Current title 47 Lights up when the player outputs the signal in NTSC format VIDEOCD CD PBC NTSC MIN SEC A B Playing status Current play mode 38 Disc type Current scene 47 Playing time 47 Lights up when playing back a VIDEO CD with PBC 37 Lights up when the player outputs the signal in NTSC format VIDEOCD CD PGM SHUFFLE NTSC TRACK INDEX MIN SEC REPEAT1 A B MPEG Playing time 47 Dis...

Страница 10: ...15 18 4 LINE 2 jack 15 18 5 5 1CH OUTPUT jacks 23 6 S VIDEO OUT jack 18 7 LINE OUT VIDEO jack 18 8 LINE OUT L R AUDIO jacks 22 25 27 Rear Panel PCM DTS MPEG DOLBY DIGITAL 5 1CH OUTPUT LINE 2 WOOFER R AUDIO L VIDEO COAXIAL OPTICAL L R FRONT REAR CENTER LINE 1 RGB TV LINE OUT S VIDEO OUT DIGITAL OUT ...

Страница 11: ...AY button 38 M TV 1 on standby button 66 N 1 on standby button 33 O wide mode button 66 P t TV VIDEO button 66 Q 2 volume buttons 66 R ENTER button S subtitle button 58 T BNR Block Noise Reduction button 59 U REPEAT button 40 V TIME TEXT button 47 W TV DVD button 66 X y scan slow buttons 43 Y X pause button 34 Z x stop button 33 wj DVD MENU button 36 wk C X x c buttons 28 wl ENTER button e O RETUR...

Страница 12: ... Menu item Operation message Icon of selected Control Menu item Control Menu items Type of disc being played back TITLE DVD only page 44 SCENE only VIDEO CD in PBC playback page 44 TRACK VIDEO CD only page 44 Selects the title DVD the scene VIDEO CD in PBC playback or the track VIDEO CD to be played CHAPTER DVD only page 44 INDEX VIDEO CD only page 44 Selects the chapter DVD or the index VIDEO CD ...

Страница 13: ...n adjust the image and sound quality Parental Control and other various settings RESET Returns the settings in SETUP to the default setting PROGRAM page 38 Selects the title the chapter or the track to play a disc in the order you want SHUFFLE page 40 Plays the title the chapter or the track in random order REPEAT page 40 Plays the entire disc all titles all tracks repeatedly or one title chapter ...

Страница 14: ...D128P 1 R6 size AA batteries 2 Step 2 Inserting Batteries into the Remote You can control the player using the supplied remote Insert two R6 size AA batteries by matching the 3 and ends on the batteries to the markings inside the compartment When using the remote point it at the remote sensor on the player Notes Do not leave the remote in an extremely hot or humid place Do not drop any foreign obj...

Страница 15: ...3 screen TV Depending on the disc the image may not fit your TV screen If you want to change the aspect ratio please refer to page 70 PCM DTS MPEG DOLBY DIGITAL 5 1CH OUTPUT LINE 2 WOOFER R AUDIO L VIDEO COAXIAL OPTICAL L R FRONT REAR CENTER LINE 1 RGB TV LINE OUT S VIDEO OUT DIGITAL OUT LINE 2 LINE 1 RGB TV VCR to t LINE 2 to T LINE 1 RGB TV TV to SCART EURO AV output to SCART EURO AV input 2 a m...

Страница 16: ...es not have a SCART EURO AV connection Refer to B in Step 1 Connecting the Video Cords page 18 If you are connecting to a VCR Connect your VCR to the LINE 2 jack on the player The VCR can record the signal only from TV ...

Страница 17: ...closes and the player begins playing the disc After Step 6 Depending on the disc a menu may be displayed on the TV screen If so select the item you want from the menu and play the DVD page 36 or VIDEO CD disc page 37 To stop playing Press x To take out the disc Press A To turn off the player Press 1 on the remote The player is set to standby mode and the power indicator lights up in red Press POWE...

Страница 18: ...to your TV monitor projector or AV amplifier receiver using a video cord Select one of the patterns A through C according to the input jack on your TV monitor projector or AV amplifier receiver PCM DTS MPEG DOLBY DIGITAL 5 1CH OUTPUT WOOFER R AUDIO L VIDEO COAXIAL OPTICAL L R FRONT REAR CENTER LINE 1 RGB TV LINE OUT S VIDEO OUT DIGITAL OUT LINE 2 INPUT S VIDEO B C A AUDIO INPUT L R VIDEO CD DVD pl...

Страница 19: ...ct the S VIDEO cord not supplied You will enjoy high quality images If you are connecting to a VCR Connect your VCR to the LINE 2 jack on the player The VCR can record the signal only from TV Notes Do not connect the player to a VCR so that the signals of the player are passed to the TV via the VCR If you do so you may not receive a clear image on the TV screen If you cannot view the pictures from...

Страница 20: ...V via the SCART EURO AV jacks the TV s input source is set to the player automatically when you start playback or press any button except for POWER on the player or 1 on the remote In this case press TV DVD on the remote to return the input to the TV When you play a disc recorded in the NTSC colour system the player outputs the video signal or the Setup Display etc in the NTSC colour system and th...

Страница 21: ...nents to be connected page 22 TV stereo page 23 AV amplifier receiver having 5 1ch input jacks 4 speakers front L and R rear L and R 6 speakers front L and R centre rear L and R subwoofer page 23 AV amplifier receiver having a Dolby Digital MPEG audio or DTS decoder and a digital input jack 6 speakers front L and R centre rear L and R subwoofer page 25 Stereo amplifier receiver having L and R audi...

Страница 22: ...s for this connection TVS DYNAMIC page 53 TVS WIDE page 53 The yellow plug is used for video signals page 18 Connecting to your TV A PCM DTS MPEG DOLBY DIGITAL 5 1CH OUTPUT LINE 2 WOOFER R AUDIO L VIDEO COAXIAL OPTICAL L R FRONT REAR CENTER LINE 1 RGB TV LINE OUT S VIDEO OUT DIGITAL OUT LINE OUT R AUDIO L VIDEO A TV l Signal flow CD DVD player white red Audio video cord supplied to audio input yel...

Страница 23: ...ch page 82 Set SURROUND to OFF Connecting to a digital jack This connection will allow you to use the Dolby Digital MPEG audio or DTS decoder function of your AV amplifier receiver You are not able to enjoy the SURROUND sound effects of the player xRecommended surround sound effects using this connection with your amplifier receiver Dolby Digital 5 1ch page 82 DTS 5 1ch page 82 MPEG audio 5 1ch pa...

Страница 24: ...VIDEO COAXIAL OPTICAL L R FRONT REAR CENTER LINE 1 RGB TV LINE OUT S VIDEO OUT DIGITAL OUT PCM DTS MPEG DOLBY DIGITAL COAXIAL DIGITAL OUT B 2 B 1 OPTICAL 5 1CH OUTPUT WOOFER L FRONT REAR CENTER R Front R Front L Rear R AV amplifier receiver having 5 1ch inputs or and a decoder Subwoofer Centre Coaxial digital cord not supplied Monaural audio cord not supplied Stereo audio cord not supplied Optical...

Страница 25: ...o connect the player directly to the MD deck or DAT deck with using your stereo amplifier receiver xRecommended surround sound effects for the connection only TVS STANDARD page 53 z In connection you can use the supplied audio video cord instead of using a separate audio cord z To realize better surround sound effects make sure that your listening position is in between your speakers Connecting to...

Страница 26: ... L VIDEO PCM DTS MPEG DOLBY DIGITAL COAXIAL DIGITAL OUT C 2 C 1 OPTICAL l Signal flow CD DVD player or Stereo amplifier receiver MD deck DAT deck Front L Front R Speakers white red white red Coaxial digital cord not supplied Stereoaudio cord not supplied to audio input to coaxial or optical digital input Optical digital cord not supplied Remove jack cap before connecting or ...

Страница 27: ...Surround Pro Logic page 82 z For correct speaker setting location please refer to the operating instructions of the amplifier receiver When connecting 6 speakers replace the monaural rear speaker with a centre speaker 2 rear speakers and a subwoofer Connecting to an AV amplifier receiver having a Dolby Surround Pro Logic decoder and 3 to 6 speakers D D 1 D 2 PCM DTS MPEG DOLBY DIGITAL 5 1CH OUTPUT...

Страница 28: ...nt press To return to the previous adjustment press 1 Turn on the TV 2 Switch the input selector on the TV to the player 3 Press POWER on the player and press 1 on the remote Press ENTER to run QUICK SETUP appears at the bottom of the screen If this message does not appear select QUICK under SETUP in the Control Menu to run Quick Setup page 68 4 Press ENTER without inserting a disc The Setup Displ...

Страница 29: ... of jack used to connect your amplifier receiver appears TV Type You select Page A wide screen TV or a 4 3 standard TV with a wide screen mode 16 9 70 4 3 standard TV 4 3 LETTER BOX or 4 3 PAN SCAN 70 Signal Type You select Page Video signals VIDEO 71 S video signals S VIDEO 71 RGB signals RGB 71 SCREEN SETUP TV TYPE SCREEN SAVER BACKGROUND 16 9 4 3 LETTER BOX 4 3 PAN SCAN 16 9 CUSTOM SETUP LINE A...

Страница 30: ...es the audio connection you selected in page 23 to 27 through When DIGITAL OUTPUT is selected Audio Cord Connection Type You select Page D PCM 74 DOLBY DIGITAL only if the amplifier receiver has a Dolby Digital decoder 74 Audio Cord Connection Type You select Page OFF 74 ON only if the amplifier receiver has a DTS decoder 74 B D AUDIO SETUP AUDIO ATT AUDIO DRC DIGITAL OUT DOLBY DIGITAL MPEG OFF ST...

Страница 31: ...EAR refer to the speakers position relative to your listening position Refer to page 76 for each selection item 4 Press ENTER The Setup Display for selecting whether or not you have connected a subwoofer appears 5 Press X x to select the item When 5 1 CH OUTPUT is selected SPEAKER SETUP SIZE DISTANCE BALANCE LEVEL OFF TEST TONE FRONT CENTER SMALL LARGE NONE LARGE REAR SUBWOOFER T t th ENTER NONE S...

Страница 32: ...e 68 for using the Setup Display Audio Connection pages 23 to 27 No additional settings are needed If the sound distorts even when the volume is turned down set AUDIO ATT to ON page 73 If ENHANCED or SOFT is selected in CENTER SPEAKER EQ it makes the spoken track sound clear page 73 Set 48kHz 96kHz PCM to 96kHz 24bit only if you connect the amplifier receiver that conforms to the 96 kHz sampling f...

Страница 33: ...Step 5 Depending on the disc a menu may appear on the TV screen You can play the disc interactively by following the instructions on the menu DVD page 36 VIDEO CD page 37 To turn on the player Press POWER on the player The player enters standby mode and the power indicator lights up in red Press 1 on the remote The player turns on and the power indicator lights up in green In standby mode the play...

Страница 34: ... Display page 74 and may affect your ears or cause your speakers to be damaged Notes on playing DVDs with a DTS sound track DTS audio signals are output only through the DIGITAL OUT OPTICAL and COAXIAL jacks If you connect the player to audio equipment without a DTS decoder do not set DTS to ON in AUDIO SETUP page 74 A loud noise may come out from the speakers affecting your ears or causing the sp...

Страница 35: ...front panel display and you can restart the disc from the point where you stopped the disc If RESUME does not appear Resume Play is not available 2 Press H The player starts playback from the point where you stopped the disc in Step 1 z To play from the beginning of the disc press x twice then press H Notes Depending on where you stopped the disc the player may not resume playback from exactly the...

Страница 36: ...lected title z You can also display the title menu by pressing TITLE on the player Some DVDs allow you to select the disc contents using a menu When you play these DVDs you can select items such as the language for the subtitles and the language for the sound using the DVD menu 1 Press DVD MENU The DVD menu appears on the TV screen The contents of the menu vary from disc to disc 2 Press C X x c or...

Страница 37: ... menu for interactive operations Refer to the instructions supplied with the disc as the operating procedure may differ according to the VIDEO CD To go back to the menu Press O RETURN z To play without using PBC press or the number buttons while the player is stopped to select a track then press H or ENTER Play without PBC appears on the TV screen and the player starts continuous play You cannot p...

Страница 38: ...c to create your own programme You can programme up to 99 titles chapters and tracks 1 Press DISPLAY twice when playing a CD press once The Control Menu appears 2 Press X x to select PROGRAM then press ENTER The options for PROGRAM appear 3 Press X x to select SET t then press ENTER The display for programming appears 4 Press c The cursor moves to the title or track in this case 01 Creating your o...

Страница 39: ... using X x or the number buttons and press c 2 Follow Step 5 for new programming To cancel the programmed order To cancel all the titles chapters or tracks in the programmed order press X and select ALL CLEAR in Step 4 To cancel the selected programme select the programme using X x in Step 4 then press CLEAR or select in Step 5 then press ENTER z You can do Repeat Play or Shuffle Play of the progr...

Страница 40: ...set to ON ON shuffle titles or tracks selected in Programme Play and plays them in a random order 4 Press ENTER To return to normal play Press CLEAR or select OFF in Step 3 To turn off the Control Menu Press DISPLAY repeatedly until the Control Menu is turned off z You can set Shuffle Play while the player is stopped After selecting the SHUFFLE option press H Shuffle Play starts z You can select S...

Страница 41: ...ess ENTER To return to normal play Press CLEAR or select OFF in Step 3 To turn off the Control Menu Press DISPLAY repeatedly until the Control Menu is turned off z You can set Repeat Play while the player is stopped After selecting the REPEAT option press H Repeat Play starts z You can select REPEAT directly by pressing REPEAT You can play a specific portion of a title chapter or track repeatedly ...

Страница 42: ...cific portion A B appears on the front panel display during A B Repeat Play To return to normal play Press CLEAR or select OFF in Step 3 To turn off the Control Menu Press DISPLAY repeatedly until the Control Menu is turned off Notes You can set A B Repeat Play for only one specific section When you set A B Repeat Play the settings for Shuffle Play Repeat Play and Programme Play are cancelled Set ...

Страница 43: ...s the indication changes as follows Playback direction Opposite direction The 2B 2b playback speed is about twice the normal speed The 2M 2m playback speed is faster than 1M 1m You can use this function only for DVDs or VIDEO CDs Press or y when the player is in the pause mode To return to the normal speed press H Each time you press or y during Slow motion play the playback speed changes Two spee...

Страница 44: ...low xWhen playing a VIDEO CD TRACK or INDEX xWhen playing a VIDEO CD with PBC Playback SCENE xWhen playing a CD TRACK or INDEX Example when you select CHAPTER is selected refers to a number The number in parentheses indicates the total number of titles chapters tracks indexes or scenes 3 Press ENTER changes to 4 Press X x or the number buttons to select the title chapter track index or scene numbe...

Страница 45: ...back directly by selecting one of the scenes For details see page 45 Note The title chapter or track number displayed is the same number recorded on the disc Searching by Using the Scenes VIEWER You can divide the screen into 9 sub screens and find the desired scene quickly 1 Press DISPLAY twice during playback The Control Menu appears 2 Press X x to select VIEWER then press ENTER The options for ...

Страница 46: ...itial scenes of titles chapters or tracks appear To start playback from the selected scene Select the scene using C X x c and press ENTER The playback starts from the selected scene z If there are more than 9 titles chapters or tracks V is displayed at the right bottom To display the additional titles chapters or tracks select the right bottom scene the position 9 and press x To return to the prev...

Страница 47: ...t When playing a DVD When playing a VIDEO CD without PBC functions or CD z When playing VIDEO CDs with PBC functions the scene number and the playing time are displayed 0 TIME TEXT CHAP HOUR MIN SEC TITLE CHAP HOUR MIN SEC TITLE CHAP HOUR MIN SEC CHAP HOUR MIN SEC Playing time and number of the current title Remaining time of the current title Playing time and number of the current chapter Remaini...

Страница 48: ...be displayed Checking the Playing Time and Remaining Time You can check the playing time and remaining time of the current title chapter or track and the total playing time or remaining time of the disc Also you can check the DVD CD text recorded on the disc 1 Press DISPLAY during playback The Control Menu appears 2 Press TIME TEXT repeatedly to change the time information The display and the kind...

Страница 49: ...e current disc To turn off the Control Menu Press DISPLAY repeatedly until the Control Menu is turned off Checking the DVD CD text Press TIME TEXT repeatedly in Step 3 to display the text recorded on the DVD CD The DVD CD text appears only when the text is recorded in the disc You cannot change the text z If the DVD CD text does not fit on a single line you can see the entire text by watching it s...

Страница 50: ...l the Control Menu is turned off By pressing DISPLAY repeatedly you can display either BIT RATE or LAYER whichever was selected in ADVANCED BIT RATE When playing MPEG audio sound tracks Bit rate refers to the amount of video audio data per second in a disc The higher the bit rate the larger the amount of data When the bit rate level is high there is a large amount of data However this does not alw...

Страница 51: ...ear 3 Press X x to select the desired audio signal xWhen playing a DVD Depending on the DVD the choice of language varies When 4 digits are displayed they represent the language code Refer to the language code list on page 86 to see which language the code represents When the same language is displayed two or more times the DVD is recorded in multiple audio formats xWhen playing a VIDEO CD or CD T...

Страница 52: ...nal LFE LFE Low Frequency Effect The display examples are as follows PCM stereo Dolby Surround Dolby Digital 5 1ch When an LFE signal component is output LFE is enclosed in a solid line When an LFE signal component is not output LFE is enclosed in a broken line MPEG DTS LFE is always enclosed in a solid line regardless of the LFE signal component being output Displaying the audio information of th...

Страница 53: ... contains DTS tracks SURROUND Mode Settings You can enjoy surround sounds while playing discs including Dolby Digital and MPEG audio DVDs even if you have only 2 or 4 speakers Select surround mode that best suits your speaker setup 1 Press DISPLAY during playback The Control Menu appears 2 Press X x to select SURROUND then press ENTER The options for SURROUND appear ENTER X x DISPLAY OFF TVS DYNAM...

Страница 54: ...AL to D PCM in AUDIO SETUP page 74 TVS TV Virtual Surround DYNAMIC Uses sound imaging to create virtual rear speakers from the sound of the front speakers L R without using actual rear speakers shown below The sound imaging effect is distinct and clearly reproduces each aural element of the audio track This mode is effective when the distance between the front L and R speakers is short such as wit...

Страница 55: ...lby Surround Pro Logic to create surround effects The rear speakers will emit identical monaural sounds If you are using a centre speaker Dolby Surround Pro Logic will also create the appropriate sounds for the centre speaker ENHANCED SURROUND Provides a greater sense of presence from a Dolby Surround Pro Logic source with a monaural rear channel signal Produces a stereo like effect in the rear ch...

Страница 56: ...fficult to hear When you select TVS DYNAMIC TVS WIDE TVS NIGHT or TVS STANDARD the player does not output the sound from the centre speaker When you select one of the SURROUND modes turn off the surround setting of the connected TV or amplifier receiver If the player is set up to output the signal from the DIGITAL OUT OPTICAL or COAXIAL jack the surround effect will not be heard when you play a CD...

Страница 57: ... c or ENTER The number of the angle changes to 4 Select the angle number using the number buttons or X x then press ENTER The angle is changed to the selected angle To turn off the Control Menu Press DISPLAY repeatedly until the Control Menu is turned off z You can select the angle directly by pressing Each time you press the button the angle changes z You can display all the angles recorded on th...

Страница 58: ...ear 3 Press X x to select the language Depending on the DVD the choice of language varies When 4 digits are displayed they indicate the language code Refer to the language code list on page 86 to see which language the code represents 4 Press ENTER To cancel the SUBTITLE setting Select OFF in Step 3 To turn off the Control Menu Press DISPLAY repeatedly until the Control Menu is turned off z You ca...

Страница 59: ...block noise more than 2 4 Press ENTER The disc plays with the setting you selected To cancel the BNR setting Select OFF in Step 3 To turn off the Control Menu Press DISPLAY repeatedly until the Control Menu is turned off z You can set BNR while the player is stopped z You can select BNR directly by pressing BNR on the remote or player Each time you press the button the item changes If you select a...

Страница 60: ...r TV screen will become crisper 1 enhances the outline 2 enhances the outline more than 1 3 enhances the outline more than 2 SOFT softens the image DVD only 4 Press ENTER The disc plays with the setting you selected To cancel the DIGITAL VIDEO ENHANCER setting Select OFF in Step 3 To turn off the Control Menu Press DISPLAY repeatedly until the Control Menu is turned off z You can set DIGITAL VIDEO...

Страница 61: ...disc you want to lock If the disc is playing press x to stop playback 2 Press DISPLAY while the player is in stop mode The Control Menu appears 3 Press X x to select CUSTOM PARENTAL CONTROL then press ENTER CUSTOM PARENTAL CONTROL is selected 4 Press X x to select ON t then press ENTER xWhen you have not entered a password The display for registering a new password appears Enter a 4 digit password...

Страница 62: ...w 4 digit password using the number buttons then press ENTER 4 To confirm your password re enter it using the number buttons then press ENTER 1 Insert the disc for which Custom Parental Control is set The CUSTOM PARENTAL CONTROL display appears 2 Enter your 4 digit password using the number buttons then press ENTER The player is ready for playback z If you forget your password enter the 6 digit nu...

Страница 63: ... ENTER The display for confirming the password appears xWhen you have already registered a password The display for entering the password appears 6 Enter or re enter your password using the number buttons then press ENTER The display for setting the playback limitation level and changing the password appears 1 2 3 4 5 6 7 8 0 9 O RETURN ENTER DISPLAY X x H Number buttons CUSTOM SETUP AUTO PLAY DIM...

Страница 64: ...word 1 In Step 7 select CHANGE PASSWORD t using x then press ENTER The display for entering the password appears 2 Follow Step 6 to enter a new password 1 Insert the disc and press H The PARENTAL CONTROL display appears 2 Enter your 4 digit password using the number buttons then press ENTER The player starts playback z If you forget your password remove the disc and repeat Step 1 to 5 of Limiting ...

Страница 65: ...in to close the disc tray 2 Press and hold X on the player for more than two seconds You will hear one beep and the Sound Feedback function is turned on Standard Code number Argentina 2044 Australia 2047 Austria 2046 Belgium 2057 Brazil 2070 Canada 2079 Chile 2090 China 2092 Denmark 2115 Finland 2165 France 2174 Germany 2109 Hong Kong 2219 India 2248 Indonesia 2238 Italy 2254 Japan 2276 Korea 2304...

Страница 66: ...s Depending on the units being connected you may not be able to control your TV or AV amplifier receiver using some of the buttons below If you enter a new code number the code number previously entered will be erased When you replace the batteries of the remote the code number may be reset to the default setting Reset the appropriate code number Hold down TV 1 and enter your TV s manufacturer s c...

Страница 67: ... you find the one that works with your AV amplifiers receiver Controlling the AV amplifier receiver You can change the volume of the AV amplifier receiver using 2 Manufacturer Code number Sony default 01 Grundig 11 Hitachi 24 Loewe 45 Nokia 15 16 69 Panasonic 17 49 Philips 06 07 08 Saba 12 13 Samsung 22 23 Sanyo 25 Sharp 29 Telefunken 36 Thomson 43 Toshiba 38 By pressing You can TV 1 Turn the TV o...

Страница 68: ... select CUSTOM then press ENTER The Setup Display appears 4 Press X x to select the setup item from the displayed list LANGUAGE SETUP SCREEN SETUP CUSTOM SETUP or AUDIO SETUP and SPEAKER SETUP Then press ENTER The selected Setup item appears Example SCREEN SETUP 5 Select an item using X x then press ENTER The options for the selected item appear Example TV TYPE How to use the Setup Display DISPLAY...

Страница 69: ... LANGUAGE SETUP LANGUAGE SETUP allows you to set various languages for the on screen display or sound track Select LANGUAGE SETUP in the Setup Display For details on using the display see Using the Setup Display page 68 xOSD On Screen Display Switches the display language on the screen Selects the language from the displayed list xDVD MENU DVD only You can select the desired language for the DVD m...

Страница 70: ...elect SCREEN SETUP in the Setup Display For details on using the display see Using the Setup Display page 68 The default settings are underlined xTV TYPE DVD only Selects the aspect ratio of the connected TV 4 3 standard or wide 16 9 Select this when you connect a wide screen TV or a TV with a wide mode function 4 3 LETTER BOX Select this when you connect a 4 3 screen TV Displays a wide picture wi...

Страница 71: ...E 1 RGB TV jack on the rear panel of the player Notes If your TV does not conform to the S video or the RGB signals no picture appears on the TV screen even if you select S VIDEO or RGB Refer to the instructions supplied with your TV If your TV has only one SCART EURO AV jack do not select S VIDEO xAUTO PLAY Selects the Auto Play setting when you turn on the player ON Turns on the screen saver OFF...

Страница 72: ...ultiple audio formats PCM MPEG audio DTS or Dolby Digital format are recorded Notes When you set the item to AUTO the language may change The TRACK SELECTION setting has higher priority than the AUDIO settings in LANGUAGE SETUP page 69 If you set DTS to OFF page 74 the DTS sound track is not played even if you set TRACK SELECTION to AUTO If PCM DTS MPEG audio and Dolby Digital sound tracks have th...

Страница 73: ...tches the mixing down methods when you play a DVD on which rear signal components such as LS RS or S are recorded in Dolby Digital format For details on the rear signal components see Changing the Sound page 51 This function affects the output of the following jacks LINE OUT L R AUDIO jacks DIGITAL OUT OPTICAL or COAXICAL jack when DOLBY DIGITAL is set to D PCM page 74 OFF Turns off the audio atte...

Страница 74: ...Dolby Surround Pro Logic effect ON Normally select this position When you select ON set DOLBY DIGITAL MPEG and DTS and 48kHz 96kHz PCM For details on setting these items see Setting the digital output signal OFF The player does not output the audio signals via the DIGITAL OUT OPTICAL or COAXIAL jack The influence of the digital circuit upon the analog circuit is minimal Setting the digital output ...

Страница 75: ...audio component lacking a built in MPEG decoder do not set this Otherwise when you play the MPEG audio sound track a loud noise or no sound will come out from the speakers affecting your ears or causing the speakers to be damaged OFF Select this when the player is connected to an audio component lacking a built in DTS decoder Note however that the DTS signals contained in a CD are output even if O...

Страница 76: ...LTI DIMENSION mode page 53 LARGE Normally select this position SMALL When the sound cracks or the surround sound effects are difficult to hear select this This activates the Dolby Digital bass redirection circuitry and outputs the bass frequencies of the front speaker from the subwoofer NONE If you do not connect a centre speaker select this LARGE Normally select this position SPEAKER SETUP SIZE D...

Страница 77: ... adjustment The default adjustments are in parentheses NONE If you do not connect a subwoofer select this This activates the Dolby Digital bass redirection circuitry and outputs the LFE signals from the front speakers as long as the front speaker size is set to LARGE YES If you connect a subwoofer select this to output the LFE low frequency effect channel from the subwoofer When you set the other ...

Страница 78: ...djust the value of BALANCE using C c and LEVEL using X x The test tone is emitted from both left and right speakers simultaneously 4 Select TEST TONE and set TEST TONE to OFF to turn off the test tone Note When you adjust the speaker settings the sound cuts off for a moment CENTER 0dB Adjust the level of the centre speaker 6dB to 6dB 0 5dB increments REAR 0dB Adjust the level of the rear speakers ...

Страница 79: ...r TV please try connecting your player to your TV s S video input page 18 Even though you set the aspect ratio in TV TYPE of SCREEN SETUP the picture does not fill the screen The aspect ratio of the disc is fixed on your DVD The picture is black and white In the Setup Display set LINE in CUSTOM SETUP to the appropriate item that conforms to your TV page 71 Depending on the TV the picture on the sc...

Страница 80: ...ide the player Remove the disc and leave the player turned on for about half an hour Turn on the power again before playing the disc page 3 The disc does not start playing from the beginning Programme Play Shuffle Play Repeat Play or A B Repeat Play has been selected page 38 Press CLEAR to cancel these functions before playing a disc Resume Play has been selected During stop press x on the player ...

Страница 81: ...yed The angle can be changed when the ANGLE indicator lights up on the front panel display page 9 The DVD prohibits changing of the angles The player does not operate properly When static electricity etc causes the player to operate abnormally press POWER on the player to turn the player off and then on again Nothing is displayed on the front panel display DIMMER in CUSTOM SETUP is set to OFF Set ...

Страница 82: ... to 5 1 channel surround sound The rear channel is stereo and there is a discrete subwoofer channel in this format Dolby Digital provides the same 5 1 discrete channels of high quality digital audio found in Dolby Digital cinema audio systems Good channel separation is realized because all of the channel data are recorded discretely and little deterioration is realized because all channel data pro...

Страница 83: ...ental Control functions are provided with the DVD Index CD Video Index VIDEO CD page 9 A number that divides a track into sections to easily locate the point you want on a VIDEO CD or CD Depending on the disc no index may be recorded MPEG audio page 23 74 International standard coding system used to compress audio digital signals authorized by ISO IEC MPEG 1 conforms to up to 2 channel stereo MPEG...

Страница 84: ...e sound characteristics of your TV this technology brings the excitement of surround sound to your home using nothing more than your stereo TV s internal speakers Furthermore various TVS modes are available For example TVS WIDE uses just two speakers to create a virtual sound environment that makes you feel like you are surrounded by multiple speakers ...

Страница 85: ...Dimensions approx 430 74 256 mm w h d incl projecting parts Mass approx 2 7 kg Operating temperature 5 C to 35 C Operating humidity 25 to 80 Supplied accessories See page 14 Specifications and design are subject to change without notice Jack name Jack type Maximum output level Load impedance LINE OUT L R AUDIO Phono jack 2 Vrms at 50 kilohms Over 10 kilohms DIGITAL OUT OPTICAL Optical output jack ...

Страница 86: ...Javanese 1287 Georgian 1297 Kazakh 1298 Greenlandic 1299 Cambodian 1300 Kannada 1301 Korean 1305 Kashmiri 1307 Kurdish 1311 Kirghiz 1313 Latin 1326 Lingala 1327 Laothian 1332 Lithuanian 1334 Latvian Lettish 1345 Malagasy 1347 Maori 1349 Macedonian 1350 Malayalam 1352 Mongolian 1353 Moldavian 1356 Marathi 1357 Malay 1358 Maltese 1363 Burmese 1365 Nauru 1369 Nepali 1376 Dutch 1379 Norwegian 1393 Occ...

Страница 87: ... NORSK PORTUGUÊS DVD MENU ENGLISH FRANÇAIS DEUTSCH ITALIANO ESPAÑOL NEDERLANDS DANSK SVENSKA SUOMI NORSK PORTUGUÊS PYCCKИЙ CHINESE JAPANESE OTHERS t AUDIO ORIGINAL All other selections are same as the DVD MENU language SUBTITLE AUDIO FOLLOW All other selections are same as the DVD MENU language TV TYPE 16 9 4 3 LETTER BOX 4 3 PAN SCAN SCREEN SAVER ON OFF BACKGROUND JACKET PICTURE GRAPHICS BLUE BLA...

Страница 88: ... MODE AUTO FRAME PARENTAL CONTROL t PLAYBACK MEMORY ON OFF TRACK SELECTION OFF AUTO AUDIO ATT OFF ON AUDIO DRC STANDARD TV MODE WIDE RANGE CENTER SPEAKER EQ FLAT ENHANCED SOFT DOWNMIX DOLBY SURROUND NORMAL DIGITAL OUT ON DOLBY DIGITAL D PCM DOLBY DIGITAL MPEG PCM MPEG DTS OFF ON 48 kHz 96 kHz PCM 48 kHz 16 bit 96 kHz 24 bit OFF ...

Страница 89: ... SIDE SUBWOOFER NONE YES DISTANCE The distance from the listening position FRONT 1 0m 15m CENTER 0m 15 6m It changes according to the distance from the front speaker REAR 0m 15 0m It changes according to the distance from the front speaker BALANCE FRONT 6dB 6dB REAR 6dB 6dB LEVEL CENTER 6dB 6dB REAR 6dB 6dB SUBWOOFER 10dB 10dB TEST TONE OFF ON ...

Страница 90: ...43 Fast reverse 43 Front panel display 9 H Handling discs 7 Hooking up 18 I INDEX 44 Index 83 L LANGUAGE SETUP 69 LEVEL 78 LINE 71 Locating a specific Point 43 by watching the TV screen 43 M MPEG 23 53 83 O On screen display Control Menu display 12 Setup Display 68 OSD 87 P PARENTAL CONTROL 61 PAUSE MODE 72 PBC Playback 37 PLAYBACK MEMORY 72 PRO LOGIC 27 73 PROGRAM 38 Programme Play 38 Q QUICK 69 ...

Страница 91: ...91 V VIDEO CD 33 VIEWER 45 ...

Страница 92: ...Sony Corporation ...

Отзывы: