background image

5-54

2-4-3.

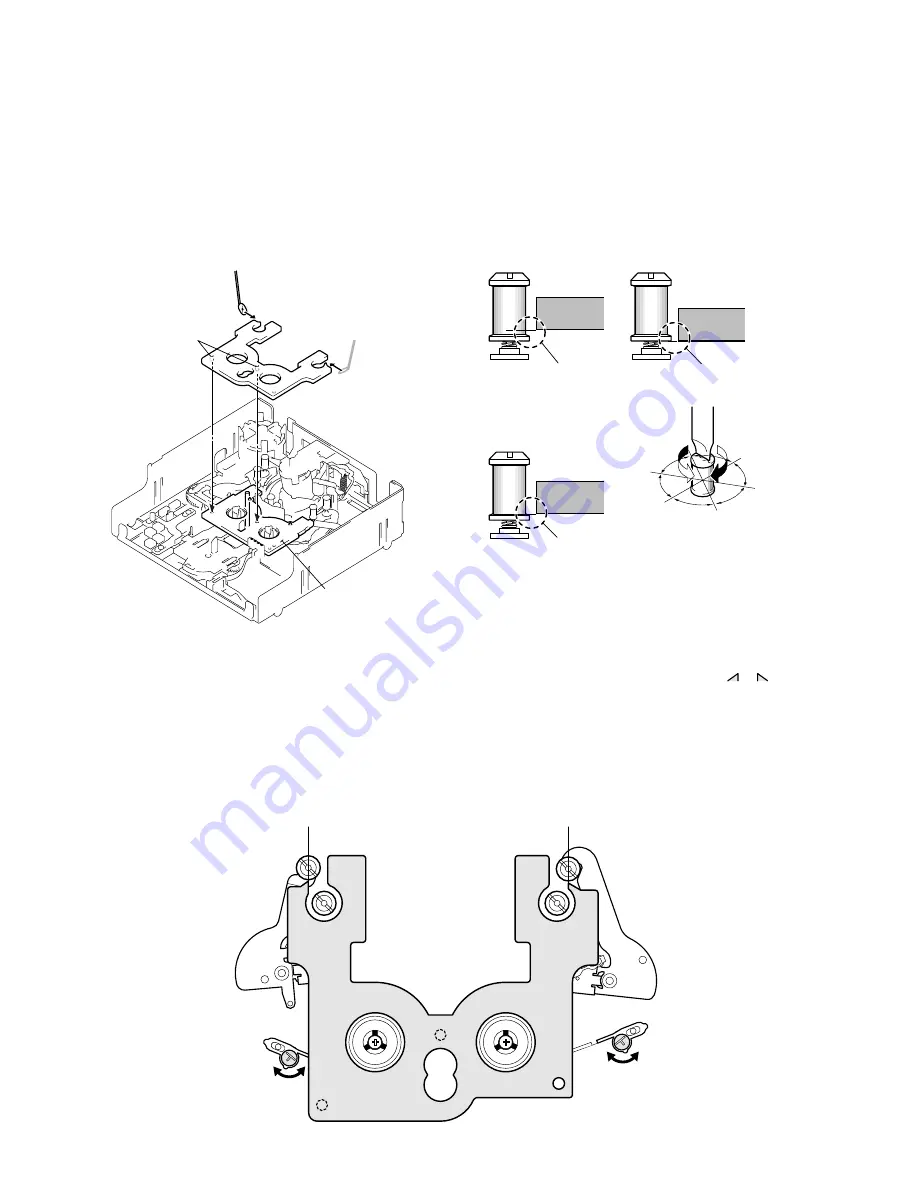
TG2/7 HEIGHT CHECK AND ADJUSTMENT

1. Preparation before check

1)

Check that the cassette compartment block has already been
removed. (Refer to page 5-35.)

2)

Set the mechanism deck to the loading end position (TG2 to 7
already moved to the loading end position and the pinch roller
is in the unloading position). Alternatively, set the mechanism
deck to the “LE position” using the mode selector II. (Refer to
page 5-35.)

3)

Place the TG2/7 preset plate (J-24).

2. Check and adjustment

Rotate the TG upper flange until the height of the TG2/7 preset
plate (J-24) and TG2 or TG7 roller block is the same. Alternatively,
rotate the TG upper flange of only TG2 by 60˚ in the direction of
raising the guide from the adjusted height while referring to the
figure below.

1. Preparation before check

1)

Check that the cassette compartment block has already been
removed. (Refer to page 5-35.)

2)

Set the mechanism deck to the loading end position (TG2 to 7
already moved to the loading end position and the pinch roller
is in the unloading position). Alternatively, set the mechanism
deck to the “LE position” using the mode selector II. (Refer to
page 5-35.)

3)

Place the TG2/7 preset plate (J-24).

2. Check and adjustment

Rotate each adjuster to adjust the TG2/7 position until 

 or 

 of

the TG2/7 preset plate (J-24), TG2 and TG7 are in line.

2-4-4.

FWD/RVS POSITION CHECK AND ADJUSTMENT

Face the mirror (J-14) in the 
direction of the arrow and 
perform a visual check.

Attach the boss while aligning it
with the hole of the cassette
reference plate (J-22).

TG2/7 preset plate 
(J-24)

Boss

Cassette reference plate 
(J-22)

Align the center of TG2 with the vertically
extended line of the jig plate's tip as shown.

TG2 arm

TG7 arm

Rotate the adjuster with a resin
screwdriver, etc. Be careful not
to bend the band.

Align the center of TG7 with the vertically
extended line of the jig plate's tip as shown.

TG2/7 preset plate (J-24)

Rotate the adjuster with a resin
screwdriver, etc. Be careful not
to bend the band.

TG2 or TG7

The guide is too low.

The guide is too high.

Screwdriver for tape path (J-15)

The guide 
is raised.

The guide 
is lowered.

Not good

Not good

Good

TG2 or TG7

TG2 or TG7

The normal height of TG2 is the position 
where the TC upper flange is rotated by 
60

°

 in the direction of raising the guide 

from the adjusted height while referring 
to the figure below.
The normal height of TG7 is the current 
one.

60

°

60

°

60

°

60

°

Содержание DSR-250

Страница 1: ...R standards NTSC color EIA standards DSR 250 Usable cassette DVCAM cassette with the mark printed Mini DVCAM cassette with the mark printed DV cassette with the mark printed Mini DV cassette with the mark printed Tape speed DVCAM format Approx 28 218 mm s DV format SP mode Approx 18 812 mm s Recording playback time DVCAM format 184 min using cassette PDV 184ME DV format SP mode 270 min using casse...

Страница 2: ...ENTS IDENTIFIED BY MARK 0 OR DOTTED LINEWITH MARK 0 ON THE SCHEMATIC DIAGRAMS AND IN THE PARTS LIST ARE CRITICAL TO SAFE OPERATION REPLACE THESE COMPONENTS WITH SONY PARTS WHOSE PART NUMBERS APPEAR AS SHOWN IN THIS MANUAL OR IN SUPPLEMENTS PUBLISHED BY SONY ATTENTION AU COMPOSANT AYANT RAPPORT À LA SÉCURITÉ LES COMPOSANTS IDENTIFÉS PAR UNE MARQUE 0 SUR LES DIAGRAMMES SCHÉMATIQUES ET LA LISTE DES P...

Страница 3: ...ting time values 1 26 Superimposing a title 1 27 Making your own titles 1 28 Labelling a cassette 1 29 Erasing the cassette memory data 1 29 Customizing Your Camcorder Changing the menu settings 1 30 Resetting the date and time 1 32 Memory Stick Operations Using a Memory Stick introduction 1 32 Recording still images on a Memory Stick Memory Photo recording 1 33 Recording an image from a tape as a...

Страница 4: ... 57 VI 156 DD CONVERTER 1 24 25 SCHEMATIC DIAGRAM 4 59 VI 156 DD CONVERTER 2 25 25 SCHEMATIC DIAGRAM 4 61 VI 156 CAMERA DV MS INTERFACE SERVO REC PB HEAD AMP AUDIO DD CONV PRINTED WIRING BOARD 4 63 MS 058 MS CONNECTOR PRINTED WIRING BOARD 4 67 MD 76 MODE SENSOR PRINTED WIRING BOARD 4 69 MD 76 MODE SENSOR SCHEMATIC DIAGRAM 4 71 JK 197 VIDEO AUDIO IN OUT VO 012 VIDEO OUT PRINTED WIRING BOARDS 4 73 R...

Страница 5: ...17 Color Reproduction Adjustment ND Filter 1 5 25 18 Color Reproduction Adjustment ND Filter 2 5 25 19 White Balance Check 5 26 20 Steady Shot Adjustment 5 27 20 1 Steady Shot Adjustment 1 5 28 20 2 Steady Shot Adjustment 2 5 29 1 4 LCD SYSTEM ADJUSTMENT 5 30 1 VCO Adjustment PD 126 board 5 30 2 Bright Adjustment PD 126 board 5 31 3 Black Limit Adjustment PD 126 board 5 31 4 Contrast Adjustment PD...

Страница 6: ...osition Adjustment VI 156 board 5 68 4 AGC Center Level and APC AEQ Adjustment 5 68 4 1 Preparations before adjustments 5 68 4 2 AGC Center Level Adjustment VI 156 board 5 68 4 3 APC AEQ Adjustment VI 156 Board 5 69 4 4 Processing after Completing Adjustments 5 69 5 PLL f0 LPF f0 Final Adjustment VI 156 board 5 69 3 4 VIDEO SYSTEM ADJUSTMENTS 5 70 3 4 1 Base Band Block Adjustments 5 70 1 Chroma BP...

Страница 7: ... 5 V Adjustment 2 2 E 2 2 2 Heater Voltage Pre Adjustment 2 2 E 2 2 3 Vertical Hold Adjustment 2 2 E 2 2 4 Horizontal Hold Adjustment 2 3 E 2 2 5 Focus Adjustment 2 4 E 2 2 6 Picture Frame Adjustment 2 5 E 2 2 7 Operational Amplifier Output Adjustment 2 6 E 2 2 8 Bright Calibration Adjustment 2 6 E 2 2 9 Heater Voltage Adjustment 2 7 E 3 Spare Parts 3 1 Notes on Repair Parts 3 1 E 3 2 Exploded Vie...

Страница 8: ...esn t move if the memory stick which memorize a correct logo isn t inserted To release the forced logo function the correct password must be input This password is memorized in the IC1105 EEPROM on VI 156 board Therefore when a user forgets the password replace the IC1105 This IC1105 memorizes the HRS METER data Hour meter data page A address 00 to 13 too Therefore replace the IC1105 in the follow...

Страница 9: ...shown in the past 3 1 Display Method While pressing the STOP key set the POWER switch from OFF to ON and continue pressing the STOP key for 5 seconds continuously The service mode will be displayed and the counter will show the backup No and the 5 character self diagnosis codes 3 2 Switching of Backup No By rotating the control dial past self diagnosis codes will be shown in order The backup No in...

Страница 10: ...form operations from the beginning Load the tape again and perform operations from the beginning Load the tape again and perform operations from the beginning Load the tape again and perform operations from the beginning Load the tape again and perform operations from the beginning Load the tape again and perform operations from the beginning Load the tape again and perform operations from the beg...

Страница 11: ...1 1 SECTION 1 GENERAL DSR 250 250P This section is extracted from instruction manual DSR 250P ...

Страница 12: ...1 2 ...

Страница 13: ...1 3 ...

Страница 14: ...1 4 ...

Страница 15: ...1 5 ...

Страница 16: ...1 6 ...

Страница 17: ...1 7 ...

Страница 18: ...1 8 ...

Страница 19: ...1 9 ...

Страница 20: ...1 10 ...

Страница 21: ...1 11 ...

Страница 22: ...1 12 ...

Страница 23: ...1 13 ...

Страница 24: ...1 14 ...

Страница 25: ...1 15 ...

Страница 26: ...1 16 ...

Страница 27: ...1 17 ...

Страница 28: ...1 18 ...

Страница 29: ...1 19 ...

Страница 30: ...1 20 ...

Страница 31: ...1 21 ...

Страница 32: ...1 22 ...

Страница 33: ...1 23 ...

Страница 34: ...1 24 ...

Страница 35: ...1 25 ...

Страница 36: ...1 26 ...

Страница 37: ...1 27 ...

Страница 38: ...1 28 ...

Страница 39: ...1 29 ...

Страница 40: ...1 30 ...

Страница 41: ...1 31 ...

Страница 42: ...1 32 ...

Страница 43: ...1 33 ...

Страница 44: ...1 34 ...

Страница 45: ...1 35 ...

Страница 46: ...1 36 ...

Страница 47: ...1 37 ...

Страница 48: ...1 38 ...

Страница 49: ...1 39 ...

Страница 50: ...1 40 ...

Страница 51: ...1 41 ...

Страница 52: ...1 42 ...

Страница 53: ...1 43 ...

Страница 54: ...1 44 ...

Страница 55: ...1 45 ...

Страница 56: ...1 46 ...

Страница 57: ...1 47 ...

Страница 58: ...1 48 This section is extracted from instruction manual Auto Logo Insert for Copyright Protection ...

Страница 59: ...1 49 ...

Страница 60: ...1 50 ...

Страница 61: ...1 51E ...

Страница 62: ...ice position to check the VTR section VI 156 board service position Service position to check the camera section 2 5 Hinge section Hinge assembly FP 241 flexible board CONNECTION DIAGRAM FOR SERVICE POSITION Mainly for voltage measurement and check TH 010 ME 019 MAIN SUB SW 343 DD 146 IN 057 VI 156 ON 001 NO 001 CD 274 XL 003 RL 057 FS 082 boards Mechanism deck 2 8 VI 156 board 2 9 Lens block asse...

Страница 63: ...e solderings 6 Remove the six solderings 7 Inverter transformer unit 8 PD 126 board 5 PCB clip 4 PCB clip REMOVING THE PD 126 BOARD INVERTER TRANSFORMER UNIT 2 Two screws M2 4 lock ace p2 1 Two screws M2 4 lock ace p2 4 Two screws M2 4 lock ace p2 A A B B PD 126 Board PD 126 Board qa Back light 6 BL retainer qf Shoulder pad assembly Cold cathode fluorescent tube BL shield sheet N PD 126 board LANC...

Страница 64: ...m REMOVING VF SHOE BASE Carrying handle block assembly 7 Two claws 6 Two screws M3 8 5 Two screws M3 8 9 Carrying handle block assembly 2 Rear handle cover assembly qd ME 019 board 0 Two screws M2 6 5 spring bolt qa Two screws M2 4 lock ace p2 REMOVING THE ME 019 BOARD 1 Two screws M2 4 lock ace p2 4 TH 010 board 3 Screw M2 3 lock ace p2 6 Two small washers W4 5 Two hexagon sockets M4 12 bolt ...

Страница 65: ...y DXF 801 DSR 250 DXF 801CE DSR 250P 5 VF assembly DXF 801 DSR 250 DXF 801CE DSR 250P 1 Two screws M3 6 8 Screw M2 6 4 6 Screw M2 6 4 2 Two screws M3 8 VF SECTION MAIN SUB BOARDS SERVICE POSITION Regulated power supply AC IN 12V How to make the DC cable See page 2 1 Refer to the separate DXF 801 810CE Service Manual attach to the end of this manual Section 1 Service Information ...

Страница 66: ...nob 6 SP cabinet assembly 3 SW protection sheet 5VR knob 4 Cabinet R block assembly Cabinet R block assembly 7 SW 343 board SP901 SB 036 board KP 011 board AE 023 board PM 040 board VI 156 Board VI 156 Board SW 343 SB 036 3 FP 245 flexible board 10P 1 Two screws M3 8 2 Two screws M3 8 REMOVING THE SW 343 BOARD ...

Страница 67: ...hree screws M2 4 lock ace p2 3 Harness PS 111 14P qf Harness PS 111 14P 3 Two claws 4 Claws 6 Blind plate assembly qd Harness PS 110 8P 5 Remove the hinge cover rear in the direction of the arrow 2 Harness PS 110 8P Cabinet R block assembly S W 3 4 3 S B 0 3 6 REMOVING HARNESS PS 111 14P HARNESS PS 110 8P qa Remove the harness PS 111 14P harness PS 110 8P in the direction of the arrow When removin...

Страница 68: ...ANC jack How to make the DC cable See page 2 1 1 Five screws M3 8 6 Flexible board from capstan motor 18P 7 Flexible board from drum motor 11P 8 Harness from loading motor 2P 9 Flexible board from drum motor 10P 0 Harness from cam motor 2P qa FRV 008 flexible flat cable from MD 76 board 21P qs FRV 008 flexible flat cable from MD 76 board 21P MECHANISM DECK SERVICE POSITION Cabinet R block assembly...

Страница 69: ...board VI 156 Board A A D C B C D B DD 146 board IN 057 board D D 146 D D 146 SW 343 SB 036 1 Two screws M2 3 lock ace p2 3 Two screws M2 3 lock ace p2 Cabinet R block assembly How to make the DC cable See page 2 1 Regulated power supply AC IN 12V DD 146 IN 057 BOARDS SERVICE POSITION ...

Страница 70: ...commander 3 Select page 0 address 01 and set data 00 A B G G H H D C EF B D C E F A qf VI 156 board VI 156 Board qa Control switch block EG 1044 6P qd FP 243 flexible board 27P qs FP 242 flexible board 39P 0 CD 274 board 50P 9 Harness VF 071 3P 8 Harness VG 052 12P 7 Harness VM 068 12P 6 Harness MV 124 7P 5 Harness VL 054 6P VI 156 Board VI 156 board VIDEO OUT VIDEO IN OUT TV monitor Connect the C...

Страница 71: ...ssembly 3 Two screws M3 8 2 Screw M3 8 1 Screw M3 8 4 Screw M3 8 5 Screw M2 3 lock ace p2 qf Mi ring assembly Control switch block EG 1044 6P 6 Flexible board 27P 9 Flexible board 39P 0 Grip assembly 8 Slide knob assembly 9 Control switch block CF 1044 Harness VG 052 12P 5 Screw M3 8 6 Grip base 4 Two screws M3 8 qa Lens block assembly 2 Screw M3 6 EG grip 1 Three screws M3 6 EG grip 3 Screw M3 8 ...

Страница 72: ... 0 0 1 N O 0 0 1 DD 146 CN007 20P 20 1 2 Screw M2 4 lock ace p2 1 Harness fixed tape Screw M2 4 lock ace p2 When you want to remove screws remove this screw first Also remove this screw last when re installing the parts CAUTION WHEN INSTALLING AND REMOVING SCREWS REMOVING LENS CABINET R Harness VF 071 3P How to make the DC cable See page 2 1 Regulated power supply LANC jack Adjustment remote comma...

Страница 73: ...lect page D address 10 set data 00 and press the PAUSE button of the adjustment remote commander 3 Select page 0 address 01 and set data 00 B AB A VI 156 Board Control switch block CF 1044 Lens block assembly VIDEO IN OUT AC IN FP 242 flexible board 39P FP 243 flexible board 27P O N 0 0 1 N O 0 0 1 DD 146 SERVICE POSITION TO CHECK THE CAMERA SECTION VIDEO OUT TV monitor LANC jack How to make the D...

Страница 74: ...lide knob REMOVING XL 003 BOARD 2 12 FS 082 BOARD 4P CONNECTOR WITH DC SW VI 156 Board 1 Four screws M2 4 lock ace p2 3 Four screws M2 3 lock ace p2 2 Front lower cabinet assembly 6 Harness DC 064 2 Remove the two solderings 5 Two screws M2 6 5 spring bolt 4 FS 082 board Harness FV 120 6P AUDIO VR knob 1 Screw M2 8 4 4P connector with DC SW 3 Micro switch Harness ID 052 6P REMOVING 4P CONNECTOR WI...

Страница 75: ... ID 052 6P Harness FV 120 6P Regulated power supply Adjustment remote commander RM 95 Mechanism deck Cabinet R block assembly Lens block assembly FP 242 flexible board 39P FP 243 flexible board 27P A Flexible board from capstan motor 18P B Flexible board from drum motor 11P C Harness from loading motor 2P D Flexible board from drum motor 10P E Harness from cam motor 2P F FRV 008 flexible flat cabl...

Страница 76: ...MER UNIT DC 095 DC OUT XL 003 CH1 CH2 MIC AMP RL 057 LANC VO 012 VIDEO OUT DV 031 DV IN OUT DD 146 DC DC CONVERTER IN 057 DC IN MS 058 MS CONNECTOR VI 156 CAMERA DV MS INTERFACE SERVO REC PB HEAD AMP AUDIO DD CONV KP 011 MENU SELECT AE 023 USER FUNCTION SB 036 USER FUNCTION ME 019 MIC AMP EVF OUT SW 343 USER FUNCTION NO 001 RELAY ON 001 RELAY FS 082 USER FUNCTION FC 074 USER FUNCTION JK 197 VIDEO ...

Страница 77: ... LOCATION FVK 001 FSS 004 FRV 008 FP 243 FP 242 FP 245 FP 241 FKE 001 FVS 001 CONTROL SWITCH BLOCK EG 1044 CONTROL SWITCH BLOCK CF 1044 The flexible boards contained in the mechanism deck and that in the zoom lens are not shown ...

Страница 78: ... IC2772 VAP LOCK VP LOCK SENS MZ F0 F1 DETECTOR IC144 1 2 8 13 8 13 IC143 DETECTOR 1 2 MF F0 F1 CN002 2 PITCH YAW 8 PSD OUT SENSOR AMP YSD OUT 12 18 12 10 CN001 5 3 CN600 PITCH SENSOR SE601 SE600 YAW SENSOR SE 116 BOARD IRIS PWM HALL AD EN1 DIR 1A 1B EN0 DIR 0A 0B P PWM Y PWM VP LOCK DR MZ A B MF A B PS OUT YS OUT 43 66 19 20 17 82 18 45 44 61 60 7 10 25 24 23 22 59 58 62 50 48 35 33 IC802 CAMERA ...

Страница 79: ... 3 16 15 XYZ IC1001 AUDIO I O IC1002 ADC DAC D A CONV A D CONV 9 12 8 DATA FROM SFD SFD BCK DATA TO SFD EVR IC1005 14 13 ZOOM VR AD 7 9 12 4 2 CN181 JK 197 BOARD TO OVERALL BLOCK 1 5 HI SO SI SCK HD VD OE CO C7 YO Y7 SPCK VI 156 BOARD 2 5 34 Y 39 36 IC1301 C TAKO 42 ACC AGC LINE IN LINE OUT 18 14 22 48 26 TAKO CK Y 7 46 C C V Y ALIGN 66 CONVERTER 6 2 68 A D IC903 63 25 Y0 Y7 C0 C7 36 38 37 34 6 13...

Страница 80: ...55 27 22 21 19 63 60 MOTOR DRUM DRIVE 4 1 FG AMP PG AMP L1 L2 UL1 UL2 IC4501 MOTOR DRIVE CASSETTE 8 13 17 12 11 9 18 14 4 1 19 6 24 21 U1 U2 V1 V2 W1 W2 20 5 U V W 23 18 2 DRIVE MOTOR DRUM 1 2 CM LOAD CM UNLOAD CN501 6 1 CN500 10 11 M MOTOR CAM M902 M901 M MOTOR DRUM FG PG 39 CAP ERROR REEL 6 30 CAPSTAN REEL ERROR 46 40 DRUM DRUM ERROR 25 DC DC CONV 44 PWM DRIVE PWM DRIVE PWM DRIVE IC4100 LPF 16 7...

Страница 81: ... VDD IC1102 3 LCD UNIT 18 34 14 EEPROM VG 47 XCC DOWN 4 VDD SWITCH 12 13 7 24 35 IC1105 COM 48 27 2 PANEL R G B 1 15 CN506 HI SCK PSIG CAM DD ON 48 2 19 24 HI SO LI 3V HSY 1 HI UNREG 10 22 23 HI SI PD 126 BOARD 81 IC2103 12 6 8 CN503 COM 28 42 3 3 10 16 CN014 SEE PAGE 3 5 12 46 8 5 LANC OUT 13 17 SW 343 BOARD 1 2 12 SEE PAGE 3 3 OSD SCK 10 45 4 LANC IN 3 14 HI SO SCK 1 6 OSD SO 24 40 2 PANEL 4 6V ...

Страница 82: ...T IC052 4 5 ATW AGC 14 DISPLAY 3 CH1 AUTO MANU 13 CH2 AUTO MANU GAIN H GAIN L 9 2 9 5 12 WHT BAL B IC051 LCD ON OFF 6 4 3 VF DISPLAY IRIS WHT BAL PRE LIGHT PARALLEL IN SERIAL OUT 2 14 IC053 IC054 I F AGC ATW GAIN H GAIN L WHT BAL PRESET WHT BAL B DIAL A DIAL B CH1 LEVEL MONI LEVEL CH2 LEVEL MONI CH2 MONI CH1 IC2502 IC2501 IC1086 CN016 IC1085 TO OVERALL BLOCK 1 5 TO OVERALL BLOCK 2 5 XVTR MODE SW X...

Страница 83: ...ERTER IC302 BUFFER Q305 DRIVE Q311 312 DRIVE Q306 307 309 L304 D302 RECT Q310 SWITCHING Q308 SWITCHING L306 RIPPLE FILTER Q320 RIPPLE FILTER Q322 RIPPLE FILTER Q323 1 2 CN306 CH2 48V CH1 48V 1 3 CN302 MIC 48V EVF 12V TO POWER BLOCK 2 4 VI 156 TO POWER BLOCK 4 4 ME 019 TO POWER BLOCK 4 4 XL 003 Q314 313 DC OUT 12V 1 2 CN281 4 1 DC 095 BOARD CN282 2 1 F307 DC DC CONVERTER 1 IC303 OUT 2 VCC INPUT 4 7...

Страница 84: ... AU 2 8V D 2 8V A 4 6V RP 4 6V AU 4 6V 1 4 3 IN3 OUT3 1 53 OUT3 2 40 54 8 VTR DD ON 5 2V REG EMERGENCY DETECT Q3325 7V REG Q3333 3335 3338 Q3315 3317 3324 VI 156 BOARD 1 3 CN022 RECT D3310 COMP 11 VREF SWITCHING SWITCHING SWITCHING D3312 RECT AU 4 6V A 4 6V PANEL 2 8V PANEL 2 8V AU 2 8V A 2 8V D 1 9V MS 3 1V RP 4 6V HI UNREG TO POWER BLOCK 3 4 CAM 7V PANEL 4 6V 4 59 MT 5 2V 1 5V REG Q3340 3341 SHO...

Страница 85: ...C102 IC101 IC803 IC802 IC801 IC771 IC704 IC706 4 37 4 37 4 16 4 13 4 14 IC1301 IC903 IC301 IC361 IC302 IC1001 IC1002 4 27 4 26 4 53 4 51 XYZ IC1101 LANC DC CN009 42 51 86 87 GENERATER INTERFACE SIGNAL PROCESS LINE IN OUT AMP D 2 8V 4 30 4 29 IC501 IC502 CONTROL CN015 1 10 27 11 2 28 9 20 CN502 SOUND CONTROL CONV CAMERA SIGNAL PROCESS STICK I F STILL CONTROL DRAM I F MS VCC ON AMP A D CONV PLL D 1 ...

Страница 86: ...O 001 BOARD CN422 CN2002 11 21 2 10 26 11 32 ON 001 BOARD 3 CN202 3 CN008 VO 012 BOARD IRIS RING 1 2 CONTROL SWITCH BLOCK EG 1044 CN020 TALLY LED IC451 REMOTE COMANDER RECEIVER REAR IC431 REMOTE COMANDER RECEIVER FRONT D451 452 ZOOM VR RV431 CONTROL SWITCH BLOCK CF 1044 TH 010 BOARD 1 2 CN451 8 7 CN012 9 7 CN018 IC1 ELETEN SENSOR AMP D2 8V IC1607 1608 IC1611 1612 IC051 054 PARALLEL IN AERIAL OUT A...

Страница 87: ...P CN202 1 VIDEO_OUT 2 GND 3 A_4 6V S221 S471 S472 S432 S433 RV431 S403 S402 S405 J901 S451 S261 S262 S263 S264 S265 S267 S267 269 S268 S270 S221 S291 10P CN012 1 VSS 2 BS 3 VCC 4 DIO 5 N C 6 INS 7 N C 8 SCLK 9 VCC 10 VSS 1 A 5P CN451 1 D_3 1V 2 MT_5 2V 3 B_TALLY_LED 4 SIRCS_SIG2 5 MT_GND DIAL_D NC FC_RST_SENS Y_OUT NC AUDIO_L_I O NC YS_REF GND MF_F0 RCH_DET PSD_OUT Y_DUMP_A MF_F0 FZ_SENS_VCC TDI H...

Страница 88: ... 2 ATW 3 AUTO 4 AGC 5 KEY_AD4 6 GND 7 GND 5P CN509 1 DIAL_A 2 GND 3 DIAL_B 4 GND 5 EXEC_SW 21P CN201 1 REEL_V 2 REEL_V 3 REEL_U 4 REEL_U 5 REEL_w 6 REEL_W 7 GND 8 GND 9 FG1 10 5V 11 5V 12 FG2 13 SREEL_FG 14 TREEL_FG 15 REC_PROOF 16 CHIME_4 VDD 17 CHIME_3 SDA 18 CHIME_2 SCK 19 GND 20 GND 21 TAPE_TOP 4P CN511 1 VTR_MODE 2 MEMORY_MODE 3 POWER_ON 4 GND 21P CN200 1 TAPE_END 2 CC_DOWN 3 C_IN 4 MODE_A 5 ...

Страница 89: ...ND 8 UNREG_12V 9 UNREG_12V 12P CN022 1 POWER_CONT 2 LIGHT_CONT 3 HI_UNREG 4 UNREG_ 12V 5 8 4V_1 6 8 4V_2 7 8 4V_3 8 8 4V_4 9 8 4V_5 10 P_UNREG_GND 11 GND 12 GND CN481 2P 1 LIGHT_OUT 2 LIGHT_GND 3P CN803 1 CH1_ 48V 2 CH2_ 48V 3 GND 6P CN241 1 BATTERY_12V 2 BATTERY_12V 3 SELECTED_12V 4 SELECTED_12V 5 GND 6 GND 9P CN243 1 HI_UNREG 2 POWER_CONT 3 LIGHT_UNREG_12V 4 LIGHT_UNREG_12V 5 GND 6 GND 7 P_UNREG...

Страница 90: ...cled numbers refer to waveforms There are few cases that the part printed on diagram isn t mounted in this model Chip parts For schematic diagrams All capacitors are in mF unless otherwise noted pF m mF 50V or less are not indicated except for electrolytics and tantalums Chip resistors are 1 10W unless otherwise noted kW 1000W MW 1000kW Caution when replacing chip parts New parts must be attached ...

Страница 91: ...u C114 A 16V 4 7u C112 B 2200p C131 B 0 1u C130 B 2200p C133 B 0 1u C132 B 2200p C134 B 0 1u C135 50P CN100 1 GND 3 VDDB 5 RGB 7 H2B 9 GND 11 VLB 13 V1B 15 V2AB 17 VDD2B 19 V3R 21 V2BR 23 VLR 25 GND 27 GND 29 VDDR 31 RGR 33 H2R 35 V2AG 37 V1G 39 VLG 41 GND 43 VDDG 45 RGG 47 H2G 49 GND 2 GND 4 SUBB 6 H1B 8 GND 10 B_CCD_OUT 12 GND 14 V3B 16 V2BB 18 V1R 20 V2AR 22 VDD2R 24 GND 26 R_CCD_OUT 28 GND 30 ...

Страница 92: ... Board 1 000 Series For printed wiring board Refer to page 4 125 for parts location CD 274 board consists of multiple layers However only the sides layers A and B are shown There are few cases that the part printed on this diagram isn t mounted in this model CCD IMAGER CD 274 ...

Страница 93: ...720 18k 0 5 R716 18k 0 5 R718 18k 0 5 R719 18k R708 0 IC706 AK5483 L 1 DA8 2 DA7 3 DVDD 4 DVSS 5 DA6 6 DA5 7 DA4 8 DA3 9 DA2 10 DA1 11 DA0 12 SEL 13 CEN 14 CKI 15 AVDD 16 AVSS 17 AINA B 18 VREFP 19 AINB G 20 VCOM 21 AINC R 22 VREFN 23 VTP 24 BVT 25 AVDD 26 DC0 27 DC1 28 DC2 29 DC3 30 DC4 31 DC5 32 DC6 33 DVSS 34 DVDD 35 DC7 36 DC8 37 DC9 38 DB0 39 DB1 40 DB2 41 DB3 42 DB4 43 DB5 44 DB6 45 DB7 46 D...

Страница 94: ...3 BAD4 BAD5 BAD6 BAD9 BAD8 BAD7 BAD2 BAD1 BAD0 GAD0 GAD5 GAD6 GAD7 GAD8 GAD9 GAD4 GAD3 GAD2 GAD1 PBLK XSG1 XV1 D_1 9V REG_GND D_2 8V R772 XX R773 0 IFI_C3 IFI_C4 IFI_C1 IFI_C5 IFI_C6 IFI_C0 IFI_C2 IFI_C7 IFI_Y0 IFI_Y1 IFI_Y6 IFI_Y4 IFI_Y2 IFI_Y5 IFI_Y7 IFI_Y3 TD_1 2 IFI_HD IFI_VD IFI_OE XX R771 SOFT_V TD_0 1 TCK TMS CAM_SCK CAM_SO CS_CAM CORE_RST UCORE_STBY CAM_SI VGAT TG_VD TG_HD CLPOB ZM_RST_SEN...

Страница 95: ...1 VDD 2 C1 3 VCC 4 C1 5 C3 6 C3 7 D_IN1 8 D_IN2 9 R_OUT1 10 R_OUT2 11 R_IN2 12 R_IN1 13 D_OUT2 14 D_OUT1 15 VCHA 16 STBY 17 VSS 18 C4 19 GND 20 C4 1u B C1403 FB1404 0 1u F C1409 0 1u F C1414 1u B C1404 1u B C1405 1u B C1406 1u B C1402 FB1401 XVSP_SCK VSP_SO XCS_HONEY TD_2 3 10u 6 3V C1416 IFI_Y0 IFI_Y1 IFI_Y2 IFI_Y3 IFI_Y4 IFI_Y5 IFI_Y6 IFI_Y7 IFI_HD IFI_VD IFI_OE IFI_C0 IFI_C1 IFI_C2 IFI_C3 IFI_C...

Страница 96: ... 16 NC 17 XWE 18 XRAS 19 NC 20 NC 21 A0 22 A1 23 A2 26 Vss 27 A4 28 A5 29 A6 30 A7 31 A8 32 A9 33 XOE 34 XUCAS 35 XLCAS 41 DQ9 42 DQ10 43 DQ11 44 DQ12 45 Vss 46 DQ13 11 NC 15 NC 36 NC 40 NC 24 A3 25 Vcc 47 DQ14 48 DQ15 49 DQ16 50 Vss 20MHz X1402 150 R1457 150 R1452 FB1408 FB1409 IC1401_2 IC1401_109 IC1401_112 232C_ON IC1401_96 IC1401_113 IC1401_92 IC1401_50 IC1401_51 XSYS_RST CL1401 REG_GND MS_IN ...

Страница 97: ...302_ B Q306_B Q304_B Q302_B Q305 B Q303_B Q301_B Q307_B Q308_B IC302_8 OSDVD OSDHD OSDL OSDR COL3 COL2 COL1 OSDP COL0 1 A ALE MCCE MCHA1 MCHA0 WRX RDX XRST_LINK TD_2 3 SFD_FCK SFD_LRCK DATA_TO_SFD LBUS3 LBUS2 LBUS1 FRL FCLR DIR XENA XACC RDX FRRV TRRT DRP ALE MCCE MCDA0 MCDA1 MCDA2 MCDA3 MCDA4 MCDA5 MCDA6 MCDA7 MCHA0 MCHA1 XDVCN LIP_SLEEP LPS OFR XCS_SFD TMS LBUS0 XRST_PHY SWP VFI_Y3 VFI_Y4 VFIO_C...

Страница 98: ...SO Q305 1k R340 1200 R351 820 R336 TPB 2SB1462J QR K8 SO Q303 TPB 2200 R356 220 R329 220 R335 2200 R338 10k R371 0 5 220p CH C338 56 R372 0 5 56 R370 0 5 1608 1u B C337 0 1u B C335 SPCK EVF_G EVF_B PANEL_R 10k R369 0 5 XOSD_SCK 12k R364 PANEL_G R361 12k XCS_OSD 56 R367 0 5 56 R368 0 5 EVER_3 0V B C333 0 01u EVF_R OSDVD 0 R383 R384 XX R385 XX IC361_VDD2 IC361_AVD3 IC361_VDD3 LBUS0 LBUS1 LBUS3 LBUS2...

Страница 99: ...T AGC_CONT CAIN_Y_OUT CAIN_C_OUT 0 01u B C1321 TAKO_CK 2SD2216J QR K8 SO Q1301 SDC_IN 4700 R1302 100 R1304 0 01u B C1301 220k R1305 4700 R1301 ALIGN_APC_ERROR 0 01u B C1303 R1322 1k R1319 1k 220 R1324 33k R1321 39k R1323 0 5 22k R1318 2 2u B C1311 2 2u B C1308 2 2u B C1310 2 2u B C1338 2 2u B C1337 100u 4V C1340 R1326 1k C1341 4V 100u C1342 4V 100u VIDEO_OUT X001 13 5MHz XX CH C1344 XX R1332 L1305...

Страница 100: ... TDI 73 TDO 74 TMS 75 TCK 76 TRST 77 RCKSEL 78 PSCNTO 79 DVSS4 80 ADATB IFI_C3 1u B C916 A_4 6V IFI_Y5 IFI_C2 10u P 6 3V C901 0 01u B C920 XSYS_RST D_2 8V 2SD2216J QR K8 SO Q903 0 01u B C903 0 01u B C902 2SA2018 H T2L Q904 680 R911 AGC_CONT 1u B C911 AFCK 470 R916 10k R908 IFI_C0 1u B C914 0 1u B C929 HI_SO IFI_Y4 IFI_C7 10V 10u C904 TA IFI_Y0 1u B C922 0 01u B C919 0 01u B C915 IFI_C5 XCS_ALIGN R...

Страница 101: ...NEY XDVCN DRUM_FWD 1k R513 0 R525 0 R524 FB501 HI_SO XHI_SCK XCS_MECHA HI_SI XSYS_RST 150 R522 220 R521 150 R520 220 R523 R506 XX 10p CH C503 10p CH C502 XAUDIO_IN 470k R508 470k R509 470k R510 0 1u B C504 0 R515 DRP_SI DRP_SO XDRP_SCK XCS_MC_FLASH MC_F_BUSY 47k 0 5 R517 220k 0 5 R518 TA C508 6 3V 10u C509 1u MODE_SW_D 470k R511 XCS_EVR_DAC XCS_AU2 REEL_ON REEL_FWD CM T_ENLTN_ERR S_ELTN_ERR L_CASS...

Страница 102: ...5 6 7 8 9 10 11 12 13 14 15 16 17 18 19 20 21 21P CN201 1 2 3 4 5 6 7 8 9 10 11 12 13 14 15 16 17 18 19 20 21 0 5 20k R4116 12k R4117 0 1u F C4115 0 1u C4116 0 1u C4117 0 1u C4118 XX R4134 1 10W 1 R4208 0 R4304 2SB709A QRS TX Q4104 10k R4126 XX R4305 UN9211J TX SO Q4105 56k R4127 0 R4128 LB1897D IC4200 1 FGin 2 FG CLIP 3 FG OUT 4 CTL 5 CTLREF 6 LIM 7 FC 8 Uin 9 Uin 10 Vin 11 Vin 12 Win 13 Win 14 V...

Страница 103: ... W 10 W 11 HE VCC 12 HE GND 13 U 14 U 15 MR GND 16 FG2 17 FG1 18 FG VCC 0 01u B C4510 0 01u B C4509 100 R4513 22k 0 5 R4519 0 1u B C4521 20V TA 4 7u C4405 LB1991V TLM IC4400 1 Vcc1 2 Vcc2 3 Vs 4 N C 5 U OUT 6 RF 7 V OUT 8 RF 9 W OUT 10 VH 11 VH 12 ANGLE 13 GND 14 FRC 15 STBY 16 U IN1 17 U IN2 18 V IN1 19 V IN2 20 W IN1 21 W IN2 22 FG IN 23 FG IN 24 FG OUT 0 1u B C4506 100 R4514 3300 R4511 100k R44...

Страница 104: ...C1 44 NC 45 GND 46 GND 47 GND 48 D1E B 470p C111 B 0 1u C114 12k R108 10k R109 B 470p C115 XX B C126 22k R118 22k R115 0 5 220 R122 0 5 220 R123 0 5 220 R124 0 5 220 R120 B 0 1u C121 B 0 1u C122 470 R110 0 033u B C116 150k R107 0 01u B C120 0 1u B C104 0 01u B C102 0 01u B C110 0 01u B C108 47p CH C113 0 01u B C112 47p CH C118 0 01u B C119 0 01u B C124 0 01u B C125 9 1k R116 0 5 0 5 R117 8 2k 0 1u...

Страница 105: ...O Q2200 B C2207 0 022u R2201 22k B C2205 0 022u R2204 10k R2209 1M C2210 B 4V 47u 1 A CXP972048 021R T6 IC802 1 UCORE_STBY 2 STBY_S H 3 4 5 SSS 6 XWEN 7 VP_LOCK_DR 8 VAP_DD_ON 9 C_RST 10 VP_LOCK_SENS 11 SOFT_V 12 13 VSS 14 15 ND_MZ_LED 16 ZM_FC_RST_LED 17 ND_SW1 18 ND_SW2 19 ZOOM_RST_SENSOR 20 FOCUS_RST_SENSOR 21 MF_LED 22 MF_A 23 MF_B 24 MZ_A 25 MZ_B 26 VD 27 IO_SYNC 28 XCS_EEPROM 29 XWEN_EEPROM ...

Страница 106: ...9 IN1 10 EN1 11 IN2 12 EN2 13 IN3 14 EN3 15 IN4 16 EN4 17 OUT4B 18 PGND 19 OUT3B 20 VM23 21 OUT2B 22 PGND 23 OUT1B 24 VDD HALL BIAS BIAS HALL DRIVE DRIVE TEMP_OUT ZM_RST_SENS ZMFC_SENS_VCC FC_RST_SENS FC_A FC_A FC_B FC_B ZM_B ZM_B ZM_A ZM_A Q141 UN9213J K8 SO 47k R141 1k R140 ND_SW3 ND_SW2 ND_SW1 68k R144 68k R145 68k R146 IC142 TA75S01F TE85R 1 2 3 4 5 R168 0 5 47k 0 5 18k R169 0 5 470 R170 B 0 1...

Страница 107: ... NJM324V TE2 IC2773 1 OUT1 2 IN1 3 IN1 4 VCC 5 IN2 6 IN2 7 OUT2 8 OUT3 9 IN3 10 IN3 11 GND 12 IN4 13 IN4 14 OUT4 0 5 47k R2788 0 5 47k R2789 IC2771 NJM3414AV TE2 1 OUT1 2 IN1 3 IN1 4 GND 5 IN2 6 IN2 7 OUT2 8 VCC 0 5 10k R2782 B 6800p C2774 0 5 100k R2780 0 5 15k R2783 B 0 47u C2777 0 5 10k R2779 0 5 10k R2776 0 5 6800 R2773 B 0 1u C2772 VP_LOCK B 1u C2776 0 5 820 R2772 VP_LOCK LOCK_SENS_OUT YD_OUT...

Страница 108: ...100k R068 100 R066 100k R065 100k R064 100k R063 100k R062 100k R067 100k R060 0 1u C051 0 1u C052 0 1u C053 0 1u C054 D_2 8V XHI_SCK HI_SI XCS_P S REG_GND ATW DISPLAY CH1_AUTO MANU CH2_AUTO MANU LIGHT WHT_BAL_PRE WHT_BAL_B IRIS C D GAIN_L GAIN_H AGC 100k R058 100k R056 100k R054 100k R052 100k R051 100k R053 100k R055 100k R057 100k R059 100k R061 VF_DISPLAY 1 A 16 XX MARK NO MOUNT PARALLEL IN SE...

Страница 109: ...1212 1500 R1206 5600 R1196 3300 R1215 4700 R1213 2SA2018H T2L Q1109 1 2 3 1k R1198 1k R1199 1k R1200 0 1u B C1101 S 81236SGUP DQ7 T1 IC1101 1 GND 2 IN 3 OUT 39 R1109 MA728 K8 S0 D1104 3300 R1216 3300 R1217 10k R1105 CHIME_SCK CHIME_SDA CHIME_VDD XCS_CAMERA 470k R1210 HI_TEST_A HI_TXD HI_RXD 1M R1229 XCPC_IN 1k R1133 0 R1218 2SB1462J QR K8 SO Q1107 2SB1462J QR K8 SO Q1112 X1102 KEY_AD2 SIRCS_SEL1 D...

Страница 110: ... 47k R1607 47k R1640 47k R1622 0 5 33k R1652 68k R1608 47k R1648 RCH2IN TA75S01F TE85R IC1602 1 2 3 4 5 B 1u C1624 47k R1612 47k R1602 0 5 39k R1614 10u 6 3V C1606 B 1u C1604 B 1u C1608 47k R1618 AU_LINE_R 15k R1604 0 5 33k R1634 47k R1630 0 5 33k R1616 10k R1620 0 5 39k R1632 47k R1636 B 1u C1616 10k R1610 47k R1658 UN9213J K8 SO Q1602 M5201FP 600D IC1612 1 CTL 2 A 3 A 4 GND 5 OUT 6 B 7 B 8 VCC R...

Страница 111: ... OUT_1 2 IN_1 3 COM 4 GND 5 VC 6 IN_2 7 OUT_2 8 VCC 5 6k R1067 M62367GP 75ED IC1005 1 VSS 2 AO2 3 AO3 4 AO4 5 AO5 6 AO6 7 AO7 8 VDD 9 VCC 10 AO8 11 DO 12 LD 13 CLK 14 DI 15 AO1 16 GND 3 9k R1074 22k R1063 AU_VCC 0 1u B C1066 TA 22u 6 3V C1065 220k R1064 VOL_OUT_LCH1 UPC4572G2 E2 IC1008 1 2 3 4 5 6 7 8 X0DB 7DB VSP_SO TA 10u 6 3V C1076 TA 22u 6 3V C1072 B 1u C1071 22k R1062 0 1u B C1069 0 01u B C10...

Страница 112: ... R1035 47k R1006 51k R1011 4 7u F C1034 UN9213J K8 SO Q1015 XX R1040 1k R1041 UN9115J K8 SO Q1014 10u 10V C1045 UN9213J K8 SO Q1010 B 1u C1041 B 1u C1035 10uH L1001 10u 6 3V TA C1024 10uH L1073 AK4550VT E2 IC1002 1 VCOM 2 AINR 3 AINL 4 VSS 5 VDD 6 DEMO 7 DEM1 8 SDTO 9 SDTI 10 LRCK 11 MCLK 12 SCLK 13 XPWAD 14 XPWDA 15 AOUTL 16 AOUTR 22uH L1002 10u 6 3V C1040 B 1u C1078 B 1u C1048 B 6800p C1047 B 68...

Страница 113: ...R1092 6 3V TA 47u C1098 6 3V TA 47u C1099 6 3V TA 4 7u C1091 10V TA 10u C1088 10V TA 10u C1085 10 10uH L1085 TC74HC4052AF EL IC1085 1 0Y 2 2Y 3 Y COM 4 3Y 5 1Y 6 INH 7 VEE 8 Vss 9 B 10 A 11 3X 12 0X 13 X COM 14 1X 15 2X 16 VDD 470k R1093 470k R1094 10 XX L1087 10 10uH L1086 TA C1100 10u 16V SP_VCC 820 R1097 2SD2216J QR K8 SO Q1031 2SD2216J QR K8 SO Q1032 820 R1098 100k R1095 100k R1096 0 R1099 0 R...

Страница 114: ...ANEL_B PANEL_2 8V HI_XRESET EVER_3 0V GND TPA TPA TPB TPB GND LANC_DC XLANC_JACK_IN LANC_SIG 232C_RD GND GND GND AUDIO_L_I O AUDIO_R_I O LCH_DET RCH_DET GND S_Y_I O GND S_C_I O GND VIDEO_I O ZOOM_VR_AD XPHOTO_FREEZE XPHOTO_REC XVTR_MODE_SW XCAM STBY_SW PHOTO_STBY_SW XS S_SW D_2 8V GND V_JACK_IN XS_JACK_IN GND D_2 8V GND IRIS_ AUTO MANU GND MT_4 75V SIRCS_SIG1 MT_GND MT_GND KEY_AD3 KEY_AD8 MONI_LEV...

Страница 115: ...T_4 75 9 B_TALLY_LED 10 SIRCS_SIG2 11 MT_GND LND011 SEIDEN_GND TLSU1002 TPX1 SONY D011 XX R011 1 10 CN012 10P 1 VSS 2 BS 3 VCC 4 DIO 5 N C 6 INS 7 N C 8 SCLK 9 VCC 10 VSS 560 R012 10P CN011 1 SCLK 2 MS_IN 3 DIO 4 BS 5 VCC 6 VCC 7 REG_GND 8 REG_GND 9 D_2 8V 10 XACCESS_LED R080 0 1 A SIGN273 PEAKING REC_TALLY VF_VIDEO VF_VIDEO_GND R Y B Y SYNC SDA SCLK LD BATT GND NDC TEMP_OUT NC NC FOCUS_A DRIVE FO...

Страница 116: ...0 LND501 LND502 LND503 LND504 LND505 LND506 LND507 LND303 LND304 LND305 AUDIO_GND XX B C3455 XX B C3452 XX CH C3458 VTR_DD_ON XX R3450 XX B C3453 XX B C3456 XX Q3450 XX R3455 4 7u 10V B C3450 XX L3452 XX 10V A C3457 0 5 XX R3453 0 R3456 XX L3453 XX 10V B C3454 0 5 XX R3452 0 5 XX R3454 4 7uH L3451 XX R3457 P_UNREG XX B C3451 XX IC3450 1 CT 2 RT 3 IN 4 IN 5 FB 6 DTC 7 CB1 8 CB2 9 Vcc 10 OUT 11 VE 1...

Страница 117: ...J K8 SO 47k R3378 CAM_DD_ON 0 5 150k R3367 1 R3391 2SB1462J QR K8 SO Q3333 1SS388 TPL3 D3310 0 5 R3390 4700 AU_8 0V 10u 6 3V P C3358 D_1 5V R3355 47k 0 5 39k R3354 A_2 8V 2SD2216J QR K8 SO Q3335 10uH L3311 XX R3398 2SD2216J QR K8 SO Q3351 AU_4 6V RP_4 6V PANEL_13 5V 4 7u TA 25V C3365 4700 R3405 10u 6 3V A C3368 10u TA 10V C3363 2SC5376F B TPL3 Q3334 C3355 10u TA 10V 10u TA 20V B C3371 D_1 9V TRF_2...

Страница 118: ...O DD CONV VI 156 VI 156 CAMERA DV MS INTERFACE SERVO REC PB HEAD AMP AUDIO DD CONV PRINTED WIRING BOARD Ref No VI 156 Board 10 000 Series ys wf wd wa ws rhrj rfrg rk rl yd yf wg wh wjwk wl tg 1 1 3 6 4 4 8 5 1 3 4 Refer to page 4 62 for Note and Circuit boards location ...

Страница 119: ...ACE SERVO REC PB HEAD AMP AUDIO DD CONV VI 156 th tj tk tl y ya td tf ts ta t 4 5 6 1 2 3 4 5 6 qa 0 qs qd qfqh qj qg qk ql w 9 8 7 e ea ed es e es ef eg ra r el rs rd ej ek eh 1 5 3 4 3 1 6 4 3 1 6 4 3 1 6 4 3 1 6 4 3 5 4 3 1 6 E B C 1 3 ...

Страница 120: ...multiple layers However only the sides layers A and B are shown There are few cases that the part printed on this diagram isn t mounted in this model DD 146 DC DC CONVERTER IN 057 DC IN MS 058 MS CONNECTOR VI 156 CAMERA DV MS INTERFACE SERVO REC PB HEAD AMP AUDIO DD CONV KP 011 MENU SELECT AE 023 USER FUNCTION SB 036 USER FUNCTION ME 019 MIC AMP EVF OUT SW 343 USER FUNCTION PM 040 MODE SELECT LED ...

Страница 121: ... isn t mounted in this model RV3 GAIN S1 S2 S3 C IN IC5 4 1 3 2 RV2 OFFSET IC4 1 2 4 3 PC00090 PC00091 PC00092 D1 Q1 Q2 PC00089 1 A B C D E F G MD 76 BOARD SIDE A MD 76 BOARD SIDE B 2 3 4 5 6 7 8 9 10 1 675 562 11 1 675 562 11 12 13 14 JR5 R5 R6 JR6 JR3 PC00114 PC00096 JR1 R4 R26 C2 IC1 IC3 1 2 4 8 5 1 4 3 C1 R30 R3 JR4 CL19 PC00010 PC00088 PC00003 IC2 R28 R14 R7 R8 R29 R27 R11 R13 R10 R12 R31 R32...

Страница 122: ...ODE_A 5 MODE_B 6 MODE_C 7 MODE_D 8 S_ELETEN 9 T_ELETEN 10 5V 11 5V 12 TAPE_LED 13 GND 14 L_CASETTE 15 DEW 16 W 17 W 18 V 19 V 20 U 21 U CL42 CL43 CL44 CL45 CL46 21P CN1 1 REEL_V 2 REEL_V 3 REEL_U 4 REEL_U 5 REEL_W 6 REEL_W 7 GND 8 GND 9 FG1 10 5V 11 5V 12 FG2 13 SREEL_FG 14 TREEL_FG 15 REC_PROOF 16 CHIME_4 VDD 17 CHIME_3 SDA 18 CHIME_2 SCK 19 GND 20 GND 21 TAPE_TOP XX R26 XX R27 100 R28 100 R29 S3...

Страница 123: ...UT NO 001 RELAY ON 001 RELAY FS 082 USER FUNCTION FC 074 USER FUNCTION JK 197 VIDEO AUDIO IN OUT SUB MAIN VL 034 LIGHT JK 197 VIDEO AUDIO IN OUT VO 012 VIDEO OUT PRINTED WIRING BOARDS Ref No JK 197 VO 012 Boards 1 000 Series For printed wiring board Refer to page 4 128 for parts location JK 197 VO 012 boards consists of multiple layers However only the sides layers A and B are shown Chip parts Dio...

Страница 124: ...s A and B are shown Chip parts RL 057 only Diode There are few cases that the part printed on this diagram isn t mounted in this model 3 2 1 PD 126 RGB DRIVE TIMING GEN HP 129 HEADPHONE OUT TH 010 SIRCS REAR KY 049 VCR FUNCTION LL 010 USER FUNCTION EJ 034 EJECT INVERTER TRANSFORMER UNIT DC 095 DC OUT XL 003 CH1 CH2 MIC AMP RL 057 LANC VO 012 VIDEO OUT DV 031 DV IN OUT NO 001 RELAY ON 001 RELAY FS ...

Страница 125: ...CN141 1 GND 2 LANC_DC 3 XLANC_JACK_IN 4 GND 5 LANC_SIG 232C_TD 0 R146 01ZA8 2 TPL3 D142 LND141 CH GND 0 R143 MAZJ200D0LS0 D141 0 R142 LND162 CH_GND LND161 CH_GND 6P CN161 1 TPA 2 TPA 3 GND 4 TPB 5 TPB 6 GND 6P CN162 1 VP 2 VG 3 NTPB 4 TPB 5 NTPA 6 TPA 1 A LND182 GND 0 R192 0 R191 C183 1000p C184 1000p L181 100uH L182 100uH C181 1000p C182 1000p LP161 CH_GND 0 JS161 0 JS162 1CH 2CH VIDEO IN OUT LAN...

Страница 126: ...RMER UNIT DC 095 DC OUT XL 003 CH1 CH2 MIC AMP RL 057 LANC VO 012 VIDEO OUT DV 031 DV IN OUT NO 001 RELAY ON 001 RELAY FS 082 USER FUNCTION FC 074 USER FUNCTION JK 197 VIDEO AUDIO IN OUT SUB MAIN VL 034 LIGHT For printed wiring board Refer to page 4 128 for parts location KY 049 EJ 034 boards consists of multiple layers However only the sides layers A and B are shown Chip parts KY 049 only Diode T...

Страница 127: ... TRANSFORMER UNIT DC 095 DC OUT XL 003 CH1 CH2 MIC AMP RL 057 LANC VO 012 VIDEO OUT DV 031 DV IN OUT NO 001 RELAY ON 001 RELAY FS 082 USER FUNCTION FC 074 USER FUNCTION JK 197 VIDEO AUDIO IN OUT SUB MAIN VL 034 LIGHT For printed wiring board Refer to page 4 128 for parts location FC 074 LL 010 boards consists of multiple layers However only the sides layers A and B are shown Chip parts Diode There...

Страница 128: ...NIT DC 095 DC OUT XL 003 CH1 CH2 MIC AMP RL 057 LANC VO 012 VIDEO OUT DV 031 DV IN OUT NO 001 RELAY ON 001 RELAY FS 082 USER FUNCTION FC 074 USER FUNCTION JK 197 VIDEO AUDIO IN OUT SUB MAIN VL 034 LIGHT For printed wiring board Refer to page 4 128 for parts location FS 082 board consists of multiple layers However only the sides layers A and B are shown Chip parts Diode There are few cases that th...

Страница 129: ...CN261 1 GND 2 XEJECT_SW 3 GND 4 GND 5 KEY_AD1 6 KEY_AD0 5 7 KEY_AD0 8 GND S265 3300 R267 S262 1200 R263 S270 S266 S261 1500 R265 S263 1500 R264 S271 3300 R266 S267 LND221 CH GND S222 1 2 4 5 6 9 10 7 8 XX R222 3P CN221 1 KEY_AD2 5 2 NC 3 GND MA8082 K8 S0 D221 LND222 CH GND S221 XX R221 01ZA8 2 TPL3 D222 22k R223 1 A EDIT EDIT REC REV LIGHT MANU AUTO LOW CUT OFF ON WHITE BAL SHUTTER INDEX MARK OFF ...

Страница 130: ...HEAD AMP AUDIO DD CONV KP 011 MENU SELECT AE 023 USER FUNCTION SB 036 USER FUNCTION ME 019 MIC AMP EVF OUT SW 343 USER FUNCTION PM 040 MODE SELECT LED A LED B For printed wiring board Refer to page 4 129 for parts location SW 343 board consists of multiple layers However only the sides layers A and B are shown Chip parts Diode There are few cases that the part printed on this diagram isn t mounted...

Страница 131: ...HEAD AMP AUDIO DD CONV KP 011 MENU SELECT AE 023 USER FUNCTION SB 036 USER FUNCTION ME 019 MIC AMP EVF OUT SW 343 USER FUNCTION PM 040 MODE SELECT LED A LED B For printed wiring board Refer to page 4 129 for parts location SB 036 PM 040 boards consists of multiple layers However only the sides layers A and B are shown Chip parts Diode There are few cases that the part printed on this diagram isn t...

Страница 132: ...ERFACE SERVO REC PB HEAD AMP AUDIO DD CONV KP 011 MENU SELECT AE 023 USER FUNCTION SB 036 USER FUNCTION ME 019 MIC AMP EVF OUT SW 343 USER FUNCTION PM 040 MODE SELECT LED A LED B For printed wiring board Refer to page 4 129 for parts location AE 023 KP 011 boards consists of multiple layers However only the sides layers A and B are shown Chip parts Diode There are few cases that the part printed o...

Страница 133: ...00 MA3075WA TX D121 S121 MA3075WA TX D122 5P CN121 1 DIAL A 2 GND 3 DIAL B 4 GND 5 EXEC SW LND121 LND121 LND122 LND122 1 2 3 4 5 6 1 A S521 S522 R521 1000P Note FB503 FB502 FB501 MEMORY MIX MEMORY DELETE DIGITAL MEMORY PLAY EFFECT DATA CODE SP SP MEMORY MEMORY MEMORY TITLE RESET INDEX REG_GND UNREG XOSD_SCK XVD PANEL_G PANEL_15 5V OSD_SO PANEL_R PANEL_13 5V PANEL_B PANEL_2 8V XCS_LCD_DRIVER UNREG_...

Страница 134: ...re shown Chip parts Transistor There are few cases that the part printed on this diagram isn t mounted in this model C B E 5 6 4 2 1 3 PD 126 RGB DRIVE TIMING GEN HP 129 HEADPHONE OUT TH 010 SIRCS REAR KY 049 VCR FUNCTION LL 010 USER FUNCTION EJ 034 EJECT INVERTER TRANSFORMER UNIT DC 095 DC OUT XL 003 CH1 CH2 MIC AMP RL 057 LANC VO 012 VIDEO OUT DV 031 DV IN OUT NO 001 RELAY ON 001 RELAY FS 082 US...

Страница 135: ...HCK1 8 HCK2 9 CRext 10 SOUT 11 REF 12 HST 13 WIDE 14 CS 15 VVSSG 16 VDDG 17 VSS 18 VDD 19 DWN 20 EN 21 VCK 22 VST 23 COM 24 TEST1 XX R2135 XX C2131 0 1u C2113 100 R2138 22uH L2101 XX R2161 TA 22u 6 3V C2101 A IC2103 CXD3505R T4 HD 1 HDO 2 XWRT 3 BL 4 DETIN 5 GND TEST 6 TESTI GND 7 LED 8 PWM 9 TEST GPWC 10 TEST GPWCB 11 TEST GSPB 12 NC GSP 13 POFF 14 RGT SLR 15 HCK1 GUD 16 HCK2 PCTL 17 HST GCK 18 D...

Страница 136: ... of multiple layers However only the sides layers A and B are shown NO 001 board consists of multiple layers However only the side layer B is shown There are few cases that the part printed on this diagram isn t mounted in this model DD 146 DC DC CONVERTER IN 057 DC IN MS 058 MS CONNECTOR VI 156 CAMERA DV MS INTERFACE SERVO REC PB HEAD AMP AUDIO DD CONV KP 011 MENU SELECT AE 023 USER FUNCTION SB 0...

Страница 137: ...A VAP_GND P_DRIV_B NC Y_OUT MF_VCC VAP_VCC Y_DRIV_B Y_DRIV_A MF_F0 P_DRIV_A MF_F1 Y_DUMP_B Y_DUMP_A MF_GND MZ_F1 TEMP_OUT P_DUMP_B NC MZ_VCC MZ_F0 NDB GND NC ND_SENS_VCC NDC NC NC HALL TEMP_OUT NC NC ZOOM_B ZOOM_B NC GND BIAS ZOOM_B HALL NDB NDA NC FZ_SENS_VCC ND_SENS_VCC GND SE_VCC YSD_OUT ZM_RST_SENS NDA FC_RST_SENS BIAS GND YS_REF BIAS DRIVE NC PSD_OUT FOCUS_B FOCUS_A HALL GND BIAS HALL 2 ZOOM_...

Страница 138: ...RVO REC PB HEAD AMP AUDIO DD CONV KP 011 MENU SELECT AE 023 USER FUNCTION SB 036 USER FUNCTION ME 019 MIC AMP EVF OUT SW 343 USER FUNCTION PM 040 MODE SELECT LED A LED B For printed wiring board Refer to page 4 130 for parts location HP 129 TH 010 boards consists of multiple layers However only the sides layers A and B are shown Chip parts Transistor Diode There are few cases that the part printed...

Страница 139: ...IS 9 MT_4 75V 10 SIRCS_SIG1 11 MT_GND 12 MT_GND S433 6P 1 2 3 4 5 6 1 A 0 JS901 0 JS902 0 JS903 0 JS904 0 JS905 B 0 001U C901 C902 0 001U B ZOOM PHOTO START STOP OUT_C OUT_C Vcc OUT_D Vcc OUT_D MAN AUTO IRIS 16 XX MARK NO MOUNT IC451 HP 129 BOARD REF NO 1000 SERIES IC431 S001 EXPOSURE DIAL TO VI 156 BOARD 22 25 CN020 SEE PAGE 4 56 SEE PAGE 4 55 TO VI 156 BOARD 22 25 CN018 CONTROL SWITCH BLOCK EG 1...

Страница 140: ...HEAD AMP AUDIO DD CONV KP 011 MENU SELECT AE 023 USER FUNCTION SB 036 USER FUNCTION ME 019 MIC AMP EVF OUT SW 343 USER FUNCTION PM 040 MODE SELECT LED A LED B For printed wiring board Refer to page 4 130 for parts location ME 019 board consists of multiple layers However only the sides layers A and B are shown Chip parts Transistor There are few cases that the part printed on this diagram isn t mo...

Страница 141: ...MIC_ 48V 4 MIC_GND TC7W34FU TE12R IC701 1 2 3 4 5 6 7 8 100k R701 100k R702 100k R703 FB706 FB705 FB704 FB701 FB702 FB703 0 1u B C709 0 R241 12P CN704 1 VF_DISPLAY 2 REC_TALLY 3 VF_VIDEO 4 GND 5 R Y 6 B Y 7 SYNC 8 SDA 9 SCLK 10 LD 11 BATT 12 GND 7P CN705 1 LOW_CUT 2 GND 3 GND 4 AU_VCC 5 MIC_SIG_OUT 6 GND 7 MT_5 2V 0 R716 XX R717 100 R706 0 R748 2SD2216J QR K8 SO Q704 10k R749 10k R750 2 2u B C734 ...

Страница 142: ... of multiple layers However only the sides layers A and B are shown There are few cases that the part printed on this diagram isn t mounted in this model DD 146 DC DC CONVERTER IN 057 DC IN MS 058 MS CONNECTOR VI 156 CAMERA DV MS INTERFACE SERVO REC PB HEAD AMP AUDIO DD CONV KP 011 MENU SELECT AE 023 USER FUNCTION SB 036 USER FUNCTION ME 019 MIC AMP EVF OUT SW 343 USER FUNCTION PM 040 MODE SELECT ...

Страница 143: ...001u B C828 6 3V 4 7u P C838 MA111 K8 S0 D804 0 5 4700 R847 6 3V 4 7u P C835 0 5 39k R848 0 5 120 R842 50V 4 7u C826 1 2W 4700 R824 6 3V 4 7u P C836 270 1 10W R821 1608 0 001u C807 2200 1 10W R808 0 5 4700 R854 1608 0 001u C808 3225 10uH L804 0 1u B C832 0 5 120k R838 1608 0 001u C811 270 1 10W R822 0 1u B C848 0 5 47k R846 0 5 4700 R836 1608 0 001u C815 MA111 K8 S0 D808 6 3V 10u P C846 MA111 K8 S...

Страница 144: ...ly the sides layers A and B are shown There are few cases that the part printed on this diagram isn t mounted in this model PD 126 RGB DRIVE TIMING GEN HP 129 HEADPHONE OUT TH 010 SIRCS REAR KY 049 VCR FUNCTION LL 010 USER FUNCTION EJ 034 EJECT INVERTER TRANSFORMER UNIT DC 095 DC OUT XL 003 CH1 CH2 MIC AMP RL 057 LANC VO 012 VIDEO OUT DV 031 DV IN OUT NO 001 RELAY ON 001 RELAY FS 082 USER FUNCTION...

Страница 145: ...VE TIMING GEN HP 129 HEADPHONE OUT TH 010 SIRCS REAR KY 049 VCR FUNCTION LL 010 USER FUNCTION EJ 034 EJECT INVERTER TRANSFORMER UNIT DC 095 DC OUT XL 003 CH1 CH2 MIC AMP RL 057 LANC VO 012 VIDEO OUT DV 031 DV IN OUT NO 001 RELAY ON 001 RELAY FS 082 USER FUNCTION FC 074 USER FUNCTION JK 197 VIDEO AUDIO IN OUT SUB MAIN VL 034 LIGHT For printed wiring board Refer to page 4 132 for parts location IN 0...

Страница 146: ...1CDR IC302 1 OUT 2 Vcc 3 F B 4 INPUT 5 SCP 6 D T 7 RT 8 GND 47k R324 0 R326 25V 10u TA C324 0 22u B C305 0 1u C339 35V 4 7u C C351 35V 4 7u C C350 2SC4177 T1L5L6 Q323 1 2 3 27k R354 3P CN306 1 CH1_ 48V 2 CH2_ 48V 3 GND 12P CN305 1 POWER_CONT 2 LIGHT_CONT 3 HI_UNREG 4 UNREG_ 12V 5 8 4V_1 6 8 4V_2 7 8 4V_3 8 8 4V_4 9 8 4V_5 10 P_UNREG_GND 11 GND 12 GND 1 4A F301 1 4A F302 1 4A F303 1 4A F304 1 4A F3...

Страница 147: ...C 2 IC704 es 3 IC704 eg 1 IC704 wl 400 mVp p H 400mVp p 300mVp p H H 4 IC704 5 IC706 wa 500mVp p H 5 IC704 7 IC706 ql 500mVp p H 6 IC704 9 IC706 qj 400mVp p H 9 IC705 rj 0 IC705 rk 8 IC705 rh 3 0Vp p 4 0Vp p 3 2Vp p H H H qa IC705 1 3 2Vp p qs IC705 2 3 2Vp p H qd IC705 5 9 3 2Vp p 7 IC705 rg 3 0Vp p H H qf IC705 8 3 2Vp p V 74 nsec qg IC705 qa qh IC705 qs 4 0Vp p 4 0Vp p 74 nsec 74 nsec 74 nsec q...

Страница 148: ...7 i PB 3 2Vp p H VI 156 BOARD 4 25 REC PB wl IC1411 4 4 3Vp p 50 nsec VI 156 BOARD 5 25 e IC301 qj z b REC PB 3 0Vp p H 3 0Vp p H ea IC301 qk PB es IC301 wa z n REC PB 3 0Vp p V 3 0Vp p V ed IC301 ws PB ef IC301 rg REC PB 3 6Vp p 40 nsec eg IC301 zc REC PB 4 0Vp p 40 nsec VI 156 BOARD 6 25 eh Q302 E PB 0 6Vp p H 0 6Vp p H ej Q304 E PB ek Q306 E PB 0 3Vp p H 0 3Vp p H el Q301 E PB r Q303 E PB 0 8Vp...

Страница 149: ... 1 2Vp p 50 nsec VI 156 BOARD 10 25 REC PB td IC4300 w 3 5Vp p 185 msec tf IC4300 wd 3 5Vp p 105 msec VI 156 BOARD 11 25 REC PB th IC4500 4 3 2Vp p 6 6 msec tj IC4500 y 3 0Vp p 1 1 msec tg IC4400 wf 3 0Vp p 610 µsec VI 156 BOARD 12 25 tl IC102 ea ed REC ONLY y IC102 eg REC PB tk IC102 wj PB ONLY 400mVp p 3 3 msec 2 0Vp p 2 0Vp p 6 6 msec 2 4Vp p 23 8 nsec ya IC102 r REC ONLY 3 3 msec VI 156 BOARD ...

Страница 150: ... REC PB 1 IC2101 rh 500mVp p H 8 IC2103 wh 2 9Vp p 56 nsec 9 IC2103 rk 2 9Vp p V 2 IC2101 rj 440mVp p H 3 IC2101 rk 420mVp p H 4 IC2101 w 8 0Vp p 2H 5 IC2101 ws 8 0Vp p 2H 6 IC2101 wf 8 0Vp p 2H 7 IC2103 1 2 8Vp p H WAVEFORMS PD 126 ...

Страница 151: ...9 C4204 D 9 C4205 D 9 C4206 D 9 C4207 C 9 C4300 B 10 C4301 B 10 C4323 A 10 C4324 A 10 C4325 A 11 C4326 B 10 C4327 A 10 C4329 B 10 C4330 A 10 C4331 B 10 C4400 B 14 C4401 B 15 C4402 B 15 C4403 B 15 C4404 B 15 C4405 B 15 C4406 B 14 C4407 B 14 C4519 C 13 C4520 C 13 C4521 B 14 C4522 B 14 C4523 A 14 C4524 C 13 C4525 B 13 CN001 A 2 CN002 A 3 CN004 A 4 CN005 A 5 CN006 A 15 CN007 A 7 CN008 A 15 CN009 B 15 ...

Страница 152: ...360 E 19 C3361 E 19 C3363 E 19 C3364 H 21 C3368 G 21 C3373 E 18 C3376 I 19 C3377 G 21 C3378 H 20 C3450 H 19 C3451 H 20 C3452 H 20 C3453 H 19 C3454 H 19 C3455 H 19 C3456 H 19 C3457 H 19 C3458 H 19 R1011 H 8 R1015 H 7 R1016 H 9 R1018 H 7 R1020 I 7 R1021 H 9 R1022 I 9 R1023 H 9 R1024 H 9 R1025 I 8 R1026 I 8 R1027 I 8 R1028 G 7 R1031 H 7 R1032 H 7 R1033 G 7 R1034 G 8 R1035 H 7 R1036 G 7 R1037 G 7 R103...

Страница 153: ...4 C 24 R505 C 24 R506 C 24 R507 C 24 R508 C 23 R509 C 23 R510 C 23 R511 B 23 R512 B 23 R513 B 23 R514 B 25 R515 B 25 R516 B 25 R517 B 25 R518 B 25 R520 B 24 R521 B 24 R522 B 24 R523 B 24 R524 B 24 R525 B 24 R527 B 24 R528 B 24 R531 B 24 R532 B 25 R533 B 25 R534 C 24 R535 C 25 R536 C 25 R537 C 23 R538 C 23 R539 C 23 R540 B 23 R542 B 23 R704 B 29 R706 C 29 R708 D 29 R710 B 29 R711 C 29 R712 C 29 R71...

Страница 154: ...B C181 A 2 C182 B 2 C183 A 1 C184 A 2 CN181 C 2 D182 A 4 D184 A 4 D187 A 4 FB181 A 4 FB182 A 4 L181 A 1 L182 B 2 R181 B 4 R185 C 1 R186 C 1 R187 A 1 R188 B 2 R190 A 2 R191 C 4 R192 C 4 R182 D 2 R183 D 2 R184 D 2 R189 D 2 VO 012 BOARD SIDE A CN202 A 2 D201 A 1 R201 A 1 VO 012 BOARD SIDE B CN201 B 4 RL 057 BOARD CN141 A 3 D141 C 3 D142 B 3 D143 C 3 J141 C 1 R141 B 3 R142 C 3 R143 B 3 R144 C 3 R145 C...

Страница 155: ...01 A 5 S801 B 3 S802 A 1 PD 126 BOARD SIDE A C2101 C 1 C2102 D 1 C2103 D 1 C2104 C 1 C2105 C 1 C2106 D 1 C2107 C 1 C2108 D 1 C2109 D 1 C2110 C 1 C2111 C 2 C2112 D 2 C2113 C 2 C2114 D 2 C2115 D 3 C2116 C 2 C2117 C 2 C2118 D 2 C2119 D 3 C2120 D 2 C2121 C 2 C2122 C 2 C2123 C 3 C2124 C 3 C2125 C 3 C2126 B 3 C2127 C 3 C2128 B 3 C2129 B 2 C2130 D 1 C2131 C 2 C2132 C 1 C2133 B 2 C2134 D 1 C2135 D 1 C2136...

Страница 156: ... 4 R762 C 3 R763 C 4 R784 B 3 R791 B 3 ME 019 BOARD SIDE B C701 D 8 C702 D 7 C703 D 7 C704 D 8 C705 D 7 C706 D 7 C707 D 7 C708 D 7 C709 A 6 C710 D 7 C715 D 9 C716 D 9 C717 C 9 C718 C 9 C719 C 9 C720 C 9 C721 C 8 C722 C 8 C723 C 8 C724 C 8 C726 C 7 C727 C 7 C734 C 6 C734 C 6 C740 C 7 C741 C 7 C742 C 7 C743 C 7 C744 C 7 C745 C 7 C746 C 7 C747 C 6 C748 C 7 C749 C 7 C750 B 7 C752 B 8 C754 B 8 C756 B 8...

Страница 157: ...5 B 2 CN301 F 1 CN302 F 2 CN303 A 3 CN304 A 2 CN305 F 3 CN306 A 1 D301 D 3 D303 D 2 F301 E 4 F302 E 4 F303 E 4 F304 E 3 F305 E 3 IC302 B 2 L301 C 2 L302 D 4 L304 C 3 L308 D 1 L309 E 2 L310 D 4 PS302 E 4 PS304 E 4 Q305 B 3 Q308 D 4 Q311 B 3 Q312 B 3 Q320 B 1 Q322 B 1 Q323 B 1 R305 B 2 R309 B 2 R310 C 2 R313 B 2 R315 D 3 R325 B 3 R326 B 3 R348 B 1 R353 B 1 R354 B 1 R404 C 3 R405 F 1 R406 A 4 PARTS L...

Страница 158: ...1 CN282 A 4 IN 057 BOARD C241 B 2 C242 B 4 C243 E 1 CB241 E 2 CN241 A 1 CN242 B 1 CN243 E 1 D241 A 2 Q241 C 4 Q242 B 4 Q243 B 4 R243 A 4 R244 B 4 VL 034 BOARD C481 A 1 C482 A 1 CN481 A 4 CN482 B 2 CN483 B 1 LP481 A 2 PARTS LOCATION DC 095 IN 057 VL 034 ...

Страница 159: ...model of the same destination Save the data Download the data PC Procedure 2 Remove the EEPROM from the board of the machine that is going to be repaired Install the removed EEPROM to the replaced board Procedure 3 When the data cannot be saved due to defective EEPROM or when the EEPROM cannot be removed or installed save the data from the same model of the same destination and download it After t...

Страница 160: ...1301 LINE IN OUT amp VI 156 board IC301 DV signal process VI 156 board IC101 EQ A D CONV PLL VI 156 board IC102 REC PB amp VI 156 board IC803 EVR MD 76 board IC2 3 RV1 to 4 Table 5 1 1 1 Adjustment Section Initialization of A B C D E F 8 page data Camera LCD System control Servo RF Video Mechanism Adjustment Initialization of C D 8 page data Initialization of A page data Initialization of B page d...

Страница 161: ... assembly Note2 When replacing the IC1105 by a user s having forgotten a password copy the HRS METER data Refer to HRS METER Hours meter of 5 4 SERVICE MODE Adjustment Section Initialization of A B C D E F 8 page data Camera LCD System control Servo RF Video Mechanism Adjustment Initialization of C D 8 page data Initialization of A page data Initialization of B page data Initialization of E F page...

Страница 162: ... B J 6082 384 A Y 2031 001 0 7 741 900 53 J 6080 840 A J 6082 026 A J 6082 460 A 8 967 999 03 J 6082 360 A J 6082 282 B J 6082 314 E 7 622 601 39 J 6082 330 A J 6082 331 A J 6082 459 A J 6082 461 A J 6082 359 A 1 783 189 11 Usage Auto white balance adjustment check White balance adjustment check White balance check White balance check 2 sheets used For checking the flange back For adjusting the vi...

Страница 163: ...5 5 J 1 J 2 J 6 J 3 J 7 J 8 J 4 J 5 Fig 5 1 1 J 9 J 10 J 11 J 12 J 13 J 14 J 15 J 16 J 17 J 18 J 19 J 20 J 21 J 22 J 23 J 24 J 26 J 27 J 25 ...

Страница 164: ...5 4 Service Mode for the data on the history use Note 4 Setting the Forced Camera Power ON Mode 1 Select page 0 address 01 and set data 01 2 Select page D address 10 set data 01 and press the PAUSE button of the adjustment remote commander The above procedure will enable the camera power to be turned on with the cabinet R assembly removed After completing adjustments be sure to exit the Forced Cam...

Страница 165: ...ack DC IN 12V VIDEO OUT BNC connector VIDEO IN OUT Phono jack Need not connected Must be connected Need not connected Must be connected CN306 CN301 CN302 CN305 CN007 CN201 CN501 CN004 CN002 CN025 CN015 Cabinet R SW 343 board IN 057 board VI 156 board DD 146 board Must be connected when performing the camera LCD or audio system adjustments Must be connected when performing the camera system adjustm...

Страница 166: ...ning frame CRT picture frame B A Difference in level Yellow Cyan Green White Magenta Red Blue Yellow Cyan Green White Magenta Red Blue Color bar chart standard picture frame Fig a Video output terminal output waveform Fig b TV monitor picture Adjust the camera zoom and direction to obtain the output waveform shown in Fig a and the TV monitor display shown in Fig b Fig 5 1 5 3 Subjects 1 Color bar ...

Страница 167: ...not shown in the tables because they are different in destination When changing the data copy the data built in the same model Note If copy the data built in the different model the camcorder may not operate 3 When changing the data press the PAUSE button of the adjustment remote commander each time when setting new data to write the data in the non volatile memory 4 Check that the data of adjustm...

Страница 168: ...r level adj S VIDEO out Cb level adj Chroma BPF f0 adj PLL f0 fine adj Fixed data 1 Fixed data 2 APC adj Fixed data 1 Fixed data 2 Fixed data 1 Fixed data 2 Fixed data 1 Fixed data 2 Fixed data 1 Fixed data 2 Fixed data 1 Fixed data 2 Fixed data 1 Fixed data 2 Fixed data 1 Fixed data 2 Fixed data 1 Fixed data 2 Fixed data 1 Fixed data 2 Fixed data 1 Fixed data 2 Fixed data 1 Fixed data 2 Fixed dat...

Страница 169: ...Fixed data 1 Fixed data 2 Fixed data 1 Fixed data 2 Fixed data 1 Fixed data 2 Fixed data 1 Fixed data 2 Fixed data 1 Fixed data 2 Fixed data 1 Fixed data 2 Fixed data 1 Battery end adj Fixed data 1 Battery end adj Fixed data 1 00 to 0F 10 11 to 12 13 14 15 16 17 18 19 1A 1B 1C 1D 1E 1F 20 21 22 23 24 25 26 27 28 29 2A 2B 2C 2D 2E 2F 30 31 to 32 33 34 35 36 37 38 to 43 44 45 46 47 48 to 65 66 67 to...

Страница 170: ...esses 00 to 13 If you know original values perform HRS METER data re writing procedure Refer to HRS METER of 5 4 SERVICE MODE Initializing Method 1 Before changing the data select page 0 address 01 and set data 01 2 Input the initial value shown in theA page table to each address 3 When inputting the data press the PAUSE button of the adjustment remote commander each time when setting new data to ...

Страница 171: ...d press PAUSE button 2 2 8F 03 Set the data and press PAUSE button 3 2 8F 00 Set the data and press PAUSE button Modifying Method 1 Before changing the data select page 0 address 01 and set data 01 2 New data for changing are not shown in the tables because they are different in destination When changing the data copy the data built in the same model Note If copy the data built in the different mo...

Страница 172: ...age Note2 If the E F page data has been initialized following adjustments need to be performed again 1 Modification of E F page data 2 Camera system adjustments Adjustment Page F Adjustment Address 10 to FF Adjustment Page E Adjustment Address 00 to FF Switch setting MODE CAMERA Initializing Method Order Page Address Data Procedure 1 0 01 01 Set the data 2 6 01 Set the following data and press PAU...

Страница 173: ...5 1 8 00 to 29 2A 2B 2C 2D 2E 2F 30 to 61 62 63 64 65 66 to 8D 8E 8F 90 91 92 93 94 to A2 A3 A4 to FF 10 10 80 80 80 EB D5 20 20 00 00 EB D5 20 20 Fixed data 1 Pre white balance data input Fixed data 1 Offset adj Fixed data 1 Color reproduction adj ND filter 1 Fixed data 1 WB ND filter 2 compensation Color reproduction adj ND filter 2 Fixed data 1 Fixed data 2 Fixed data 1 10 10 80 80 80 EB D5 20 ...

Страница 174: ... 2 F 1C Change the data and set the frequency f to the specified value 3 F 1C Press PAUSE button 4 0 01 00 Set the data 2 Zoom Key Center Adjustment Set theA D value center of the microprocessor to the center voltage of the zoom key If deviated the zoom lens operates of itself even if the zoom key is the center position Subject Not required Measurement Point Display data of page 6 address 50 Measu...

Страница 175: ...a Procedure 1 6 01 00 Set the data and press PAUSE button 2 6 04 00 Set the data 3 6 94 00 Set the data 4 6 95 00 Set the data 5 0 01 00 Set the data 4 Offset Adjustment Adjust so that theAGC OUT potential lies within the specified value of the digital clamp Subject Not required Measurement Point DDS display data of LCD or TV monitor Note1 Measuring Instrument Adjustment Page E Adjustment Address ...

Страница 176: ...the zoom lens TELE end and WIDE end the center of the Siemens star chart and center of the exposure screen coincide Specified voltage The specified voltage varies according to the minipattern box so adjust the power supply output voltage to the specified voltage written on the sheet which is supplied with the minipattern box Adjusting method Order Page Address Data Procedure 1 0 01 01 Set the data...

Страница 177: ... 6 01 00 Set the data and press PAUSE button 2 Turn off the power and turn on again 3 Perform Flange Back Adjustment 2 6 2 Flange Back Adjustment 2 Perform this adjustment after performing Flange BackAdjustment 1 Subject Subject more than 500m away Subjects with clear contrast such as buildings etc Measurement Point Check operation on TV monitor Measuring Instrument Adjustment Page F Adjustment Ad...

Страница 178: ...and check that the lens is focused 8 Picture Frame Setting Subject Color bar chart Color bar standard picture frame 95cm from the front of the protection glass Measurement Point Video output terminal Measuring Instrument Oscilloscope and TV monitor Specified Value A B C D t 0 0 1msec Switch setting 1 ND FILTER OFF The data of page 6 address 9D is 00 2 STEADY SHOT Menu setting OFF Setting method Or...

Страница 179: ...age Address Data Procedure 1 6 01 00 Set the data and press PAUSE button 2 6 02 00 Set the data 3 F 16 Set the following data and press PAUSE button 13 DSR 250 NTSC 93 DSR 250P PAL 4 0 01 00 Set the data 5 Perform Auto White Balance Standard Data Input 10 Auto White Balance Standard Data Input At 3200K input the white balance standard data Subject Clear chart Color bar standard picture frame Adjus...

Страница 180: ...ue Subject Clear chart Color bar standard picture frame Measurement Point Display data of page 1 Note2 Measuring Instrument Adjustment remote commander Adjustment Page F Adjustment Address 3E 3F Specified Value 0FE0 to 1020 Note1 Check that the data of page 6 address 02 is 00 If not turn the power of the unit OFF ON Note2 Displayed data of page 1 of the adjustment remote commander 1 XX XX LV data ...

Страница 181: ... 01 00 Set the data and press PAUSE button 2 6 02 00 Set the data 3 0 01 00 Set the data 14 White Balance ND Filter 2 Compensation Compensate the white balance deviation when ND FILTER switch is 2 Subject Clear chart Color bar standard picture frame Adjustment Page E Adjustment Address 8E 8F Note1 After the power is turned on this adjustment can be done only once Note2 Check that the data of page ...

Страница 182: ...ut terminal Measuring Instrument Vectorscope Adjustment Page F Adjustment Address 44 45 46 47 Specified Value All color luminance points should settle within each color reproduction frame Fig 5 1 12 Note1 After the power is turned on this adjustment can be done only once Note2 Check that the data of page 6 address 02 is 00 If not to page 6 address 01 set data 00 and press the PAUSE button Switch s...

Страница 183: ... 02 00 Set the data 3 F 5E 1D Set the data and press PAUSE button 4 0 01 00 Set the data 18 Color Reproduction Adjustment ND Filter 2 When the ND FILTER switch is 2 adjust the color difference matrix coefficient so that proper color reproduction is produced Subject Color bar chart Color bar standard picture frame Measurement Point Video output terminal Measuring Instrument Vectorscope Adjustment P...

Страница 184: ...t is within the circle shown Fig 5 1 13 B 7 Remove the C14 filter Indoor white balance data check 8 Place the ND filter 1 6 1 0 0 3 0 3 on the lens 9 6 01 0F Set the data and press PAUSE button 10 Wait for 2 seconds 11 0 01 01 Set the data 12 F 10 A1 Set the data and press PAUSE button 13 F 11 04 Set the data and press PAUSE button 14 1 Check that the second digit of the display data Note is an od...

Страница 185: ...ng hand shake correction operations Precautions on the Parts Replacement There are two types of repair parts Type A ENC03JA Type B ENC03JB Replace the broken sensor with a same type sensor If replace with other type parts the image will vibrate up and down or left and right during hand shake correction operations After replacing re adjust according to the adjusting method after replacement Precaut...

Страница 186: ...D41 using the following equation decimal calculation NTSC model D41 1 53 0 6 99 SV1 SV2 PITCH sensor sensitivity PAL model D41 1 84 0 6 99 SV1 SV2 PITCH sensor sensitivity Note PITCH sensor sensitivity SE601 of SE 116 board is written only on the repair parts 9 Convert D41 to hexadecimal notation and obtain D41 Round off to one decimal place Refer to Table 5 4 1 Hexadecimal notation Decimal notati...

Страница 187: ...eform Oscilloscope is H period 8 Obtain D42 using the following equation decimal calculation D42 3 90 0 6 99 SH1 SH2 YAW sensor sensitivity Note YAW sensor sensitivity SE600 of SE 116 board is written only on the repair parts 9 Convert D42 to hexadecimal notation and obtain D42 Round off to one decimal place Refer to Table 5 4 1 Hexadecimal notation Decimal notation conversion table of 5 4 Service...

Страница 188: ...ing Instrument Frequency counter Adjustment Page D Adjustment Address A2 A3 Specified Value f 15734 30Hz NTSC f 15625 30Hz PAL Note1 NTSC DSR 250 PAL DSR 250P Adjusting method Order Page Address Data Procedure 1 0 01 01 Set the data 2 D A2 Change the data and set the VCO frequency f to the specified value 3 D A2 Press PAUSE button 4 D A2 Read the data and this data is named DA2 5 Convert DA2 to de...

Страница 189: ...USE button 4 0 01 00 Set the data 3 Black Limit Adjustment PD 126 board Set the dynamic range of the LCD driver to an appropriate level If deviated the LCD screen will become blackish or saturated whitish Mode VTR stop Signal No signal Measurement Point Pin 4 of CN2105 PSIG Measuring Instrument Oscilloscope Adjustment Page D Adjustment Address A6 Specified Value A 8 50 0 05V Adjusting method Order...

Страница 190: ...e data 5 Check that the specified value of Bright Adjustment is satisfied 5 Center Level Adjustment PD 126 board Set the video signal center level of LCD panel to an appropriate level Mode VTR stop Signal No signal Measurement Point Pin 1 of CN2105 VG Measuring Instrument Digital voltmeter Adjustment Page D Adjustment Address AB Specified Value A 7 00 0 05Vdc Adjusting method Order Page Address Da...

Страница 191: ...ta that was written down in the step 2 8 D B0 Press PAUSE button 9 0 01 00 Set the data 7 White Balance Adjustment PD 126 board Correct the white balance If deviated the reproduction of the LCD screen may degenerate Mode VTR stop Signal No signal Measurement Point Check on LCD screen Measuring Instrument Adjustment Page D Adjustment Address A8 A9 Specified Value The LCD screen should not be colore...

Страница 192: ...awing numbers 757 Cam motor Drawing numbers M902 Idler gear A B Drawing numbers 751 752 Motor holder block Drawing numbers 763 764 M902 TG2 arm TG2 band block Drawing numbers 766 768 771 to 775 TG7 arm TG7 band block Drawing numbers 767 769 770 775 Sub slider arm Drawing numbers 761 Sub slider Drawing numbers 758 Main cam gear Drawing numbers 755 Coupling gear Drawing numbers 762 Sub cam gear Draw...

Страница 193: ...oning pin Bent portion C SL shifter Screw Screw Positioning pin Cassette compartment Remove in the direction of arrow A SL shifter Bent portion C of the reel selector slider should be securely hooked on the bent portion of the SL shifter A B Tightening torque of cassette compartment 0 3432 0 0196N m 3 5 0 2 kg cm Select the desired cassette position by pressing the claw position Reel select slider...

Страница 194: ... condition shift table recorded in the unit for each mechanism deck All the conditions of the decks are checked through a series of operations An error message is displayed and operations are stopped if incorrect shifts and conditions are detected 3 3 MODE SELECTOR II CONNECTION 3 2 MECHANISM CONDITION POSITION SHIFTING ORDER LIST After selecting the mechanism deck select one of the two test modes...

Страница 195: ...ty of grease when installing the parts which is needed to apply the grease When replacing these parts make sure to apply the specified amount of grease FOIL SG 941 Part No 7 662 601 39 2 2 3 PERIODIC CHECKS 2 2 2 CLEANING OF TAPE PATH SYSTEM 1 Clean the tape path systems TG1 to TG8 and capstan and the lower drum using a super fine applicator J 13 moistened with cleaning fluid Note Make sure that n...

Страница 196: ...ing the TG rollers check the upward and downward directions and attach them to the chassis shaft The guide guard is fixed at each slit of the cassette positioning shaft To attach the guide guard only insert it into the right and left holes To remove it use a pair of tweezers as shown in the figure below TG2 side TG upper flange TG roller TG sleeve TG sleeve TG ring TG ring Compression coil spring ...

Страница 197: ...SSEMBLY Disassembly Assembly 2 3 3 CAPSTAN COVER Disassembly Assembly Gear A Gear B Positioning bosses FL motor assembly Hole D Hole A Hole C Hole B Gear CD assembly Apply grease half size of one grain of rice Do not fasten this screw CN 3 Screw 2 Fasten the screws in order of 1 2 3 Reel motor Screw 1 Screw 3 Tightening torque of reel motor 0 0686 0 0098 N m 0 7 0 1 kg cm After inserting the flexi...

Страница 198: ... is aligned Move the TG2 7 arms to the loading position with the regulated power supply or by hand while referring to page 5 35 Each coaster assembly must be in the unloading position For the disassembling and assembling procedures of the GL gear GL helical torsion spring etc refer to page 5 50 2 3 6 GL ARM S ASSEMBLY GL ARM T ASSEMBLY COASTER S ASSEMBLY AND COASTER T ASSEMBLY Disassembly Remove t...

Страница 199: ...n the direction of the arrow the claw is removed from the center shaft then the right pin and the drum cap are removed as shown in the figure on the right To attach the drum assembly perform the disassembly steps in reverse order Assembly and disassembly of the drum assembly Assembly and disassembly of the tape support 3 2 1 4 Flexible board 7P Flexible board 10P Drum assembly Drum cap Positioning...

Страница 200: ...ach the pendulum retainer to shaft B Be careful of the positions of the pendulum stopper at the rear of the chassis and shaft A of the pendulum arm 1 2 3 Screw Tightening torque of pendulum retainer 0 3432 0 0196 N m 3 5 0 2 kg cm Pendulum retainer Remove in the direction of the arrow Pendulum arm assembly Shaft Positioning boss Shaft B Shaft A Shaft B Hole E D F Rear side of pendulum retainer Ins...

Страница 201: ...of the adjuster side of the TG band in advance as shown in the figure Idler gear A assemblies IReel table assembly Idler gears B Reel table assembly Apply grease to part half size of one grain of rice Shaft B Shaft A Shaft C Good Not good Shaft D or E When attaching the TG band the part also must be inserted into shaft D or E When attaching the idler gear A assembly be careful not to apply grease ...

Страница 202: ...o the motor holder and route the two wires of the cam motor into claw C When attaching the TG2 control arm claw E must be inserted into the hole of the TG2 control arm Checks before disassembly and assembly The cam motor is fixed on the motor holder by the four claws Releasing the four claws enables the cam motor to be removed without removing the motor holder from the chassis When attaching the c...

Страница 203: ... washer Stop washer Compression coil spring TG Shaft A Shaft C Shaft D Stop washer Be careful not to touch the tape guide part and TG band block Band TG2 TG7 assembly Shaft E H C F G D Sub slider Hook each spring on the second hook from above Half size of one grain of rice TG2 side TG7 side Hook the spring from the inside and put it under the TG band Hook the spring from the outside and put it und...

Страница 204: ...the pinch slider Fig 1 2 3 Apply grease to the groove at the rear of the sub cam gear Fig 6 After applying adjust the phase of the sub cam gear to that of the pinch slider Fig 7 Phase pin D of the loading arm assy must be inserted into the groove at the rear of the sub cam gear Fig 5 7 Disassembly of the encoder gear Disassembly of the sub slider 2 4 6 1 3 7 8 Pinch slider Sub cam gear 5 Phase pin...

Страница 205: ...g gear to shaft J and U shaped groove K in order 120 120 120 Apply grease to the three parts half size of one grain of rice for each part Main cam gear rear side a does not exist Main cam gear front side a exists Phase pin C should be fitted in the groove of the main cam gear front side Sub slider Sub slider arm Reel selector slider After attaching the sub slider arm return the reel base to the or...

Страница 206: ...ure above or below and the descriptions Assembly of each part Attach each part while referring to the figure above or below When attaching the parts adjust the positions carefully while referring to the instructions in the figure below Because these positioning will be used as a reference when assembling in future make sure to adjust the positions and phases correctly 1 2 3 Main slider Main slider...

Страница 207: ...sitioning pin tape A FP 104 flexible board Six parts are soldered Screw Screw Positioning pin Screw Encoder cover A positioning claw is hooked Encoder disk Positioning is required Encoder disk Positioning is required Screw MD 76 board Sensor block Peel off the flexible board while being careful not to get the sensor block dirty or damage the sensor block Tape A Adhere a half of the tape in the per...

Страница 208: ... of the GL arm into the large cut out of the GL gear while rotating the GL gear in the direction of the arrow Assembly Disassembly and distinguishing the S side from the T side One phase adjustment hole GL gear T GL helical torsion spring T Indented GL arm assembly T Two phase adjustment holes GL gear S GL helical torsion spring S GL arm assembly S Tip of coil T side S side Fit the tip of the spri...

Страница 209: ... arm assembly in the direction opposite to the arrow while holding the ET magnet with the magnet holder then hook the lock pin Tightening torque of motor FPC assembly 0 0294 0 0049N m 0 3 0 05 kg cm Screws Supporter plate This component is not supplied as an independent repair part Positioning pin A Motor FPC assembly Positioning pin B Elastic connectors Hole C Drum assembly Note Be careful not to...

Страница 210: ...ND ADJUSTMENT 2 4 3 TG2 7 HEIGHT CHECK AND ADJUSTMENT 2 4 2 TG1 8 HEIGHT CHECK AND ADJUSTMENT 2 4 1 REEL TABLE HEIGHT CHECK AND ADJUSTMENT ADJUSTMENT START 2 When only the TG1 8 guide is replaced perform tape path adjustment after height adjustment If the TG1 8 guide is not replaced and removed proceed to TG2 7 height adjustment Tape Path Adjustment ADJUSTMENT START 4 ADJUSTMENT START 3 ADJUSTMENT...

Страница 211: ... TG1 8 HEIGHT CHECK AND ADJUSTMENT 1 Preparation before check 1 Check that the cassette compartment block has already been removed Refer to page 5 35 2 Set the mechanism deck to the loading end position TG2 to 7 already moved to the loading end position and the pinch roller is in the unloading position Alternatively set the mechanism deck to the LE position using the mode selector II Refer to page...

Страница 212: ...sing the mode selector II Refer to page 5 35 3 Place the TG2 7 preset plate J 24 2 Check and adjustment Rotate each adjuster to adjust the TG2 7 position until or of the TG2 7 preset plate J 24 TG2 and TG7 are in line 2 4 4 FWD RVS POSITION CHECK AND ADJUSTMENT Face the mirror J 14 in the direction of the arrow and perform a visual check Attach the boss while aligning it with the hole of the casse...

Страница 213: ...nd Then press the guide to the TG2 7 preset plate J 24 Adjust RV3 TG2 side or RV1 TG7 side until the voltmeter measurement is 1 3 0 1 V Attach the boss while aligning it with the hole of the cassette reference plate J 22 Boss TG2 7 preset plate J 24 Regulated power supply Apply 6 5 to 8 5V Digital voltmeter Change the connection of the positive probe to E T out TG7 and E T out TG2 for measurement ...

Страница 214: ...n page 5 52 4 Turn the HOLD switch of the adjustment remote commander to the ON position 5 Select page 3 address 33 and set data 08 6 Select page 3 address 26 and set data 31 7 Connect an oscilloscope to VI 156 board CN007 via the CPC 13 jig J 6082 388 A J 8 Channel 7 VI 156 board CN007 Pin 2 Note External trigger VI 156 board CN007 Pin 3 Note Connect a 75 Ω resistor between pins 2 of CN007 and 1 ...

Страница 215: ...e there must not exist too much fluctuation of waveform amplitude If not flat If the waveform at the entrance is bad rotate TG3 If the waveform at the exit is bad rotate TG6 to flatten the waveform RV1 RV3 RV2 RV4 TG3 adjustment of entrance TG6 adjustment of exit C C 0 65 A A A 100 C C A C 8 1 Tracking waveform check 1 Tracking waveform check 2 The waveform should not change sharply A Emin Emin Em...

Страница 216: ...arge Perform the adjustment from Adjustment Start 3 TG7 side of the flowchart on page 5 52 again Waveform in CUE or REV mode The intervals of the waveform peaks must be consistent RV1 RV3 RV2 RV4 There should be no large curls while the tape runs along each upper and lower flange Pinch roller Capstan Drum Be careful that there are often large curls around the capstan and pinch roller between TG6 a...

Страница 217: ...ontally within 2 seconds Perform this 2 or 3 times Check after checking rising Check that the tape loads and unloads smoothly Play a self recorded or already recorded tape and check that the sound and images are normal When switching the modes the waveform should rise horizontally within 2 seconds STOP REV REW FF CUE PLAYBACK PLAYBACK PLAYBACK PLAYBACK PLAYBACK ...

Страница 218: ...rator 7 Audio level meter 8 Audio distortion meter 9 Audio attenuator 10 Regulated power supply 11 Alignment tapes Tracking standard XH2 1A1 Parts code 8 967 999 03 SW OL standard XH2 3 Parts code 8 967 997 11 Audio operation check for NTSC XH5 3 Parts code 8 967 997 51 System operation check for NTSC XH5 5 Parts code 8 967 997 61 BIST check for NTSC XH5 6 Parts code 8 967 997 71 Audio operation c...

Страница 219: ...llowing connectors VI 156 board CN016 12P 1 5mm VI 156 board CN017 7P 1 5mm The HP 129 board Headphone jack and TH 010 board Remote commander receiver Tally LED are need not be connected To open theVI 156 board disconnect the following connectors VI 156 board CN012 12P 1 0mm The KY 049 board VTR function switch and EJ 034 board Eject switch are need not be connected Note To open the VI 156 board d...

Страница 220: ...1 and set data 0B and press the PAUSE button of the adjustment remote commander The mechanism enters the playback mode automatically Note The function buttons becomes inoperable 5 To quit the playback mode select page 3 address 01 set data 00 and press the PAUSE button of the adjustment remote commander Whenever you want to quit the playback mode be sure to quit following this procedure 3 1 5 Adju...

Страница 221: ...olor bar pattern Fig 5 3 3 Color bar signal of alignment tapes 3 1 8 Input Output Level and Impedance Video input output Phono jack Input output BNC connector Output Video signal 1 Vp p 75 Ω unbalanced sync negative S video input output 4 pin mini DIN Luminance signal 1 Vp p 75 Ω unbalanced sync negative Chrominance signal 0 286Vp p 75 Ω unbalanced NTSC 0 300 Vp p 75 Ω unbalanced PAL Audio input o...

Страница 222: ...from Table 5 3 2 Example If D1 is 77881 D2 D1 65536 12345 H1 FE Table 5 3 2 4 Input H1 to page C address ED Model code input Example If H1 is FE Select page C address ED set data FE and press the PAUSE button 5 Obtain the maximum decimal not exceeding D2 from Table 5 3 3 and take this as D3 Example If D2 is 12345 D3 12288 6 Obtain the hexadecimal corresponding to D3 from Table 5 3 3 and take this ...

Страница 223: ...2224 52480 52736 52992 53248 53504 53760 54016 54272 54528 54784 55040 55296 55552 55808 56064 56320 56576 56832 57088 57344 57600 57856 58112 58368 58624 58880 59136 59392 59648 59904 60160 60416 60672 60928 61184 61440 61696 61952 62208 62464 62720 62976 63232 63488 63744 64000 64256 64512 64768 65024 65280 0000 0100 0200 0300 0400 0500 0600 0700 0800 0900 0A00 0B00 0C00 0D00 0E00 0F00 1000 1100...

Страница 224: ...ress PAUSE button 5 D F8 Dref Set the data and press PAUSE button 6 Convert Dref to decimal notation and obtain Dref Note1 7 Calculate DF1 to DF6 and DF9 to DFE using following equations decimal calculation DF1 Dref 4 DF2 Dref 5 DF3 Dref 12 DF4 Dref 31 DF5 Dref 46 DF6 Dref 62 DF9 Dref 4 DFA Dref 5 DFB Dref 8 DFC Dref 12 DFD Dref 16 DFE Dref 23 8 Convert DF1 DF2 DF3 DF4 DF5 DF6 DF9 DFA DFB DFC DFD ...

Страница 225: ...s PAUSE button 4 3 02 Check that the data changes in the following order 1B 2B 00 5 3 03 Check that the data is 00 Note 6 0 01 00 Set the data 7 Press EJECT button Note If the data is 01 adjustment has errors or the mechanism deck is defective 2 PLL f0 LPF f0 Adjustment VI 156 board Mode VTR stop Measurement Point Display data of page 3 address 03 Measuring Instrument Adjustment remote commander A...

Страница 226: ...ent data is out of range E7 No data is returned from IC301 CAIN 4 AGC Center Level and APC AEQ Adjustment 4 1 Preparations before adjustments Mode Camera recording Subject Arbitrary Adjusting method Order Page Address Data Procedure 1 2 30 40 Set the data 2 Record the camera signal for three minutes 4 2 AGC Center Level Adjustment VI 156 board Mode Playback Signal Recorded signal at Preparations b...

Страница 227: ...the following table Data Contents of defect 20 Perform re adjustment Note 4 30 The machine is defective 50 Perform re adjustment Note 4 60 The machine is defective 80 The machine is defective Note 4 If this data is displayed twice successively the machine is defective 4 4 Processing after Completing Adjustments Order Page Address Data Procedure 1 2 30 00 Set the data 2 3 33 00 Set the data 3 0 01 ...

Страница 228: ...n 4 C 28 Change the data for minimum amplitude of the burst signal level A The data should be 00 to 07 5 C 28 Press PAUSE button 6 3 0C 00 Set the data and press PAUSE button 7 Check that the burst signal level B satisfies the specified value 8 0 01 00 Set the data 2 S VIDEO OUT Y Level Adjustment VI 156 board Mode Camera Subject Arbitrary Measurement Point Y signal terminal of S VIDEO jack 75Ω te...

Страница 229: ...lue 8 C 27 Press PAUSE button 9 Check that the burst signal level C is satisfied the specified value 10 3 0C 00 Set the data and press PAUSE button 11 2 35 Set the data that is noted down at step 2 12 0 01 00 Set the data 4 VIDEO OUT Y Chroma Level Check VI 156 board Mode Camera Subject Arbitrary Measurement Point VIDEO jack 75Ω terminated Measuring Instrument Oscilloscope Specified Value Sync lev...

Страница 230: ...55 Case2 07 Case3 D6 Case4 01 Case5 D0 Case6 PAL model 35 Case1 33 Case2 B6 Case3 5 3 If the data of address 73 and address 74 are correct IC301 TRX RF playback system is normal 1 3 IC301 AUD ABUS PB BIST Check Order Page Address Data Procedure 1 3 11 04 Set the data and press PAUSE button 2 3 12 08 Set the data and press PAUSE button 3 3 12 00 Set the data and press PAUSE button 4 3 13 03 Set the...

Страница 231: ... button 4 3 13 04 Set the data and press PAUSE button 5 3 14 Check that the data is the following value NTSC model FD PAL model 58 6 3 15 Check that the data is the following value NTSC model 3E PAL model BE 7 3 If the data of address 14 and address 15 are correct IC301 ENCORDER Ya playback system is normal ENCODER Yb BIST Check Order Page Address Data Procedure 1 3 10 8C Set the data and press PA...

Страница 232: ...C SELECT XL 003 board MIC A REF REVEL Menu setting 12dB Note Note Except for Playback Level Check Connection of Audio System Measuring Devices Fig 5 3 11 Recording Camera mode Audio oscillator Attenuator 600 Ω Main unit CH1 CH2 600 Ω 270 Ω 1 249 410 11 330 Ω 1 249 411 11 Main unit 47k Ω 47k Ω Video Video jack Audio jack L R TV monitor Audio level meter or Distortion meter 47k Ω 1 249 437 11 Playba...

Страница 233: ...Audio CH1 or CH2 terminal of AUDIO jack Measuring Instrument Audio distortion meter Specified Value Below 0 4 200Hz to 6kHz BPF ON Menu setting A REF LEVEL 12dB Checking Method 1 Input the 400Hz 60dBs signal in the XLR jack 2 Record in the camera mode 3 Playback the recorded section 4 Check that the distortion is the specified value 4 Overall Noise Level Check Mode Camera recording and playback Si...

Страница 234: ...nging the address The address increases when the FF M button is pressed and decreases when the REW m button is pressed There are altogether 256 addresses from 00 to FF Changing the data Data setting The data increases when the PLAY N button is pressed and decreases when the STOP x button is pressed There are altogether 256 data from 00 to FF Writing the adjustment data The PAUSE button must be pre...

Страница 235: ...3 84 85 86 87 88 89 90 91 92 93 94 95 96 97 98 99 100 101 102 103 104 105 106 107 108 109 110 111 112 113 114 115 116 117 118 119 120 121 122 123 124 125 126 127 128 129 130 131 132 133 134 135 136 137 138 139 140 141 142 143 144 145 146 147 148 149 150 151 152 153 154 155 156 157 158 174 159 175 160 161 162 163 164 165 166 167 168 169 170 171 172 173 177 176 178 179 180 181 182 183 184 185 186 18...

Страница 236: ...e PAUSE button 3 Select page 0 address 01 and set data 00 Function Normal Forced camera power ON Forced VTR power ON Forced camera VTR power ON Forced memory power ON Data 00 01 02 03 05 Contents EMG code when first error occurs Upper MSW code when shift starts when first error occurs Lower MSW code when first error occurs Lower MSW code to be moved when first error occurs EMG code when second err...

Страница 237: ...will not stop at this code during operations Excluding LOAD UNLOAD Code during loading Tape guide LOAD completion position REW position The pinch roller is released FF position The pinch roller is released Stop position The pinch roller is released and tension regulator returns and the brake is imposed on both reels PB REC CUE REVIEW PAUSE positions The pinch roller is pressed and the tension regu...

Страница 238: ...ustment remote commander 3 Bit value discrimination Bit values must be discriminated using the display data of the adjustment remote commander for following items Use the table below to discriminate if the bit value is 1 or 0 4 Switch check 1 Page 2 Address 43 Bit 0 1 2 3 4 5 6 7 Function VTR MODE SW PM 040 board S081 CAMERA MODE SW PM 040 board S081 START STOP SW FS 082 board S402 CF 1044 block S...

Страница 239: ...59 45 to 6E REC KY 049 board S267 269 AUDIO DUB KY 049 board S268 TITLE SW 343 board S512 DISPLAY SB 036 board S066 LCD BRIGHT SW 343 board S518 MEMORY DELETE SW 343 board S514 INDEX FS 082 board S403 85 6F to 9F EDIT LL 010 board S472 FRAME KY 049 board S270 FOCUS INFINITY FC 074 board S222 DIGITAL EFFECT SW 343 board S517 ZEBRA 100 SB 036 board S061 LCD BRIGHT SW 343 board S519 MEMORY PLAY SW 34...

Страница 240: ...d 3rd time BC Repaired by code Occurred 4th time 1 BD Block function code Occurred 4th time BE Detailed code Occurred 4th time C0 Repaired by code Occurred 5th time 1 C1 Block function code Occurred 5th time C2 Detailed code Occurred 5th time C4 Repaired by code Occurred the last time 1 C5 Block function code Occurred the last time C6 Detailed code Occurred the last time 1 01 C 03 E Using method 1...

Страница 241: ...ion counted time Upper digits Capstan rotation counted time Lower digits Capstan rotation counted time Upper digits Unloading counter Lower digits Unloading counter Upper digits Check sum Lower digits Check sum Upper digits Power supply operation counted time Lower digits Power supply operation counted time Upper digits Drum rotation counted time Lower digits Drum rotation counted time Upper digit...

Страница 242: ...F ASSY 250P 7 3 179 882 01 SPACER MICROPHONE 8 X 3950 953 1 COVER ASSY HANDLE REAR 9 3 968 729 91 SCREW M2 LOCK ACE P2 10 1 475 950 21 REMOTE COMMANDER RMT 811 11 3 053 056 01 LID BATTERY CASE FOR RMT 811 12 3 063 724 01 B M3X6 EG GRIP 13 3 679 690 02 MOUNT V 14 3 679 648 02 SPRING COMPRESSION 15 7 627 553 38 SCREW PRECISION P M2X3 16 3 679 688 02 LEVER RELEASE 17 3 063 720 01 RETAINER B LEVER 18 ...

Страница 243: ...D 67 3 063 700 01 BRACKET R MD 68 A 7074 553 A ME 019 BOARD COMPLETE 69 1 960 783 11 HARNESS VM 068 12P 70 1 960 784 11 HARNESS MV 124 7P 71 1 757 148 11 FVK 001 FLEXIBLE FLAT CABLE 8P 72 A 7074 554 A EJ 034 BOARD COMPLETE 73 1 757 150 11 FKE 001 FLEXIBLE FLAT CABLE 6P 74 X 3950 948 1 FRAME ASSY VTR KEY 75 3 063 711 01 KEY VTR 76 A 7074 545 A KY 049 BOARD COMPLETE 77 3 948 339 61 TAPPING 78 1 757 ...

Страница 244: ...8 3 061 062 01 BOLT M2 6 SPRING 119 1 960 796 11 HARNESS ID 052 6P 120 3 717 821 01 CAP BREAKER 121 1 960 795 11 HARNESS IB 053 2P 123 A 7074 546 A DD 146 BOARD COMPLETE 124 1 960 790 11 HARNESS DV 063 2P 125 1 960 778 11 HARNESS VD 053 12P 126 1 960 789 11 HARNESS DM 141 4P 127 1 960 786 11 HARNESS DX 050 3P 128 1 960 787 11 HARNESS DI 065 9P 129 1 960 788 11 HARNESS DD 064 2P 130 A 7074 552 A DC...

Страница 245: ...392 21 FP 241 FLEXIBLE BOARD 6P 159 X 3949 119 1 PLATE ASSY BLIND 160 3 063 694 01 LID HINGE 161 3 968 729 91 SCREW M2 LOCK ACE P2 162 3 063 692 01 CABINET C P 250 162 3 063 692 11 CABINET C P 250P 163 1 960 798 11 HARNESS PS 111 14P 164 1 960 797 11 HARNESS PS 110 8P 165 3 060 795 01 TAPE HARNESS FIXED 0166 1 418 876 11 TRANSFORMER UNIT INVERTER 167 A 7096 158 A PD 126 BOARD COMPLETE 168 3 051 23...

Страница 246: ...A 7074 540 A PM 040 BOARD COMPLETE 209 3 063 696 01 KNOB A SLIDE 210 A 7074 539 A MS 058 BOARD COMPLETE 211 A 7074 536 A SB 036 BOARD COMPLETE 212 A 7074 537 A AE 023 BOARD COMPLETE 213 3 063 698 01 FRAME KP 214 A 7074 538 A KP 011 BOARD COMPLETE 215 X 3950 957 1 RETAINER ASSY SP 216 3 063 593 01 KNOB VR SP901 1 529 590 11 SPEAKER 2 0CM 201 201 203 206 204 205 201 215 SP901 201 201 211 212 201 201...

Страница 247: ...EL POP 266 3 060 641 01 PAD PANEL POP UP 267 3 063 578 01 BASE PANEL LOCK 268 3 063 579 01 KNOB PANEL LOCK 269 3 055 248 01 SHAFT PANEL LOCK 270 3 063 721 01 SPRING PANEL LOCK 271 3 063 585 01 COVER MS 272 3 063 583 01 CABINET POWER 273 3 064 679 01 COVER L STROKE SW 274 3 063 586 01 CABINET AE 275 3 063 606 01 GUIDE VR 276 3 063 597 01 SHAFT SW 277 3 063 805 01 RETAINER B SW SHAFT 278 3 063 601 0...

Страница 248: ...6 TAPPING P2 310 3 063 523 01 COVER CASSETTE 311 3 968 729 81 SCREW M2 LOCK ACE P2 312 3 063 530 01 LOCK CC 313 3 063 531 01 SPRING CC LEAF 314 3 063 524 01 GUIDE R CASSETTE 315 7 624 101 04 STOP RING 1 2 E TYPE 316 3 063 534 01 SHAFT CG 317 3 063 532 01 SPRING CC TORSION COIL 318 3 063 536 01 GUIDE L CASSETTE 319 X 3950 927 1 FRAME R ASSY CC 320 X 3950 928 1 FRAME L ASSY CC 321 X 3950 959 1 CABIN...

Страница 249: ...LL 010 BOARD COMPLETE 370 3 063 653 01 COVER HANDLE TOP 371 A 7074 542 A HP 129 BOARD COMPLETE 372 A 7074 543 A TH 010 BOARD COMPLETE 373 3 968 729 51 SCREW M2 LOCK ACE P2 374 1 960 782 11 HARNESS VH 050 12P 375 3 063 665 01 ARM SLIDE 376 3 063 663 01 COVER PHONE 377 3 063 617 01 KNOB HANDLE SLIDE 378 3 063 618 01 BRACKET HANDLE SLIDE KNOB 379 3 063 664 01 KEY REV 380 1 960 785 11 HARNESS VL 054 4...

Страница 250: ...IP 416 1 960 775 11 HARNESS VG 052 12P 417 1 476 007 11 SWITCH BLOCK CONTROL CF 1044 418 X 3950 936 1 RING ASSY MI 419 3 968 729 11 SCREW M2 LOCK ACE P2 420 3 948 339 61 TAPPING 421 1 476 008 11 SWITCH BLOCK CONTROL EG 1044 422 X 3950 930 1 CABINET R ASSY LENS 423 1 960 774 11 HARNESS VF 071 3P 424 A 7074 530 A FC 074 BOARD COMPLETE 425 3 063 562 01 HOLDER MF KNOB 426 3 063 604 01 SPRING COMPRESSI...

Страница 251: ... 709 595 21 VAP ASSY BC114C 455 3 963 933 01 EMBLEM CCD 456 3 713 791 91 SCREW M1 7 457 3 709 596 01 LENS ASSY ZOOM 458 3 948 339 31 SCREW TAPPING P2 459 A 7074 532 A SE 116 BOARD COMPLETE 460 3 948 339 61 TAPPING 461 A 7031 100 A PRISM ASSY SERVICE INCLUDING 3CCD 250 461 A 7031 101 A PRISM ASSY SERVICE INCLUDING 3CCD 250P 462 3 713 791 61 SCREW M1 7X7 TAPPING P2 463 A 7074 531 A CD 274 BOARD COMP...

Страница 252: ...34 01 FLANGE TG UPPER 715 3 057 379 01 GUARD GUIDE 716 A 7094 608 B SCREW ASSY DRUM FITTING 717 3 973 171 01 SUPPORT TAPE 718 3 057 227 01 RETAINER TAPE 719 3 973 818 01 SPRING COMPRESSION TAPE RETAINER 720 X 3949 915 1 ARM ASSY PINCH 721 3 057 228 01 CAP DRUM 722 A 7094 602 B CASSETTE COMPARTMENT BLOCK ASSY 723 3 726 829 01 WASHER STOPPER 724 3 057 353 01 SPRING MIC BASE 725 3 318 201 11 SCREW B ...

Страница 253: ... 3949 918 1 ARM ASSY TG2 767 X 3949 919 1 ARM ASSY TG7 768 3 057 295 01 SPRING EXTENSION TG2 769 3 057 296 02 SPRING EXTENSION TG7 770 X 3949 921 1 BAND TG7 ASSY 771 X 3949 920 1 BAND TG2 ASSY 772 3 057 281 01 MAGNET ET 773 3 057 336 01 HOLDER MAGNET 774 3 057 344 01 SPRING COMPRESSION TG ARM 775 3 726 829 01 WASHER STOPPER 776 3 057 232 01 SPRING COMPRESSION TG 777 3 057 238 01 RING TG 778 3 057 ...

Страница 254: ...R ENCODER 819 3 057 340 01 COVER CAPSTAN 820 3 057 282 01 SLIDER MAIN 821 1 657 785 11 FP 248 FLEXIBLE BOARD DEW SENSOR 822 3 057 320 01 BLOCK REEL LOCK RELEASE 823 3 057 354 01 SPRING REEL LOCK RELEASE 824 A 7067 229 A MD 76 BOARD COMPLETE 825 3 057 376 01 HOLDER SENSOR 826 3 057 555 01 HOLDER LED 827 X 3950 199 1 RAIL BASE S ASSY SERVICE 828 X 3950 200 1 RAIL BASE T ASSY SERVICE 829 3 057 265 01...

Страница 255: ...57 254 01 GEAR A 855 3 057 255 01 GEAR B 856 A 7094 689 A GEAR CD BLOCK ASSY SERVICE M905 X 3949 925 1 MOTOR ASSY FL Ref No Part No Description Remarks Ref No Part No Description Remarks 6 1 14 CASSETTE COMPARTMENT BLOCK ASSEMBLY M905 851 854 855 856 not supplied ...

Страница 256: ...1 107 826 11 CERAMIC CHIP 0 1uF 10 16V C102 1 119 751 11 TANTAL CHIP 22uF 20 16V C103 1 119 751 11 TANTAL CHIP 22uF 20 16V C104 1 127 760 11 CERAMIC CHIP 4 7uF 10 6 3V C105 1 127 760 11 CERAMIC CHIP 4 7uF 10 6 3V C108 1 104 851 11 TANTAL CHIP 10uF 20 10V C109 1 107 686 11 TANTAL CHIP 4 7uF 20 16V C110 1 127 760 11 CERAMIC CHIP 4 7uF 10 6 3V C111 1 125 777 11 CERAMIC CHIP 0 1uF 10 10V C112 1 107 68...

Страница 257: ...1 165 319 11 CERAMIC CHIP 0 1uF 50V C340 1 110 618 11 ELECT 12uF 20 63V C341 1 164 227 11 CERAMIC CHIP 0 022uF 10 25V C342 1 125 988 21 ELECT CHIP 330uF 20 25V C343 1 164 227 11 CERAMIC CHIP 0 022uF 10 25V C344 1 104 920 11 TANTAL CHIP 4 7uF 20 35V C345 1 104 920 11 TANTAL CHIP 4 7uF 20 35V C346 1 117 193 11 CERAMIC 1 5uF 50V C347 1 163 038 11 CERAMIC CHIP 0 1uF 25V C348 1 104 920 11 TANTAL CHIP 4...

Страница 258: ... 5 1 10W R331 1 216 829 11 METAL CHIP 4 7K 5 1 16W R332 1 216 073 00 METAL CHIP 10K 5 1 10W R333 1 216 845 11 METAL CHIP 100K 5 1 16W R334 1 218 847 11 METAL CHIP 1K 0 5 1 16W R335 1 216 073 00 METAL CHIP 10K 5 1 10W R336 1 216 073 00 METAL CHIP 10K 5 1 10W R337 1 216 013 00 METAL CHIP 33 5 1 10W R338 1 216 025 11 RES CHIP 100 5 1 10W R339 1 216 105 91 RES CHIP 220K 5 1 10W R340 1 216 097 11 RES C...

Страница 259: ...RD COMPLETE Ref No 1000Series CAPACITOR C241 1 128 406 11 ELECT CHIP 33uF 20 50V C242 1 163 021 91 CERAMIC CHIP 0 01uF 10 50V C243 1 163 037 11 CERAMIC CHIP 0 022uF 10 25V CIRCUIT BREAKER CB241 1 532 524 11 BREAKER CIRCUIT CONNECTOR CN241 1 506 485 11 PIN CONNECTOR 6P CN242 1 566 693 11 PIN CONNECTOR 2P CN243 1 506 474 11 PIN CONNECTOR 9P DIODE D241 8 719 030 03 DIODE EA60QC06 TE16F2 TRANSISTOR Q2...

Страница 260: ... 11 SWITCH TACTIL REC S268 1 572 438 11 SWITCH TACTIL AUDIO DUB S269 1 572 438 11 SWITCH TACTIL REC S270 1 572 438 11 SWITCH TACTIL FRAME S271 1 572 438 11 SWITCH TACTIL FRAME A 7074 544 A LL 010 BOARD COMPLETE Ref No 1000Series CONNECTOR CN471 1 778 507 21 PIN CONNECTOR PC BOARD 4P DIODE D471 8 719 064 61 DIODE 01BZA8 2 TE85L D472 8 719 064 61 DIODE 01BZA8 2 TE85L RESISTOR R471 1 216 837 11 METAL...

Страница 261: ...CERAMIC CHIP 0 001uF 10 50V C716 1 162 964 11 CERAMIC CHIP 0 001uF 10 50V C717 1 107 826 11 CERAMIC CHIP 0 1uF 10 16V C718 1 125 926 91 TANTAL CHIP 4 7uF 20 6 3V C719 1 125 926 91 TANTAL CHIP 4 7uF 20 6 3V C720 1 125 926 91 TANTAL CHIP 4 7uF 20 6 3V C721 1 162 964 11 CERAMIC CHIP 0 001uF 10 50V C722 1 162 964 11 CERAMIC CHIP 0 001uF 10 50V C723 1 164 156 11 CERAMIC CHIP 0 1uF 25V C724 1 117 919 11...

Страница 262: ...METAL CHIP 10K 5 1 16W R755 1 216 845 11 METAL CHIP 100K 5 1 16W R756 1 216 841 11 METAL CHIP 47K 5 1 16W R757 1 216 841 11 METAL CHIP 47K 5 1 16W R758 1 216 839 11 METAL CHIP 33K 5 1 16W R759 1 216 833 11 METAL CHIP 10K 5 1 16W R760 1 216 839 11 METAL CHIP 33K 5 1 16W R761 1 216 833 11 METAL CHIP 10K 5 1 16W R762 1 216 841 11 METAL CHIP 47K 5 1 16W R763 1 216 840 11 METAL CHIP 39K 5 1 16W R764 1 ...

Страница 263: ...2112 8 729 048 77 TRANSISTOR XP4313 TX SO Q2181 8 729 042 72 TRANSISTOR UN9214J K8 SO Q2182 8 729 037 53 TRANSISTOR 2SA1832F Y GR TPL3 Q2183 8 729 042 59 TRANSISTOR UN9112J K8 SO RESISTOR R2111 1 218 985 11 RES CHIP 470K 5 1 16W R2112 1 218 985 11 RES CHIP 470K 5 1 16W R2113 1 218 990 11 SHORT 0 R2114 1 218 967 11 RES CHIP 15K 5 1 16W R2115 1 218 958 11 RES CHIP 2 7K 5 1 16W R2116 1 218 973 11 RES...

Страница 264: ...2 272 11 SWITCH SLIDE ATW ON OFF S063 1 572 272 11 SWITCH SLIDE AUTO ON OFF S064 1 572 272 11 SWITCH SLIDE AGC ON OFF S065 1 572 078 11 SWITCH TACTILE AUDIO LEVEL S066 1 572 078 11 SWITCH TACTILE DISPLAY S067 1 572 078 11 SWITCH TACTILE SPOT LIGHT S068 1 572 078 11 SWITCH TACTILE BACK LIGHT A 7074 532 A SE 116 BOARD COMPLETE Ref No 1000Series CAPACITOR C600 1 107 826 11 CERAMIC CHIP 0 1uF 10 16V C...

Страница 265: ...1 SWITCH SLIDE CH 1 AUDIO INPUT S504 1 570 860 11 SWITCH SLIDE CH 2 AUDIO INPUT S505 1 570 852 11 SWITCH SLIDE AUDIO MONITOR S506 1 570 860 11 SWITCH SLIDE DISPLAY SELECT S507 1 572 078 11 SWITCH TACTILE MEMORY MIX S508 1 572 078 11 SWITCH TACTILE MEMORY INDEX S509 1 572 078 11 SWITCH TACTILE MEMORY S510 1 572 078 11 SWITCH TACTILE DATA CODE S511 1 572 078 11 SWITCH TACTILE RESET S512 1 572 078 11...

Страница 266: ...943 11 CERAMIC CHIP 0 01uF 10 16V C310 1 127 760 11 CERAMIC CHIP 4 7uF 10 6 3V C311 1 164 943 11 CERAMIC CHIP 0 01uF 10 16V C312 1 164 943 11 CERAMIC CHIP 0 01uF 10 16V C313 1 164 937 11 CERAMIC CHIP 0 001uF 10 16V C314 1 164 937 11 CERAMIC CHIP 0 001uF 10 16V C315 1 164 937 11 CERAMIC CHIP 0 001uF 10 16V C316 1 164 937 11 CERAMIC CHIP 0 001uF 10 16V C317 1 164 943 11 CERAMIC CHIP 0 01uF 10 16V C3...

Страница 267: ...11 CERAMIC CHIP 0 01uF 10 16V C903 1 164 943 11 CERAMIC CHIP 0 01uF 10 16V C904 1 104 851 11 TANTAL CHIP 10uF 20 10V C908 1 125 777 11 CERAMIC CHIP 0 1uF 10 10V C910 1 117 919 11 TANTAL CHIP 10uF 20 6 3V C911 1 125 837 91 CERAMIC CHIP 1uF 10 6 3V C912 1 125 837 91 CERAMIC CHIP 1uF 10 6 3V C913 1 164 943 11 CERAMIC CHIP 0 01uF 10 16V C914 1 125 837 91 CERAMIC CHIP 1uF 10 6 3V C915 1 164 943 11 CERA...

Страница 268: ...1 1 164 943 11 CERAMIC CHIP 0 01uF 10 16V C1112 1 164 943 11 CERAMIC CHIP 0 01uF 10 16V C1113 1 164 943 11 CERAMIC CHIP 0 01uF 10 16V C1114 1 164 943 11 CERAMIC CHIP 0 01uF 10 16V C1115 1 164 943 11 CERAMIC CHIP 0 01uF 10 16V C1116 1 164 943 11 CERAMIC CHIP 0 01uF 10 16V C1117 1 164 943 11 CERAMIC CHIP 0 01uF 10 16V C1119 1 164 943 11 CERAMIC CHIP 0 01uF 10 16V C1120 1 107 819 11 CERAMIC CHIP 0 02...

Страница 269: ...uF 10 10V C2509 1 107 826 11 CERAMIC CHIP 0 1uF 10 16V C2512 1 127 569 91 TANTAL CHIP 100uF 20 4V C2513 1 127 569 91 TANTAL CHIP 100uF 20 4V C2770 1 125 777 11 CERAMIC CHIP 0 1uF 10 10V C2771 1 107 826 11 CERAMIC CHIP 0 1uF 10 16V C2772 1 107 826 11 CERAMIC CHIP 0 1uF 10 16V C2773 1 164 942 11 CERAMIC CHIP 0 0068uF 10 16V C2774 1 164 942 11 CERAMIC CHIP 0 0068uF 10 16V C2775 1 107 823 11 CERAMIC C...

Страница 270: ...P 0PF 0V C4134 1 104 913 11 TANTAL CHIP 10uF 20 16V C4135 1 104 913 11 TANTAL CHIP 10uF 20 16V C4136 1 113 985 11 TANTAL CHIP 10uF 20 20V C4137 1 104 913 11 TANTAL CHIP 10uF 20 16V C4200 1 107 826 11 CERAMIC CHIP 0 1uF 10 16V C4201 1 107 826 11 CERAMIC CHIP 0 1uF 10 16V C4202 1 107 826 11 CERAMIC CHIP 0 1uF 10 16V C4203 1 107 826 11 CERAMIC CHIP 0 1uF 10 16V C4204 1 113 987 11 TANTAL CHIP 4 7uF 20...

Страница 271: ...056 48 DIODE 1SS388 TPL3 D3309 8 719 056 48 DIODE 1SS388 TPL3 D3310 8 719 056 48 DIODE 1SS388 TPL3 D3311 8 719 056 48 DIODE 1SS388 TPL3 D3312 8 719 056 48 DIODE 1SS388 TPL3 D4101 8 719 066 98 DIODE RB051L 40TE25 D4102 8 719 066 98 DIODE RB051L 40TE25 D4103 8 719 066 98 DIODE RB051L 40TE25 D4104 8 719 066 98 DIODE RB051L 40TE25 FERRITE BEAD FB101 1 414 760 21 FERRITE 0UH FB140 1 414 445 11 FERRITE ...

Страница 272: ...C2502 8 759 564 49 IC TC7W53FU TE12R IC2770 8 759 359 49 IC NJM3414AV TE2 IC2771 8 759 359 49 IC NJM3414AV TE2 IC2772 8 759 823 51 IC LB1830M TLM IC2773 8 759 444 87 IC NJM324V TE2 IC2774 8 759 058 45 IC NJM3403AV TE2 IC2775 8 759 478 92 IC TC7SET04FU TE85R IC2776 8 759 478 92 IC TC7SET04FU TE85R IC3300 8 759 491 09 IC MB4488PFV G BND ER IC3301 8 759 364 52 IC TA75S01F TE85R IC4100 8 759 060 94 IC...

Страница 273: ...5 8 729 037 74 TRANSISTOR UN9213J K8 SO Q1016 8 729 117 32 TRANSISTOR 2SC4177 T1L5L6 Q1024 8 729 042 26 TRANSISTOR 2SB1462J QR K8 SO Q1025 8 729 042 26 TRANSISTOR 2SB1462J QR K8 SO Q1031 8 729 037 52 TRANSISTOR 2SD2216J QR K8 SO Q1032 8 729 037 52 TRANSISTOR 2SD2216J QR K8 SO Q1033 8 729 037 52 TRANSISTOR 2SD2216J QR K8 SO Q1034 8 729 037 52 TRANSISTOR 2SD2216J QR K8 SO Q1101 8 729 037 52 TRANSIST...

Страница 274: ... 5 1 16W R064 1 216 845 11 METAL CHIP 100K 5 1 16W R065 1 216 845 11 METAL CHIP 100K 5 1 16W R066 1 216 809 11 METAL CHIP 100 5 1 16W R067 1 216 845 11 METAL CHIP 100K 5 1 16W R068 1 216 845 11 METAL CHIP 100K 5 1 16W R103 1 218 965 11 RES CHIP 10K 5 1 16W R104 1 218 963 11 RES CHIP 6 8K 5 1 16W R105 1 218 990 11 SHORT 0 R106 1 218 989 11 RES CHIP 1M 5 1 16W R107 1 218 979 11 RES CHIP 150K 5 1 16W...

Страница 275: ...11 SHORT 0 R383 1 218 990 11 SHORT 0 R501 1 218 977 11 RES CHIP 100K 5 1 16W R502 1 218 977 11 RES CHIP 100K 5 1 16W R503 1 218 977 11 RES CHIP 100K 5 1 16W R504 1 218 977 11 RES CHIP 100K 5 1 16W R505 1 218 985 11 RES CHIP 470K 5 1 16W R507 1 218 953 11 RES CHIP 1K 5 1 16W R508 1 218 985 11 RES CHIP 470K 5 1 16W R509 1 218 985 11 RES CHIP 470K 5 1 16W R510 1 218 985 11 RES CHIP 470K 5 1 16W R511 ...

Страница 276: ...18 1 218 864 11 METAL CHIP 5 1K 0 5 1 16W R1020 1 218 971 11 RES CHIP 33K 5 1 16W R1021 1 218 971 11 RES CHIP 33K 5 1 16W R1022 1 218 965 11 RES CHIP 10K 5 1 16W R1023 1 218 965 11 RES CHIP 10K 5 1 16W R1024 1 218 977 11 RES CHIP 100K 5 1 16W R1025 1 218 953 11 RES CHIP 1K 5 1 16W R1026 1 218 957 11 RES CHIP 2 2K 5 1 16W R1027 1 218 966 11 RES CHIP 12K 5 1 16W R1028 1 218 945 11 METAL CHIP 220 0 5...

Страница 277: ...1 RES CHIP 1K 5 1 16W R1179 1 218 973 11 RES CHIP 47K 5 1 16W R1180 1 218 989 11 RES CHIP 1M 5 1 16W R1188 1 218 985 11 RES CHIP 470K 5 1 16W R1189 1 218 985 11 RES CHIP 470K 5 1 16W R1191 1 218 977 11 RES CHIP 100K 5 1 16W R1193 1 218 977 11 RES CHIP 100K 5 1 16W R1194 1 218 977 11 RES CHIP 100K 5 1 16W R1195 1 218 977 11 RES CHIP 100K 5 1 16W R1196 1 218 962 11 RES CHIP 5 6K 5 1 16W R1197 1 218 ...

Страница 278: ...218 961 11 RES CHIP 4 7K 5 1 16W R1454 1 218 953 11 RES CHIP 1K 5 1 16W R1455 1 218 938 11 RES CHIP 56 5 1 16W R1456 1 218 990 11 SHORT 0 R1457 1 218 943 11 RES CHIP 150 5 1 16W R1601 1 218 973 11 RES CHIP 47K 5 1 16W R1602 1 218 973 11 RES CHIP 47K 5 1 16W R1603 1 208 915 11 RES CHIP 15K 0 5 1 16W R1604 1 208 915 11 RES CHIP 15K 0 5 1 16W R1605 1 218 973 11 RES CHIP 47K 5 1 16W R1606 1 218 975 11...

Страница 279: ...11 METAL CHIP 10K 0 5 1 16W R2798 1 208 935 11 METAL CHIP 100K 0 5 1 16W R2799 1 208 935 11 METAL CHIP 100K 0 5 1 16W R2800 1 218 969 11 RES CHIP 22K 5 1 16W R2801 1 218 969 11 RES CHIP 22K 5 1 16W R2802 1 218 969 11 RES CHIP 22K 5 1 16W R2803 1 218 969 11 RES CHIP 22K 5 1 16W R2804 1 218 969 11 RES CHIP 22K 5 1 16W R2805 1 218 969 11 RES CHIP 22K 5 1 16W R2806 1 218 975 11 RES CHIP 68K 5 1 16W R2...

Страница 280: ...216 864 11 METAL CHIP 0 5 1 16W R4120 1 216 864 11 METAL CHIP 0 5 1 16W R4122 1 216 864 11 METAL CHIP 0 5 1 16W R4123 1 216 838 11 METAL CHIP 27K 5 1 16W R4124 1 216 864 11 METAL CHIP 0 5 1 16W R4126 1 216 833 11 METAL CHIP 10K 5 1 16W R4127 1 216 842 11 METAL CHIP 56K 5 1 16W R4128 1 216 864 11 METAL CHIP 0 5 1 16W R4131 1 218 865 11 METAL CHIP 5 6K 0 5 1 16W R4136 1 216 864 11 METAL CHIP 0 5 1 1...

Страница 281: ...0 CONNECTOR POST HEADER ILG 2P A 7074 557 A VO 012 BOARD COMPLETE Ref No 1000Series CONNECTOR CN201 1 778 787 13 CONNECTOR COAXIAL BNC TYPE AUDIO OUT CN202 1 691 550 11 PIN CONNECTOR 1 5MM SMD 3P DIODE D201 8 719 062 16 DIODE 01ZA8 2 TPL3 RESISTOR R201 1 216 864 11 METAL CHIP 0 5 1 16W A 7074 551 A XL 003 BOARD COMPLETE Ref No 1000Series CAPACITOR C801 1 162 964 11 CERAMIC CHIP 0 001uF 10 50V C802...

Страница 282: ... R807 1 216 057 00 METAL CHIP 2 2K 5 1 10W R808 1 216 057 00 METAL CHIP 2 2K 5 1 10W R809 1 216 057 00 METAL CHIP 2 2K 5 1 10W R810 1 216 057 00 METAL CHIP 2 2K 5 1 10W R811 1 216 057 00 METAL CHIP 2 2K 5 1 10W R812 1 216 057 00 METAL CHIP 2 2K 5 1 10W R813 1 216 033 00 METAL CHIP 220 5 1 10W R814 1 216 037 00 METAL CHIP 330 5 1 10W R815 1 216 295 11 SHORT 0 R816 1 216 033 00 METAL CHIP 220 5 1 10...

Страница 283: ...76 01 PICTURE GEAR 4 1 LITE SYSTEM DISK 3 061 255 01 SYSTEM DISK MSAC US1 3 062 061 12 MANUAL INSTRUCTION AUTO LOGO INSERT FOR CORYRIGHT PROTECTION ENGLISH FRENCH GERMAN ITALIAN 3 064 678 11 MANUAL INSTRUCTION ENGLISH 250 3 064 678 21 MANUAL INSTRUCTION FRENCH 250 3 064 678 31 MANUAL INSTRUCTION ENGLISH 250P 3 064 678 41 MANUAL INSTRUCTION FRENCH 250P 3 064 678 51 MANUAL INSTRUCTION GERMAN 250P 3 ...

Страница 284: ...ELECTRONIC VIEWFINDER DXF 801 DXF 801CE SERVICE MANUAL Attached Manual ...

Страница 285: ...f MAIN Board To replace the MAIN board perform adjustment referring to Section 2 Alignment 1 2 2 Replacement of CRT DY Assembly n If a deflection yoke is replaced you should replace assembly of CRT and deflection yoke CRT DY assembly 1 Remove four screws and remove the bottom case 2 Remove the screw B2 6 x 4 Disconnect connector CN8 from the MAIN board 1 1 Board Layout MAIN board LED B board LED A...

Страница 286: ...d 6 When installing a new CRT DY assembly reverse the above procedures n In reconnecting the CRT socket be sure to match a projection of the CRT socket with a mark of the CRT DY assembly 3 Remove the slide ring Remove two screws and remove the CRT DY assembly from outside holders B and T 4 Untie two strings and remove an adhesive tape and a cable holder Outside holder T Outside holder B CRT DY ass...

Страница 287: ...e inserting position of friction spring and hold it by finger Match boss of portion D with B and insert the inner ring to the outer ring 1 3 Replacement of VF Loupe Optional VF loupe There are two kind of VF loupes as optional accessory Use a VF loupe to match your visibility range VF loupe for aged eyes _2D to 1D Sony part No 3 725 276 01 _0 5 to 3D Sony part No 3 176 501 01 For reference Standar...

Страница 288: ...nt of CRT DY assembly 2 Push two pins to portion A by slotted screwdriver as shown in figure 3 Remove a screw washer and two hinge springs Then remove the outside holder T and eypiece outer ring as shown in figure arrow 4 Pull out two pins 5 Replace outside holder T or eyepiece outer ring to new one Insert two pins to portion B by slotted screwdriver as shown in figure 1 4 Replacement of Outside H...

Страница 289: ...r of the viewfinder attach the left eye adaptor At this time pull the lock lever to release locking 3 Fix the left eye adaptor by pushing the lock lever vertically direction 1 5 Changing the Viewfinder Correspond to Left Eye 1 6 Recommended Replacement Parts 1 6 Recommended Replacement Parts Parts listed below are recommended replacement parts They are subject to cracks with the lapse of time Chec...

Страница 290: ...s Pattern box PTB 500 Sony part number J 6029 140 B Resolution chart Sony part number J 6026 100 A White window chart Measuring equipment Oscilloscope Waveform monitor Digital voltmeter Frequency counter Pattern generator 2 1 3 Connecting Diagram 2 1 4 Initial setting DSR 250 250P MODE switch CAMERA AUTO MODE switch OFF ATW switch OFF WHITE BAL switch PRESET 5600K 3200K 3200K AGC switch OFF GAIN s...

Страница 291: ...03 Vrms Adjustment Procedure If not met the specification adjust 1RV4 VH ADJ MAIN board 2 2 3 Vertical Hold Adjustment Note Perform adjustment with removing R76 resistor on the SUB board After adjustment re mount R76 resistor Perform adjustment with connecting Pin 2 of RV20 CONTRAST on SUB board and GND with a jumper wire After adjustment disconnect the jumper wire Equipment Frequency counter Prep...

Страница 292: ... so that the picture on the monitor screen becomes all white Monitor Screen 2 IRIS switch MAN Adjust the iris control for the white level at VIDEO OUT connector on the camera is 100 2 IRE PAL 700 14 mV Test point CH1 TP4 G1 MAIN board CH2 TP9 H DEF MAIN board Adjusting point 1RV5 H HOLD SUB board Adjustment 2 2 Viewfinder System Adjustment A A B B CH 2 CH 1 SOLDERING SIDE MAIN BOARD CN7 TP1 TP12 T...

Страница 293: ...ontrol Fully clockwise 2 PEAKING control Fully counterclockwise 3 Adjustment Procedure 1 Adjust the lens zoom so that the resolution chart frame coincides the underscanned picture frame on the monitor screen 2 Set the resolution on the monitor screen to the best state with the lens focus Monitor Screen 3 Adjust the iris control for the white level at VIDEO OUT connector on the camera is 100 2 IRE ...

Страница 294: ...vel at VIDEO OUT connector on the camera is 100 2 IRE PAL 700 14 mV Monitor Screen 4 Adjust 1RV2 H SIZE MAIN board so that the H size of resolution chart is underscanned by approxi mately 2 mm from the CRT picture frame 5 Adjust 1RV7 V SIZE MAIN board so that the V size of resolution chart is underscanned by approxi mately 2 mm from the CRT picture frame Viewfinder Screen 6 Adjust 1RV8 V LIN MAIN ...

Страница 295: ...mplifier Output Adjustment Note When this adjustment is carried out 2 2 5 Focus Adjustment and 2 2 2 Heater Voltage Pre Adjustment must be confirmed again Equipment Digital voltmeter Preparation DSR 250 250P IRIS switch MAN Lens iris Close C Viewfinder BRIGHT control Fully counterclockwise 3 CONTRAST control Fully counterclockwise 3 PEAKING control Fully counterclockwise 3 Test point TP12 MAIN boa...

Страница 296: ...point TP5 TP6 MAIN board Adjusting point 1RV4 VH ADJ MAIN board Specification 0 65 0 03 Vrms COMPONENT SIDE MAIN BOARD CN8 RV4 RV15 RV8 RV7 RV2 RV3 CN5 CN4 CN3 CN6 CN2 RV14 RV1 SOLDERING SIDE MAIN BOARD CN7 TP1 TP12 TP13 TP4 TP5 TP6 TP7 TP8 TP9 TP10 TP3 TP2 TP11 2 2 Viewfinder System Adjustment ...

Страница 297: ...3 Stock of Parts Parts marked with o at SP Supply Code column of the spare parts list may not be stocked Therefore the delivery date will be delayed 4 Harness Harnesses with no part number are not registered as spare parts In need of repair get components shown in the list and repair using them 5 Destination Representation The part indicated For J UC CE in the spare parts list is used in the unit ...

Страница 298: ...W B3X8 6 3 678 684 01 s HOLDER CABLE 7 3 710 008 02 s HOUSING STOPPER 8 7 621 773 86 s SCREW B2 6X4 9 7 623 307 07 s LW 2 6 TYPE A 10 7 624 102 04 s STOPRING 1 5 TYPE E 11 7 627 554 18 s SCREW P2X3 5 No Part No SP Description 12 7 627 556 38 s SCREW P2 6X4 13 7 682 547 09 s SCREW B3X6 14 9 885 000 94 o CASE BOTTOM 15 9 885 000 95 o CLAMP CABLE 16 9 885 000 96 o LABEL VF 17 9 885 000 97 o PLATE PAR...

Страница 299: ... MIRROR No Part No SP Description 116 9 933 340 02 s HOLDER B OUTSIDE 117 9 933 341 02 o OUTER RING EYEPIECE 118 9 933 342 01 o INNER RING EYEPIECE 119 9 933 343 01 o HOLDER LENS 120 9 933 344 01 s LOUPE VF 3D to 0D 3 176 501 01 s LOUPE aged eyes VF 0 5D to 3D 3 725 276 01 s LOUPE aged eyes VF 2D to 1D 121 9 933 345 01 o HOLDER 2 LENS 122 9 933 346 03 s HOLDER EYECAP 123 9 933 347 02 s STOPPER 124...

Страница 300: ... 1uF 16V C53 9 904 851 01 s TANTALUM CHIP 10uF 20 16V C55 9 980 618 01 s ELECT 220uF 20 6 3V C56 9 885 001 22 s CERAMIC CHIP 100pF 50V C57 9 885 001 23 s CERAMIC CHIP 1000pF 50V C58 9 885 001 22 s CERAMIC CHIP 100pF 50V C60 9 885 001 24 s CERAMIC CHIP 0 01uF 50V C61 9 885 001 22 s CERAMIC CHIP 100pF 50V C62 1 163 243 11 s CERAMIC CHIP 47pF 5 50V C63 9 885 001 18 s CERAMIC CHIP 47pF 50V C64 9 885 0...

Страница 301: ...W R24 1 218 823 11 s METAL CHIP 100 0 5 1 16W R25 1 218 855 11 s METAL CHIP 2 2K 0 5 1 16W R26 1 216 053 00 s METAL CHIP 1 5K 5 1 10W R28 1 216 073 00 s METAL CHIP 10K 5 1 10W R29 1 218 871 11 s METAL CHIP 10K 0 5 1 16W R30 1 218 851 11 s METAL CHIP 1 5K 0 5 1 16W R31 1 216 053 00 s METAL CHIP 1 5K 5 1 10W R32 1 216 049 11 s METAL CHIP 1K 5 1 10W R33 1 216 097 00 s METAL CHIP 100K 5 1 10W R34 1 21...

Страница 302: ...s FILM 4700pF 5 50V C47 9 980 617 01 s ELECT 100uF 20 16V C75 9 904 851 01 s TANTALUM CHIP 10uF 20 16V C76 9 904 851 01 s TANTALUM CHIP 10uF 20 16V C77 1 401 913 11 s TANTALUM CHIP 10uF 20 16V C78 1 104 911 11 s TANTALUM CHIP 33uF 20 10V C80 9 885 001 06 s CERAMIC CHIP 4 7uF 10V C81 1 104 911 11 s TANTALUM CHIP 33uF 20 10V C82 9 885 001 07 s TANTALUM CHIP 4 7uF 20V C85 9 885 001 08 s TANTALUM CHIP...

Страница 303: ...218 839 11 s METAL CHIP 470 5 1 10W R135 1 218 831 11 s METAL CHIP 220 0 5 1 16W R136 1 216 045 00 s METAL CHIP 680 0 5 1 16W R137 1 218 831 11 s METAL CHIP 220 0 5 1 16W R138 1 216 025 00 s METAL CHIP 100 5 1 10W R139 1 216 061 00 s METAL CHIP 3 3K 0 5 1 16W R140 1 216 073 00 s METAL CHIP 10K 5 1 10W R141 1 216 033 00 s METAL CHIP 220 5 1 10W R142 1 216 311 00 s METAL CHIP 6 8 5 1 10W R143 1 216 ...

Страница 304: ...20 CONTRAST IC12 Q20 PEAKING 50V INV Q18 19 80ns BUFF Q17 LED DRIVER Q27 LED9 SUB MAIN A8 A7 A6 A5 A4 A3 A2 A1 B1 B2 B3 B4 B5 B6 B7 B8 SYNC NC EXT DC 12V EXT DC GND VF VIDEO G VF VIDEO X EXT DC 12V BATT ALARM SERIAL DATA REC TALLY R Y B Y SERIAL LOAD ZEBRA ON OFF PEAKING CONT SERIAL CLOCK EXT DC GND NC ZEBRA ON OFF SERIAL CLOCK SERIAL DATA PEAKING CONT VF VIDEO G VF VIDEO X REC TALLY BATT ALARM EX...

Страница 305: ...P10 TP11 TP4 TP5 TP6 6 5 6 4 RV7 2 4 1 6 3 6 1 TP9 TP8 RV3 RV2 RV8 RV5 RV6 LED6 LED7 1 1 5 3 6 2 4 DRIVER DRIVER TP7 D12 Q9 IC8 Q6 Q7 Q8 IC9 IC11 3 3 IC11 1 3 IC11 2 3 IC7 BUFF BUFF BUFF Q3 Q3 BUFF Q4 Q4 LED B LED A LED4 LED8 LED5 TAKE GREEN 10 1 10 2 10 3 11 1 11 2 3 3 3 1 3 2 2 1 2 2 2 3 IC10 1 2 IC10 2 2 TP12 RV14 OP ADJ RV4 VH ADJ TP2 BATT REC B BUFF D2 Q2 SHUTTER REC TALLY RV15 V SIZE WIDE Q1...

Страница 306: ...L1 100u CF 8 D3 SC802 04 SHIELD R37 620 R38 470 2SB1201 S Q5 R39 1k 3 TP3 TP1 TP13 EXT DC 12V CN8 9 18 EXT DC G 17 8 EXT DC 12V EXT DC G VF VIDEO X ZEBRA ON OFF 16 7 FB1 50V B 0 01u C60 50V CH 47p C52 C66 100p 50V CH B Y 15 VF VIDEO G 6 CH C65 47p 50V R28 10k R Y 14 REC TALLY 5 50V 47p C71 C67 100p 50V CH CH R29 10k GND 13 SERIAL DATE 4 CH C58 47p 50V 12 SERIAL LOAD DISP ON OFF 3 47p C59 50V CH PE...

Страница 307: ... V DEF IN 2 2 CN5 V DEF OUT TP10 TP11 V DEF OUT TP9 TP8 DY 5400 05 H DY 3 3 1 1 H DEF IN GND H DEF OUT GND 2 2 H DEF IN CN4 H DEF OUT 3 2 4 1 TP7 TP6 TP5 TP4 CRT CN S501 2B 3 4 1 2 NC G2 H2 H1 5 G1 NC 2 1 3 H2 OUT G2 OUT 4 5 G1 OUT H1 OUT CN6 LED6 GND CN11 4 3 2 1 GAIN UP 1 SHUTTER GND REC B 2 3 4 REC B SHUTTER GAIN UP CN3 CN2 CN10 LED3 BATT ALARM 1 TAKE GREEN GND REC T 2 3 4 1 2 3 4 REC T GND TAK...

Страница 308: ...6 1 DXF 801 801CE MAIN MAIN COMPONENT SIDE Section 6 Board Layouts MAIN SOLDERING SIDE ...

Страница 309: ...6 2 DXF 801 801CE SUB SUB COMPONENT SIDE SUB SOLDERING SIDE ...

Страница 310: ... Take a copy of CAMERA COLOR REPRODUCTION FRAME with a clear sheet for use 387 FOR CAMERA COLOR REPRODUCTION ADJUSTMENT DSR 250 250P ...

Страница 311: ...Sony EMCS Co DSR 250 250P 388 9 929 845 12 2001K1600 1 2001 11 Published by DI Customer Center ...

Страница 312: ... File this supplement 1 with the Service Manual PV00 019 DSR 250 250P RMT 811 US Model Canadian Model DSR 250 AEP Model DSR 250P Subject Change of Self diagnosis code table Change of Adjustments Addition of Supplied parts 2000 11 ...

Страница 313: ...m operations from the beginning Load the tape again and perform operations from the beginning Load the tape again and perform operations from the beginning Load the tape again and perform operations from the beginning Load the tape again and perform operations from the beginning Load the tape again and perform operations from the beginning Load the tape again and perform operations from the beginn...

Страница 314: ... 1 0mm 6mm 6mm Fig 5 1 13 B Input method 1 Select page 0 address 01 and set data 01 2 Read the serial No on the name plate and take it as D1 Example If the serial No is 77881 D1 77881 3 Obtain D2 and H1 corresponding to D1 from Table 5 3 2 Example If D1 is 77881 D2 D1 65536 12345 H1 FE Input method 1 Select page 0 address 01 and set data 01 2 Read the serial No on the name plate and take it as D1 ...

Страница 315: ...7 CABINET L ASSEMBLY G C B D E F H K J L I VI 156 Board 55 80 55 57 79 G C B D E F H K J L I VI 156 Board 55 80 84 55 57 79 321 X 3950 959 1 CABINET L ASSY 250 321 X 3951 182 1 CABINET L ASSY 250P 301 322 301 Ref No Part No Description Remarks Ref No Part No Description Remarks 82 3 061 062 01 BOLT M2 6 SPRING 83 1 960 908 11 HARNESS JJ 059 84 3 066 154 01 SHEET MS 321 X 3950 959 1 CABINET L ASSY ...

Страница 316: ...rks Ref No Part No Description Remarks 6 1 10 LENS BLOCK SECTION 2 464 X 3950 586 1 COVER ASSY PRISM not sup 463 462 458 461 460 459 not sup 463 462 458 461 460 459 467 466 465 464 X 3950 586 1 COVER ASSY PRISM 465 1 543 936 11 CORE FPC 466 3 066 155 01 CUSHION 467 3 066 153 01 SHEET VI ...

Страница 317: ...Sony EMCS Co DSR 250 250P 6 9 929 845 81 2001K1600 1 2001 11 Published by DI Customer Center ...

Страница 318: ...OE C ASSY V 23 3 063 723 01 K M4X8 EG GRIP 6 1 1 OVERALL SECTION 1 Page Before change 22 3 716 391 01 WEDGE MOUNTING 23 3 063 723 01 K M4X8 EG GRIP 24 3 612 631 01 SHOE S CAMERA 25 7 682 160 09 SCREW P M4X6 Original 6 1 Changed portion Deleted portion Added portion Ref No Part No Description Remarks Ref No Part No Description Remarks Refer to Supplement 1 9 929 845 81 together with the original Se...

Страница 319: ...Description Remarks Ref No Part No Description Remarks After change 102 134 104 103 5 not sup 102 136 137 135 107 134 104 103 5 not sup 464 X 3950 586 1 COVER ASSY PRISM 465 1 543 936 11 CORE FPC 466 3 066 155 01 CUSHION 467 3 066 153 01 SHEET VI 468 1 960 906 11 HARNESS JJ 057 6 1 10 LENS BLOCK SECTION 2 464 X 3950 586 1 COVER ASSY PRISM 465 1 543 936 11 CORE FPC 466 3 066 155 01 CUSHION 467 3 06...

Страница 320: ... 082 347 01 MANUAL INSTRUCTION CHINESE 250P CH 8 814 298 90 MICROPHONE ECM NV1 A 7096 180 A MSAC US1 MEMORY STICK READER WRITER A 7013 113 A OVERALL ASSY MSAC US2 X 3952 84401 STAND ASSY X 3950 568 1 CAP ASSY HOOD 6 2 ELECTRICAL PARTS LIST Page Before change Original 6 42 Changed portion Deleted portion Added portion Ref No Part No Description Remarks Ref No Part No Description Remarks After chang...

Страница 321: ...DSR 250 250P Sony EMCS Co 9 929 845 82 2003A1600 1 2003 1 Published by DI Customer Center ...

Страница 322: ...plement 1 Correction 1 PV01 036 Supplement 2 Contents Change of Self diagnosis code table Change of Adjustments Addition of Supplied parts Correction of part No for service part S M correction Page 6 1 6 16 Addtion of Chinese Model Addtion of Supplied parts S M Rev issued No Yes No 992984513 pdf Reverse ...

Отзывы: