background image

31

3

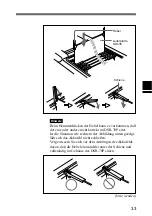
Vermeiden Sie Kabeldurchhang, indem Sie sie zuerst
durch den linken dann den rechten Kabelhalter, dann
wieder den linken und dann rechten, dann erneut durch den
linken führen wie in der Abbildung gezeigt (linke und
rechte Seite wie von der Rückseite des DSR-70P
betrachtet).

Hinweise

• Beim Wickeln der Kabel durch die Kabelhalter diese

nicht zu straff ziehen. Wie gezeigt locker wickeln.

• Sicherstellen, daß die Kabel nicht die Leiterplatten-

Verriegelungshebel behindern.

(bitte wenden)

Kabelhalter

An Leiterplatte
SDI-38

Vom Anschlußfeld

Содержание DSBK-160

Страница 1: ...allationsanleitung Seite 27 Istruzioni per l installazione Pagina 35 お買い上げいただきありがとうございます 警告 電気製品は 安全のための注意事項を守らないと 火災や人身事故になることがあります ご使用にあたっては デジタルビデオカセットレコーダー本体 に付属の取扱説明書の 安全のために と 警告 注意 をよくお読みください お読みになったあとは いつでも見ら れるところに必ず保管してください 本基板の取り付けは 必ずお買い上げ店またはソニーのサービ ス窓口にご依頼ください DSBK 160 SDI Input Output Board GB FR JP DE IT ...

Страница 2: ...2 日本語 警告表示の意味 設置説明書および製品では 次のような表示をしています 表示の内容をよく理解し てから本文をお読みください 警告 この表示の注意事項を守らないと 火災や感電などにより死亡や大けがなど人身事故 につながることがあります ...

Страница 3: ...60の構成品 5 設置説明 取り付け 6 準備 6 取り付け手順 7 コネクターキャ ップを取り付ける 10 警告 お客様へ 6ページ以降の設置説明 取り付け の項 は 特約店およびソニーの サービス窓口用の設置説明書です お客様がこの設置説明書に記載された作業を行う と 火災や 感電やけ がなどの人身事故につながる こ とがあ り ます お客様自身では絶対に取り付け作業をしないでく ださい 本基板の取り付けは 必ずお買い上げ店またはソニーのサービス窓口に ご依頼く ださい ...

Страница 4: ...イ ンプッ ト アウ ト プッ ト ボー ドDSBK 160は ソニーデジタルビデオカ セッ ト レコーダーDSR 70用のオプシ ョ ン基板です 本基板をDSR 70に取 り付ける こ とによ り DSR 70とベータカムSXデジタルビデオカセッ ト レコー ダーDNW A25を接続してカ ッ ト編集システムを構成する こ とができます DSR 70に本基板を取り付けた後の接続や操作については DSR 70の取 扱説明書をご覧く ださい ...

Страница 5: ...5 DSBK 160の構成品 DSBK 160は 下図の品目で構成されています SDI 38基板 1 ケーブル 3 コネクターパネル 1 コネクターキャップ 3 ...

Страница 6: ...取り付け 6 設置説明 取り付け 準備 基板の取り付け作業を始める前に コネクターパネルにケーブル3本を接 続しておいてく ださい SDI IN端子に赤色のケーブルを SDI OUT 1端子にオレンジ色のケーブ ルを SDI OUT 2端子に黄色のケーブルをそれぞれ接続します 赤色のケーブル オレンジ色のケーブル 黄色のケーブル コネクターパネル ...

Страница 7: ...順 1 DSR 70のバッテリ ーパネル ネジ4か所 とブラ ンクパネル ネジ2か 所 を取り外す ご注意 ブラ ンクパネルとネジをなく さないよ う に保管してく ださい 2 コネク ターパネルを差し込み 接続されているケーブル3本をDSR 70 の基板スロ ッ トの中から1本ずつ上面へ出す 手順1で外したネジでコネクターパネルをネジ止めする バッテリーパネル ブランクパネル ネジ コネクターパネル ネジ 続く ...

Страница 8: ...る ご注意 ケーブルをケーブルホルダーに留める と きは ケーブルをピンと張ら ずに図のよう にたるませてく ださい ケーブルがレバーの上や下を通らないよう にしてく ださい 4 バッテリ ーパネルをはずした開口部の上にSDI 38基板を置き 基板 にケーブルを接続する 基板上のRED ORG YELのコネクターに ケーブル3本 赤 オレ ンジ 黄色 をそれぞれ接続する RED 赤色のケーブル ORG オレンジ色のケーブル YEL 黄色のケーブル 基板にケーブルを接続したら 配線止めで固定する SDI 38基板へ コネクターパネルより ケーブル ホルダー ...

Страница 9: ...9 5 SDI 38基板をDSR 70前面側から2番目のスロ ッ ト に差し込み 基板 の両端のレバーを両手で持って ゆっ く り と奥へ入れる レバーが基板押さ えの位置まできたと き レバーを少し倒して基板を 押し込み 最後にレバーを確実に倒す 配線止め YEL ORG RED 続く レバー SDI 38基板 基板押さえ ...

Страница 10: ...DSR 70のバッテ リ ー パネルが閉ま り ません バッテリ ーパネルを取り付ける前に レバーが確実にDSR 70内部に 収まっている こ とを確認してく ださい 6 DSR 70のバッテリ ーパネルを取り付ける ご注意 バッテリ ーパネルを取り付ける前に ケーブルが基板レバーの上を 通っていないこ とを再度確認してく ださい ケーブルは基板上を通 し 余分は基板スロ ッ トのすきまに押し込んでく ださい コネクターキャップを取り付ける SDI IN端子とSDI OUT 1 2端子を使用しないときは 付属のコネク ター キャ ップを取り付けてく ださい コネクターキャップ ...

Страница 11: ...erference in which case the user will be required to correct the interference at his own expense You are cautioned that any changes or modifications not expressly approved in this manual could void your authority to operate this equipment The shielded interface cable recommended in this manual must be used with this equipment in order to comply with the limits for a digital device pursuant to Subp...

Страница 12: ...oard is an optional board for the DSR 70 70P Sony Digital Videocassette Recorder Installing this board in a DSR 70 70P gives the VCR the capability of being connected to a DNW A25 A25P Betacam SX Digital Videocassette Recorder to form a cut editing system Refer to the DSR 70 70P Operating Instructions for information on connecting and operating the DSR 70 70P with the DSBK 160 installed Overview ...

Страница 13: ...13 Components of the DSBK 160 The DSBK 160 consists of the following items SDI 38 board 1 Cables 3 Connector panel 1 Connector caps 3 ...

Страница 14: ...es To avoid such risks installation should be performed by qualified service personnel Preparations Before installing the board into the VCR first connect the three cables to the connector panel Connect the red cable to the SDI IN connector the orange cable to the SDI OUT 1 connector and the yellow cable to the SDI OUT 2 connector Red cable Orange cable Yellow cable Connector panel ...

Страница 15: ...o lose the cover plate or screws 2 Insert the connector panel and its attached cables into the hole left by the cover plate Pull the three cables one at a time through the DSR 70 70P board slot space and up to the top Secure the connector panel using the screws removed from the cover plate in step 1 Screws Battery panel Cover plate Continued ...

Страница 16: ... holders do not pull them tight Loop them loosely through the cable holders as shown in the figure Make sure that the cables do not pass over or under any board levers 4 Place the SDI 38 board above the opening where the battery panel was removed and connect the cables to the board Attach the red orange and yellow cables to their respective RED ORG and YEL connectors on the board RED red cable ORG...

Страница 17: ...des of the board slowly slide it into place When the board is inserted until the levers are aligned with the board retaining rail lower the levers slightly to seat the board firmly then lower the levers to be flush with the edge of the board YEL ORG RED Wire clip Continued Levers SDI 38 board Board retaining rail ...

Страница 18: ...that the levers are properly seated under the board retaining rail fully inside the DSR 70 70P case 6 Replace the DSR 70 70P battery panel Note Before replacing the battery panel make sure again that the cables are not over any board levers Be sure to pass the cables over the boards and push their slack into the space between boards Attaching the Connector Caps When the SDI IN SDI OUT 1 and SDI OU...

Страница 19: ...ns de connecteur 26 Aperçu La carte d entrée sortie SDI DSBK 160 est une carte en option pour le magnétoscope numérique DSR 70 70P Sony L installation de cette carte dans le DSR 70 70P permet la connexion du magnétoscope à un magnétoscope numérique Betacam SX DNW A25 A25P pour former un système de montage de coupures Voir le mode d emploi du DSR 70 70P pour les informations sur le raccordement et ...

Страница 20: ...20 Installation Composants de la DSBK 160 La carte DSBK 160 comprend les éléments suivants Carte SDI 38 1 Câbles 3 Plaque à connecteurs 1 Bouchons de connecteur 3 Aperçu ...

Страница 21: ...nstances accidentelles Pour éviter de tels risques l installation doit être faite par un personnel de service qualifié Préparatifs Avant d installer la carte dans le magnétoscope raccordez d abord les câbles au panneau des connecteurs Raccordez le câble rouge au connecteur SDI IN l orange au connecteur SDI OUT 1 et le jaune au connecteur SDI OUT 2 Câble rouge Câble orange Câble jaune Plaque à conn...

Страница 22: ...cle ou les vis 2 Insérez la plaque à connecteurs et les câbles attachés dans le trou laissé par la plaque couvercle Tirez sur les trois câbles un à la fois via l espace du logement pour carte du DSR 70 70P puis vers le haut Attachez la plaque à connecteurs en utilisant les vis retirées de la plaque couvercle à l étape 1 Vis Panneau de la batterie Plaque couvercle Plaque à connecteurs Vis ...

Страница 23: ...gure gauche et droite sont indiques de l arrière du DSR 70 70P Remarques En enroulant les câbles autour des supports de câble ne tirez pas fort dessus Enroulez les en boucle sans serrer dans les supports de câble comme le montre la figure Vérifiez que les câbles ne passent pas sur ou sous un levier de carte à suivre Supports de câble Vers la carte SDI 38 Depuis la plaque à connecteurs ...

Страница 24: ...câble jaune Enroulez le serre câble autour des câbles 5 Insérez la carte dans le second logement depuis l avant du DSR 70 70P Maintenez les leviers des deux côtés de la carte et glissez la lentement en place Quand la carte est insérée jusqu à ce que les leviers soient alignés sur le rail de retenue de carte abaissez légèrement les leviers pour asseoir fermement la carte puis abaissez les pour qu i...

Страница 25: ...ns le coffret du DSR 70 70P Si un levier est placé comme indiqué sur le côté droit de la figure ci dessous le panneau supérieur du DSR 70 70P ne se fermera pas Avant d essayer de remettre le panneau supérieur vérifiez que les leviers sont bien assis sous le rail de retenue de carte entièrement à l intérieur du coffret du DSR 70 70P à suivre ...

Страница 26: ... que les câbles ne sont pas au dessus d un levier de carte Faites passer les câbles au dessus des cartes et poussez la partie détendue dans l espace entre les cartes Fixation des bouchons de connecteur Quand les connecteurs SDI IN SDI OUT 1 et SDI OUT 2 ne sont pas utilisés insérez les bouchons de connecteur fournis dedans Bouchons de connecteur ...

Страница 27: ...on 29 Vorbereitungen 29 Einbauverfahren 30 Anbringen der Anschlußkappen 34 Kurzbeschreibung Die DSBK 160 SDI Input Output Board ist eine optionale Leiterplatte für den digitalen Videorecorder DSR 70P von Sony Bei Installation dieser Leiterplatte läßt sich der Videorecorder an einen Betacam SX Digital Videorecorder DNW A25P für ein einfaches Schnittsystem anschließen Einzelheiten zu den Anschlüssen...

Страница 28: ...28 Installation Die Komponenten der DSBK 160 Die DSBK 160 besteht aus den folgenden Komponenten Leiterplatte SDI 38 1 Kabel 3 Anschlußfeld 1 Anschlußkappen 3 Kurzbeschreibung ...

Страница 29: ...ssen Sie Installationsarbeiten ausschließlich qualifiziertem Fachpersonal Vorbereitungen Vor der Installation der Leiterplatte in den Videorecorder schließen Sie bitte die drei Kabel an das Anschlußfeld an Schließen Sie das rote Kabel an die SDI IN Buchse das orangerote Kabel an die SDI OUT 1 Buchse und das gelbe Kabel an die SDI OUT 2 Buchse an Rotes Kabel Orangerotes Kabel Gelbes Kabel Anschlußf...

Страница 30: ...Abdeckung und Schrauben nicht zu verlieren 2 Setzen Sie das Anschlußfeld mit den angeschlossenen Kabeln durch die freie Öffnung der Abdeckung ein Ziehen Sie die drei Kabel einzeln durch den Einsteckschlitz des DSR 70P und nach oben Sichern Sie das Anschlußfeld mit den in Schritt 1 gelösten Schrauben Schrauben Akkufeld Abdeckung Anschlußfeld Schrauben ...

Страница 31: ...inken führen wie in der Abbildung gezeigt linke und rechte Seite wie von der Rückseite des DSR 70P betrachtet Hinweise Beim Wickeln der Kabel durch die Kabelhalter diese nicht zu straff ziehen Wie gezeigt locker wickeln Sicherstellen daß die Kabel nicht die Leiterplatten Verriegelungshebel behindern bitte wenden Kabelhalter An Leiterplatte SDI 38 Vom Anschlußfeld ...

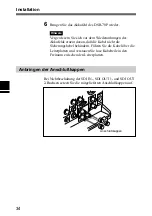
Страница 32: ...tes Kabel YEL gelbes Kabel Sichern Sie die Kabel mit der Kabelklemme 5 Schieben Sie die Leiterplatte SDI 38 in den zweiten Steckschlitz von der Frontseite des DSR 70P aus betrachtet Halten Sie die Leiterplatte an den Hebeln an beiden Seiten und schieben Sie sie vorsichtig ein Wenn die Verriegelungshebel mit der Schiene ausgerichtet sind drücken Sie sie leicht nach unten so daß die Leiterplatte kor...

Страница 33: ...e oder andere nicht korrekt im DSR 70P sitzt Ist die Situation wie rechts in der Abbildung unten gezeigt läßt sich das Akkufeld nicht schließen Vergewissern Sie sich vor dem Anbringen des Akkufelds davon daß die Hebel einwandfrei unter der Schiene und vollständig im Gehäuse des DSR 70P sitzen bitte wenden ...

Страница 34: ...ut davon daß die Kabel nicht die Sicherungshebel behindern Führen Sie die Kabel über die Leiterplatten und verstauen Sie lose Kabelteile in den Freiraum zwischen den Leiterplatten Anbringen der Anschlußkappen Bei Nichtbeschaltung der SDI IN SDI OUT 1 und SDI OUT 2 Buchsen setzen Sie die mitgelieferten Anschlußkappen auf Anschlußkappen ...

Страница 35: ...ale per il videoregistratore per videocassette digitali DSR 70P Sony L installazione di questa scheda in un DSR 70P consente al videoregistratore di poter essere collegato ad un videoregistratore per videocassette digitali Betacam SX DNW A25P per formare un sistema di montaggio di sequenze Fare riferimento alle istruzioni per l uso del DSR 70P per informazioni sui collegamenti e sul funzionamento ...

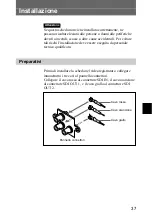
Страница 36: ...36 Installazione Componenti della DSBK 160 La DSBK 160 è costituita dalle seguenti parti Scheda SDI 38 1 Cavi 3 Pannello connettori 1 Copriconnettori 3 Presentazione ...

Страница 37: ...er evitare tali rischi l installazione deve essere eseguita da personale tecnico qualificato Preparativi Prima di installare la scheda nel videoregistratore collegare innanzitutto i tre cavi al pannello connettori Collegare il cavo rosso al connettore SDI IN il cavo arancione al connettore SDI OUT 1 e il cavo giallo al connettore SDI OUT 2 Cavo rosso Cavo arancione Cavo giallo Pannello connettori ...

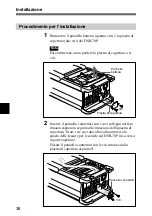
Страница 38: ... Inserire il pannello connettori con i cavi collegati nel foro rimasto esposto in seguito alla rimozione della piastra di copertura Tirare i tre cavi uno alla volta attraverso lo spazio delle fessure per le schede sul DSR 70P in su verso la parte superiore Fissare il pannello connettori con le viti rimosse dalla piastra di copertura al punto 1 Viti Pannello batteria Piastra di copertura Viti Panne...

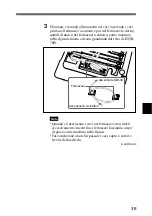
Страница 39: ...ome mostrato nella figura sinistra e destra guardando dal retro del DSR 70P Note Quando si inseriscono i cavi nei fermacavi non tirarli eccessivamente Inserirli nei fermacavi lasciando un po di gioco come mostrato nella figura Fare attenzione a non far passare i cavi sopra o sotto le levette della scheda continua Fermacavi alla scheda SDI 38 dal pannello connettori ...

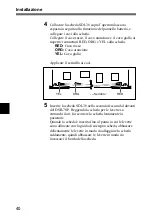
Страница 40: ...ne YEL Cavo giallo Applicare il serrafilo ai cavi 5 Inserire la scheda SDI 38 nella seconda fessura dal davanti del DSR 70P Reggendo la scheda per le levette su entrambi i lati far scorrere la scheda lentamente in posizione Quando la scheda è inserita fino al punto in cui le levette sono allineate con la guida di sostegno scheda abbassare delicatamente le levette in modo da alloggiare la scheda sa...

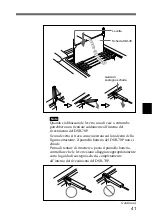
Страница 41: ...o del rivestimento del DSR 70P Se una levetta si trova come mostrato sul lato destro della figura sottostante il pannello batteria del DSR 70P non si chiude Prima di tentare di rimettere a posto il pannello batteria controllare che le levette siano alloggiate appropriatamente sotto la guida di sostegno scheda completamente all interno del rivestimento del DSR 70P ...

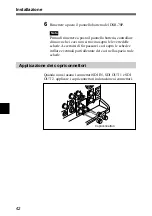
Страница 42: ... che i cavi non si trovino sopra le levette delle schede Accertarsi di far passare i cavi sopra le schede e infilare eventuali parti allentate dei cavi nello spazio tra le schede Applicazione dei copriconnettori Quando non si usano i connettori SDI IN SDI OUT 1 e SDI OUT 2 applicare i copriconnettori in dotazione ai connettori Copriconnettori ...

Страница 43: ...ソニー株式会社 お問い合わせは ソニー業務用製品ご相談窓口のご案内 にある窓口へ 141 0001 東京都品川区北品川6 7 35 ソニーマーケティング株式会社 情報システム営業本部 108 0074 東京都港区高輪4 10 18 Printed in Japan ...

Отзывы: