background image

Tabl

e of


C

o

n

tent
s

Let

’s

 U
s

e

E

njo
y

ing 
Mo

re

T

ro

u

b

les
hoo

ti

ng

In

dex

10

GB

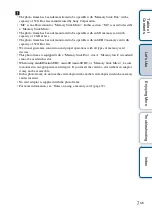
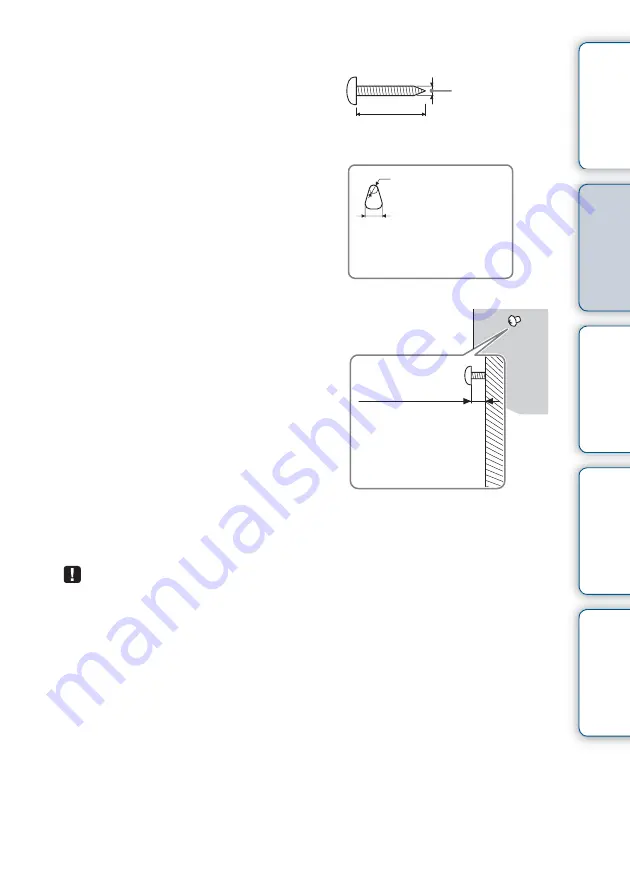
To hang the photo frame on a wall (DPF-W700 only)

1

Prepare commercially available 
screws suitable for the holes on the 
rear of the unit.

2

Drive the commercially available 
screws into the wall.

Make sure the screws protrude 2.5 mm to 3 
mm (approx. 1/8 inch) from the surface of 
the wall.

3

Hang the photo frame on the wall by fitting the screw head to the hole 
on the rear of the unit.

• Use screws suited for the wall material. The screws may be damaged, depending on the type 

of material used in the wall. Drive the screws into a stud in the wall or a pillar. 

• Firmly tighten the screw so that the photo frame will not fall from the wall. 
• When you want to re-insert a memory card, remove the photo frame from the wall then eject 

and re-insert the memory card while the photo frame is placed on a stable surface. 

• Remove the stand when you hang the photo frame on a wall. 
• Connect the DC cable of the AC adaptor to the photo frame and hang the photo frame on the 

wall. Then plug the AC adaptor into the wall outlet. 

• Sony takes no responsibility for any accidents or damage caused by defects of attachment, 

misuse, natural disasters, etc. 

• While the photo frame is mounted on a wall, it may fall when you operate the buttons or the 

touch screen. when operating the photo frame, support it carefully so as not to drop it. 

4 mm (

3

/

16

 inch) 

More than 25 mm (1 inch) 

 ø 5 mm (

7

/

32

 inch)

10 mm (

13

/

32

 inch) 

Holes for hanging the unit 
on the wall

2.5 mm - 3 mm
(approx. 

1

/

8

 inch)

Содержание DPF-WA700

Страница 1: ...DPF WA700 W700 4 400 694 13 1 Table of Contents Let s Use Enjoying More Troubleshooting Index Digital Photo Frame Handbook ...

Страница 2: ...tent which may be caused by use or malfunction of the digital photo frame or memory card Backup recommendations To avoid potential risk of data loss caused by accidental operation or malfunction of the digital photo frame we recommend that you save a backup copy of your data Notes on the LCD screen Do not press against the LCD screen The screen may become discolored and that may cause a malfunctio...

Страница 3: ...photo frame 14 Enjoying a slideshow 19 Displaying the desired images 27 Enjoying Music or Internet Radio DPF WA700 only 30 Saving images in your photo frame Import 33 Enjoying More Deleting an image 35 Exporting an image from internal memory 38 Using the auto power ON OFF timer 41 Enjoying Network Services 44 Enjoying the Home Network 52 Changing the Settings 56 Copying images and music files from...

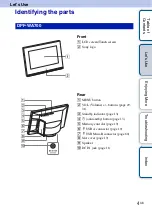
Страница 4: ...0 Front A LCD screen Touch screen B Sony logo Rear A MENU button B VOL Volume buttons page 29 31 C Standby indicator page 13 D 1 on standby button page 13 E Memory card slot page 19 F USB A connector page 19 G USB Mini B connector page 60 H Slot cover page 19 I Speaker J DC IN jack page 11 Let s Use ...

Страница 5: ...t A LCD screen Touch screen B Sony logo Rear A MENU button B 1 on standby button page 13 C Standby indicator page 13 D USB A connector page 19 E USB Mini B connector page 61 F Memory card slot page 19 G Holes for hanging the unit on a wall page 10 H Stand page 9 I DC IN jack page 12 ...

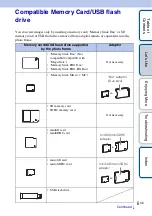
Страница 6: ...era or equivalent into the photo frame Memory cards USB flash drive supported by the photo frame Adaptor Memory Stick Duo Not compatible Compatible with MagicGate Memory Stick PRO Duo Memory Stick PRO HG Duo Not necessary Memory Stick Micro M2 SD memory card SDHC memory card Not necessary miniSD card miniSDHC card microSD card microSDHC card USB flash drive M2 adaptor Duo size miniSD miniSDHC adap...

Страница 7: ...e with an SDHC memory card with capacity of 32 GB or less We do not guarantee connection and proper operations with all types of memory card devices This photo frame is equipped with a Memory Stick Duo slot A Memory Stick standard cannot be used in this slot When using miniSD miniSDHC microSD microSDHC or Memory Stick Micro be sure to mount it in an appropriate card adaptor If you insert the card ...

Страница 8: ...Preparation 1 Checking included items Make sure that the following items are included Digital photo frame 1 AC adaptor 1 Stand DPF W700 only 1 Operating Instructions 1 CD ROM Digital Photo Frame Handbook 1 Warranty 1 In some regions the warranty is not packaged together ...

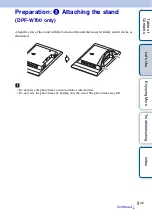
Страница 9: ...ing the stand DPF W700 only Align the claw of the stand with the bottom of the unit then insert it firmly until it clicks as illustrated Do not place the photo frame on an unstable or tilted surface Do not carry the photo frame by holding only the stand The photo frame may fall Continued r ...

Страница 10: ...at the photo frame will not fall from the wall When you want to re insert a memory card remove the photo frame from the wall then eject and re insert the memory card while the photo frame is placed on a stable surface Remove the stand when you hang the photo frame on a wall Connect the DC cable of the AC adaptor to the photo frame and hang the photo frame on the wall Then plug the AC adaptor into ...

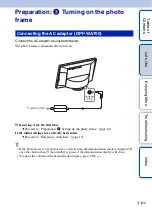
Страница 11: ...roceed to Preparation 4 Setting up the photo frame page 14 If the initial settings have already been made c Proceed to Enjoying a slideshow page 19 If the photo frame is not operated for a certain time the demonstration mode is displayed If any other button than 1 on standby is pressed the demonstration display will close To adjust the volume of the demonstration display press VOL Connecting the A...

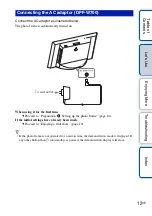
Страница 12: ...t time c Proceed to Preparation 4 Setting up the photo frame page 14 If the initial settings have already been made c Proceed to Enjoying a slideshow page 19 If the photo frame is not operated for a certain time the demonstration mode is displayed If any other button than 1 on standby is pressed the demonstration display will close Connecting the AC adaptor DPF W700 To wall outlet ...

Страница 13: ...previous status Do not turn the photo frame off or disconnect the AC adaptor from an AC outlet or the DC IN jack of the photo frame Doing so may damage the photo frame Connect the AC adaptor to an easily accessible wall outlet close by If trouble occurs while using the adaptor immediately shut off the power by disconnecting the plug from the wall outlet Do not short the plug of the AC adaptor with...

Страница 14: ...e reaction of the touch screen properly Perform it if the touch screen does not react on the tapped position This photo frame employs a resistive film pressure sensitive touch panel The pressure sensitive panel operates when it detects pressure from your tapping on the panel The panel will respond more precisely when you apply pressure to a small area a point It is recommended to tap the panel wit...

Страница 15: ... WPS button tGo to B WPS PIN Method page 16 C Select this if your access point does not support WPS Tap Search so that the connectable access point list is shown Select an access point to which you want to connect from this list and enter SSID network name and passphrase security key following the on screen instructions t Go to C Search Wi Fi Networks page 17 WPS Wi Fi Protected Setup is a standar...

Страница 16: ...tting will be made automatically 4 Confirm the displayed content and tap Complete The slideshow display appears If no image data are stored in the unit is displayed BWPS PIN Method 1 Tap WPS PIN Method 2 Enter the WPS PIN code displayed on the screen of the photo frame to your access point For details on entering the WPS PIN code for your access point refer to the instruction manual for your acces...

Страница 17: ...le access point list If no access point is found Tap Add Wi Fi Networks enter the SSID on the display then tap Next Go to step 4 3 On the displayed screen enter the password then tap Next By tapping the Show password button so that the mark appears on it you can confirm the entered password Tap the blank area below the password so that the screen keyboard appears Input in a case sensitive manner 4...

Страница 18: ...der Network device such as an ADSL modem Access point or wireless router Setting information SSID on the access point If any wireless LAN cannot be connected check the following 1 Check that the access point to be used is ready Check that the power is on Check that the number of other Wi Fi devices connected via the access point does not exceed the maximum Check that any access restriction such as...

Страница 19: ...ith its front facing away from the screen Playback automatically begins and images in the memory card or USB flash drive are displayed one after another as a slideshow xDPF WA700 xDPF W700 Have the labels of memory cards facing outward USB flash drive SD memory card Memory Stick Duo Open the Slot cover Have the labels of memory cards facing outward USB flash drive SD memory card Memory Stick Duo C...

Страница 20: ... than 1 on satndby is pressed Do not simultaneously insert multiple memory cards and USB flash drive into the memory card slots A B or the USB connector Do not insert memory cards into slots A and B simultaneously It may be a cause of breakage of the photo frame Note the following when you select a slideshow using the image stored in a memory card Owing to the characteristics of memory card device...

Страница 21: ...the selected device 2Image Information Shows information regarding the image that is received with the network service Displayed items Network service icon Email Facebook PlayMemories Online Sent date and time From Sender Title Tapping opens the image information display except Slideshow 4 With Facebook The Like button and number of Like are displayed page 48 You can set whether this information i...

Страница 22: ...the indication is no Wi Fi network is connected 5New arrivals information Shows the recent arrival time of each network service Network service icons Email Facebook PlayMemories Online is shown during incoming The newly arrived image can be displayed by tapping the icon shown above Service that doesn t set the account is not displayed 6Date Time Shows the date and time You can change the display f...

Страница 23: ... 4 Tap Select Area 5 Tap the white box below Area The keyboard appears 6 Enter the desired Area on the keyboard Enter the name of the area in English Example Hawaii t Enter HAWAII The list of selectable cities appears If the number of selectable cities is large all of them may not be displayed at a time In such a case slide the screen up or down using a finger to display other selectable cities Se...

Страница 24: ...step 5 Repeat the procedure 8 After setting of the city tap at the upper left of the display The slideshow display is restored To change the temperature display You can change the temperature display Celsius Fahrenheit of the Weather Settings display Tap Celsius Fahrenheit on Weather Settings display then tap Celsius or Fahrenheit After setting tap at the upper left of the display to return to the...

Страница 25: ...The menu appears 2 Tap Slideshow Styles 3 Tap the desired Slideshow Slideshow 1 Shows all standard items See page 21 for its content Slideshow 2 Unlike Slideshow 1 it does not display the Weather Slideshow 3 Unlike Slideshow 1 it does not display the Weather and Date Time Changing the slideshow display Continued r ...

Страница 26: ...ubleshooting Index 26GB Slideshow 4 Like Slideshow 1 it displays Weather and Date Time in larger fonts with the image in smaller size In addition Weekly Weathercast is displayed Slideshow 5 In addition to Slideshow 1 it displays Weekly Weathercast ...

Страница 27: ...lay A memory card which is not inserted in is indicated in gray You cannot select it When you select Home Network select one of the displayed network devices and select a folder in it A list of photos in the selected device is displayed See Enjoying the Home Network page 52 4 Tap Start Slideshow The images in the selected device are displayed as a slideshow in order of filename or from the newest ...

Страница 28: ...elect an image you want to display and tap its listing The selected image is displayed The displayed image is cropped partially at top bottom left and right to fill the entire display without changing the aspect ratio To switch the image to the next by fingertip Slide your finger lightly at the center of the display to the left or right to swich the image manually Specifying the playback image Sin...

Страница 29: ...some video files that fast forward backward playback cannot be performed or that a video image is disturbed or audio is not played back properly You cannot play the following types of video files Video files with copyright protection Video files that exceed the maximum number of pixels either in width or height We cannot guarantee operation with video files not mentioned above Continuous playback ...

Страница 30: ...t is not inserted in is indicated in gray You cannot select it When you select Home Network select one of the displayed network devices and select a folder in it A list of music files in the selected device is displayed See Enjoying the Home Network page 52 When you want to listen to Internet Radio see Listening to Internet Radio page 32 4 Tap the listing for the music file you want to play The se...

Страница 31: ...ry card directly to internal memory is not supported To import a music file to internal memory connect a computer to the photo frame first then transfer the file from the computer to the internal memory of the photo frame For details see Copying images and music files from a computer page 60 Function Operation To adjust the volume Press VOL on the rear of the photo frame To pause playback Tap X on...

Страница 32: ...listening to Pandora internet radio U S A only 1 Press MENU on the rear of the photo frame The menu appears 2 Tap Music 3 Tap Pandora internet radio The Internet Radio display appears then the display for selecting a station appears The login display appears the first time or if you logged out last time to exit Input according to the instructions on the display 4 Operate according to the instructi...

Страница 33: ...to the internal memory of the photo frame 1 Press MENU on the rear of the photo frame The menu appears 2 Tap Photo Videos DPF WA700 Photo DPF W700 3 Tap the icon to select the device that has images you want to import 4 Tap Go to Index A list of images in the selected device is displayed 5 Press MENU on the rear of the photo frame An operation menu appears at the bottom of the display 6 Tap Import...

Страница 34: ...pear 8 Tap Import 9 Tap Yes The selected image s is are imported to internal memory When import has been completed the index display is restored If you select No in step 9 the image selection display is restored If you tap Cancel during import import is interrupted and the index display is restored When any image is imported it is saved in a new folder with the import date stamp created automatica...

Страница 35: ...ess MENU on the rear of the photo frame The menu appears 2 Tap Photo Videos DPF WA700 Photo DPF W700 3 Tap the icon to select the device that has images you want to delete 4 Tap Go to Index A list of images in the selected device is displayed 5 Press MENU on the rear of the photo frame The operation menu appears at the bottom of the display 6 Tap Delete Index display Continued r Enjoying More ...

Страница 36: ... select No in step 9 the image selection display is restored If you tap Cancel during deletion is interrupted and the index display is restored An image from the home network cannot be deleted with the photo frame Avoid the following while an image is being deleted from selected device doing so may damage the photo frame memory card or data Turning off the power Removing a memory card Inserting an...

Страница 37: ...Table of Contents Let s Use Enjoying More Troubleshooting Index 37GB To format the internal memory 1 Tap Settings 2 Tap Initialize 3 Tap Format Internal Memory ...

Страница 38: ...o a memory card 1 Press MENU on the rear of the photo frame The menu appears 2 Tap Photo Videos DPF WA700 Photo DPF W700 3 Tap Internal Memory 4 Tap Go to Index A list of images in the selected device is displayed 5 Press MENU on the rear of the photo frame The operation menu appears at the bottom of the display 6 Tap Export Index display Continued r ...

Страница 39: ...o it To cancel selection Tap the listing of the image you want to cancel The mark will disappear If you tap Clear All selection of all selected images will be canceled All marks next to them will disappear 8 Tap Export 9 Tap the icon of the memory card to which the image is to be exported 10 Tap Yes The selected image s is are exported to the selected memory card When export has been completed the...

Страница 40: ...is restored When any image is exported it is saved in a new folder with the export date stamp created automatically Avoid the following while an image is being exported to selected device doing so may damage the photo frame memory card or data Turning off the power Removing a memory card Inserting another memory card Any device that is not recognized by the photo frame is indicated in gray and can...

Страница 41: ...play 4 Tap Setup Method then tap to select a setup method Advanced You can set the auto power ON OFF function in one hour units independently for each day of the week Simple You can set the auto power ON OFF function in one minute increments Auto off You can set the auto power off time as a specified time that has elapsed with no operation after the photo frame is turned on You can specify two or ...

Страница 42: ...ray the time zone s during which you wish to keep the photo frame off for each day of the week You can set the time zone in one hour units independently for each day of the week The photo frame is kept off during the grayed time zones Each tap toggles between highlighted in blue and grayed 3 Tap OK The power is turned off automatically at the time you set for the power off timer of Advanced settin...

Страница 43: ...roubleshooting Index 43GB 3 Tap to select Auto ON day or Auto OFF day and select the day of the week on which you want the timer activated The selected day of the week is checked 4 Tap OK When Auto off is selected Tap to select 2 Hour or 4 Hour ...

Страница 44: ...ion to a Wi Fi network must be established before the e mail setting To confirm the Wi Fi connection status check the signal strength indication at the upper right of the screen No Wi Fi network is connected Set up the Wi Fi connection Signal strength is indicated in four levels Weak Strong Use the unit in a place where signal strength is strong 1 Press MENU on the rear of the photo frame The menu...

Страница 45: ...ng mail server cannot be confirmed The display shows a message Tap OK to return to the Set up email display In this case see the instructions To set e mail manually below 8 Tap OK The settings are completed To set e mail manually 1 Tap Manual Setup in step 7 2 Tap POP3 or IMAP 3 Enter your Username Password POP3 Server or IMAP Server Port and or Security Type When you tap the Show password button ...

Страница 46: ... not Tap the Show photo information button on the Network Services display in step 3 To show the photo information Mark the button with To not display the photo information Unmark the button Tapping the marked button again removes To suspend the e mail service you have set You can disable your e mail settings and discontinue having the photo frame receive e mail Tap Email on the Network Services d...

Страница 47: ...address and password you use with your Facebook service then tap Login The list of friends is displayed A message appears the first time only to confirm access permission 5 Specify the friends from whom you wish to receive photos Select such a friend by tapping on the listing for that friend Friend marked with Photos from him her are automatically received Friend not marked with Photos from him he...

Страница 48: ...ap Facebook on the slideshow display When more than 100 images are received the latest 100 images sent via Facebook are displayed To display Like except Slideshow 4 Tap for the image information The image information display opens and the Like button or the Unlike button for the already liked image and the number of likes are displayed To like the image tap the Like button To unlike the image tap ...

Страница 49: ... you wish to change Friend marked with Photos from him her are automatically received Friend not marked with Photos from him her are not received 3 Make the selection for the friend then tap OK 4 Tap OK on the completion display Friend selection becomes valid first upon reception after the setting Friends added after you specified a friend for automatic photo reception will be automatically marked...

Страница 50: ... the PlayMemories Online service you use 1 Press MENU on the rear of the photo frame The menu appears 2 Tap Network Services The Network Services display appears 3 Tap at the right of PlayMemories Online on the display 4 Follow the instructions on the PlayMemories Online display then tap OK on the completion display The settings are completed Setting PlayMemories Online Continued r ...

Страница 51: ...ies Online settings and discontinue having the photo frame receive files via PlayMemories Online Tap PlayMemories Online on the Network Services display and remove the mark To resume reception of PlayMemories Online files by the photo frame tap PlayMemories Online and reapply the mark It may not work properly because of some issue with the network services It is necessary to setup an account in ad...

Страница 52: ...ws Media Player Version 12 supplied with Microsoft Windows 7 To use the home network a DLNA conforming digital device or a preparatory setting on your PC is required 1 Set the wireless LAN For the setting method refer to Read This First supplied separately or Changing the Settings page 56 2 Set the computer This section shows an example of setting with Windows 7 Windows Media Player Version 12 Dep...

Страница 53: ...Table of Contents Let s Use Enjoying More Troubleshooting Index 53GB The above procedure is an example of setting Perform the required setup according to your network environment ...

Страница 54: ...hoto Videos DPF WA700 Photo DPF W700 3 Tap Home Network 4 Tap the item that you want to access on the list of equipment shown on the display 5 Tap the folder that that contains the images you want to display A list of displayable images is displayed 6 Tap Start Slideshow or Go to Index The slideshow starts displaying the images listed in step 5 or shows as thumbnails on the index display Displayin...

Страница 55: ...to frame The menu appears 2 Tap Music 3 Tap Home Network 4 Tap the equipment that you want to access on the list of equipment shown on the display 5 Tap the icon of the folder that contains the music you want to play A list of playable music is displayed 6 Tap the listing for the music file you want to play The selected music file starts playback Playing music DPF WA700 only ...

Страница 56: ... is displayed 4 Tap the item you want to change This enables you to change the setting page 57 5 Make the setting according to the instructions on the display 6 Press MENU on the rear of the photo frame The previous display will be restored Some items cannot be set depending on the condition of the photo frame for example during slideshow etc In this case these items are indicated in gray and you ...

Страница 57: ...t Search Wi Fi Networks c For setting see Preparation 4 Setting up the photo frame page 14 SSID Security Signal Strength MAC Address IP address Default Gateway Subnet Mask DNS Server Primary DNS Server Secondary Displays the current settings Setting Description Slideshow Speed Selects 3 sec 7 sec 20 sec 1 min 5 min 30 min 1 hour 3 hours 12 hours or 24 hours as the interval for switching slideshow ...

Страница 58: ...olish Czech Greek Turkish Swedish Danish Finnish Setting Description Set Time and Date from Internet Activated if is marked in the checkbox Date Sets date Time Sets time Time Zone Selects time zone Use 24 hour Format Changes the time format 24 hour format A is marked in the checkbox of Use 24 hour Format AM PM format A is not marked in the checkbox of Use 24 hour Format Date Display Order Selects ...

Страница 59: ... current date and time settings of Date Time Settings page 58 Setting Description Version Displays the version of the firmware of the photo frame Memory Capacity Displays the maximum amount of space available in internal memory in the initial state Remaining Capacity Displays the amount of free space currently available in internal memory Open Source License Displays the Open Source License Update...

Страница 60: ...ory of the photo frame with a computer and copy them to a computer or copy images from a computer to the photo frame 1 Connect the AC adaptor to the photo frame and to the AC outlet then turn the photo frame on 2 Connect the computer and photo frame with a commercially available USB cable x DPF WA700 Connecting to a computer To USB Mini B connector Computer To USB connector Continued r ...

Страница 61: ...ndex 61GB x DPF W700 System requirements Windows Recommended OS Microsoft Windows 7 SP1 Windows Vista SP2 Windows XP SP3 Port USB port Macintosh Recommended OS Mac OS X v 10 4 or later Port USB port To USB Mini B connector Computer To USB connector Continued r ...

Страница 62: ... sure to connect the Mini B TYPE USB connector to the photo frame shorter than 3 meters If multiple USB devices are connected to a computer or if a hub is used a problem may occur You cannot operate the photo frame from another USB device being used simultaneously Do not disconnect the USB cable during data communication Operation may not be guaranteed with some computers even if they satisfy the ...

Страница 63: ...2 Click on Open folder to view files when the AutoPlay window appears If the AutoPlay window does not appear select S FRAME removable disc then open it 3 Move the cursor in this window and right click then click on New t Folder Name this new folder In this manual the folder name sony is used as an example 4 Double click to open this sony folder 5 Open the folder that contains the image files you w...

Страница 64: ...60 When connection to the computer has been completed the S FRAME icon will appear on the computer display 2 Double click on the S FRAME icon when it appears on the screen 3 Move the cursor in this window then select New Folder Name this new folder In this manual the folder name sony is used as an example 4 Open this sony folder 5 Open the folder that contains the image files you want to copy then...

Страница 65: ...r of images may be reduced depending on the filename length or character type When image files from the computer are saved in internal memory of the photo frame they are saved without being compressed As a result fewer images may be saved in internal memory of the photo frame Image files made or edited on a computer may not be displayed Image files set to Read Only on a computer cannot be deleted ...

Страница 66: ...photo frame But its thumbnail data for review or the image itself cannot be accessed No data are recorded in the internal memory Memory stick Duo SD memory card or USB flash drive The internal memory Memory stick Duo SD memory card or USB flash drive is damaged and inoperable c Use a normal Memory Stick Duo SD memory card or USB flash drive or format the internal memory A internal memory Memory st...

Страница 67: ... be displayed page 74 Is the file format compatible with DCF c A file that is not compatible with DCF may not be displayed with the photo frame even if it can be displayed with a computer Some images are not displayed Are the images displayed in the index view mode c If the image is displayed in the index view mode but cannot be displayed as a single image the image file may be damaged even though...

Страница 68: ...pace Is internal memory full c Delete any unwanted images page 35 Did you save images from a computer to internal memory without making a folder in internal memory c If you do not make a folder you can only save up to 512 images In addition the number of images to be saved may be reduced depending on the file name length or character type When you save images in the internal memory from a computer...

Страница 69: ...usic file DPF WA700 only A music file cannot be imported c A music file cannot be imported from a memory card to internal memory directly To import a music file to internal memory connect the photo frame with a computer and transfer the music file from the computer to internal memory For details see Copying images and music files from a computer page 60 x Playing the music DPF WA700 only A music f...

Страница 70: ...nnot be ejected c If a miniSD card microSD card or Memory Stick Micro is inserted improperly it may be possible to take it out using a fine tipped tool such as tweezers or needle nose pliers In this case be careful that this does not damage the memory card and or photo frame Continued r ...

Страница 71: ...etwork without entering a log in ID or Password Check the service content of the connected wireless network c Some equipment that uses a frequency band of around 2 4 GHz such as a microwave oven or Bluetooth device may be in use near the photo frame Move the photo frame away from such equipment or turn that equipment off It takes long time to transfer images c It may take a long time to transfer i...

Страница 72: ... transport When you transport the photo frame remove the memory card AC adaptor and connected cables from the photo frame and put the photo frame and its peripherals in the original box with the protective packaging If you no longer have the original box and packing parts use similar packing material so that the photo frame will not be damaged while being transported If the body of the unit is dir...

Страница 73: ...rect insertion direction of the card Incorrect insertion may cause damage to the photo frame When inserting a memory card it will only insert part of the way so do not try to force it as this could damage the memory card and or photo frame Do not remove a memory card or turn off the photo frame while the photo frame is reading or accessing data Otherwise data may be rendered unreadable or be erase...

Страница 74: ...ne Progressive JPEG with 4 4 4 4 2 2 or 4 2 0 format Baseline JPEG with 4 4 4 4 2 2 or 4 2 0 format Photo image Maximum picture elements 2 16 384 12 288 Baseline JPEG Video 3 4 5 MPEG 4 AVC H 264 Extension mp4 mts Profile Baseline Profile Main Profile High Profile Level lower than 4 2 Maximum resolution 1920 1080 Audio format Dolby Digital AAC MPEG 4 Visual Extension mp4 Profile Simple Profile Adv...

Страница 75: ...ry card an internal device Internal memory capacity 6 1 GB Approx 4 000 images 7 can be saved Wireless LAN Transmission method IEEE 802 11b g n Frequency band 2 4 GHz band Encryption WEP WPA Personal WPA2 Personal Connection method WPS Wi Fi Protected Setup manually Compliance Power requirements DC IN jack DC 12 V DC IN jack DC 5 V Power consumption At the maximum load 13 3 W At the standard load ...

Страница 76: ...card due to the transfer rate of the memory card 5 Number of frames shown may be reduced during playback of some video files 6 When measuring media capacity 1 GB equals 1 000 000 000 bytes a portion of which is used for data management and or application files The capacity that a user can use is approximately 800 MB 7 The number of stored images is an approximate guide when resizing and importing ...

Страница 77: ...ng Inc iType is a trademark of Monotype Imaging Inc AccuWeather com is registered trademark of AccuWeather Inc Facebook is registered trademark of Facebook Inc Wi Fi CERTIFIED logo is registered trademark of Wi Fi Alliance Clear Phase and the logo are trademarks of Sony Corporation DLNA the DLNA Logo and DLNA CERTIFIED are trademarks service marks or certification marks of the Digital Living Netwo...

Страница 78: ...cence Notice on GNU GPL LGPL applied software This product contains software that is subject to the following GNU General Public License hereinafter referred to as GPL or GNU Lesser General Public License hereinafter referred to as LGPL These establish that customers have the right to acquire modify and redistribute the source code of said software in accordance with the terms of the GPL or LGPL s...

Страница 79: ...NG VIDEO IN COMPLIANCE WITH THE MPEG 4 VISUAL STANDARD MPEG 4 VIDEO AND OR ii DECODING MPEG 4 VIDEO THAT WAS ENCODED BY A CONSUMER ENGAGED IN A PERSONAL AND NON COMMERCIAL ACTIVITY AND OR WAS OBTAINED FROM A VIDEO PROVIDER LICENSED BY MPEG LA TO PROVIDE MPEG 4 VIDEO NO LICENSE IS GRANTED OR SHALL BE IMPLIED FOR ANY OTHER USE ADDITIONAL INFORMATION INCLUDING THAT RELATING TO PROMOTIONAL INTERNAL AN...

Страница 80: ...joying More Troubleshooting Index 80GB All other companies and product names mentioned herein may be the trademarks or registered trademarks of their respective companies Furthermore and are not mentioned in each case in this manual ...

Страница 81: ...Compatible file formats 74 Compatible Memory Card 6 Computer 60 Connecting to a computer 60 Copying from a Macintosh computer 64 Copying from a Windows computer 63 Connecting AC adaptor 11 12 Computer 60 D Date Time Settings 58 Date 58 Date Display Order 58 Set Time and Date from Internet 58 Time 58 Time Zone 58 Use 24 hour Format 58 Demonstration display 11 E Email 44 Enjoying a slideshow 19 Erro...

Страница 82: ...k 47 Setting PlayMemories Online 50 O On standby 4 5 Overview of the slideshow display 21 P Playing Slideshow 19 Videos 29 Precautions 72 R Resetting to the factory default settings 56 S Saving music files 31 Sellecting slideshow Slideshow 1 25 Slideshow 2 25 Slideshow 3 25 Slideshow 4 26 Slideshow 5 26 Setting up 14 Calibrating the touch screen 14 Selecting the screen language 14 Selecting the ti...

Страница 83: ...Mini B connector 4 5 60 61 Using the auto power ON OFF timer 41 V Videos 29 Adjusting the volume 29 Fast forward backward playback 29 Pausing playback 29 W Weather 23 Setting the city 23 Temperature display 24 Weather Settings 58 Celsius Fahrenheit 58 Select Area 58 Wi Fi Settings 57 Search Wi Fi Networks 17 WPS PIN Method 16 WPS Push Button Configuration method 16 ...

Страница 84: ... 2011 Sony Corporation http www sony net ...

Отзывы: