background image

30 

GB

Exporting an image from 
the internal memory to a 
memory card

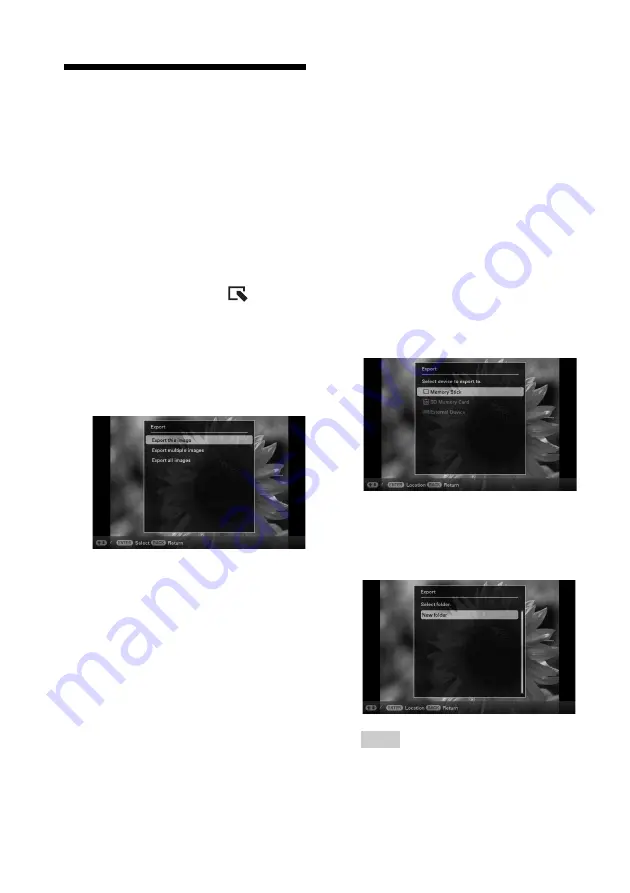
You can export the images in the internal 
memory to a memory card.

1

Press MENU when an image stored 
on the internal memory is displayed 
on the screen.

2

Press 

B

/

b

 to select the 

 (Editing) 

tab.

3

Press 

v

/

V

 to select [Export] and 

press ENTER.

Single view mode 
(Single image display)

4

Press 

v

/

V

 to select [Export this 

image], [Export multiple images] or 
[Export all images] and press 
ENTER.

If you select [Export this image], the 
image currently displayed is exported to 
the device. Go to step 7. (This item cannot 
be selected on the Slideshow display.)

If you select [Export multiple images], 
you can select the image you want to 
export from the image list. Go to step 5.

If you select [Export all images], the 
image list with check marks in the check 
boxes for all the images is displayed. Go 
to step 6.

5

Press 

B

/

b

/

v

/

V

 to select the image to 

be exported from the image list, and 
press ENTER.

” is added to the selected image.

If you want to export multiple images at a 
time, repeat this step.

If you want to clear the selection, select 
the image and press ENTER. “

” 

disappears from the image.

6

Press MENU.

The screen for selecting the memory card 
to which the image is exported is 
displayed.

7

Press 

v

/

V

 to select a memory card 

to which the image is exported, and 
press ENTER.

8

Press 

v

/

V

 to select a destination 

folder and press ENTER.

The confirmation screen for exporting the 
image is displayed.

Tip

A new folder is created automatically when you 
select [New folder].

Содержание DPF-A710/A700

Страница 1: ... D1020 D1010 DPF D820 D810 DPF D720 D710 D700 DPF A710 A700 2010 Sony Corporation Before operation Basic operations Advanced operations Using with a computer Error messages Troubleshooting Additional information Digital Photo Frame Handbook ...

Страница 2: ...e slideshow 22 Playing a slideshow with background music DPF D1020 D820 D720 only 25 Importing a music file 25 Selecting a music file to play 25 Playing background music with a slideshow 26 Refresh mode DPF D1020 D820 D720 only 27 Importing images from a memory card to the internal memory 27 Specifying the playback device 29 Exporting an image from the internal memory to a memory card 30 Deleting ...

Страница 3: ...ting If trouble occurs 47 Additional information About memory cards 52 Memory Stick 52 SD memory card 53 Notes on using a memory card 53 Index 54 On the illustrations and screen shots used in this manual The illustrations and screen shots used in this manual are of the DPF D1020 unless noted otherwise The illustrations and screen shots used in this manual may not be identical to those actually use...

Страница 4: ...4 GB Before operation Enjoying your photo frame in various ways This Sony digital photo frame allows you to easily display images taken with a digital camera or other devices without using a computer ...

Страница 5: ... including the ones displaying a clock or calendar You can also change playback settings such as the playback order page 22 xDisplaying memory card images and importing them to the internal memory Just insert a memory card such as a Memory Stick and SD memory card removed from a digital camera or other device and you will be able to view the images immediately You can import and save the memory ca...

Страница 6: ...ages pages 21 25 xSorting function You can sort images by the date folder image orientation mark and videos photos page 34 xAutomatic rotation of images The photo frame automatically rotates images to their proper orientation Images are also automatically rotated when the photo frame is set in either the portrait or landscape position supplied Operating Instructions Stand A video file is not rotat...

Страница 7: ...DPF A710 only Sony logo page 11 Rear BACK button ENTER button Direction v V buttons Direction B b buttons MENU button VIEW MODE button page 14 1 on standby button Standby Indicator USB mini B connector page 43 Memory card slot page 13 Access lamp Holes for hanging unit on the wall DC IN 5 V jack Stand Continued ...

Страница 8: ...n v V buttons Direction B b buttons MENU button VIEW MODE button page 14 1 on standby button Standby Indicator EXT INTERFACE USB A connector USB mini B connector page 43 Memory card slot page 13 Access lamp Holes for hanging unit on the wall DC IN 12V jack DPF D1020 D1010 DC IN 5 V jack DPF D820 D810 D720 D710 D700 Speaker DPF D1020 D820 D720 only Stand ...

Страница 9: ...on standby button SINGLE button INDEX button Zoom in button Direction B b v V buttons ENTER button Zoom out button IMPORT button DELETE button ROTATE button About descriptions in this manual The operations described in this manual are based on those with the buttons on the photo frame When an operation is performed differently for example with the remote control and the buttons on the photo frame ...

Страница 10: ...mote control towards the remote sensor on the photo frame DPF A710 DPF D1020 D1010 D820 D810 D720 D710 The photo frame may fall if you use the buttons on the photo frame when it is hanging on a wall Operate the photo frame while holding it firmly so that it will not fall down Replacing the battery of the remote control If the remote control does not operate replace the battery CR2025 lithium batte...

Страница 11: ...l to prevent leaking and corrosion Incorrectly inserting shorting dismantling or heating the battery or throwing it into a fire may cause the battery to rupture or leak Turning the photo frame on When you have already turned on your photo frame by connecting it to the AC power source skip to the next section Turning on the power Press 1 on standby on the photo frame to turn on the power The standb...

Страница 12: ...he Settings tab 3 Press v V to select Date time Settings and press ENTER 4 Adjust the date 1Press v V to select Date and press ENTER 2Press B b to select month day and year press v V to select a value then press ENTER 5 Adjust the time 1Press v V to select Time and press ENTER 2Press B b to select hour minute and second press v V to select a value then press ENTER 6 Select the format of the date 1...

Страница 13: ... 9 Press MENU The menu screen is closed Inserting a memory card Insert the memory card firmly into the corresponding slot with its label side facing toward you when you are facing the back side of the photo frame The access lamp flashes when the memory card is inserted correctly Reinsert the memory card after checking the label side of the memory card if the access lamp does not flash Access lamp ...

Страница 14: ...ess lamp is flashing Notes The slot is both a Memory Stick standard and Duo size compatible slot so you do not need a Memory Stick adaptor The Memory Stick Standard Duo SD memory card MMC multi purpose slot automatically detects the card type Do not insert multiple memory cards into A B slots simultaneously If multiple memory cards are inserted the photo frame will not work properly Changing the d...

Страница 15: ...s in the display selection area move it to the style selection area by pressing v You can move the cursor in the style selection area by pressing the VIEW MODE button on the remote control except DPF A700 D700 corresponding to the currently selected view mode or or pressing VIEW MODE on the photo frame repeatedly Note If you have not operated the photo frame for an extended period of time the styl...

Страница 16: ...iew Displays multiple images at the same time For a video file only the first frame of the file is displayed DPF D1020 D820 D720 only Clock view Displays images one after another while showing the current date and time Calendar view Displays images one after another while showing a calendar The current date and time are also displayed Time Machine except for DPF A710 A700 Displays images one after...

Страница 17: ...lock and Calendar are displayed Clock1 Clock2 Clock3 Clock4 Clock5 Clock6 Clock7 Clock8 Clock9 Clock10 Clock11 Calendar1 Calendar2 Calendar3 Lunar Calendar when you select Simplified Chinese in Language Setting Arabic Calendar when you select Arabic in Language Setting Farsi Calendar when you select Persian in Language Setting ...

Страница 18: ...ormation such as the image number file name and shooting date while displaying the entire image You can switch the images to be displayed by pressing B b See About the information displayed on the LCD screen page 20 for details on the image information Fit to screen with Exif Displays image information such as the image number file name and shooting date in fit to screen mode Depending on the aspe...

Страница 19: ...sing B b v V then ENTER The display changes to the Single view mode Display Style Description Index Index 1 Displays a list of large thumbnails Move the cursor to select an image by pressing B b v V Index 2 Displays a list of thumbnails Move the cursor to select an image by pressing B b v V Index 3 except for DPF A710 A700 Displays a list of small thumbnails Move the cursor to select an image by p...

Страница 20: ...height Playback duration Video file size 4Setting information 5Image number folder file number This is displayed if the image is DCF compliant If the image does not comply with DCF its file name is displayed If you named or renamed the file on your computer and the file name includes characters other than alphanumeric characters the file name may not be displayed properly on the photo frame Also f...

Страница 21: ...ile To resume playback press ENTER again Fast forward backward playback Press B b during playback of the video file The file is played forward or backward at high speed while you hold down the b or B button When you release the button normal playback starts from that point Depending on the video file fast forward backward playback may not be available with the photo frame To stop playback Press BA...

Страница 22: ...tab 3 Press v V to select Slideshow Settings and press ENTER 4 Press v V to select the item you want to change and press ENTER See the tables on the next page for details on the setting items Notes Note the following when you select a slideshow using the image stored on the memory card Due to the characteristics of memory card devices images may be subject to data error when read too often Do not ...

Страница 23: ...ay not switch at the intervals you set on the menu depending on the style of the slideshow color effect or image size Effect Center cross Transitions to the next image as though the previous image is being pushed from the center to the four corners Vert blinds Transitions to the next image as though blinds are being lowered vertically Horiz blinds Transitions to the next image as though blinds are...

Страница 24: ...ode DPF D1020 D820 D720 only Entire image Displays an entire image enlarged to proper size An image may be displayed with margins on the top bottom left and right Fit to screen Enlarges an image to fill the whole screen without changing the aspect ratio Note An image may not be displayed with the display size you set on the menu depending on the style of the slideshow Factory default settings Item...

Страница 25: ...step 2 then press ENTER Press v V to select the music file you want to delete from the music file list and press ENTER A check mark will be displayed next to the selected file Press MENU then press ENTER when the confirmation screen appears The file will be deleted from the music file list Notes Playback of the imported music file is enabled only as BGM on a slideshow Only music files imported to ...

Страница 26: ...ic for the photo displayed after playback of the video will start playback from the beginning of the next music file If a music file to play is not selected from the imported music file list even if BGM ON OFF is set to ON background music will not be played The music files registered in internal memory at the factory BGM1 BGM2 and BGM3 cannot be deleted Playing background music with a slideshow I...

Страница 27: ...e interval set to 3 sec Doing so could corrupt image data in internal memory Importing images from a memory card to the internal memory You can use the photo frame as a digital album by saving important images in the internal memory Tips When saving images to the internal memory you can use Image import size in the menu to preset whether to resize images to the optimum size or save them as they ar...

Страница 28: ... in the check boxes for all the images is displayed Go to step 5 4 Press B b v V to select the image to be imported from the image list and press ENTER is added to the selected image If you want to import multiple images at a time repeat this step If you want to clear the selection select the image and press ENTER disappears from the image 5 Press MENU The folder selection screen is displayed 6 Pr...

Страница 29: ... the photo frame and copy a video file on the computer to internal memory on the photo frame For details see Connecting to a computer page 43 Tip You can change the thumbnail size for the image list using on the remote control except for DPF A700 D700 Specifying the playback device You can specify whether to display a memory card or the internal memory 1 Press MENU then select the Select device ta...

Страница 30: ...lect the image you want to export from the image list Go to step 5 If you select Export all images the image list with check marks in the check boxes for all the images is displayed Go to step 6 5 Press B b v V to select the image to be exported from the image list and press ENTER is added to the selected image If you want to export multiple images at a time repeat this step If you want to clear t...

Страница 31: ...want to delete is displayed on the screen The screen for deleting an image described in step 2 below is displayed Go to step 3 2 Press B b to select the Editing tab select Delete with v V and press ENTER 3 Press v V to select Delete this image Delete multiple images or Delete all images and press ENTER If you select Delete this image the image currently displayed is deleted Go to step 6 This item ...

Страница 32: ...700 D700 Registering a mark except for DPF A710 A700 You can produce a slideshow only with images which have been selected beforehand and have been marked You can easily check for images with marks using the index image display or single view mode 1 Press MENU when an image is displayed on the screen Using the remote control except for DPF D700 Press MARKING when an image is displayed on the scree...

Страница 33: ...t for DPF A710 A700 page 34 6 Press MENU The confirmation screen appears 7 Press v V to select Yes and press ENTER The mark is attached to the selected image To delete the registration of a mark Select Unmark this image or Unmark all images and press ENTER in step 3 You can also cancel the selection when you remove the check mark from the check box Unmark this image Removes a mark from the image c...

Страница 34: ... orientation Sort by mark Filters by the mark Sort by videos photos DPF D1020 D820 D720 only Filters according to files that contain videos or photos Either the video files or photos are sorted 4 Press B b v V to select the item you want and then press ENTER 5 When you want to sort images in another sort style press MENU then repeat steps 3 and 4 To cancel the sort Press MENU while the sorted imag...

Страница 35: ...o step 5 3Press v V to select the device on which the image is saved and press ENTER 4Press v V to select a destination folder and press ENTER 5Press v V to select Yes and press ENTER The image is saved 6When the confirmation screen appears press ENTER Tip If you move the enlarged image with B b v V and press MENU in step 1 the image is trimmed into the displayed image size and saved Notes You can...

Страница 36: ...me is turned on 1 Press MENU 2 Press B b to select the Settings tab 3 Press v V to select Auto Power ON OFF and press ENTER The Auto Power ON OFF screen is displayed 4 Press v V to select Setup method and press ENTER Press v V to select Simple Advanced except for DPF A710 A700 or Auto off and press ENTER Simple Sets the auto power on off function in one minute increments Advanced Sets the auto pow...

Страница 37: ...o activate the timer and press ENTER The select day of the week is checked Press v V to move the cursor to OK and press ENTER Advanced 1Press B b v V to select the time you want to use the auto power on off function You can set this function according to a day of the week by one hour units The color of the selected time zone changes to blue after you press ENTER The power supply of the photo frame...

Страница 38: ...lideshow Settings Slideshow BGM Settings DPF D1020 D820 D720 only Auto Power ON OFF Date time Settings General Settings Listing Order Sony logo ON OFF etc Language Setting Initialize 1 Press MENU 2 Press B b to select the Settings tab 3 Press v V to select the item you want to change and press ENTER The setting screen of the selected item is displayed For example when Slideshow Settings is selecte...

Страница 39: ...g value and press ENTER Each time you press v V the setting value changes In the case of a numerical value press V to increase the value and press v to decrease it If you press ENTER the setting is executed 6 Press MENU The menu closes To reset to factory default settings 1 Press MENU and select the Settings tab by pressing B b 2 Press v V to select Initialize and press ENTER 3 Press v V to select...

Страница 40: ...evious screen after confirming the operation Cancel Returns to the previous screen after cancelling the operation Reset all Deletes all the selected times Auto off Sets the timer that turns the power of the photo frame off automatically at a certain elapsed time with no operation after the photo frame is turned on When you select Disable the Auto off function is not activated Date time Settings Se...

Страница 41: ...ndicates the amount of free space currently available in internal memory Language Setting Sets the display language on the LCD screen DPF A710 A700 Japanese English French Spanish German Italian Russian Simplified Chinese Traditional Chinese Dutch Portuguese DPF D1020 D1010 D820 D810 D720 D710 D700 Japanese English French Spanish German Italian Russian Korean Simplified Chinese Traditional Chinese...

Страница 42: ...ect the USB External Device in Select device page 29 An image in the USB memory device is displayed on the screen For details on the slideshow see page 22 For details on adding images to the internal memory see page 27 Notes Do not disconnect the USB memory or turn off the photo frame while the access lamp on the photo frame is flashing Doing so may damage the data stored in the USB memory Sony as...

Страница 43: ...fy the recommended system requirements is not guaranteed The photo frame has been demonstrated as operable when connected to a computer or Sony digital photo printer When other devices are connected to the photo frame these devices may not recognize the internal memory of the photo frame Do not connect a computer to the USB mini B connector on the photo frame simultaneously when a USB memory or ex...

Страница 44: ...ed depending on the file name length or character type If you edit or save an image file on a computer the shooting date of the file may be changed or erased In this case images may not be displayed in order of the shooting date on the index image display When images from the computer are saved in the internal memory of the photo frame the image files are saved without being compressed As a result...

Страница 45: ... is write protected Slide the write protect switch to the enable position page 52 The Memory Stick is full The SD Memory Card is full The internal memory is full No more data can be saved because the memory card or the internal memory is full Delete images or use a memory card with free space available Error reading the Memory Stick Error reading the SD Memory Card Error reading the internal memor...

Страница 46: ...ormat the memory card Use the photo frame to initialize the internal memory Note When you initialize the memory card all the files on the memory card will be deleted Cannot open the image The photo frame cannot display or open an image file whose format is not supported Error message Meaning Solutions ...

Страница 47: ... displayed on the screen Is a memory card inserted properly c Insert a memory card properly page 13 Does the memory card contain images saved with a digital camera or other device c Insert a memory card containing images c Check the file formats that can be displayed See Operating Instructions Specifications Is the file format compatible with DCF c A file that is not compatible with DCF may not be...

Страница 48: ...mark on the left is displayed again the image cannot be displayed because the image file is not supported by the photo frame Does the mark displayed below appear in the index view c If the mark shown on the left is displayed the image file is supported by the photo frame but the thumbnail data or image itself cannot be opened Select the mark and press ENTER If the mark shown on the left is display...

Страница 49: ...ndex or single view display c If the mark shown on the left is displayed the video file may not supported by the photo frame For video files that cannot be played see Playing a video file DPF D1020 D820 D720 only page 21 Fast forward backward playback is not available c Fast forward backward playback of some video files may not be available with the photo frame Symptom Check item Cause Solutions C...

Страница 50: ... device you are using to cancel write protection and try deleting again Is the write protect switch of the memory card in the LOCK position c Slide the write protect switch to the enable position Are you using a Memory Stick ROM c It is not possible to delete an image from or format a Memory Stick ROM Is this image protected c Check the image information displayed in Single view mode page 20 c An ...

Страница 51: ...the remote control properly c Replace the battery page 10 c Insert a battery page 10 c Insert a battery in the proper orientation page 10 c Point the top end of the remote control towards the remote sensor on the photo frame page 10 c Remove any obstruction between the remote control and the remote sensor Is there a protective sheet inserted c Remove the protective sheet page 10 ...

Страница 52: ...ere you use your photo frame and then select Digital Photo Frame from each area page Do not insert more than one Memory Stick at the same time or this may cause trouble with the photo frame If you use a Memory Stick Micro with the photo frame the Memory Stick Micro needs to be inserted into an M2 adaptor If you insert a Memory Stick Micro into the photo frame without an M2 adaptor you may be unabl...

Страница 53: ...ect insertion direction of the card Incorrect insertion may cause damage to the photo frame When inserting the memory card it will only insert part of the way so do not try to force it as this could damage the memory card and or photo frame Do not remove a memory card or turn off the photo frame while the photo frame is reading or writing data or the access indicator is flashing Otherwise data may...

Страница 54: ...itialize 41 Initialize settings 41 L Language setting 41 Listing Order 40 M Marking 32 Memory card slot 13 Memory cards 52 Memory Stick 52 Notes on use 53 SD memory card 53 P Playback device 29 Playing a slideshow with background music 25 Playing a video file 21 Power on off 11 R Refresh mode 27 Registering a mark 32 Remote control 10 Removing a memory card 14 Replacing the battery of the remote c...

Страница 55: ...Sony Corporation ...

Отзывы: