background image

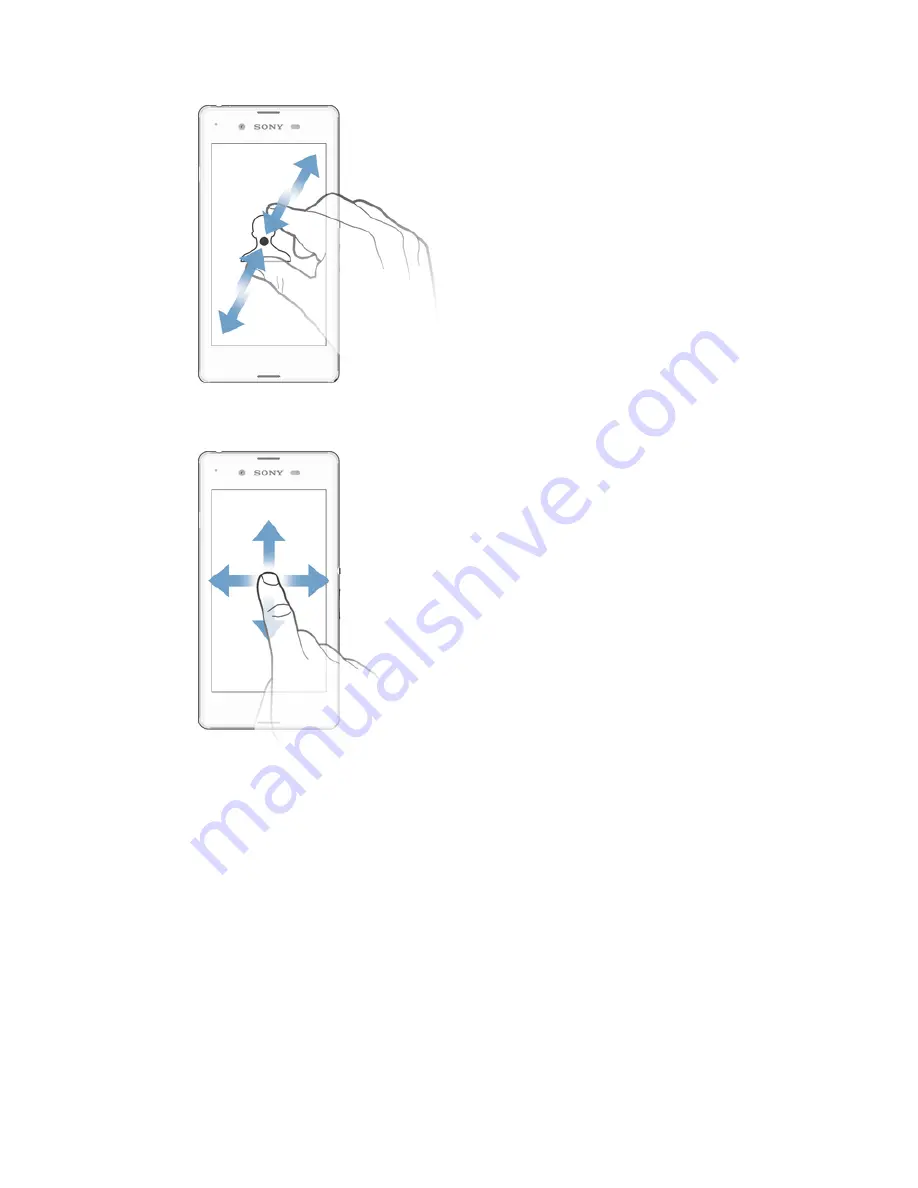
Pinching and spreading

Zoom in or out on a web page, a photo or a map.

Swiping

Scroll up or down a list.

Scroll left or right, for example, between Home screen panes.

12

This is an Internet version of this publication. © Print only for private use.

Содержание D2202

Страница 1: ...User guide Xperia E3 D2202 D2203 D2206 ...

Страница 2: ...cations 21 Icons in the status bar 22 Application overview 23 Downloading applications 25 Downloading applications from Google Play 25 Downloading applications from other sources 25 Internet and networks 26 Browsing the web 26 Internet and MMS settings 26 Wi Fi 27 Sharing your mobile data connection 29 Controlling data usage 30 Selecting mobile networks 31 Virtual private networks VPNs 31 Synchron...

Страница 3: ...mergency calls 49 Contacts 50 Transferring contacts 50 Searching and viewing contacts 51 Adding and editing contacts 52 Adding medical and emergency contact information 53 Favourites and groups 54 Sending contact information 55 Avoiding duplicate entries in the Contacts application 55 Backing up contacts 55 Messaging and chat 57 Reading and sending messages 57 Organising your messages 58 Calling f...

Страница 4: ...our photos 75 General camera settings 76 Still camera settings 77 Video camera settings 79 Photos and videos in Album 81 Viewing photos and videos 81 Sharing and managing photos and videos 82 Editing photos with the Photo editor application 83 Album home screen menu 84 Viewing your photos on a map 85 Videos 87 Watching videos in the Movies application 87 Transferring video content to your device 8...

Страница 5: ...velling 103 Airplane mode 103 Calendar and alarm clock 104 Calendar 104 Alarm and clock 105 Support and maintenance 107 Support for your device 107 Computer tools 107 Updating your device 108 IMEI number 109 Battery and power management 109 Memory and storage 111 Managing files using a computer 112 Restarting and resetting 113 Recycling your device 114 Limitations to services and features 114 Lega...

Страница 6: ...ion about software updates see Updating your device on page 108 To check the current software version of your device 1 From your Home screen tap 2 Find and tap Settings About phone Android version Overview 1 Charging Notification light 2 Headset jack 3 Front camera lens 4 Speaker 5 Proximity Light sensor 6 Power key 7 Volume Zoom key 8 Main microphone 6 This is an Internet version of this publicat...

Страница 7: ...sembly A protective plastic sheet is attached to the screen You should peel off this sheet before using the touchscreen Otherwise the touchscreen might not function properly To remove the back cover Insert a fingernail into the gap as indicated in the illustration and lift up the cover 7 This is an Internet version of this publication Print only for private use ...

Страница 8: ...ve a micro SIM card or if your current SIM card does not contain a detachable micro SIM card contact your network operator for information on how to collect or exchange your SIM card To insert a memory card 1 Remove the back cover 2 Insert the memory card into the memory card slot with the gold coloured contacts facing down To attach the back cover 1 Place the back cover over the back of the devic...

Страница 9: ... Xperia device from Sony runs on the Android platform developed by Google A range of Google applications and services is available on your device when you purchase it for example Gmail Google Maps YouTube and Google Play the online store for downloading Android applications To get the most out of these services you need a Google account For example a Google account is mandatory if you want to Down...

Страница 10: ...bol facing up The notification light illuminates when charging begins 4 When the device is fully charged disconnect the cable from your device by pulling it straight outwards Make sure not to bend the connector If the battery is completely discharged it may take a few minutes before the notification light illuminates and the charging icon appears Battery notification light status Green The battery...

Страница 11: ...unmark a checkbox or option Enter text using the on screen keyboard Touching and holding Move an item Activate an item specific menu Activate selection mode for example to select several items from a list 11 This is an Internet version of this publication Print only for private use ...

Страница 12: ...ding Zoom in or out on a web page a photo or a map Swiping Scroll up or down a list Scroll left or right for example between Home screen panes 12 This is an Internet version of this publication Print only for private use ...

Страница 13: ...re not using it When you buy your device a basic screen swipe lock is already set This means that you have to swipe in any direction from the middle of the screen to unlock it You can change the security settings later and add other kinds of locks See Screen lock on page 37 To activate the screen Briefly press the power key To unlock the screen Place a finger on the screen and swipe up or down To ...

Страница 14: ...in To go to the Home screen Press To browse the Home screen Home screen panes You can add new panes to your Home screen up to a maximum of seven panes and delete panes You can also set the pane that you want to use as the main Home screen pane To set a pane as the main Home screen pane 1 Touch and hold an empty area on your Home screen until the device vibrates 2 Flick left or right to browse to t...

Страница 15: ...ion To open the Application screen menu When the Application screen is open drag the left edge of the screen to the right To move an application on the Application screen 1 To open the Application screen menu drag the left edge of the Application screen to the right 2 Make sure that Own order is selected under SHOW APPS 3 Touch and hold the application until it magnifies and the device vibrates th...

Страница 16: ... applications Some applications are closed when you press to exit while others continue to run in the background or pause If the application is paused or runs in the background you can continue where you left off the next time you open the application 1 Recently used applications window Open a recently used application 2 Favourites bar Open a shortcut for applications or widgets 3 Task navigation ...

Страница 17: ...ect an application then tap Done Small apps A small app is a shortcut used for applications and widgets You can get quick access to the small apps at any time using the favorites bar A small app only takes up a small area of your screen so you can interact with a small app and another application at the same time on the same screen For example you can have a web page open and then open the Calcula...

Страница 18: ...o restore a previously removed small app 1 Open the small apps bar then tap 2 Touch and hold the small app that you want to restore then drag it into the small apps bar To add a widget as a small app 1 To make the small apps bar appear press 2 Tap 3 Select a widget 4 Enter a name for the widget if desired then tap OK Widgets Widgets are small applications that you can use directly on your Home scr...

Страница 19: ...ns 2 Access an application using a shortcut To add a shortcut to your Home screen 1 Touch and hold an empty area on your Home screen until the device vibrates and the customisation menu appears 2 In the customisation menu tap Apps 3 Scroll through the list of applications and select an application The selected application gets added to the Home screen In step 3 alternatively you can tap Shortcuts ...

Страница 20: ...can also change the wallpaper on the lock screen To change your Home screen wallpaper 1 Touch and hold an empty area on your Home screen until the device vibrates 2 Tap Wallpapers and select an option To set a theme 1 Touch and hold an empty area on your Home screen until the device vibrates 2 Tap Themes then select a theme When you change a theme the background also changes in some applications T...

Страница 21: ...ties in progress such as file downloads and status information such as battery level and signal strength You can drag down the status bar to open the Notification panel and handle your notifications To open or close the Notification panel To take action on a notification Tap the notification To dismiss a notification from the Notification panel Place your finger on a notification and flick left or...

Страница 22: ...IM card is not inserted The microphone is muted The speakerphone is on Silent mode Vibrate mode An alarm is set GPS is activated Synchronisation is ongoing Problem with sign in or synchronisation Your device is ready to connect to other ANT capable devices Depending on your service provider network and or region the functions or services represented by some icons in this list may not be available ...

Страница 23: ...ideo clips Use the Contacts application to manage phone numbers email address and other information related to your contacts Access your downloaded applications Use the Email application to send and receive emails through both private and corporate accounts Use the Facebook application to engage in social networking with friends family members and colleagues around the world Browse and listen to F...

Страница 24: ...equirements Use the Hangouts application to chat with friends online Identify music tracks that you hear playing in your surroundings and get artist album and other info Use YouTube to share and view videos from around the world Use the Support application to access user support in the device For example you can access a User guide troubleshooting information plus tips and tricks Download and inst...

Страница 25: ...issions to applications that you trust You can view the permissions granted to a downloaded application by tapping the application under Settings Apps Downloading applications from other sources When your device is set to allow downloads from sources other than Google Play you can download applications directly from other websites by following the relevant download instructions Installing applicat...

Страница 26: ... or to access the Internet when there is no available Wi Fi network you must have a working mobile data connection with the correct Internet and MMS Multimedia Messaging Service settings Here are some tips For most mobile networks and operators Internet and MMS settings come pre installed on your device You can then start using the Internet and send multimedia messages right away In some cases you...

Страница 27: ...Home screen tap 2 Find and tap Settings More Mobile networks 3 Tap Access Point Names 4 To view more details tap any of the available items If you have several available connections the active network connection is indicated by a marked button To delete all Internet and MMS settings 1 From your Home screen tap 2 Find and tap Settings More Mobile networks 3 Tap Access Point Names then tap 4 Tap Res...

Страница 28: ... settings mark the Show advanced options checkbox and then edit as desired 8 Tap Save Contact your Wi Fi network administrator to get the network SSID and password Increasing Wi Fi signal strength There are a number of things you can do to increase the strength of a Wi Fi signal Move your device closer to the Wi Fi access point Move the Wi Fi access point away from any potential obstructions or in...

Страница 29: ...your computer to establish a network connection via USB cable Go to www android com tether to get the most current information To share your data connection using a USB cable 1 Deactivate all USB cable connections to your device 2 Using the USB cable that came with your device connect your device to a computer 3 From your Home screen tap 4 Find and tap Settings More Tethering portable hotspot 5 Ma...

Страница 30: ...ll establish Wi Fi and Bluetooth connections To set a data usage warning 1 Make sure that mobile data traffic is turned on 2 From your Home screen tap 3 Find and tap Settings Data usage 4 To set the warning level drag the warning line to the desired value You receive a warning notification when the amount of data traffic approaches the level you set To set a mobile data usage limit 1 Make sure tha...

Страница 31: ...our device to connect to virtual private networks VPNs which allow you to access resources inside a secured local network from a public network For example VPN connections are commonly used by corporations and educational institutions for users who need to access intranets and other internal services when they are outside of the internal network for example when they are travelling VPN connections...

Страница 32: ...sync to the right To synchronise manually with an online account 1 From your Home screen tap Settings 2 Under Accounts select the account type then tap the name of the account that you want to synchronise with A list of items that can be synchronised with the account appears 3 Mark the items that you want to synchronise 4 Tap then tap Sync now To remove an online account 1 From your Home screen ta...

Страница 33: ... account as desired To set a synchronisation interval for an EAS account 1 From your Home screen tap 2 Tap Email then tap 3 Tap Settings and select an EAS account 4 Tap Account check frequency Check frequency and select an interval option To remove an EAS account 1 From your Home screen tap Settings 2 Under Accounts tap Exchange ActiveSync then select the EAS account that you want to remove 3 Tap ...

Страница 34: ...tion is installed on the Apple Mac computer 2 Computer Open the PC Companion application or the Sony Bridge for Mac application 3 Click Start to start the Calendar and Calendar Sync applications and follow the on screen instructions to synchronise your device with your Outlook calendar 34 This is an Internet version of this publication Print only for private use ...

Страница 35: ...device to silent mode so that it doesn t ring when you re in a meeting To adjust the ringtone volume with the volume key Press the volume key up or down To adjust the media playing volume with the volume key When playing music or watching video press the volume key up or down To set your device to vibrate mode Press the volume key down until appears in the status bar To set your device to silent m...

Страница 36: ...SIM PIN 3 Enter the old SIM card PIN and tap OK 4 Enter the new SIM card PIN and tap OK 5 Re type the new SIM card PIN and tap OK To unlock a blocked SIM card using the PUK code 1 Enter the PUK code and tap 2 Enter a new PIN code and tap 3 Re enter the new PIN code and tap If you enter an incorrect PUK code too many times you need to contact your network operator to get a new SIM card Screen setti...

Страница 37: ...te the setup For best results capture your face in an indoor area that is well lit but not too bright and hold the device at eye level To unlock the screen using the Face Unlock feature 1 Activate the screen 2 Look at your device from the same angle you used to capture your Face Unlock photo If the Face Unlock feature fails to recognise your face you must use the backup unlock method to unlock the...

Страница 38: ...ap Then select the text beside and select the first entry in the menu that opens You can then select the language you want Date and time You can change the date and time on your device To set the date manually 1 Find and tap Settings Date time 2 Unmark the Automatic date time checkbox if it is marked 3 Tap Set date 4 Adjust the date by scrolling up and down 5 Tap Set To set the time manually 1 Fin...

Страница 39: ... the Clear Phase feature has no effect on voice communication applications Using xLOUD technology Use xLOUD audio filter technology from Sony to enhance the speaker volume without sacrificing quality Get a more dynamic sound as you listen to your favourite songs To enhance the speaker volume using xLOUD 1 From your Home screen tap 2 Find and tap Settings Sound 3 Mark the xLOUD checkbox The activat...

Страница 40: ...e on screen keyboard is displayed turn the device sideways You may need to adjust the settings in some applications to enable landscape orientation To enter text character by character 1 To enter a character visible on the keyboard tap the character 2 To enter a character variant touch and hold a regular keyboard character to get a list of available options then select from the list For example to...

Страница 41: ... number of languages and regions To enable voice input 1 When you enter text using the on screen keyboard tap 2 Tap then tap Keyboard settings 3 Mark the Google voice typing key checkbox 4 Tap to save your settings A microphone icon appears on your on screen keyboard To enter text using voice input 1 Open the on screen keyboard 2 Tap When appears speak to enter text 3 When you re finished tap agai...

Страница 42: ...ettings for the on screen keyboard such as writing language and automatic correction To access the on screen keyboard settings 1 When you enter text using the on screen keyboard tap 2 Tap then tap Keyboard settings and change the settings as desired 3 To add a writing language for text input tap Writing languages and mark the relevant checkboxes 4 Tap OK to confirm To display the Smiley key 1 When...

Страница 43: ...ew your call log entries 3 View your favourite contacts 4 View all contact groups saved to your device 5 Delete number 6 Dialpad 7 View more options 8 Call button 9 Hide or show the dialer To make a call by dialling 1 From your Home screen tap 2 Find and tap Phone 3 Enter the number of the recipient and tap To make a call using smart dial 1 From your Home screen tap 2 Find and tap Phone 3 Use the ...

Страница 44: ...ecline a call To mute the ringtone for an incoming call When you receive the call press the volume key Using the answering machine You can use the answering machine application in your device to answer calls when you are busy or miss a call You can enable the automatic answering function and determine how many seconds to wait before the calls get answered automatically You can also manually route ...

Страница 45: ...ect a call with such a message the message is automatically sent to the caller and stored in the Messaging conversation with the contact You can select from a number of predefined messages available on your device or you can create a new message You can also create you own personalised messages by editing the predefined ones To reject a call with a text message 1 When an incoming call arrives drag...

Страница 46: ...er from your call log 1 From your Home screen tap 2 Find and tap Phone The call log view appears on the upper part of the screen 3 To call a number directly tap the number To edit a number before calling touch and hold the number then tap Edit number before call You can also call a number by tapping Call back To add a number from the call log to your contacts 1 From your Home screen tap 2 Find and...

Страница 47: ...t an option 4 Enter the password and tap Enable When you set up call blocking for the first time you need to enter a password to activate the call blocking function You must use this same password later if you want to edit call blocking settings To enable or disable fixed dialling 1 From your Home screen tap 2 Find and tap Settings Call settings Fixed dialling numbers 3 Tap Activate fixed dialling...

Страница 48: ... the second participant and tap The first participant is put on hold 3 Tap to add the second participant to the conference call 4 Repeat steps 1 to 3 to add more call participants To have a private conversation with a conference call participant 1 During an ongoing conference call tap 0 participants 2 Tap the telephone number of the participant with whom you want to talk privately 3 To end the pri...

Страница 49: ...mally use these numbers to make emergency calls in any country with or without a SIM card inserted if you are within range of a network To make an emergency call 1 From your Home screen tap 2 Find and Tap Phone 3 Enter the emergency number and tap To delete a number tap You can make emergency calls when no SIM card is inserted or when outgoing calls are barred To make an emergency call while the S...

Страница 50: ...ntacts Transferring contacts using an online account If you sync the contacts in your old device or your computer with an online account for example Google Sync Facebook or Microsoft Exchange ActiveSync you can transfer your contacts to your new device using that account To synchronise contacts to your new device using a synchronisation account 1 From your Home screen tap then tap 2 Tap then tap S...

Страница 51: ...rom your Home screen tap then tap 2 Tap then tap Import contacts SIM card 3 To import an individual contact find and tap the contact To import all contacts tap Import all Searching and viewing contacts 1 Contacts Calling Favourites and Groups tabs 2 Edit and view medical and emergency contact information 3 View contact details 4 Jump to contacts starting with the selected letter 5 Access communica...

Страница 52: ...d want to change it you need to create a new contact and select a different account to save it to If you add a plus sign and the country code before a contact s phone number you do not have to edit the number again when you make calls from other countries To edit a contact 1 From your Home screen tap then tap 2 Tap the contact that you want to edit then tap 3 Edit the desired information 4 When yo...

Страница 53: ...on can be accessed from the security lock screen This means that even if the screen is locked for example by a PIN pattern or password emergency personnel can still retrieve your ICE information 1 Go back to the main Contacts screen 2 Get more information about ICE 3 Show your medical and personal information as part of the ICE information 4 Medical information 5 ICE contact list 6 Create new ICE ...

Страница 54: ...call If your device is locked by a security screen lock emergency personnel can only see the phone number of the ICE contacts even if there is other information entered in the Contacts application about the contacts To make your ICE information visible from the security lock screen 1 From your Home screen tap then tap 2 Tap ICE In Case of Emergency 3 Tap then tap Settings 4 Mark the ICE in lock sc...

Страница 55: ...tries in the Contacts application If you synchronise your contacts with a new account or import contact information in other ways you could end up with duplicate entries in the Contacts application If this happens you can join such duplicates to create a single entry And if you join entries by mistake you can separate them again later To link contacts 1 From your Home screen tap then tap 2 Tap the...

Страница 56: ...hen tap Export contacts SIM card 3 Mark the contacts you want to export or tap Mark all if you want to export all your contacts 4 Tap Export 5 Select Add contacts if you want to add the contacts to existing contacts on your SIM card or select Replace all contacts if you want to replace the existing contacts on your SIM card 56 This is an Internet version of this publication Print only for private ...

Страница 57: ...ions 3 Sent and received messages 4 Send button 5 Add attachments 6 Attach a location 7 Attach a handwritten note or image 8 Take a photo and attach it 9 Attach a photo saved on your device 10 Text field To create and send a message 1 From your Home screen tap then find and tap 2 Tap 3 Enter the recipient s name or phone number or other contact information that you have saved about the recipient t...

Страница 58: ...d and tap 2 Tap the conversation you want to open 3 If the message has not been downloaded yet tap and hold the message then tap Download message 4 Touch and hold the file you want to save then select the desired option Organising your messages To delete a message 1 From your Home screen tap then find and tap 2 Tap the conversation containing the message you want to delete 3 Touch and hold the mes...

Страница 59: ...port function on or off for outgoing messages 1 From your Home screen tap then find and tap 2 Tap then tap Settings 3 Mark or unmark the Delivery report checkbox as desired After the delivery report function is turned on a check mark is displayed in messages that have been successfully delivered Instant messaging and video chat You can use the Google Hangouts instant messaging and video chat appli...

Страница 60: ...y from the suggested list 4 To start an instant messaging session tap 5 To start a video call tap To reply to a chat message or join a video call 1 When someone contacts you on Hangouts or appears in the status bar 2 Drag the status bar downwards then tap the message or video call and begin to chat To learn more about Hangouts When the Hangouts application is open tap then tap Help 60 This is an I...

Страница 61: ...ss and password then tap Next If the settings for the email account cannot be downloaded automatically complete the setup manually 5 When prompted enter a name for your email account so that it is easily identifiable 6 When you are finished tap Next To set an email account as your default account 1 From your Home screen tap 2 Find and tap Email 3 Press then tap Settings 4 Select the account you wa...

Страница 62: ...4 Enter the email subject and message text then tap To reply to an email message 1 In your email inbox find and tap the message that you want to reply to then tap Reply or Reply all 2 Enter your reply then tap To forward an email message 1 In your email inbox find and tap the message that you want to forward then tap Forward 2 Enter the recipient s email address manually or tap and select a recipi...

Страница 63: ...Combined inbox 4 Tap then tap Sort 5 Select a sorting option To search for emails 1 From your Home screen tap then find and tap Email 2 If you are using several email accounts tap and select the name of the account that you want to check then tap Inbox in the drop down menu If you want to search all your email accounts at once tap then tap Combined view 3 Tap 4 Enter your search text then tap on t...

Страница 64: ...2 Press then tap Settings 3 Select the EAS Exchange Active Sync account for which you want to set an Out of Office auto reply 4 Tap Out of office 5 Drag the slider beside Out of office to the right to turn on the function 6 If needed mark the Set time range checkbox and set the time range for the auto reply 7 Enter your Out of Office message in the body text field 8 Tap OK to confirm Gmail If you ...

Страница 65: ...ot support all music file formats For more information about supported file formats and the use of multimedia audio image and video files download the White Paper for your device at www sonymobile com support Listening to music Use the Walkman application to listen to your favourite music and audio books 1 Go to the Walkman home screen 2 Search songs on Music Unlimited and all songs saved to your ...

Страница 66: ...d to share To find song related information online While a song is playing in the Walkman application tap the infinite button The infinite button gives you access to several sources of information including videos on YouTube lyrics and artist info on Wikipedia To adjust the audio volume Press the volume key To minimise the Walkman application When a song is playing tap to go to the Home screen The...

Страница 67: ...s not displayed tap then drag the left edge of the Walkman home screen to the right If the Walkman home screen is displayed drag the left edge of the Walkman home screen to the right To return to the Walkman home screen When the Walkman home screen menu is open tap Home When the Walkman home screen menu is open tap on the screen to the right of the menu To update your music with the latest informa...

Страница 68: ...song or album that you want to add to a playlist 2 Touch and hold the song or the album title then tap Add to 3 Tap the name of the playlist to which you want to add the album or song The album or song is added to the playlist To remove a song from a playlist 1 In a playlist touch and hold the title of the song you want to delete 2 Tap Delete from playlist from the list that appears To delete a pl...

Страница 69: ...To adjust the sound automatically tap and select a style To turn on the Surround sound feature 1 When the Walkman application is open tap 2 Tap Settings Sound enhancements Settings Surround sound VPT 3 Select a setting then tap OK to confirm Visualiser The Visualiser adds visual effects to your songs as you play them The effects for each song are based on the characteristics of the music They chan...

Страница 70: ...ur own region is shown To view TrackID charts from another region 1 Open the TrackID application then tap Charts 2 Tap Regions and then select a country or region To buy a track recognised by the TrackID application 1 After a track has been recognised by the TrackID application tap Download 2 Follow the instructions in your device to complete your purchase You can also select a track to buy by ope...

Страница 71: ...your playlists and music using a PC that runs the Windows operating system Go to www sonyentertainmentnetwork com for more information Sony Entertainment Network with Video Unlimited and Music Unlimited is not available in every market Separate subscription required Additional terms and conditions apply To get started with Music Unlimited 1 From the Walkman home screen tap Settings 2 Drag the slid...

Страница 72: ...ove up the frequency band to search for a channel 8 A saved favourite channel 9 Move down the frequency band to search for a channel To listen to the FM radio 1 Connect a headset or a set of headphones to your device 2 Find and tap FM radio The available channels appear as you scroll through the frequency band When you start the FM radio available channels appear automatically If a channel has RDS...

Страница 73: ...channels To save a channel as a favourite 1 When the radio is open navigate to the channel that you want to save as a favourite 2 Tap 3 Enter a name and select a colour for the channel then press Save To listen to a favourite radio channel 1 Tap Favourites 2 Select an option To remove a channel as a favourite 1 When the radio is open navigate to the channel that you want to remove 2 Tap then tap D...

Страница 74: ...ra 2 Tap then tap 3 Drag the slider beside Touch capture to the right 4 Point the camera towards the subject 5 To activate auto focus touch and hold a spot on the screen When the focus frame turns blue lift your finger to take the photo To take a photo by tapping the on screen camera button 1 Activate the camera 2 Point the camera towards the subject 3 Tap the on screen camera button The photo is ...

Страница 75: ...ter 1 When the camera is open and Smile Shutter is turned on point the camera at your subject The camera selects which face to focus on 2 The face selected appears inside a coloured frame and the photo is taken automatically 3 If no smile is detected tap the screen to take the photo manually Adding the geographical position to your photos Turn on geotagging to add the approximate geographical loca...

Страница 76: ...can apply AR augmented reality effects to your photos and make them more fun This setting lets you integrate 3D scenes into your photos as you take them Just select the scene you want and adjust its position in the viewfinder Creative effect You can apply different effects on your photos or videos For example you can add a Nostalgic effect to make photos look older or a Sketch effect for a more fu...

Страница 77: ... conditions Cloudy Adjusts the colour balance for a cloudy sky This setting is only available in Manual capturing mode Still camera settings To adjust the still camera settings 1 Activate the camera 2 To display all settings tap 3 Select the setting that you want to adjust then edit as desired Still camera settings overview Resolution Choose between several resolutions and aspect ratios before tak...

Страница 78: ... focus frame turns blue indicating that the focus is set The photo is taken when you release your finger Face detection The camera automatically detects up to five human faces indicated by frames on the screen The camera automatically focuses on the nearest face You can also select which face to focus on by tapping it on the screen When you tap the camera screen a blue frame shows which face is se...

Страница 79: ... resolution for different formats Full HD 1920 1080 16 9 Full HD Full High Definition format with 16 9 aspect ratio HD 1280 720 16 9 HD High Definition format with 16 9 aspect ratio VGA 640 480 4 3 VGA format with 4 3 aspect ratio QVGA 320 240 4 3 QVGA format with 4 3 aspect ratio MMS Record videos suitable for sending in multimedia messages The recording time of this video format is limited so th...

Страница 80: ...an object by touching it in the viewfinder the camera tracks it for you This setting is only available in Manual capturing mode Metering This function automatically determines a well balanced exposure by measuring the amount of light striking the image that you want to capture Centre Adjust the exposure to the centre of the image Average Calculate the exposure based on the amount of light striking...

Страница 81: ...d and tap Album 3 Tap a photo or video to view it 4 Flick left to view the next photo or video Flick right to view the previous photo or video If the screen orientation does not change automatically when you turn your device sideways mark the Auto rotate screen checkbox under Settings Display To change the size of the thumbnails When viewing thumbnails of photos and videos in Album spread two fing...

Страница 82: ...u can also manage them in different ways For example you can work with photos in batches delete photos and link them to contacts You might not be able to copy send or transfer copyright protected items Also some items may not send if the file size is too large To share a photo or video 1 In Album find and tap the photo or video that you want to share 2 Tap the screen to display the toolbars then t...

Страница 83: ...e name 1 When you are viewing a face in full screen view tap the screen to display the toolbars then tap Edit name tags 2 Tap OK 3 Tap the name of the face that you want to edit 4 Edit the name then tap Done Add as new person Editing photos with the Photo editor application You can edit and apply effects to original photos that you ve taken with your camera For example you can change the light eff...

Страница 84: ...tap 2 If prompted select Photo editor Just once 3 Tap then select an option 4 To save a copy of the edited photo tap Save Album home screen menu Through the Album home screen menu you can browse to all your photo albums including albums of photos and videos taken with the camera as well as content that you share online via services such as PlayMemories Online Picasa and Facebook Once you are logge...

Страница 85: ...geotagging You can view and tag your photos on a map and show friends and family where you were when you took a particular photo See Adding the geographical position to your photos on page 75 for more information If you have turned on location detection and activated geotagging in the camera you can tag your photos directly for map viewing at a later stage 1 View geotagged photos in Globe view 2 V...

Страница 86: ...Drag the left edge of the Album home screen to the right then tap Places 4 Tap the photo that you want to view on a map To view geotagged photos on a globe 1 From your Home screen tap 2 Find and tap Album 3 Drag the left edge of the Album home screen to the right then tap Places 4 Tap the photo that you want to view on a globe To change the geotag of a photo 1 When viewing a photo on the map in Al...

Страница 87: ...pply To play a video in Movies 1 From your Home screen tap then find and tap Movies 2 Find and tap the video that you want to play If the video is not displayed on the screen drag the left edge of the screen to the right to open the Movies home screen menu then find and tap the video that you want to play 3 To display or hide the controls tap the screen 4 To pause playing tap To resume playing tap...

Страница 88: ...mation manually 1 Make sure that your device has an active data connection 2 From your Home screen tap then find and tap Movies 3 Drag the left edge of the screen to the right to open the Movies home screen menu then browse through the different categories and to the video file that you want to get information 4 Touch and hold the thumbnail for the video then tap Search for info 5 In the search fi...

Страница 89: ...rtainment Network account then you can use that account instead Sony Entertainment Network with Video Unlimited and Music Unlimited is not available in every market Separate subscription required Additional terms and conditions apply To get started with Video Unlimited 1 From your Home screen tap 2 Find and tap 3 If you are starting Video Unlimited for the first time tap Continue in the Welcome sc...

Страница 90: ...t the track that you want to play The track starts playing automatically To play a shared video on your device 1 Make sure the devices that you want to share files with are connected to the same Wi Fi network as your device 2 From your Home screen tap then find and tap Movies 3 Select a device from the list of connected devices 4 Browse the folders of the connected device and select the video that...

Страница 91: ...ng devices list 4 Select an access permission level To change the name of a registered device 1 From your Home screen tap 2 Find and tap Settings Xperia Connectivity Media server settings 3 Select a device from the Registered devices list then select Change name 4 Enter a new name for the device To change the access level of a registered device 1 From your Home screen tap 2 Find and tap Settings X...

Страница 92: ...ice and that it is connected to the same Wi Fi network as your device 2 From your Home screen tap then find and tap WALKMAN 3 Select a music category and browse to the track that you want to share then tap the track 4 Tap and select a DMR device to share your content with The track plays automatically on the device that you select 5 To disconnect from the DMR device tap and select your device The ...

Страница 93: ...ake sure that both devices have the NFC function turned on and that both screens are active 2 To view contacts go to your Home screen tap then tap 3 Tap the contact that you want to share 4 Hold your device and the receiving device back to back so that the NFC detection areas of each device touch each other When the devices connect a thumbnail of the contact appears 5 Tap the thumbnail to start th...

Страница 94: ... displayed on the screen of the receiving device Scanning NFC tags Your device can scan various kinds of NFC tags For example it can scan embedded tags on a poster on a billboard advertisement or beside a product in a retail store You can receive additional information such as a web address To scan an NFC tag 1 Make sure that your device has the NFC function turned on and that the screen is active...

Страница 95: ...ith another Bluetooth device your device remembers this pairing When pairing your device with a Bluetooth device you may need to enter a passcode Your device will automatically try the generic passcode 0000 If this does not work refer to the user guide for your Bluetooth device to get the device passcode You do not need to re enter the passcode the next time you connect to a previously paired Blue...

Страница 96: ...ng item To receive items using Bluetooth 1 Make sure that the Bluetooth function is on and is visible to other Bluetooth devices 2 The sending device now starts sending data to your device 3 If prompted enter the same passcode on both devices or confirm the suggested passcode 4 When you are notified of an incoming file to your device drag the status bar downwards and tap the notification to accept...

Страница 97: ...function on the other Xperia device is turned on 4 Make sure the screens of both devices are unlocked and active 5 Hold the two devices together so that the NFC detection area of each device touches the other The one touch setup function launches automatically Both devices must support the One touch setup function 97 This is an Internet version of this publication Print only for private use ...

Страница 98: ...n times of the day For example when you connect your headset between 7am and 9am you can decide that The Walkman application starts The web browser opens the morning paper The ring volume is set to vibrate With Smart Connect you can also manage your accessories such as SmartTags and SmartWatch Refer to the User guide of the specific accessory for more information 1 Tap to display all added devices...

Страница 99: ...he Smart Connect application to manage a range of smart accessories that you can connect to your device including SmartTags SmartWatch and Smart Wireless Headset pro from Sony Smart Connect downloads any necessary applications and also finds third party applications when available Previously connected devices show in a list that allows you to get more information about the features of each device ...

Страница 100: ...ithout reaching for your real wallet You can also keep information about special offers on your device To be able to pay for goods using your mobile device you need to first sign up with a wallet payment service They can be offered for example by Google or by your network operator For more information about such wallet services refer to your service provider You can read more about Google Wallet a...

Страница 101: ...GPS satellites and Google s location service get enabled by default You can disable either option manually To allow Google apps to access your location 1 From your Home screen tap 2 Find and tap Settings Google Location 3 Drag the slider beside Location to the right 4 Tap Agree twice to confirm When you enable location services both GPS satellites and Google s location service get enabled by defau...

Страница 102: ...ple a restaurant s name or address 2 Select a transportation mode and get directions to your destination 3 View your account profile 4 Location mark shows a searched location on the map 5 Show your current location 6 View help and options To show your location on the map 1 From your Home screen tap 2 Find and tap Maps then tap To search for a location 1 From your Home screen tap 2 Find and tap Map...

Страница 103: ... and tap Settings More Mobile networks 3 Mark or unmark the Data roaming checkbox You can t activate data roaming when mobile data is turned off Airplane mode In Airplane mode the network and radio transceivers are turned off to prevent disturbance to sensitive equipment However you can still play games listen to music watch videos and other content as long as all this content is saved on your mem...

Страница 104: ...e quickly 5 Agenda for the selected day To create a calendar event 1 From your Home screen tap then tap Calendar 2 Tap 3 If you have synchronised your calendar with one or more accounts select the account to which you want to add this event If you only want to add this event on your device tap Device calendar 4 Enter or select the desired information and add attendees to the event 5 To save the ev...

Страница 105: ...en search for the city that you want to add For more information about how to enable location services see Using location services on page 101 To change weather forecast settings in the Calendar application 1 From your Home screen tap then tap Calendar 2 Tap then tap Settings 3 Tap Weather forecast 4 Adjust the settings as desired Alarm and clock You can set one or several alarms and use any sound...

Страница 106: ...f position To delete an alarm 1 Open the Alarm clock application then touch and hold the alarm that you want to delete 2 Tap Delete alarm then tap Yes To set the sound for an alarm 1 Open the Alarm clock application then tap the alarm that you want to edit 2 Tap Alarm sound and select an option or tap to select from your music files 3 Tap Done twice To set a recurring alarm 1 Open the Alarm clock ...

Страница 107: ...ge info settings 3 Mark the Send usage info checkbox if it is not already marked 4 Tap Agree Computer tools There are a number of tools available to help you connect your device to a computer and manage content such as contacts movies music and photos PC Companion for Microsoft Windows PC Companion is a computer application that gives you access to additional features and services which help you t...

Страница 108: ...ter application to update your device wirelessly It handles both application updates and system updates and can also facilitate the download of new applications developed for your device The updates that you can download over a mobile network depend on your operator It is recommended to use a Wi Fi network instead of a mobile network to download new software so that you can avoid data traffic cost...

Страница 109: ...ove the cover to view your IMEI number Open the phone dialer on your device and enter 06 To view your IMEI number in the device 1 From your Home screen tap 2 Find and tap Settings About phone Status 3 Scroll to IMEI to view the IMEI number Battery and power management Your device has an embedded battery You can keep track of your battery consumption and see which applications are using the most po...

Страница 110: ...ich you want to activate STAMINA mode 4 Tap OK appears in the status bar when the battery reaches the level that you set To activate the Extended standby function 1 From your Home screen tap 2 Find and tap Settings Power management then tap STAMINA mode 3 Mark the Extended standby checkbox if it is not already marked then tap Activate if prompted To select which applications to run in STAMINA mode...

Страница 111: ...our Home screen tap 2 Find and tap Settings Power management 3 Mark the checkbox beside Queue background data Memory and storage Your device has different types of memory and storage possibilities for photos apps and other files The internal storage is about 1 7 GB and is used to store downloaded or transferred content along with personal settings and data Examples are alarm volume and language se...

Страница 112: ...me screen tap 2 Find and tap Settings Storage Erase SD card 3 To confirm tap Erase SD card Erase everything All content on the memory card gets erased when you format it Make sure you make backups of all data that you want to save before formatting the memory card To back up your content you can copy it to a computer For more information see Managing files using a computer on page 112 Managing fil...

Страница 113: ...ctivity USB Connectivity 5 Under Wireless Media Transfer select the paired device that you want to connect 6 Tap Connect To disconnect from a paired device 1 From your Home screen tap 2 Find and tap Settings Xperia Connectivity USB Connectivity 3 Under Wireless Media Transfer select the paired device that you want to disconnect 4 Tap Disconnect To remove a pairing with another device 1 From your H...

Страница 114: ... GSM International Emergency Number 112 Please contact your network operator or service provider to determine availability of any specific service or feature and whether additional access or usage fees apply Use of certain features and applications described in this guide may require access to the Internet You may incur data connection charges when you connect to the Internet from your device Cont...

Страница 115: ...Microsoft may include a revocation list with the licences Content owners may require you to upgrade WMDRM to access their content If you decline an upgrade you will not be able to access content that requires the upgrade This product is licensed under the MPEG 4 visual and AVC patent portfolio licences for the personal and non commercial use of a consumer for i encoding video in compliance with th...

Отзывы: