background image

9

G

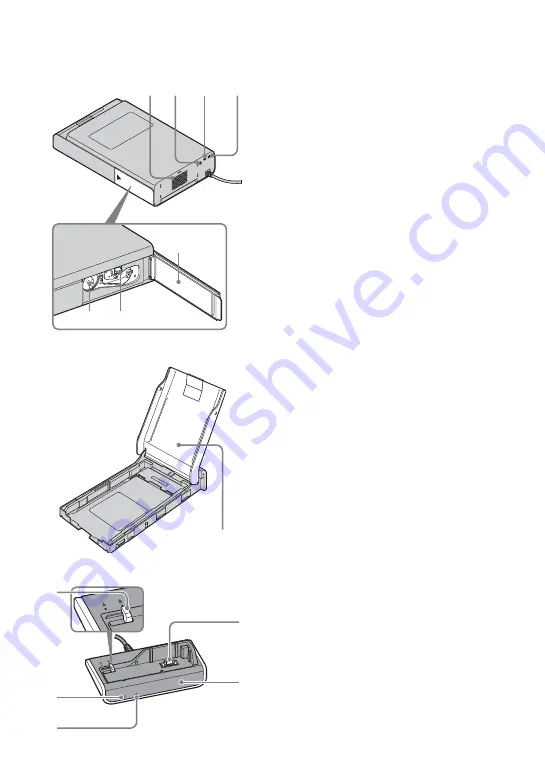
Ventilation holes

H

DC IN 24V jack (page 15)

Insert the AC power adaptor supplied 
here, and then connect the AC power 
adaptor and the wall outlet with the 
supplied AC power cord.

I

A/V OUT jack (page 16)

J

COMPONENT OUT jack (page 16)

K

Ink ribbon slot (page 12)

L

Ink ribbon eject lever (page 12)

M

Ink ribbon compartment cover (page 12)

Paper tray

A

Paper tray lid (page 13)

Camera adaptor

A

Model select switch

When using this printer, the Model 
select switch must be set to B.

B

CHARGE indicator (page 20)

C

HD OUTPUT indicator

• Lights when the setting is set to 

“HD(1080i)” on the camera.

D

Remote sensor

E

Multi connector

G H

I

J

K

L

M

A

A

B

C

D

E

Содержание Cyber-shot DSC-W80HDPR

Страница 1: ...his manual thoroughly and retain it for future reference DPP FPHD1 Owner s Record The model and serial numbers are located on the bottom Record the serial number in the space provided below Refer to these numbers whenever you call upon your Sony dealer regarding this product Model No DPP FPHD1 Serial No _____________________ ...

Страница 2: ...ful interference to radio or television reception which can be determined by turning the equipment off and on the user is encouraged to try to correct the interference by one or more of the following measures Reorient or relocate the receiving antenna Increase the separation between the equipment and receiver Connect the equipment into an outlet on a circuit different from that to which the receiv...

Страница 3: ...lose the fuse cover please contact your nearest Sony service station Trademarks Cyber shot is the trademark of Sony Corporation All other companies and product names mentioned herein may be the trademarks or registered trademarks of their respective companies Furthermore and are not mentioned in each case in this manual This software is based in part on the work of the independent JPEG Group Notic...

Страница 4: ...d illustrated is for 120V only The plug shape and specifications of the AC power cord differ depending on the region you purchased the printer Cleaning cartridge 1 Cleaning sheet 1 Remote Control 1 Vertical stand attachment 2 A V connecting cable 1 Component video cable 1 Paper protector 1 Sample color print pack Post card size Operating Instructions this manual 1 ...

Страница 5: ...s 11 Preparing the print pack 11 Loading the ink ribbon 12 Inserting the print paper 13 Connecting 15 Viewing images on the TV 17 Printing images 18 Charging the battery pack 20 Troubleshooting 21 If trouble occurs 21 If paper jams 25 Cleaning the inside of the printer 25 Precautions 27 Specifications 29 Display range of images 30 ...

Страница 6: ...se the DSC T20 refer to the Instruction Manual supplied with the camera and the Cyber shot Handbook PDF Place the camera on the camera adaptor You can enjoy viewing images on a high definition TV and print the desired image instantly using the digital photo printer DPP FPHD1 Shooting Setting ...

Страница 7: ...y charger supplied with the camera t page 20 You can play back a series of recorded images with the desired effect and music Slide show t page 17 You can print the desired image easily by pressing the PRINT button on the remote control t page 18 You can print up to 20 sheets of print paper at once The Super Coat 2 feature enables high durability and moisture or fingerprint resistance keeping your ...

Страница 8: ... It flashes also when an error occurs C ACCESS indicator page 19 Lights The camera is being connected to the printer Flashes The image to be printed is damaged D ERROR indicator pages 12 25 Lights The paper tray is not inserted No print paper is in the paper tray Paper remains in the printer Flashes slowly The ink ribbon ends No ink ribbon is inserted Flashes rapidly Paper is jammed E Paper tray p...

Страница 9: ...UT jack page 16 K Ink ribbon slot page 12 L Ink ribbon eject lever page 12 M Ink ribbon compartment cover page 12 Paper tray A Paper tray lid page 13 Camera adaptor A Model select switch When using this printer the Model select switch must be set to B B CHARGE indicator page 20 C HD OUTPUT indicator Lights when the setting is set to HD 1080i on the camera D Remote sensor E Multi connector G H I J ...

Страница 10: ...selection For details refer to the Instruction Manual supplied with the camera and the Cyber shot Handbook PNotes Remove the insulation sheet before using the remote control Point the remote control towards the remote sensor on the camera adaptor to operate your camera To change the battery of the remote control 1 While pressing on the tab inset your fingernail into the slit to pull out the batter...

Страница 11: ...ypes of print pack printing may not be possible or malfunction may occur The side without the imprinting is the printing surface Inferior print quality may result if the printing surface is contaminated with dust or fingerprints Be careful to avoid touching the printing surface Do not bend the paper or tear it off at the perforations before printing Do not print on used sheets of print paper or at...

Страница 12: ... ribbon When the ink ribbon runs out the ERROR indicator will flash slowly Open the ink ribbon compartment cover push up the eject lever and remove the used ink ribbon PNotes Use the ink ribbon contained in the same box with the print paper Do not touch the ink ribbon or place the ink ribbon in a dusty location Fingerprints or dust on the ink ribbon may result in imperfect printing Eject lever Ink...

Страница 13: ...nting Otherwise proper printing result will not be obtained or even a malfunction may occur If the ink ribbon does not click into place remove it and then re insert it If the ink ribbon is too slack to be loaded wind the ink ribbon in the direction of the arrow to remove the slack Do not remove the ink ribbon while printing Inserting the print paper 1 Open the paper tray 2 Lift the paper tray lid ...

Страница 14: ...er thoroughly Then insert the print paper with its printing surface the side with no imprint facing up Set the print paper toward the paper feeding direction with the back of paper with the SONY logo facing down PNote Do not touch the printing surface Fingerprints on the printing surface may result in imperfect printing 4 Remove the protective sheet 5 Close the paper tray lid Printing surface Pape...

Страница 15: ...printed image thicker Use the print paper for this printer only Do not use the print paper ejected without printed PNote on storing the print paper Avoid storing the paper with the printed faces touching each other or in contact with rubber or plastic products including vinyl chloride or plasticizer for an extended period of time color changes or deterioration of the printed image may occur Connec...

Страница 16: ... printer when using the paper protector The protector also prevents blocking the ventilation holes PPrecautions The printer is not disconnected from the AC power source mains as long as it is connected to the wall outlet even if the printer itself has been turned off Connect the AC adaptor to an easily accessible wall outlet close by If some trouble occurs while using the adaptor immediately shut ...

Страница 17: ... to Video For details refer to the operating instructions supplied with the TV 3 Press 1 on the remote control to turn on the power of the camera The print menu appears on the screen 4 Select Exit by pressing V on the remote control and press at the center The playback screen appears 5 Select the desired image by pressing b B You cannot play back movies When connecting with the component video cab...

Страница 18: ... B and press at the center 2 Press the MENU button 3 Select OK and press at the center 5 Set the print mode You can select from the following print modes Index print Border Borderless print Date print When you specify border print for 16 9 size images you can print the full images without margins being cut off page 30 6 Select OK with the control buttons and press at the center The image will be p...

Страница 19: ...g continuous printing or if you print with no print paper in the paper tray the printer s ERROR indicator lights Feed the print paper without turning off the power and resume printing On the ACCESS indicator The ACCESS indicator shows the connection status between the printer and the camera as follows When the indication lights The connection between the printer and the camera is established When ...

Страница 20: ...tely 230 minutes It may take longer to charge depending on the charging condition and environment If the motor in the printer is still running turn off the camera after the motor stops running You cannot charge the battery while the motor is running If CHARGE indicator fails to light or blinks for more than 10 seconds refer to Troubleshooting After attaching the camera to the camera adaptor the CH...

Страница 21: ...rn off the camera after the motor stops running The CHARGE indicator flashes fast or flashes for more than 10 seconds The battery pack installed into the camera is inapplicable Install the battery pack compatible with your camera Check whether the camera is placed properly on the camera adaptor Unable to turn on the camera or the power suddenly turns off Check whether the camera is placed properly...

Страница 22: ...olded before printing If print paper runs out during continuous printing or if you print with no print paper in the paper tray the printer s ERROR indicator lights on Feed the print paper without turning off the power and resume printing Print paper you used is incompatible with the printer Use print paper designed for the printer Using print paper incompatible with the printer may cause a malfunc...

Страница 23: ...ence only The image is not printed full size within print range The print range differs depending on the image size See page 30 The printed image is crooked The paper tray is not inserted properly Re insert the paper tray firmly and straight until it reaches the end An image rotated on the camera does not appear as it is on the print paper When you try to print a rotated image the printer prints t...

Страница 24: ...paper cannot be removed contact the Sony service facilities If the ERROR indicator lights re start printing after the print paper is removed See If paper jams tpage 25 and remove the jammed paper from the printer If the jammed paper cannot be removed contact the Sony service facilities Printing stops midway If the ERROR indicator flashes rapidly the paper is jammed See If paper jams tpage 25 and r...

Страница 25: ...and remove the jammed paper if any PNote If you cannot remove the jammed paper contact your Sony dealer or service facilities If white lines or periodical dots are printed on the pictures use the cleaning cartridge supplied and the cleaning sheet of the supplied printing pack to clean inside the printer 1 Open the ink ribbon compartment cover and if there is an ink ribbon remove it page 12 2 Inser...

Страница 26: ...eet from the printer Keep the cleaning cartridge and cleaning sheet together for future cleaning When cleaning ends Set the ink ribbon and print paper into the printer PNotes Carry out cleaning only when there are white lines or dots on the print When you can obtain proper printing performances cleaning will not improve the printed picture quality Do not place the cleaning sheet on the print paper...

Страница 27: ...se holes may cause internal heat build up On the AC adaptor Be sure to use the AC adaptor supplied with the printer Do not use other AC adaptors as this may cause a malfunction Do not use the supplied AC adaptor to other devices Do not use an electrical transformer travel converter as this may cause overheat or a malfunction In case the cord of the AC adaptor is damaged never use it any longer as ...

Страница 28: ... duplicating documents with the printer pay special attention to the following Duplication of banknotes coins or securities is against the law Duplication of blank certificates licenses passports private securities or unused postal stamps is also against the law TV program films video tapes others portraits or other materials may be copyrighted Unauthorized video printing of such materials may inf...

Страница 29: ...mensions Approx 185 62 302 mm 7 3 8 2 1 2 12 inches w h d excluding protruding parts the paper protector and the stand attachments Mass Approx 1 75 kg 3 lb 13 7 oz excluding the ink ribbon print paper and the AC power adaptor Supplied accessories See Checking the contents of the package on page 4 x Camera adaptor Dimensions Approx 124 45 65 mm 5 1 13 16 2 5 8 inches w h d excluding protruding part...

Страница 30: ...ages on a high definition TV Print paper 3 2 Normal 4 3 Displayed in dark color The top and bottom margins are slightly cut off 3 2 Displayed in dark color The whole image is printed 16 9 Borderless print The left and right margins are slightly cut off Border print The whole image is slightly scaled down and entirely printed Picture size ...

Страница 31: ......

Страница 32: ...n on this product and answers to frequently asked questions can be found at our Customer Support Website Printed on 70 or more recycled paper using VOC Volatile Organic Compound free vegetable oil based ink Printed in Japan ...

Отзывы: