background image

36

For details on the operation 

t

 page 26

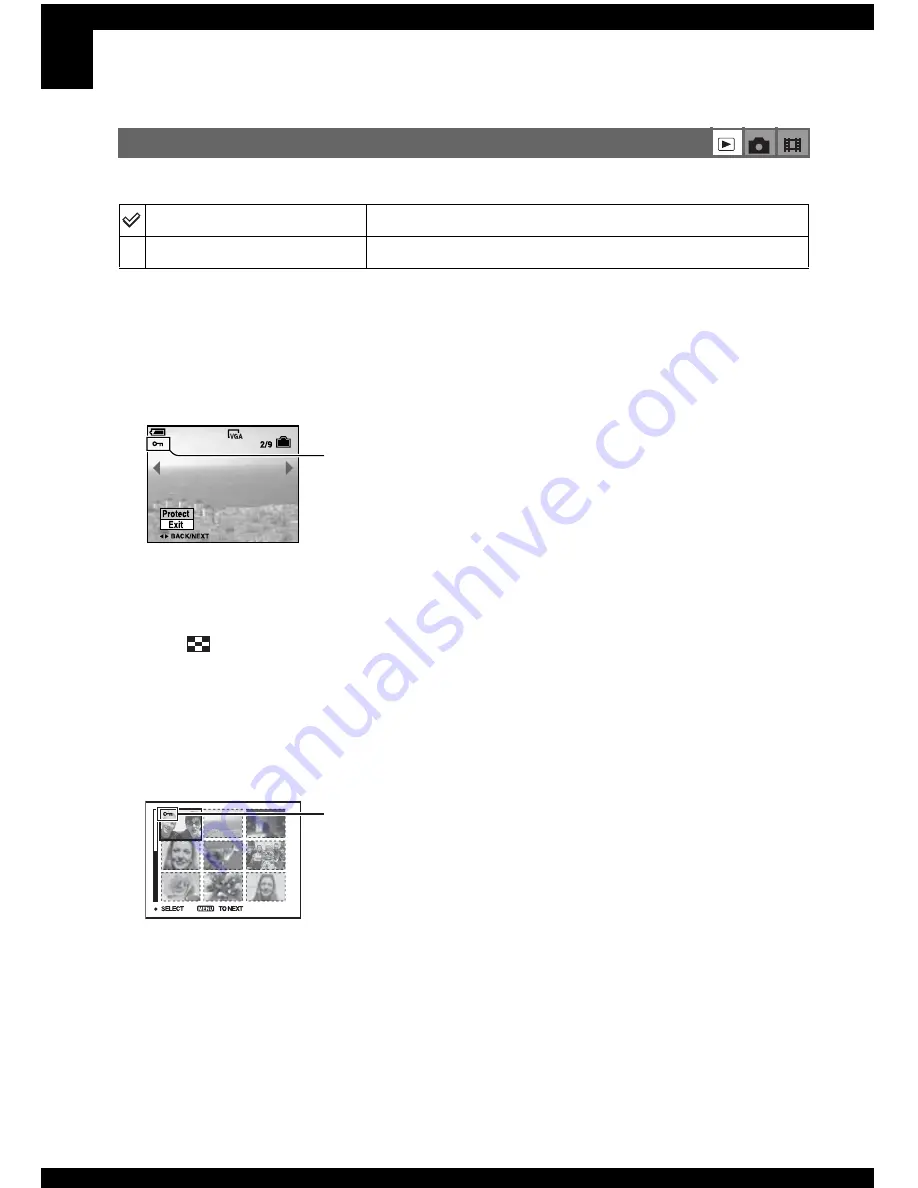
Protects images against accidental erasure.

To protect images in single-image mode

1

Display the image you want to protect.

2

Press MENU to display the menu.

3

Select 

-

 (Protect) with 

b

/

B

 on the control button, then press 

z

.

The image is protected and the 

-

 (protect) indicator appears on the image.

4

To protect other images, select the desired image with 

b

/

B

, then press 

z

.

To protect images in index mode

1

Press 

 (Index) to display the index screen.

2

Press MENU to display the menu.

3

Select 

-

 (Protect) with 

b

/

B

 on the control button, then press 

z

.

4

Select [Select] with 

v

/

V

, then press 

z

.

5

Select the image you want to protect with 

v

/

V

/

b

/

B

, then press 

z

.

A green 

-

 indicator appears on the selected image.

6

Repeat step 

5

 to protect other images.

7

Press MENU.

8

Select [OK] with 

B

, then press 

z

.

The 

-

 indicator turns white. The selected images are protected.

• To protect all images in the folder, select [All In This Folder] in step 

4

, and press 

z

. Select [On] with 

B

then press 

z

.

-

 (Protect)

Protect (

-

)

See the following procedure.

Exit

Exits the Protection function.

-

-

 (green)

Содержание Cyber-shot DSC-S600

Страница 1: ...ical Support Department 9 876 922 41 DSC S600_L1 DIGITAL STILL CAMERA US Model Canadian Model AEP Model UK Model E Model Australian Model Chinese Model Brazilian Model Hong Kong Model Korea Model DSC S600 Note The components identified by mark 0 or dotted line with mark 0 are critical for safety Replace only with part number specified Note Les composants identifiés par une marque 0 sont critiques ...

Страница 2: ...es T Input and Output connectors USB jack mini B USB communication Hi Speed USB USB 2 0 compliant LCD screen LCD panel 5 1 cm 2 0 type TFT drive Total number of dots 84 960 354 240 dots Power general Power R6 size AA Alkaline batteries 2 3 V HR 15 51 HR6 size AA Nickel Metal Hydride batteries 2 not supplied 2 4 V ZR6 size AA Oxy Nickel Primary Battery 2 not supplied 3 V AC LS5K AC Adaptor not supp...

Страница 3: ... NUMBERS APPEAR AS SHOWN IN THIS MANUAL OR IN SUPPLEMENTS PUBLISHED BY SONY ATTENTION AU COMPOSANT AYANT RAPPORT À LA SÉCURITÉ LES COMPOSANTS IDENTIFÉS PAR UNE MARQUE 0 SUR LES DIAGRAMMES SCHÉMATIQUES ET LA LISTE DES PIÈCES SONT CRITIQUES POUR LA SÉCURITÉ DE FONCTIONNEMENT NE REMPLACER CES COMPOSANTS QUE PAR DES PIÈSES SONY DONT LES NUMÉROS SONT DONNÉS DANS CE MANUEL OU DANS LES SUPPÉMENTS PUBLIÉS...

Страница 4: ...nd the set to a specialized center METHOD FOR COPYING THE DATA IN INTERNAL MEMORY Copies all images in the internal memory to a Memory Stick Duo 1 Insert a Memory Stick Duo having 32 MB or larger capacity 2 Select OK with v on the control button then press z The message All data in internal memory will be copied Ready appears 3 Select OK with v then press z Copying starts Use batteries with enough...

Страница 5: ...INSTRUCTION READ THIS FIRST NORWEGIAN DANISH AEP 2 658 425 11 INSTRUCTION USER S GUIDE ENGLISH EXCEPT CH KR BR 2 658 425 21 INSTRUCTION USER S GUIDE FRENCH ITALIAN CND AEP 2 658 425 31 INSTRUCTION USER S GUIDE SPANISH PORTUGUESE AEP E 2 658 425 41 INSTRUCTION USER S GUIDE GERMAN DUTCH AEP 2 658 425 51 INSTRUCTION USER S GUIDE TRADITIONAL CHINESE SIMPLIFIED CHINESE E HK CH 2 658 425 61 INSTRUCTION ...

Страница 6: ...ns the set up and basic operations for shooting playback with your camera Operating Instructions Before operating the unit please read this manual and Read This First separate volume thoroughly and retain them for future reference Owner s Record The model and serial numbers are located on the bottom Record the serial number in the space provided below Refer to these numbers whenever you call upon ...

Страница 7: ...ous voltage within the product s enclosure that may be of sufficient magnitude to constitute a risk of electric shock to persons This symbol is intended to alert the user to the presence of important operating and maintenance servicing instructions in the literature accompanying the appliance Declaration of Conformity Trade Name SONY Model No DSC S600 Responsible Party Sony Electronics Inc Address...

Страница 8: ...ursuant to Subpart B of Part 15 of FCC Rules This product has been tested and found compliant with the limits set out in the EMC Directive for using connection cables shorter than 3 meters 9 8 feet Attention The electromagnetic fields at the specific frequencies may influence the picture and sound of this camera Notice If static electricity or electromagnetism causes data transfer to discontinue m...

Страница 9: ...ta in the internal memory or Memory Stick Duo may be corrupted Be sure to back up the data to avoid the potential risk of data loss See pages 22 and 55 on how to back up the data Notes on recording playback This camera is neither dust proof nor splash proof nor water proof Read Precautions page 94 before operating the camera Before you record one time events make a trial recording to make sure tha...

Страница 10: ...es may trail across on the LCD screen in a cold location This is not a malfunction This camera is equipped with a power zoom lens Be careful not to bump the lens and be careful not to apply force to it On image data compatibility This camera conforms with DCF Design rule for Camera File system universal standard established by JEITA Japan Electronics and Information Technology Industries Associati...

Страница 11: ...still images Scene Selection 6 View delete images Get more friendly with your camera This manual Shoot with your favorite settings Program auto shooting t page 24 Enjoy various shooting playback using the menu t page 26 Change the default settings t page 42 Connect your camera to a PC or a printer This manual Copy your images to a computer and enjoy editing them in various ways t page 52 Print ima...

Страница 12: ...n the screen 16 Changing the screen display 20 Number of still images and recording time of movies 21 When you do not have a Memory Stick Duo Recording with the internal memory 22 Battery life and number of images that can be recorded viewed 23 Using the mode switch 24 Using menu items 26 Menu items 27 Shooting menu 28 Camera EV 9 Focus WB White Bal ISO P Quality Mode REC Mode Interval Flash Level...

Страница 13: ...tup items 42 Camera 43 AF Mode Digital Zoom Red Eye Reduction AF Illuminator Auto Review Internal Memory Tool 46 Format Memory Stick Tool 47 Format Create REC Folder Change REC Folder Copy Setup 1 49 Beep Language Initialize Setup 2 50 File Number USB Connect Clock Set Using the Setup screen 1 2 ...

Страница 14: ...uo 61 Using the supplied software 62 Using your Macintosh computer 66 How to print still images 68 Printing images directly using a PictBridge compliant printer 69 Printing at a shop 73 Troubleshooting 75 Warning indicators and messages 87 On the Memory Stick 90 On the batteries 92 Precautions 94 Specifications 95 Using your computer Printing still images Troubleshooting Others Index 96 ...

Страница 15: ...a subject successfully Press the shutter button fully down straight away Press the shutter button halfway down AE AF lock Flashing lit beeps Then press the shutter button fully down Hints for preventing blur Hold the camera steadily keeping your arms at your side Also you can stabilize the camera by leaning against a tree or a building beside you Using a tripod and using the flash in dark places a...

Страница 16: ...y set to the proper value in the auto adjustment mode However you can adjust it manually using the functions below EV Allows you to adjust the exposure that has been determined by the camera t page 28 Metering Mode Allows you to change the part of the subject to be measured to determine the exposure t step 5 in Read This First Correct exposure Underexposure too little light Darker image High ISO s...

Страница 17: ...y and the image is displayed in fine detail Image size is shown by the number of pixels Although you cannot see the differences on the screen of the camera the fine detail and data processing time differ when the image is printed or displayed on a computer screen Description of the pixels and the image size Color On the effects of lighting Weather lighting Daylight Cloudy Fluorescent Incandescent ...

Страница 18: ...en digital images are saved When you select a high compression ratio the image lacks the fineness of detail but has a smaller file size Pixel Many pixels Fine image quality and large file size Example Printing in up to A4 size Few pixels Rough image quality but small file size Example An attached image to be sent by e mail Image size Usage guidelines 6M 2816 2112 Larger Smaller For printing in A4 ...

Страница 19: ... in Read This First B Flash charge lamp Record lamp orange t step 5 in Read This First C Finder t step 5 in Read This First D Mode switch 24 E MENU button 26 F LCD screen 20 G Screen status button 20 H Image Size Delete button t step 4 and 6 in Read This First I For shooting Zoom W T button t step 5 in Read This First For viewing Playback zoom button Index button t step 6 in Read This First J Cont...

Страница 20: ...eceptacle bottom Use a tripod with a screw length of less than 5 5 mm 7 32 inch You will be unable to firmly secure the camera to tripods having screws longer than 5 5 mm 7 32 inch and may damage the camera After use remove the camera from the tripod R Speaker bottom S Memory Stick Duo cover t step 3 in Read This First T AC Adaptor cord cover To use the AC LS5K AC Adaptor not supplied Do not pinch...

Страница 21: ...e 24 31 White balance 30 STBY REC Standby Recording a movie t step 5 in Read This First Camera mode Scene Selection t step 5 in Read This First Camera mode Program 24 Flash mode t step 5 in Read This First Zoom scaling 43 t step 5 in Read This First Red Eye Reduction 44 Sharpness 34 Saturation 33 Contrast 33 AF illuminator 44 Metering mode t step 5 in Read This First Picture effect 33 Display Indi...

Страница 22: ...ient lighting Even if the vibration warning appears you can still shoot images However we recommend using the flash for better lighting or using a tripod or other means to stabilize the camera E Low battery warning 23 87 Spot metering cross hairs t step 5 in Read This First 1M 101 AF range finder frame 29 Display Indication NR slow shutter When using certain shutter speeds the NR slow shutter func...

Страница 23: ... t step 4 in Read This First Protect 36 Print order DPOF mark 73 Change folder 35 This does not appear when using the internal memory Zoom scaling t step 6 in Read This First Step 12 16 Frame by frame playback 31 N Playback t step 6 in Read This First Volume t step 6 in Read This First Display Indication 101 0012 Folder file number 35 Playback bar t step 6 in Read This First M 1M 1 3 ...

Страница 24: ...ted folder 35 C 32 00 Self diagnosis display 87 00 00 12 Counter t step 6 in Read This First Display Indication Do not disconnect the USB cable 71 2 0EV Exposure Value 28 ISO number 31 Metering mode t step 5 in Read This First Flash White balance 30 500 Shutter speed F3 5 Aperture value Playback image t step 6 in Read This First 101 101 Display Indication 2006 1 1 9 30 AM Recorded date time of the...

Страница 25: ...When you set the LCD screen to Off the digital zoom does not function page 43 and AF Mode is set to Single page 43 When you select Flash mode Self timer Metering mode the image is displayed for about two seconds VGA 96 Indicators off LCD screen off Indicators on Image information is displayed during playback ...

Страница 26: ...ing time of movies Units hour minute second Movies with the size set to 640 Fine can only be recorded on a Memory Stick PRO Duo For image size and image quality see page 12 When images recorded using earlier Sony models are played back on this camera the display may differ from the actual image size Capacity Size 32MB 64MB 128MB 256MB 512MB 1GB 2GB 6M 10 21 42 77 157 322 660 19 39 79 142 290 592 1...

Страница 27: ... pages 55 to 59 without a Memory Stick Duo inserted in the camera You cannot move image data on a Memory Stick Duo to the internal memory By connecting the camera and a computer with a USB cable you can copy data stored in the internal memory to a computer but you cannot copy data on a computer to the internal memory When a Memory Stick Duo not supplied is inserted Recording Images are recorded on...

Страница 28: ...ooting in the following situations P Quality is set to Fine AF Mode is set to Single Shooting once every 30 seconds The zoom is switched alternately between the W and T ends The flash strobes once every two times The power turns on and off once every ten times The measurement method is based on the CIPA standard CIPA Camera Imaging Products Association The number of shooting images battery life do...

Страница 29: ...ng mode Allows you to shoot with the exposure adjusted automatically both the shutter speed and the aperture value Also you can select various settings using the menu For details on the functions available t page 27 Scene Selection mode Allows you to shoot with preset settings according to the scene t step 5 in Read This First Control button Mode switch Shooting movies t step 5 in Read This First ...

Страница 30: ...ep 5 in Read This First For shooting an image appropriately according to the scene condition a combination of functions is determined by the camera you can select the desired setting Flash AF range finder White Balance Burst Multi Burst Flash Level Auto SL ...

Страница 31: ...g b B until the item appears on the screen Press z after selecting an item when the mode switch is set to 4 Select the setting with v V The setting you select is zoomed and is set 5 Press MENU to turn off the menu If there is an item that is not displayed an v V mark appears on the edges of the location where menu items usually appear To display an item that is not displayed select the mark with t...

Страница 32: ...peration is limited according to the Scene mode page 25 Available only during enlarged playback available Mode switch position Auto Program Scene Menu for shooting page 28 Camera EV 9 Focus WB White Bal ISO P Quality Mode REC Mode Interval Flash Level PFX P Effect Saturation Contrast Sharpness Setup Menu for viewing page 35 Folder Protect DPOF Print Slide Resize Rotate Divide Setup Trimming M ...

Страница 33: ...he exposure Toward Toward For details on the exposure t page 11 The compensation value can be set in 1 3EV increments If a subject is being shot in extremely bright or dark conditions or the flash is used the exposure adjustment may not be effective Camera EV M 2 0EV Toward Brightens an image 0EV The exposure is determined automatically by the camera m 2 0EV Toward Darkens an image ...

Страница 34: ...e frame In this case the or indicator flashes and the AF range finder frame is not displayed Some settings cannot be selected depending on the Scene mode 9 Focus Center AF Focuses automatically on a subject in the center of the finder frame Using this with the AF lock function lets you shoot in the desired image composition Multi AF Multipoint AF Still image Movie Focuses automatically on a subjec...

Страница 35: ...r button fully down Adjusts the color tones according to the lighting condition in a situation for example when the colors of an image look strange For details on the white balance t page 12 Under fluorescent lights that flicker the white balance function may not work correctly even though you select Fluorescent Some options are not available depending on the Scene mode page 25 WB White Bal n Inca...

Страница 36: ... in dark locations or shooting a subject moving at high speed or select a small number to obtain high image quality 800 400 200 100 80 Auto P Quality Fine FINE Records with high quality low compression Standard STD Records with standard quality high compression Mode REC Mode Multi Burst Records 16 frames in succession as a still image file when you press the shutter button This is convenient for c...

Страница 37: ...mage is displayed as a single image with 16 frames The image size of images shot in the Multi Burst mode is 1M You may not be able to shoot images in the Multi Burst mode depending on the Scene mode page 25 On the Burst The flash is set to No flash When recording with the self timer a series of a maximum of five images is recorded When the battery level is low or when the internal memory or Memory...

Страница 38: ...is not maintained when the power is turned off Adjusts the saturation of the image Adjusts the contrast of the image Flash Level Toward Makes the flash level higher Normal Toward Makes the flash level lower PFX P Effect B W Records the image in monochrome black and white Sepia Records the image in sepia like an old photograph Off No effect Saturation Toward Brightens the color Normal Toward Darken...

Страница 39: ...34 For details on the operation t page 26 Adjusts the sharpness of the image See page 42 Sharpness Toward Sharpens the image Normal Toward Softens the image Setup ...

Страница 40: ... images in a specified folder of a Memory Stick Duo page 47 You can change the folder or create a new one To create a new folder t Create REC Folder page 47 To change the folder for recording images t Change REC Folder page 48 When multiple folders are created in the Memory Stick Duo and the first or last image in the folder is displayed the following indicators appear Moves to the previous folder...

Страница 41: ...e 1 Press Index to display the index screen 2 Press MENU to display the menu 3 Select Protect with b B on the control button then press z 4 Select Select with v V then press z 5 Select the image you want to protect with v V b B then press z A green indicator appears on the selected image 6 Repeat step 5 to protect other images 7 Press MENU 8 Select OK with B then press z The indicator turns white ...

Страница 42: ...ith B and then press z To cancel protection of all images in the folder Select All In This Folder in step 4 of To protect images in index mode and press z Select Off with B then press z Note that formatting the internal memory or Memory Stick Duo erases all the data stored on the recording media even if images are protected and these images cannot be recovered It may take some time to protect an i...

Страница 43: ...ss z 4 Select the desired size with v V then press z The resized image is recorded in the recording folder as the newest file For details on Image Size t step 4 in Read This First You cannot change the size of movies or Multi Burst images When you change from a small size to a large size the image quality deteriorates You cannot resize to an image size of 3 2 or 16 9 When you resize a 3 2 or 16 9 ...

Страница 44: ...ages on a computer the image rotation information may not be reflected depending on the software Cuts movies or deletes unnecessary portions of movies This is the recommended function to use when the internal memory or Memory Stick Duo capacity is insufficient or when you attach movies to your e mail messages Note that the original movie is deleted and that number is skipped Also note that you can...

Страница 45: ...A Divide 101_0002 is divided into 101_0004 and 101_0005 2 Cutting scene B Divide 101_0005 is divided into 101_0006 and 101_0007 3 Deleting scenes A and B if they are unnecessary Delete Delete 4 Only the desired scenes remain Procedure 1 Display the movie to be divided 2 Press MENU to display the menu 3 Select Divide with b B on the control button then press z 4 Select OK with v then press z The pl...

Страница 46: ... Still image Movies not long enough to cut shorter than about two seconds Protected movies page 36 See page 42 Records an enlarged image t step 6 in Read This First as a new file 1 Press MENU during playback zoom to display the menu 2 Select Trimming with B on the control button then press z 3 Select the image size with v V then press z The image is recorded and the original image is displayed aga...

Страница 47: ... item you want to set The frame of the selected item turns yellow 5 Press z to enter the setting To turn off the Setup screen press MENU To return to the menu from the Setup screen press b on the control button repeatedly To cancel the Setup setting Select Cancel if it appears then press z on the control button If it does not appear select the previous setting again This setting is maintained even...

Страница 48: ... halfway down This mode is useful for shooting stationary subjects Monitor M AF Automatically adjusts the focus before the shutter button is pressed and held halfway down This mode shortens the time needed for focusing Battery consumption is faster than in Single mode Digital Zoom Smart Smart zoom Enlarges the image digitally with almost no distortion This is not available when the image size is s...

Страница 49: ...e AF illuminator emits red light allowing the camera to focus easily when the shutter button is pressed halfway until the focus is locked The indicator appears at this time If the AF illuminator light does not reach the subject sufficiently or the subject has no contrast focus will not be achieved A distance of up to approximately 3 5 m 137 7 8 inches W 2 5 m 98 1 2 inches T is recommended Focus i...

Страница 50: ...on the screen for approximately two seconds immediately after shooting a still image If you press the shutter button halfway down during this period the recorded image display disappears and you can immediately shoot the next image Auto Review On Use the Auto Review Off Does not use Auto Review ...

Страница 51: ...Formats the internal memory Note that formatting irrevocably erases all data in the internal memory including even protected images 1 Select OK with v on the control button then press z The message All data in internal memory will be erased Ready appears 2 Select OK with v then press z The format is complete Format OK See the following procedure Cancel Cancels the formatting ...

Страница 52: ...The folder creation screen appears 2 Select OK with v then press z A new folder is created with a number incremented one higher than the largest number and the folder becomes the current recording folder For details on the folder see page 35 When not creating a new folder the 101MSDCF folder is selected as the recording folder You can create folders designated up to 999MSDCF Images are recorded in...

Страница 53: ...ars 3 Select OK with v then press z Copying starts Use batteries with enough capacity or the AC Adaptor not supplied If you attempt to copy image files using batteries with little remaining capacity the batteries may run out causing copying to fail or possibly corrupting the data You cannot copy individual images The original images in the internal memory are retained even after copying To delete ...

Страница 54: ... v on the control button then press z The message Initialize all settings Ready appears 2 Select OK with v then press z The settings are reset to the default setting Make sure that the power is not disconnected during resetting Beep Shutter Turns on the shutter sound when you press the shutter button On Turns on the beep shutter sound when you press the control button press the shutter button Off ...

Страница 55: ...ins a file a number one higher than the largest number is assigned USB Connect PictBridge Connects the camera to a PictBridge compliant printer page 69 PTP When PTP Picture Transfer Protocol is set and the camera is connected to a computer the images in the recording folder on the camera are copied to the computer Compatible with Windows XP and Mac OS X Mass Storage Establishes a Mass Storage conn...

Страница 56: ...t page 42 Using the Setup screen Sets the date and time Clock Set OK Select OK with v on the control button and press z Then perform the procedure explained in Set the clock t step 2 in Read This First Cancel Cancels setting the clock ...

Страница 57: ...page 66 This section describes the English version screen contents Install the supplied software first page 54 Copying images to your computer page 55 Viewing images on your computer Enjoying images using the supplied software page 62 Viewing images saved on your computer Viewing photos organized by date Editing images Printing images ...

Страница 58: ... MB of RAM or more Hard Disk Disk space required for installation 200 MB or more Display Screen resolution 800 600 dots or more Colors High Color 16 bit color 65 000 colors or more Notes on connecting your camera to a computer Operations are not guaranteed for all the recommended computer environments mentioned above If you connect two or more USB devices to a single computer at the same time some...

Страница 59: ... screen appears If it does not appear double click My Computer t CYBERSHOTSOFT 2 Click Install The Choose Setup Language screen appears 3 Select the desired language then click Next The License Agreement screen appears Read the agreement carefully If you accept the terms of the agreement click the radio button next to I accept the terms of the license agreement and then click Next 4 Follow the ins...

Страница 60: ...install the supplied software before proceeding With Windows XP the installation is unnecessary The screen displays shown in this section are the examples for copying images from Memory Stick Duo 1 Insert a Memory Stick Duo with recorded images into the camera When copying images in the internal memory this step is unnecessary 2 Insert batteries with enough capacity in the camera or connect the ca...

Страница 61: ...ndows XP when the wizard screen does not appear automatically follow the procedure explained in Stage 3 B Copying images to a Computer on page 57 This section describes an example of copying images to a My Documents folder 1 After making a USB connection in Stage 2 click Copy pictures to a folder on my computer using Microsoft Scanner and Camera Wizard t OK as the wizard screen appears automatical...

Страница 62: ...5 Click the radio button next to Nothing I m finished working with these pictures to select it then click Next The Completing the Scanner and Camera Wizard screen appears 6 Click Finish The wizard screen closes To continue copying other images disconnect the USB cable page 59 Then follow the procedure explained in Stage 2 Connecting the camera and your computer on page 56 For Windows XP follow the...

Страница 63: ... the My Documents window to display the menu and click Paste The image files are copied to the My Documents folder When an image with the same file name exists in the copy destination folder the overwrite confirmation message appears When you overwrite an existing image with a new one the original file data is deleted To copy an image file to the computer without overwriting change the file name t...

Страница 64: ... Perform the procedures listed below beforehand when Disconnecting the USB cable Removing a Memory Stick Duo Inserting a Memory Stick Duo into the camera after copying images from the internal memory Turning off the camera x For Windows 2000 Me XP 1 Double click on the tasktray 2 Click Sony DSC t Stop 3 Confirm the device on the confirmation window then click OK 4 Click OK The device is disconnect...

Страница 65: ...not equipped with the folder creating function You cannot record any images to the 100MSDCF folder The images in these folders are available only for viewing You cannot record playback any images to the MSSONY folder Image files are named as follows ssss stands for any number within the range from 0001 to 9999 The numerical portions of the name of a movie file recorded in movie mode and its corres...

Страница 66: ...that of your camera playback on your camera is not guaranteed When there is no folder first create a folder with your camera page 47 and then copy the image file 1 Right click the image file then click Rename Change the file name to DSC0ssss Enter a number from 0001 to 9999 for ssss If the overwrite confirmation message appears enter a different number An extension may be displayed depending on th...

Страница 67: ... Programs in Windows XP All Programs t Sony Picture Utility t Cyber shot Viewer Exiting the software Click button in the top right corner of the screen Follow these steps to import and view images from the camera Importing images 1 Make sure Media Check Tool is running Media Check Tool is a program that automatically detects and imports images when a Memory Stick is inserted or when the camera is ...

Страница 68: ...tures folder is set as the default folder in Viewed folders You can double click a thumbnail to display the image by itself 2 Viewing images in Viewed folders arranged by shooting date on a calendar 1Click the Calendar tab Years when images were shot are listed 2Click the year Images shot that year are displayed arranged on the calendar by shooting date 3To display images by month click the desire...

Страница 69: ...umbnail to display the image by itself in a separate window You can edit displayed images by clicking the toolbar button Displaying images in full screen mode To display a slide show of current images in full screen mode click the button To play or pause the slide show click the button on the lower left of the screen To stop the slide show click the button on the lower left of the screen ...

Страница 70: ...orted To change the Folder to be imported access the Import Settings screen To display the Import Settings screen choose Image Import Settings from the File menu Choose the Folder to be imported You can specify the Folder to be imported from folders registered as Viewed folders Updating image registration information To update image information choose Update Database from the Tools menu Updating t...

Страница 71: ...a USB connection when connecting a computer Auto default setting Mass Storage and PTP modes This section describes the Auto and Mass Storage as examples For details on PTP see page 50 When your computer resumes from the suspend or sleep mode communication between your camera and your computer may not recover at the same time 1 Prepare the camera and a Macintosh computer Perform the same procedure ...

Страница 72: ...rning off the camera Drag and drop the drive icon or the icon of the Memory Stick Duo to the Trash icon The camera is disconnected from the computer If you are using Mac OS X v10 0 perform the procedure above after you have turned your computer off To delete the USB connection Additional information on this product and answers to frequently asked questions can be found at the Sony Customer Support...

Страница 73: ...nt printer Printing directly using a Memory Stick compliant printer You can print images with a Memory Stick compliant printer For details see the operating instructions supplied with the printer Printing using a computer You can copy images to a computer using the supplied software and print the images Printing at a shop page 73 You can take a Memory Stick Duo containing images shot with your cam...

Страница 74: ... images that can be printed as an index image differ depending on the printer You cannot print movies If the indicator flashes on the screen of the camera for about five seconds error notification check the connected printer Prepare the camera to connect it to the printer with the USB cable When connecting the camera to a printer that is recognized when USB Connect is set to Auto Stage 1 is unnece...

Страница 75: ...press z All In This Folder Prints all the images in the folder DPOF image Prints all the images with a Print order mark page 73 regardless of the displayed image Select Selects images and prints all the selected images 1Select the image you want to print with b B then press z The mark appears on the selected image To select other images repeat this procedure 2Select Print with V then press z This ...

Страница 76: ...t to print side by side on a sheet as an index image The designated number of images may not all fit onto a single sheet depending on the quantity of images 3 Select OK with V B then press z The image is printed Do not disconnect the USB cable while the Do not disconnect the USB cable indicator appears on the screen To print other images After step 3 select Select and the desired image with v V th...

Страница 77: ... v V b B then press z to display the mark Repeat this procedure to select other images Then press MENU DPOF image Prints all the images with a Print order mark regardless of the displayed image All In This Folder Prints all the images in the folder 5 Perform steps 2 and 3 of Stage 3 Printing page 70 ...

Страница 78: ...al Print Order Format standard or using a PictBridge compliant printer You cannot mark movies When you mark images shot in Multi Burst mode all the images are printed on one sheet divided into 16 panels When taking a Memory Stick Duo to a shop Consult your photo printing service shop as to what types of Memory Stick Duo they handle If a Memory Stick Duo is not handled by your photo printing servic...

Страница 79: ... green mark appears on the selected image 6 Repeat step 5 to mark other images 7 Press MENU 8 Select OK with B then press z The mark turns white To cancel select Cancel in step 4 or select Exit in step 8 then press z To remove the mark in index mode Select the images from which you want to remove the mark in step 5 then press z To remove all the marks in the folder Select All In This Folder in ste...

Страница 80: ...ontents of the internal memory may be checked when you send your camera to be repaired 1 Check the items on pages 76 to 86 If a code such as C E ss ss appears on the screen see page 87 2 Remove batteries and insert batteries again after about one minute and turn on the power 3 Initialize the settings page 49 4 Consult your Sony dealer or local authorized Sony service facility ...

Страница 81: ... Fully discharge and then charge the batteries to correct the display The batteries are dead Replace them with new ones The batteries run down too quickly You are using the camera in an extremely cold location page 92 The batteries are dead Replace them with new ones When using the Nickel Metal Hydride batteries charge them sufficiently Cannot turn on the camera Install the batteries correctly t s...

Страница 82: ...ding movies Do one of the following Set the image size to other than 640 Fine Insert a Memory Stick PRO Duo pages 21 and 90 The subject is not visible on the screen Set the mode switch to an other position than page 24 Recording takes a long time The NR slow shutter function is activated page 17 This is not a malfunction The image is out of focus The subject is too close Ensure the lens is farther...

Страница 83: ...ne particles This phenomenon is not a malfunction The date and time are recorded incorrectly Set the correct date and time t step 2 in Read This First The F value and shutter speed flash when you press and hold the shutter button halfway down The exposure is incorrect Correct the exposure page 28 The image is too dark You are shooting a subject with a light source behind the subject Select the met...

Страница 84: ...age 5 t Read This First Cannot shoot images in succession The internal memory or the Memory Stick Duo is full Delete unnecessary images t step 6 in Read This First The battery level is low Install new batteries or charged Nickel Metal Hydride batteries t step 1 in Read This First Refer to Computers page 81 in conjunction with the following items Your camera cannot play back images Set the mode swi...

Страница 85: ...mmend that you protect images page 36 or use the Memory Stick Duo with the write protect switch and set the switch to the LOCK position page 90 to prevent accidental erasure The resizing function does not work You cannot resize movies and Multi Burst images You cannot display a DPOF Print order mark You cannot display DPOF Print order marks on movies You cannot cut a movie The movie is not long en...

Страница 86: ...computer does not properly recognize the device because you connected the camera and your computer with the USB cable before you installed the supplied software Delete the erroneously recognized device from your computer then install the supplied software see the next item The Removable disk icon does not appear on the computer screen when you connect your computer to the camera Follow the procedu...

Страница 87: ...opy them to a folder recognized by the camera such as 101MSDCF page 60 Operate correctly page 61 Images are not displayed correctly with the supplied software Make sure the folder of the images is registered in Viewed folders If the images are not displayed even if the folder is registered in Viewed folders update the database page 65 You cannot find images imported with the supplied software Look...

Страница 88: ... on the Memory Stick Duo is deleted by formatting You cannot restore it We recommend that you set the write protect switch on the Memory Stick Duo to the LOCK position to prevent accidental erasure page 90 Memory Stick PRO Duo is not recognized by a computer with a Memory Stick slot Check whether the computer and the card reader support Memory Stick PRO Duo Users of computers and card readers made...

Страница 89: ... with the image size set to 16 9 HDTV both edges of the image may be cut off When printing images using your own printer try canceling the trimming or borderless settings Consult the printer manufacturer as to whether the printer provides these functions or not When having images printed at a digital print shop ask the shop whether they can print the images without cutting off both edges A connect...

Страница 90: ... these functions Consult the printer manufacturer as to whether the printer provides these functions or not The date may not be inserted in the index mode depending on the printer Consult the printer manufacturer is printed on the date inserted part of the image Images that do not have the recording data cannot be printed with the date inserted Set Date to Off and print the image again page 71 Can...

Страница 91: ...n the camera Cannot identify an indicator on the screen See page 16 The lens gets fogged Moisture condensation has occurred Turn off the camera and leave it for about an hour before using it page 94 The camera becomes warm when you use it for a long time This is not a malfunction The lens does not move when you turn off the camera The batteries are discharged Install new batteries or charged Nicke...

Страница 92: ...ata is damaged Insert a new Memory Stick Duo page 90 E 61 ss E 91 ss E 92 ss A camera malfunction has occurred Initialize the camera page 49 then turn the power on again If the following messages appear follow the instructions Turn the power off and on again A problem with the lens has caused an error E The battery level is low Install new ones or charged Nickel Metal Hydride batteries t step 1 in...

Страница 93: ...sts on the Memory Stick Duo For example 123MSDCF and 123ABCDE Select another folder or create a new folder page 47 Cannot create more folders The folder with a name beginning with 999 exists on the Memory Stick Duo You cannot create any folders if this is the case Cannot record The camera cannot record images in the selected folder Select a different folder page 48 File error An error occurred whi...

Страница 94: ...ictBridge device You tried to print images before the printer connection was established Connect to a PictBridge compliant printer No printable image You tried to execute DPOF image without placing a DPOF Print order mark on the image s You tried to execute All In This Folder while a folder that holds only movies was selected You cannot print movies Printer busy Paper error No Paper Ink error Low ...

Страница 95: ...itch the position and shape may vary depending on the Memory Stick Duo Do not remove the Memory Stick Duo while reading or writing data Data may be corrupted in the following cases When the Memory Stick Duo is removed or the camera is turned off during a read or write operation When the Memory Stick Duo is used in locations subject to static electricity or electrical noise We recommend backing up ...

Страница 96: ...ve it from the device When inserting a Memory Stick Duo into a Memory Stick Duo Adaptor make sure the Memory Stick Duo is inserted facing in the correct direction then insert it all the way in Incorrect insertion may result in a malfunction When using a Memory Stick Duo inserted into a Memory Stick Duo Adaptor with a Memory Stick compliant device make sure that the Memory Stick Duo Adaptor is inse...

Страница 97: ...t This is especially true at low temperatures and you may not be able to shoot at temperatures below 5 C 41 F Do not mix new and old batteries The battery remaining indicator may not display the correct information when using alkaline batteries Oxy Nickel Primary Battery Due to characteristics of alkaline batteries Oxy Nickel Primary Battery there is a large difference between the available shooti...

Страница 98: ...urchase or when the Nickel Metal Hydride batteries have not been used for a long time they may not full charge This is typical of this type of battery and is not a malfunction If this happens repeatedly using up the batteries fully and then recharging them should correct the problem If you recharge Nickel Metal Hydride batteries before fully using up the existing charge the low battery warning may...

Страница 99: ...ot recommended x On moisture condensation If the camera is brought directly from a cold to a warm location moisture may condense inside or outside the camera This moisture condensation may cause a malfunction of the camera Moisture condensation occurs easily when The camera is brought from a cold location such as a ski slope into a warmly heated room The camera is taken from an air conditioned roo...

Страница 100: ... to 3 8 m 19 3 4 inches to 149 5 8 inches T Input and Output connectors USB jack mini B USB communication Hi Speed USB USB 2 0 compliant LCD screen LCD panel 5 1 cm 2 0 type TFT drive Total number of dots 84 960 354 240 dots Power general Power R6 size AA Alkaline batteries 2 3 V HR 15 51 HR6 size AA Nickel Metal Hydride batteries 2 not supplied 2 4 V ZR6 size AA Oxy Nickel Primary Battery 2 not s...

Страница 101: ...ompression ratio 13 Computer 52 Copying images 55 66 Macintosh 66 Recommended environment 53 66 Software 62 Viewing image files stored on a computer with your camera 61 Windows 52 Connecting Computer 56 Printer 70 Contrast 33 Copy 48 Copying images to your computer 55 Create REC Folder 47 D Daylight 30 Delete t step 6 in Read This First Digital Zoom 43 Divide 39 DPOF 73 E Effective pixels 95 EV 28...

Страница 102: ...ti AF 29 Multi Burst 31 Multi pattern metering t step 5 in Read This First Multipoint AF 29 N NR slow shutter 17 Number of images Recording time 21 O Optical zoom 43 OS 53 66 Overexposure 11 P P Effect 33 P Quality 31 Parallax 79 PC see Computer PFX 33 PictBridge 50 69 Picture effect 33 Pixel 12 Playback zoom t step 6 in Read This First Playback see Viewing Playback Edit 24 Precautions 94 Precisio...

Страница 103: ... Soft snap mode t step 5 in Read This First Software 62 Specifications 95 Spot metering cross hairs t step 5 in Read This First Spot metering t step 5 in Read This First Standard 31 T Trimming 41 Troubleshooting 75 Twilight mode t step 5 in Read This First Twilight portrait mode t step 5 in Read This First U Underexposure 11 USB cable 56 70 USB Connect 50 V VGA t step 4 in Read This First Viewing ...

Страница 104: ...soft Corporation in the United States and or other countries Macintosh and Mac OS are trademarks or registered trademarks of Apple Computer Inc Intel MMX and Pentium are trademarks or registered trademarks of Intel Corporation In addition system and product names used in this manual are in general trademarks or registered trademarks of their respective developers or manufacturers However the or ma...

Страница 105: ...Revision History 987692241 pdf DSC S600_L1 Ver 1 0 Date 2005 12 History Official Release Contents S M Rev issued Reverse ...

Страница 106: ...DS REPAIR PARTS LIST SPECIFICATIONS Link Revision History Revision History Ver 1 0 2005 12 How to use Acrobat Reader How to use Acrobat Reader Sony EMCS Co 2005L1600 1 2005 12 Published by DI Technical Support Department 9 876 922 31 DSC S600_L2 DSC S600 Internal memory ON BOARD Internal memory ON BOARD Note The components identified by mark 0 or dotted line with mark 0 are critical for safety Rep...

Страница 107: ...es T Input and Output connectors USB jack mini B USB communication Hi Speed USB USB 2 0 compliant LCD screen LCD panel 5 1 cm 2 0 type TFT drive Total number of dots 84 960 354 240 dots Power general Power R6 size AA Alkaline batteries 2 3 V HR 15 51 HR6 size AA Nickel Metal Hydride batteries 2 not supplied 2 4 V ZR6 size AA Oxy Nickel Primary Battery 2 not supplied 3 V AC LS5K AC Adaptor not supp...

Страница 108: ...ary solder Ordinary soldering irons can be used but the iron tip has to be applied to the solder joint for a slightly longer time Soldering irons using a temperature regulator should be set to about 350 C Caution The printed pattern copper foil may peel away if the heated tip is applied for too long so be careful Strong viscosity Unleaded solder is more viscous sticky less prone to flow than ordin...

Страница 109: ...GE DATA CHECK 1 3 1 5 HOW TO OPERATE THE CAMERA WITHOUT THE FRONT CABINET 1 3 2 DISASSEMBLY 2 1 DISASSEMBLY 2 3 3 BLOCK DIAGRAMS 3 1 OVERALL BLOCK DIAGRAM 3 1 3 2 POWER BLOCK DIAGRAM 3 3 4 PRINTED WIRING BOARDS AND SCHEMATIC DIAGRAMS 4 1 FRAME SCHEMATIC DIAGRAM 4 1 4 2 SCHEMATIC DIAGRAMS 4 5 4 3 PRINTED WIRING BOARDS 4 27 4 5 MOUNTED PARTS LOCATION 4 36 5 REPAIR PARTS LIST 5 1 EXPLODED VIEWS 5 3 5...

Страница 110: ...ff and on again Cause Trouble with hardware Caution Display During Error SYSTEM ERROR FORMAT ERROR MEMORY STICK ERROR E 61 ss E 91 ss E 92 ss Turn the power off and on again Trouble with internal memory INTERNAL MEMORY ERROR Checking of lens drive circuit When failed in the focus and zoom initialization Checking of flash unit or replacement of flash unit Insert batteries correctly Abnormality when...

Страница 111: ...k is not copied Copy OK See the following procedure Cancel Cancels the copying This item does not appear when a Memory Stick Duo is inserted in the camera The default settings are marked with Formats the internal memory Note that formatting irrevocably erases all data in the internal memory including even protected images 1 Select OK with v on the control button then press z The message All data i...

Страница 112: ...set same initial language as that of the set distributing in each region Initial language Language displayed at the next starting if the setting of Setup menu was reset It is different from the language setting selectable with the menu Initial Language Data Note GP2 is fixed to English GP3 is either English Spanish or Russian GP4 is either English Spanish Portugal Simplified Chinese or Korean Writ...

Страница 113: ...DSC S600_L2 Link Link 2 DISASSEMBLY HELP DISASSEMBLY DISASSEMBLY HELP COMMON NOTE FOR DISASSEMBLY COMMON NOTE FOR DISASSEMBLY ...

Страница 114: ... end of a resistor of 1 kW 1 W 1 215 869 11 Wrap insulating tape fully around the leads of the resistor to prevent electrical shock 1 kΩ 1 W Wrap insulating tape Make sure that the flat cable and flexible board are not cracked of bent at the terminal Do not insert the cable insufficiently nor crookedly Cut and remove the part of gilt which comes off at the point Take care that there are some piece...

Страница 115: ...et upper assembly 5 Cabinet front assembly 1 Two solderings 2 Flexible board from the LCD unit 3 LCD unit 1 Two solderings 2 Claw 3 Two claws 4 Flexible board from the lens block assembly 5 Flexible board from the lens block assembly 6 Flexible flat cable FFC 058 7 Flexible flat cable FFC 056 8 SY 145 board RL 063 board speaker microphone etc 1 4 3 2 1 Screw M1 7x4 2 Two claws 3 RL 063 board 4 Cab...

Страница 116: ...peaker holder 3 Speaker 4 Two solderings 5 Miclophone holder 6 Miclophone HN 015 1 Two solderings 2 Elect 180uF 330V capacitor 3 Three solderings 4 Flash unit harness HN 015 5 SY 145 board RL 063 board flexible flat cable FFC 056 etc 4 1 2 3 1 2 4 5 2 4 1 Flexible board from the lens block assembly 2 Flexible board from the lens block assembly 3 Flexible board from the optical unit 4 Lens block as...

Страница 117: ... installing the Cabinet Rear assembly install it while aligning the Mode switch of the SW 461 board with the position A of the Cabinet Rear assembly A Yellow Two reads from the BM 001 board Tree reads from the LB 117 board Red SW 461 board Black Gray White HELP 02 Solder each lead according to the color Y yellow G gray W white R red B black displayed on the SW 461 board ...

Страница 118: ...ew and the SW 461 board When installing the cabinet front asembly put the lead lines in the space between the optical unit and the DC mortor HELP 03 SW 461 board Tripod screw DC mortor Optical unit Solder each lead according to the color R red B black displayed on the SY 145 board Black Red LCD leads SY 145 board HELP 04 ...

Страница 119: ...ccording to the color R red B black displayed on the SY 145 board HELP 06 Give folding to the flexible flat cable FFC 057 SY 145 board SY 145 board RL 063 board Peak folding Peak folding Valley folding Valley folding RL 063 board Flexible flat cable FFC 057 Flexible flat cable FFC 057 ...

Страница 120: ...DSC S600_L2 Link Link 3 BLOCK DIAGRAMS OVERALL BLOCK DIAGRAM POWER BLOCK DIAGRAM OVERALL BLOCK DIAGRAM POWER BLOCK DIAGRAM ...

Страница 121: ...202 POWER S201 SHUTTER D201 POWER LED901 AF LED XAF LED RL 063 BOARD 7 6 2 3 8 FFC 056 FLEXIBLE FLAT CABLE 3 3 S001 004 002 005 003 DOWN RIGHT UP LEFT SET S011 D001 FLASH D002 AE LOCK MOVIE STILL PLAY S007 009 008 010 006 DISPLAY DUST MENU ZOOM WIDE ZOOM TELE SW 461 BOARD 3 3 3 2 1 USB CN003 BT001 LITHIUM BATTERY SECONDARY CN006 VL 3V USB VBUS 5 6 20 22 21 2 3 FFC 058 FLEXIBLE FLAT CABLE OPTICAL V...

Страница 122: ...LDO3 LDO3IN VL 3V R041 EVER 2 8V B7 XPWR OFF XPWR OFF C7 XPWR ON XPWR ON XPWRON1 D3 MS PWR ON MS PWR ON BATT SENS D4 DTG1 XDD RST OUT A7 K25 AA23 T25 XRESET B2 A2 2 9V REG A1 B1 C2 L002 3 1V REG IC001 DC DC CONVERTER REAL TIME CLOCK A8 OSC I A9 OSC O X001 32 768KHz IC101 CAMERA DSP SYSTEM CONTROL IC202 256Mbit SDRAM W23 AB5 AA5 Y5 IC201 BURST FLASH MEMORY IC203 SUPER AND FLASH MEMORY P25 AB22 7 5V...

Страница 123: ..._SENSE OVF_SENS MIC_GND N C REG_GND LENSV_OPEN MS_D1 NC ZOOM_XB XLENSV_OPEN_SENSE XLENSV_CLOSE_SENSE D4 INT LENSV_CLOSE REG_GND XLENSV_CLOSE_SENSE XLENSV_OPEN_SENSE REG_GND BL_H GND VSS EMITTER MAIN CON DATA1 ZM_OVF_XA GND N C MS_D2 N C REG_GND REG_GND SCLK GND D3 LENSV_CLOSE SHUTTER SP LCD901 2 0 INCH COLOR DIGITAL LCD PANEL XHD BS LENSV_OPEN TH1 XMS_IN GND D LENSV_CLOSE EMITTER OVF_SENS ZM_OVF_A...

Страница 124: ... 461 BOARD JACK FUNCTION SW LITHIUM BATTERY LB 117 BOARD OPEN CLOSE SWITCH SW 461 BOARD JACK FUNCTION SW LITHIUM BATTERY BM 001 BOARD LENS OPEN CLOSE MOTOR RL 063 BOARD POWER SWITCH COMMON NOTE FOR SCHEMATIC DIAGRAMS COMMON NOTE FOR SCHEMATIC DIAGRAMS 4 2 SCHEMATIC DIAGRAMS Link Link DSC S600_L2 ...

Страница 125: ...waveforms VOM of DC 10 MΩ input impedance is used Voltage values change depending upon input impedance of VOM used Precautions for Replacement of imager If the imager has been replaced carry out all the adjustments for the camera section As the imager may be damaged by static electricity from its structure handle it carefully like for the MOS IC In addition ensure that the receiver is not covered ...

Страница 126: ... REG_GND XLENSV_CLOSE_SENS TO SW 461 BOARD PAGE 4 7 LND101 LND102 LND103 LENS BARRIER OPEN LENS BARRIER CLOSE 16 XX MARK NO MOUNT LB 117 BOARD OPEN CLOSE SWITCH 4 3 B 2 HN 013 HARNESS HN 014 HARNESS LND209 LND208 S202 1 3 2 4 SML 412MWT86 D201 S201 5 6 1 3 4 2 9P 1 2 3 4 5 6 7 8 9 LED901 1 A XSHUTTER_SW D_3 2V XAF_LED XPWR_LED D_3 2V REG_GND XPWR_ON XAF_LED XAE_LOCK_SW N C N C AFLED SHUTTER POWER ...

Страница 127: ... LENSV_CLOSE MS_CLK VCC MODE_DIAL0 REG_GND DATA1 MS_D1 MS_D0 REG_GND GND MS_VCC XMS_IN LENSV_OPEN LENSV_CLOSE GND MS_D2 VL_3V KEY_AD0 BS VCC MS_D3 DATA2 GND D XLENSV_OPEN_SENSE XACCESS_LED SDIO DATA0 D XLENSV_CLOSE_SENSE LENSV_OPEN D_3 2V MS_BS XLENSV_CLOSE_SENSE REG_GND INT REG_GND KEY_AD1 XLENSV_OPEN_SENSE SCLK ZM_OVF_XB OVF_SENS N C ZM_OVF_A ZM_OVF_XA RST_VCC ZM_OVF_B ZM_OVF_XA XOVF_RST_LED XST...

Страница 128: ...S Link Link LB 117 BOARD SW 461 BOARD BM 001 BOARD RL 063 BOARD LB 117 BOARD SW 461 BOARD BM 001 BOARD RL 063 BOARD COMMON NOTE FOR PRINTED WIRING BOARDS MOUNTED PARTS LOCATION COMMON NOTE FOR PRINTED WIRING BOARDS MOUNTED PARTS LOCATION ...

Страница 129: ...s refer to waveforms There are a few cases that the part printed on diagram isn t mounted in this model C panel designation THIS NOTE IS COMMON FOR WIRING BOARDS In addition to this the necessary note is printed in each block Chip parts Transistor Diode 2 1 3 1 2 3 2 1 3 2 1 3 3 4 5 2 1 1 2 3 6 5 4 E B C 3 1 5 5 2 4 6 1 2 3 5 4 4 3 1 2 5 4 1 3 1 2 4 3 3 1 2 4 5 5 3 4 1 2 3 4 2 1 1 2 4 3 4 6 2 5 3 ...

Страница 130: ...rs S101 S102 LND101 LND102 LND103 LENS BARRIER OPEN LB 117 BOARD 1 867 722 11 LENS BARRIER CLOSE Uses unleaded solder M LND401 LND402 LND403 LND404 M001 LENS BARRIER 1 868 243 11 BM 001 BOARD RL 063 BOARD 1 9 3 4 1 2 6 5 1 2 3 A K 4 S201 FFC 057 SHUTTER POWER S202 D201 POWER LND208 LED901 AF LED LND209 1 867 293 11 ...

Страница 131: ...WN SET RIGHT LEFT MENU UP ZOOM TELE ZOOM WIDE DUST DISPLAY S002 S003 S004 S005 S006 S007 S008 S009 S010 D003 ACCESS D004 D005 D006 D007 LND042 RB001 RB002 RB003 R007 R015 A K A K LF001 D001 FLASH D002 AE LOCK LND037 LND038 LND039 LND040 LND041 LND043 FB007 R012 SW 461 BOARD SIDE B 1 867 292 11 MEMORY STICK Duo CONNECTOR USB A B C D E 1 2 3 4 5 16 SW 461 2 layers Printed wiring board of the SY 145 ...

Страница 132: ...05 D 1 D006 D 1 D007 D 1 FB001 A 2 FB002 A 1 FB003 A 1 FB004 A 1 FB005 A 1 FB006 A 4 FB007 D 5 LF001 D 5 LND037 D 5 LND038 D 5 LND039 D 5 LND040 D 5 LND041 D 5 LND042 E 1 LND043 C 5 LND044 B 1 LND045 B 5 R001 A 2 R007 C 2 R008 A 1 R009 B 5 R012 D 5 R015 C 2 RB001 D 2 RB002 D 1 RB003 D 1 S001 C 1 S002 D 1 S003 D 1 S004 D 1 S005 D 2 S006 E 1 S007 C 2 S008 D 2 S009 C 1 S010 E 2 SW 461 Mounted parts l...

Страница 133: ...1 BOARD SY 145 BOARD BM 001 BOARD LB 117 BOARD RL 063 BOARD SW 461 BOARD SY 145 BOARD BM 001 BOARD LB 117 BOARD A D B E C ELECTRICAL PARTS LIST ELECTRICAL PARTS LIST EXPLODED VIEWS EXPLODED VIEWS ACCESSORIES ACCESSORIES NOTE Characters A to Z of the electrical parts list indicate location of exploded views in which the desired part is shown SY 145 B C E A D ...

Страница 134: ...eference number please include the board name Abbreviation AR Argentine model AUS Australian model BR Brazilian model CH Chinese model CND Canadian model EE East European model HK Hong Kong model J Japanese model JE Tourist model KR Korea model NE North European model RU Russian model 5 REPAIR PARTS LIST For the part of 51 TAPE FFC FIXED 2 662 566 01 cut WOVEN T0 25 FABRIC NON 3 706 631 01 into th...

Страница 135: ...CABINET FRONT ASSY 7 2 660 502 01 SCREW TRIPOD 8 3 080 204 11 SCREW TAPPING P2 9 A 1156 110 A LB 117 BOARD COMPLETE 10 1 964 236 11 HARNESS HN 014 WHITE 11 1 964 235 11 HARNESS HN 013 GRAY 12 1 964 234 11 HARNESS HN 012 YELLOW 13 A 1159 170 A BM 001 BOARD COMPLETE 14 1 964 232 11 HARNESS HN 010 RED 15 1 964 233 11 HARNESS HN 011 BLACK M001 1 763 818 51 DC MOTOR 8C 036G55 5 1 EXPLODED VIEWS SY 145 ...

Страница 136: ...o page 5 1 CAUTION4 70 Refar to page 5 1 CAUTION4 71 Refar to page 5 1 CAUTION3 72 2 660 551 01 HOLDER SP 73 2 660 549 01 FRAME LCD 74 2 633 989 01 GASKET MS 75 A 1179 454 A SW 461 BOARD COMPLE SERVICE 76 1 830 732 11 FLEXIBLE FLAT CABLE FFC 058 77 2 670 905 01 SHEET CON RADIATION 78 2 668 809 01 SHEET FFC RADIATION 0BT001 1 756 539 21 BATTERY LITHIUM SECONDARY 0C9001 1 112 767 11 CAP ELECT 180MF ...

Страница 137: ...EAD THIS FIRST CZECH POLISH AEP 2 658 424 11 INSTRUCTION READ THIS FIRST HUNGARIAN SLOVAKIAN AEP 2 658 424 21 INSTRUCTION READ THIS FIRST SWEDISH FINNISH AEP 2 658 424 31 INSTRUCTION READ THIS FIRST NORWEGIAN DANISH AEP 2 658 425 11 INSTRUCTION USER S GUIDE ENGLISH EXCEPT CH KR BR 2 658 425 21 INSTRUCTION USER S GUIDE FRENCH ITALIAN CND AEP 2 658 425 31 INSTRUCTION USER S GUIDE SPANISH PORTUGUESE ...

Страница 138: ...56 54 DIODE MAZS068008SO FERRITE BEAD FB001 1 481 021 21 INDUCTOR FERRITE BEAD 1005 FB002 1 481 021 21 INDUCTOR FERRITE BEAD 1005 FB003 1 481 021 21 INDUCTOR FERRITE BEAD 1005 FB004 1 481 021 21 INDUCTOR FERRITE BEAD 1005 FB005 1 400 331 11 FERRITE EMI SMD 1005 FB006 1 400 331 11 FERRITE EMI SMD 1005 FB007 1 400 331 11 FERRITE EMI SMD 1005 LINE FILTER LF001 1 456 583 11 COMMON MODE CHOKE COIL RESI...

Страница 139: ...pplied to the Service Manual depending on the date of issue Switching a page To move to the first page click the To move to the last page click the To move to the previous page click the To move to the next page click the Reversing the screens displayed once To reverse the previous screens operation one by one click the To advance the reversed screens operation one by one click the Application to ...

Страница 140: ...Revision History 987692231 pdf DSC S600_L2 Ver 1 0 Date 2005 12 History Official Release Contents S M Rev issued Reverse ...

Страница 141: ...TA PREPARATIONS BEFORE ADJUSTMENTS CAMERA SECTION ADJUSTMENTS SERVICE MODE SERVICE MODE Sony EMCS Co Use this Service Manual together with the Automatic Adjustment Program DSC S600 Auto Adj Ver1 r exe Note numeric value of the file name varies depending on the version of Automatic Adjustment Program Precaution on Replacing the SY 145 board Auto ADJ DSC S600_ADJ DSC S600 Ver 1 0 2005 12 9 876 922 5...

Страница 142: ...tems When Replacing Main Parts and Boards 6 3 1 2 List of Service Tools 6 4 6 1 Camera Section Adjustments 6 5 1 1 Preparations Before Adjustments 6 5 1 2 Adjustment Programs 6 9 1 3 Camera System Adjustments 6 10 1 4 LCD System Adjustments 6 16 1 5 Error 6 18 1 6 Initialization of Data 6 20 6 2 Service Mode 6 21 ...

Страница 143: ...eset It is different from the language setting selectable with the menu Initial Language Data Page Address Data Language GP2 GP3 GP4 4F 8C 00 English z z z 04 Spanish z z 06 Portugal z 08 Simplified Chinese z 0B Russian z 0D Korean z Note GP2 is fixed to English GP3 is either English Spanish or Russian GP4 is either English Spanish Portugal Simplified Chinese or Korean Writing Method 1 Select page...

Страница 144: ...ot supplied If you attempt to copy image files using batteries with little remaining capacity the batteries may run out causing copying to fail or possibly corrupting the data You cannot copy individual images The original images in the internal memory are retained even after copying To delete the contents of the internal memory remove the Memory Stick Duo after copying then execute the Format com...

Страница 145: ... adj z z z z CAMERA adjustment 5 Auto focus illumination check z z V COM adj White Balance adj Note 1 Initialization of data z LCD adjustment COMPLETE Note 2 3 4 Lens block Including CD 606 flexible board and CCD imager CAMERA adjustment 3 z z z z 1 1 Adjusting items when replacing main parts and boards When replacing main parts and boards adjust the items indicated by z in the following table Not...

Страница 146: ...etc to shield the light Personal computer Note 1 J 1 J 10 J 9 J 7 HASP key and application for adjustment SEUS Contact our service headquater of each area how to get the application for adjustment SEUS and HASP key J 2 Pattern box PTB 450 J 6082 200 A or Small pattern box PTB 1450 J 6082 557 A J 4 Clear chart For PTB 450 J 6080 621 A For PTB 1450 J 6082 560 A J 6 Minipattern box J 6082 353 B Sieme...

Страница 147: ... following data 1 Select page 40 address 38 and set data 00 Fig 6 1 3 PC The SEUS must be installed in the PC OS Windows 98 98SE Me 2000 XP RAM 256MB or more recommended USB 2 0 recommended also compatible with 1 1 Two connectors are required AC IN AC power adaptor AC LS5 1 479 284 12 Insert the connection cord DK 2AA 1 830 351 11 To USB connector HASP Key To USB connector To USB connector USB cab...

Страница 148: ...t adjust the picture frame as shown in Fig 6 1 5 Standard picture frame 2 Clear chart Standard picture frame Remove the 9 colors chart from the pattern box and insert a clear chart in its place Do not perform zoom operations dur ing this time Fig 6 1 5 9 colors chart Standard picture frame Adjust the camera position and direction to obtain the LCD screen shown in Fig a Fig a LCD screen A C C Effec...

Страница 149: ...thickness 2 Apply black mat paint to one side of woody board A and B 3 Attach background paper J 2501 130 A to woody board C 4 Assemble so that the black sides and the background paper side of woody board A B and C are internal Fig 6 1 7 Fig 6 1 6 Fig 6 1 7 woody board A 2 400 mm woody board B 2 370 mm woody board C 1 700 mm 513 mm 513 mm 700 mm 700 mm 730 mm woody board A woody board B woody boar...

Страница 150: ...exadecimal notation This operation does not write the data to the nonvolatile memory Data saving To write the all changed data to the nonvolatile memory click Save on the SEUS screen and wait for more than 3 sec Data reading The data displayed on the SEUS screen are the data values at the time when the pages and addresses were set and they are not updated automatically To check the data change cli...

Страница 151: ...e SEUS must be already started on the PC when using the Automatic Adjustment Program With the SEUS not started some adjustment items will take time in adjustment 2 Start of Automatic Adjustment Program Double click the application file DSC S600 Auto Adj Ver_1 r exe and theAutomaticAdjustment Program will start Note numeric value of the file name varies depending on the version of Automatic Adjustm...

Страница 152: ...tart button Each adjustment from Camera Adjustment 1 to Camera Adjustment 5 starts 4 Reset button This button functions same as the Initialize of the setup screen 5 Release Data Setting button The data setting at the adjustment is cancelled During the data setting the button color changes from white to red When the data setting is cancelled the button color returns to white Use this button when an...

Страница 153: ...nt 1 Flange Back Adj for minipattern box Note or D0 to DB E1 to F2 Flange back adjustment jig 6F 18 to 53 Siemens star CAMERA Adjustment 2 Flange Back Check 1 0m from front the lens Luminance 200 to 400 lux F No Compensation 6F 60 6B to 6D Measure Gain Adj Clear chart 6F 6B 6F Mechanical Shutter Adj Standard picture frame 6F 6B to 6D B8 to BB C7 C8 Light Value Adj 6F 65 to 67 AWB 3200K 5800K 6E 00...

Страница 154: ...nt of lens of camera is less than 3 cm 3 Make the height of minipattern box and the camera equal 4 Check the output voltage of the regulated power supply is the specified voltage 0 01 Vdc 5 Check that the center of Siemens star chart meets the center of shot image screen with the zoom lens at TELE end and WIDE end respectively Specified voltage The specified voltage varies according to the minipat...

Страница 155: ...ng message is displayed Click the OK button Fig 6 1 17 3 CAMERA Adjustment 3 Automatic Adjustment Program execution items and sequence 1 Data Setting during Camera Adj 2 Picture Frame Setting 3 F No Compensation 4 Measure Gain Adj 5 Mechanical Shutter Adj 6 Light Value Adj 7 AWB 3200K 5800K Standard Data Input 8 AWB 3200K 5800K Check 9 Color Reproduction Adj Check 10 CCD Linearity Check 11 CCD Whi...

Страница 156: ...l items of the CAMERA Adjustment 3 the following message is displayed Click the OK button Fig 6 1 25 After that the next message is displayed Then change the chart in accordance with the message Fig 6 1 20 4 Click the OK button and the items from 3 F No Compen sation to 6 Light Value Adj will be executed 5 Upon successful completion of 6 Light Value Adj the fol lowing message is displayed Change t...

Страница 157: ...g 6 1 27 6 Upon successful completion of 2 Strobe Adj 3 Release of Data Setting during CAMERA Adj is executed 7 Upon successful completion of all items of the CAMERA Adjustment 4 the following message is displayed Click the OK button Fig 6 1 28 10 CAMERA Adjustment 5 Automatic Adjustment Program execution items and sequence 1 Data Setting during Camera Adj 2 Auto Focus Illumination Check 3 Release...

Страница 158: ...d During the data setting the button color changes from white to red When the data setting is cancelled the button color returns to white Use this button when an error occurred in the LCD adjust ment If the adjustment completed successfully the data set ting is automatically cancelled and the button color returns to white 4 3 2 1 1 4 2 Adjustment Items of LCD System Adjustment The adjustment items...

Страница 159: ...perate the UP DOWN key so that the brightness of portions A and B on the LCD panel is equal After the adjustment click the OK button Fig 6 1 32 4 Upon completion of 2 V COMAdj 3 White BalanceAdj is executed The following message is displayed and then check that LCD screen is not colored If colored change the data of page 8F address 42 and 43 on the SEUS Operation screen to adjust so that the LCD s...

Страница 160: ...t the set is in USB Mode Install the power supply correctly Start the SEUS and click the Connect to check that the connection state is established 2 RESET the CAMERA and Try Again Fig 6 1 38 Symptom The camera is not ready for adjustment Cause Data error exists in the camera Remedy Reset the camera 3 Adjustment Time Out Fig 6 1 39 Symptom Adjustment does not finish within the specified time Cause ...

Страница 161: ...s Accordingly if the adjustment termi nates by an error the data during the adjustment may be left in the camera Note 1 With this data left in the camera the camera will not operate normally In this case the Release Data Setting button is displayed in red on the screen as shown in Fig 6 1 42 and 43 Click the Release Data Setting button to cancel the data setting When the data setting is cancelled ...

Страница 162: ...ig 6 1 44 2 Initializing Single Page Data By performing the following procedure data of the page that you want to initialize will be initialized Note 1 If the 6D or 6E or 6F page data have been initialized the following adjustment needs to be performed again 1 Camera system adjustments Note 2 If the 8F page data have been initialized the following adjustment needs to be performed again 1 LCD syste...

Страница 163: ...ss A1 and set data 00 2 Bit Value Discrimination In the following items the bit values must be discriminated from the data displayed on the SEUS Whether bit values are 1 or 0 can be discriminated from the table shown below Data displayed on SEUS 0 0 bit 3 to bit 0 discriminated bit 7 to bit 4 discriminated Bit values Display on the bit3 bit2 bit1 bit0 SEUS or or or or bit7 bit6 bit5 bit4 0 0 0 0 0...

Страница 164: ... address 12 and set data 00 6 Select page 8E address FE and set data 00 7 Select page 00 address 01 and set data 00 8 Click Disconnect on the SEUS screen 9 Disconnect the USB cable 10 Turn off the power 4 Switch Check 1 Page 80 Address 13 Using method 1 Select page 80 address 13 2 By discriminating the read data the state of the switches can be discriminated Function When data 00 When data 01 When...

Страница 165: ...IAL0 SW 461 BOARD SW 461 BOARD SW 461 BOARD IC101 L22 S008 S008 S008 Display Code C 32 ss C 13 ss Countermeasure Turn the power off and on again Format the Memory Stick or internal memory Insert a new Memory Stick Cause Trouble with hardware Memory Stick or internal memory is unformatted Memory Stick is broken Caution Display During Error SYSTEM ERROR FORMAT ERROR MEMORY STICK ERROR E 61 ss E 91 s...

Страница 166: ...Revision History Reverse DSC S600_ADJ Ver 1 0 Date 2005 12 History Official Release Contents S M Rev issued 987692251 pdf ...

Отзывы: