28
Inserting the date and time on a still image
,
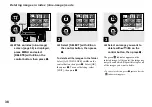
Set the mode dial to SET UP.
The SET UP screen appears.
•
When images are shot with the date and time
superimposed, the date and time cannot be
removed later.
•
The date and time do not appear on the screen
during shooting, instead, “
” appears in the
upper left corner of the screen. The actual date
and time appear during playback only.
,
Select
1
(CAMERA 1)
with
v
on the control button, then
press
B
.
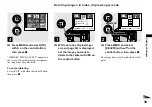
Select [DATE/TIME] with
v
/
V
,
then press
B
.
•
If you select [DATE], the date is superimposed
onto the image in the order selected in “Setting
the date and time” (page 16).
,
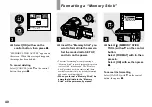
Select the date and time setting
with
v
/
V
on the control button,
then press
z
.
DAY & TIME:
Superimposes the date,
hour, and minute onto the image.
DATE:
Superimposes the year, month and
day onto the image.
OFF:
Does not superimpose the date and
time onto the image.
After the setting has been completed, set the
mode dial to
, and shoot the image.
•
You can also shoot images with the mode dial
set to
,
S, A, M or SCN.
•
This setting is maintained even when the power
is turned off.
CAMERA 1
MOVING IMAGE :
DATE/TIME :
DIGITAL ZOOM :
RED EYE REDUCTION :
HOLOGRAM AF :
CONVERSION LENS :
SELECT
1
1
2
MPEG MOVIE
OFF
ON
OFF
AUTO
OFF
OK
CAMERA 1
2
1
2
DAY&TIME
DATE
OFF
MOVING IMAGE :
DATE/TIME :
DIGITAL ZOOM :
RED EYE REDUCTION :
HOLOGRAM AF :
CONVERSION LENS :
3
MPEG MOVIE
DATE
ON
OFF
AUTO
OFF
PAGE SELECT
CAMERA 1
1
2
MOVING IMAGE :
DATE/TIME :
DIGITAL ZOOM :
RED EYE REDUCTION :
HOLOGRAM AF :
CONVERSION LENS :


