background image

8-FR

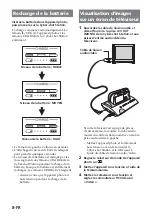
Recharge de la batterie

Insérez la batterie dans l’appareil photo,
puis placez-le sur la Cyber-shot Station.

La charge commence automatiquement. Le
témoin  /CHG de l’appareil photo et les
témoins CHARGE de la Cyber-shot Station
s’allument.

• Le témoin de gauche s’allume en premier.
• L’affichage du niveau de batterie adéquat

peut prendre quelques secondes.

• Le niveau de la batterie est indiqué par les

trois segments des témoins CHARGE de la
Cyber-shot Station pendant la charge de la
batterie. Lorsque la batterie est entièrement
rechargée, les témoins CHARGE s’éteignent.

– Assurez-vous que l’appareil photo est

hors tension pendant la charge de la
batterie.

Visualisation d’images
sur un écran de téléviseur

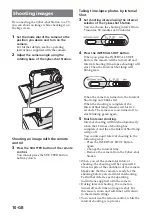
1

Raccordez le câble de liaison audio et

vidéo (fourni) à la prise A/V OUT
(MONO) de la Cyber-shot Station et aux
prises d’entrée audio/vidéo du
téléviseur.

Si votre téléviseur est équipé de prises
d’entrée stéréo, raccordez la fiche audio
(noire) du câble de liaison audio/vidéo à la
prise audio située à gauche.

– Mettez l’appareil photo et le téléviseur

hors tension avant de raccorder la
Cyber-shot Station et le téléviseur à
l’aide du câble de liaison audio/vidéo.

2

Réglez le sélecteur de mode de l’appareil

photo sur 

.

3

Mettez l’appareil sous tension à l’aide de

la télécommande.

4

Mettez le téléviseur sous tension et

réglez le commutateur TV/Vidéo sur
« Vidéo ».

Câble de liaison
audio/vidéo

Niveau de la batterie : FAIBLE

Niveau de la batterie : MOYEN

Niveau de la batterie : HAUT

Содержание CSS-PHB

Страница 1: ...2 586 723 11 1 Cyber shot Station 2005 Sony Corporation CSS PHB Operating Instructions Mode d emploi GB FR ...

Страница 2: ...aintenance servicing instructions in the literature accompanying the appliance If you have any questions about this product you may call Sony Customer Information Services Center 1 800 222 SONY 7669 The number below is for the FCC related matters only Regulatory Information Declaration of Conformity Trade Name SONY Model No CSS PHB Responsible Party Sony Electronics Inc Address 16450 W Bernardo Dr...

Страница 3: ...ed Consult the dealer or an experienced radio TV technician for help The supplied interface cable must be used with the equipment in order to comply with the limits for a digital device pursuant to Subpart B of Part 15 of FCC Rules Notice on the supplied AC adaptor for customers in the United Kingdom A moulded plug complying with BS1363 is fitted to this equipment for your safety and convenience S...

Страница 4: ...ntrol Note If you want to print one of the still images in a Slide Show cancel the Slide Show first then press PRINT button zUsing the Cyber shot Station you can charge the battery pack inside the camera While charging the battery pack you can check the battery level with the CHARGE lamps of the Cyber shot Station zYou can connect the Cyber shot Station to your computer using the supplied USB cabl...

Страница 5: ... 8 Placing the camera on the Cyber shot Station 8 Charging the battery pack 9 Viewing images on a TV screen 9 Shooting images 10 Printing still images 11 Connecting the camera to your computer via the Cyber shot Station 12 Care and maintenance 12 Troubleshooting 13 Specifications 15 Index ...

Страница 6: ...er shot Station away from sand The Cyber shot Station that is covered with sand may malfunction Do not use the Cyber shot Station in locations that are subject to strong radio waves or radiation Images may not be played back properly The set is not disconnected from the AC power source mains as long as it is connected to the wall outlet even if the set itself has been turned off Before using the C...

Страница 7: ...Interval Shot lamp CHARGE lamps INTERVAL SHOT button Remote sensor Multi connector PRINT button SHUTTER button POWER button Display LCD on off button Control buttons v V b B Zoom W T button MENU button Cyber shot Station Remote Control The remote control buttons share the functions as the ones on your camera ...

Страница 8: ...g it on the Cyber shot Station or removing it from the Cyber shot Station Be sure the camera is securely attatched to the Cyber shot Station Preparing the remote control Notes on the remote control The remote control is powered by a button type lithium battery CR2025 installed at the factory To avoid draining the battery an insulation sheet is inserted Before using the remote control for the first...

Страница 9: ...d to the A V OUT MONO jack of the Cyber shot Station and the audio video input jacks of the TV If your TV provides stereo input jacks connect the audio plug black of the A V connecting cable to the left audio jack Turn off both camera and TV before connecting the Cyber shot Station and the TV by the A V connecting cable 2 Set the mode dial of the camera to 3 Turn on the power with the remote contr...

Страница 10: ...Shot lamp will blink green When the camera is turned on the Interval Shot lamp now blinks red When the shooting is completed the Interval Shot lamp remains red for five seconds The camera is soon turned off to start blinking green again 5 Finish interval shooting Interval shooting will finish automatically when the 12 times of shooting has completed and then the Interval Shot lamp will go off You ...

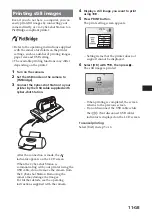
Страница 11: ...r the connection is made the indicator appears on the LCD screen When the Cyber shot Station is communicating with your printer using the USB cable do not remove the camera from the Cyber shot Station Removing the camera may damage the images For further details see the operating instructions supplied with the camera 4 Display a still image you want to print using b B 5 Press PRINT button The prin...

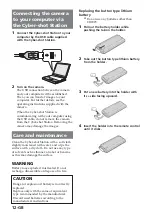
Страница 12: ...tion with a soft cloth slightly moistened with water and wipe the surface with a dry cloth Do not use any type of solvent such as thinner alcohol or benzine as this may damage the surface WARNING Battery may explode if mistreated Do not recharge disassemble or dispose of in fire CAUTION Danger of explosion if battery is incorrectly replaced Replace only with the same or equivalent type recommended...

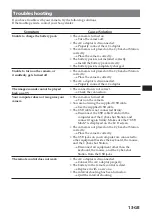
Страница 13: ... camera correctly The AC adaptor is disconnected t Properly connect the AC adaptor The connection is not correct t Check the connection The camera is turned off t Turn on the camera You are not using the supplied USB cable t Use the supplied USB cable The USB cable is not connected firmly t Disconnect the USB cable from both the computer and the Cyber shot Station and connect it again firmly Make ...

Страница 14: ...ith the printer Movies cannot be printed Still images modified with a computer or still images taken using other than the camera compatible with this Cyber shot Station may not be able to be printed You disconnected the USB cable before the mark disappeared You removed the camera from the Cyber shot Station before the mark disappeared When the camera was not placed on the Cyber shot Station you ha...

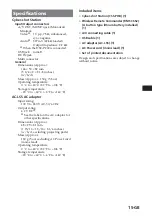
Страница 15: ...daptor Input rating 100 V to 240 V AC 50 60 Hz Output rating 4 2 V DC See the label on the AC adaptor for other specifications Dimensions Approx 48 29 81 mm 1 15 16 1 3 16 3 1 4 inches w h d excluding projecting parts Mass Approx 130 g 5 oz excluding AC Power cord mains lead Operating temperature 0 C to 40 C 32 F to 104 F Storage temperature 20 C to 60 C 4 F to 140 F Included items Cyber shot Stat...

Страница 16: ... constater qu il respectait les limites prescrites par la directive sur la CEM sur l utilisation de câbles de raccordement de moins de 3 mètres 9 8 pieds Attention Le champ électromagnétique à des fréquences particulières peut avoir une incidence sur l image et le son de l appareil photo utilisé avec cette Cyber shot Station Avis Si des interférences électriques ou électromagnétiques entraînent un...

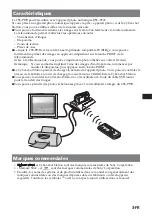
Страница 17: ...vous souhaitez imprimer l une des images d un diaporama commencez par annuler le diaporama puis appuyez sur la touche PRINT zLa Cyber shot Station permet de charger la batterie de l appareil photo Vous pouvez contrôler le niveau de la batterie en cours de charge grâce aux témoins CHARGE de la Cyber shot Station zVous pouvez raccorder la Cyber shot Station à votre ordinateur à l aide du câble USB f...

Страница 18: ...7 Placement de l appareil photo sur la Cyber shot Station 7 Recharge de la batterie 8 Visualisation d images sur un écran de téléviseur 8 Prises de vues 9 Impression d images fixes 10 Raccordement de l appareil photo à votre ordinateur via la Cyber shot Station 11 Nettoyage et entretien 11 Dépannage 12 Spécifications 15 ...

Страница 19: ...verte de sable la Cyber shot Station risque de fonctionner de manière incorrecte N utilisez pas la Cyber shot Station dans des endroits soumis à des ondes radio ou à des rayonnements puissants Les images risquent de ne pas pouvoir être lues correctement L appareil n est pas déconnecté de la source d alimentation secteur tant qu il reste branché sur la prise murale même s il a été mis hors tension ...

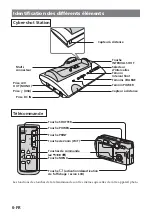
Страница 20: ...hot Témoins CHARGE Touche INTERVAL SHOT Capteur à distance Multi connecteur Touche PRINT Touche SHUTTER Touche POWER Touche activation désactivation de l affichage écran LCD Touches de commande v V b B Touche de Zoom W T Touche MENU Cyber shot Station Télécommande Les fonctions des touches de la télécommande sont les mêmes que celles de votre appareil photo ...

Страница 21: ...sérée pour protéger la pile Avant d utiliser la télécommande pour la première fois retirez la feuille isolante Feuille isolante Placement de l appareil photo sur la Cyber shot Station Insérez le Memory Stick dans votre appareil photo Assurez vous que l appareil photo est hors tension avant de le placer sur la Cyber shot Station ou de l en retirer Vérifiez que l appareil photo est correctement fixé...

Страница 22: ...ge de la batterie Visualisation d images sur un écran de téléviseur 1 Raccordez le câble de liaison audio et vidéo fourni à la prise A V OUT MONO de la Cyber shot Station et aux prises d entrée audio vidéo du téléviseur Si votre téléviseur est équipé de prises d entrée stéréo raccordez la fiche audio noire du câble de liaison audio vidéo à la prise audio située à gauche Mettez l appareil photo et ...

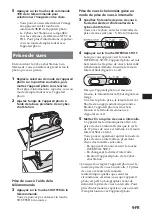
Страница 23: ... intervalles de prise de vues suivants 5 30 et 60 minutes 4 Appuyez sur la touche INTERVAL SHOT Lorsque vous appuyez sur la touche INTERVAL SHOT l appareil photo est mis hors tension et la prise de vues à intervalle échelonnée démarre Ensuite le témoin Interval Shot clignote en vert Dès que l appareil photo est mis sous tension le témoin Interval Shot clignote en rouge Une fois la photo prise le t...

Страница 24: ...leurs valeurs par défaut Vous ne pouvez pas utiliser la télécommande pendant la prise de vues à intervalle Une fois la connexion établie l indicateur apparaît sur l écran LCD Ne retirez pas l appareil photo de la Cyber shot Station pendant que celle ci communique avec votre imprimante via le câble USB car cela risquerait d altérer les photos Pour plus d informations reportez vous au mode d emploi ...

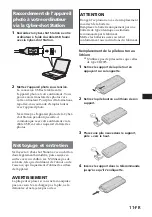
Страница 25: ...uis essuyez sa surface avec un chiffon sec N utilisez pas de solvants tels que du diluant de l alcool ou de l essence qui risqueraient d abîmer la surface de l appareil AVERTISSEMENT La pile peut exploser si vous ne la manipulez pas avec soin Ne rechargez pas la pile ne la démontez et ne la jetez pas au feu Remplacement de la pile bouton au lithium N utilisez pas de piles autres que celles de type...

Страница 26: ...ez correctement l appareil photo L adaptateur secteur est débranché t Raccordez correctement l adaptateur secteur La connexion n est pas correcte t Vérifiez la connexion L appareil photo est hors tension t Mettez l appareil photo sous tension Vous n utilisez pas le câble USB fourni t Utilisez le câble USB fourni Le câble USB n est pas raccordé correctement t Débranchez le câble USB de l ordinateur...

Страница 27: ...formations reportez vous au mode d emploi fourni avec l imprimante Il est impossible d imprimer des films Il est possible que des photos modifiées à l aide d un ordinateur ou prises à l aide d un appareil photo autre que le présent appareil compatible avec la Cyber shot Station ne puissent pas être imprimées Vous avez débranché le câble USB avant la disparition du témoin Vous avez retiré l apparei...

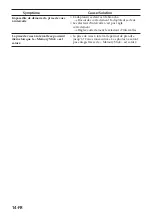
Страница 28: ...uré Cause Solution L adaptateur secteur est débranché t Raccordez correctement l adaptateur secteur Le sélecteur d intervalle n est pas réglé correctement t Réglez correctement le sélecteur d intervalles La prise de vues à intervalle permet de prendre jusqu à 12 vues consécutives Les photos ne seront pas enregistrées si le Memory Stick est saturé ...

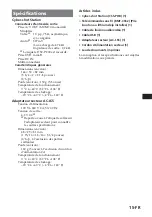
Страница 29: ...ation 100 V à 240 V CA 50 60 Hz Tension de sortie 4 2 V CC Reportez vous à l étiquette collée sur l adaptateur secteur pour connaître les autres spécifications Dimensions environ 48 29 81 mm 1 15 16 1 3 16 3 1 4 pouces l h p à l exclusion des parties saillantes Poids environ 130 g 5 onces à l exclusion du cordon d alimentation CA Température de fonctionnement 0 C à 40 C 32 F à 104 F Température de...

Страница 30: ......

Страница 31: ......

Страница 32: ...n Japan Printed on 100 recycled paper using VOC Volatile Organic Compound free vegetable oil based ink Imprimé sur papier 100 recyclé avec de I encre á base d huile végétale sans COV composés organiques volatils ...

Отзывы: