11
10
Setting the Jumpers
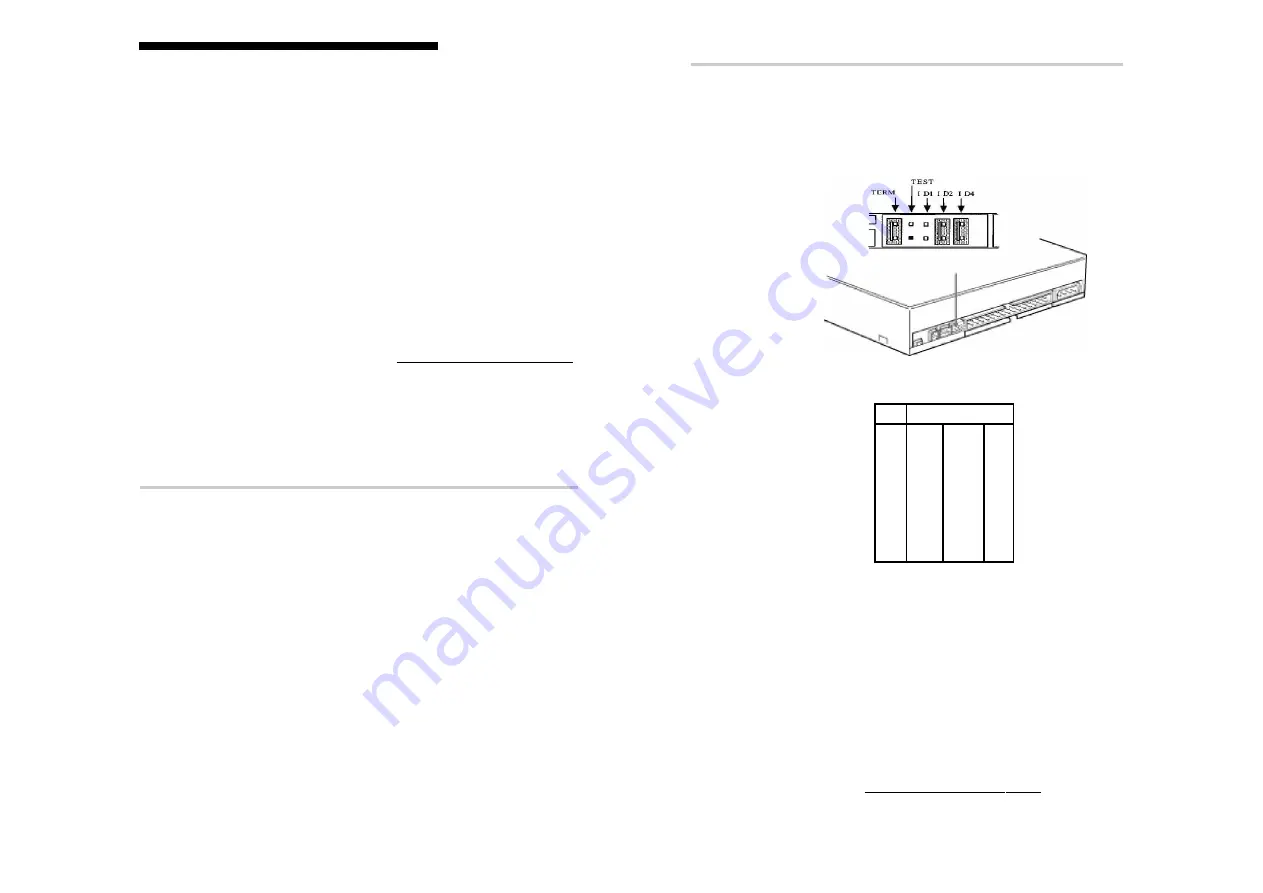
Set the jumpers on the rear of the drive in accordance with the
configuration of your computer system.
The illustration below shows the jumpers set to “ID 6” and
termination “ON”, this is the default set by the factory.
SCSI ID must not be the same as any other device on that SCSI bus. Refer to the
table below for ID settings.
ID
Jumper Settings
0
1
2
0
X
X
X
1
O
X
X
2
X
O
X
3
O
O
X
4
X
X
O
5
O
X
O
6
X
O
O
7
O
O
O
X = Jumper OFF
O = Jumper ON
Important SCSI rule
The beginning and end of any SCSI bus must always be terminated. No other point
on the SCSI bus should be terminated. If the CRX-160S is at one end of the SCSI
bus set the termination jumper ON.
If there is either no internal or no external SCSI devices attached to your SCSI
controller then the SCSI controller becomes one end of the SCSi bus, hence it must
be terminated. Most SCSI controllers set their termination automatically.
If unsure on how to configure your SCSI bus then consult your PC dealer or visit our
support web site for assistance - http://www.sony.com.au/support/itp
Installing the Drive in Your Computer
System Setup
To use this CD-R/RW device, the following components are
required:
• Personal Computer with a SCSI controller (50 pin SCSI)
• SCSI Interface cable (50 pin flat cable)
• Software -
Device Driver (for reading discs only): No device drivers are
required from Sony to enable use of the CRX-160S. Instead your
SCSI controller and its device driver must support CD writer
devices. This should be checked at the SCSI controller manufactur-
ers web site.
Authoring Software (for writing discs): To write to a CD
authouring software will be required. There are many varities.
Please be sure that the version of software you are using is
compatible with the CRX-160S. You should check this on the
software manufacturers web site or at:
http://www.sony.com.au/support/itp
Installing the Drive in Your Computer
Consult your computers User Manual for instructions on how to add
new hardware. Be sure to follow their anti-static precautions.
Preparation
The following parts and tools will be required to mount the drive in
your computer:
• Four screws 3 mm in diameter and 6 mm in length.
• A screwdriver to suit.
• Two mounting rails if your computer has mounting tracks.
NOTE:
The CRX-160S can be installed in an external case and
connected to the computer via an external SCSI port. If
using the CRX-160S in an external case be sure the case
is of good quality. It is possible that the EMF generated
by the power supply in the external case can cause
malfunctions.
Do not turn on the power of the computer before completing the
entire installation process.
System Setup / Installing the Drive in Your Computer


