MEX-GS610BE/GS610BT/N6050BT
17
Bracket
Support
Bracket
Support
Bracket
Support
Bracket
Support
A
TOYOTA
B
NISSAN
to dashboard/center console
vers le tableau de bord/la console centrale
to dashboard/center console
vers le tableau de bord/la console centrale
ʗ
ʗ
ʗ
ʗ
Existing parts supplied with your car
Pièces existantes fournies avec la voiture
Existing parts supplied with your car
Pièces existantes fournies avec la voiture
size
5 × max. 8 mm
(
7
/
32
× max.
5
/
16
in)
dimension
5 × max. 8 mm
(
7
/
32
×
5
/
16
po max.)
size
5 × max. 8 mm
(
7
/
32
× max.
5
/
16
in)
dimension
5 × max. 8 mm
(
7
/
32
×
5
/
16
po max.)
size
5 × max. 8 mm
(
7
/
32
× max.
5
/
16
in)
dimension
5 × max. 8 mm
(
7
/
32
×
5
/
16
po max.)
size
5 × max. 8 mm
(
7
/
32
× max.
5
/
16
in)
dimension
5 × max. 8 mm
(
7
/
32
×
5
/
16
po max.)
1
2
ʖ
q
q
q
ʕ
ʓ
Face the hook inwards.
Tournez le crochet vers
l’intérieur.
A
B
q
Fuse (10 A)
Fusible (10 A)
Front panel release button
Touche de déverrouillage
de la façade
Front panel release button
Touche de déverrouillage
de la façade
OFF
ʖ
ʓ
Dashboard
Tableau de bord
Claws
Griffes
2
3
1
Unit: mm (in)
Unité : mm (po)
ʓ
Catch
Loquet
182 (7
1
/
4
)
53 (2
1
/
8
)
Remplacement du fusible (
)
Lorsque vous remplacez le fusible, veillez à utiliser un
fusible dont l’intensité, en ampères, correspond à la
valeur indiquée sur le fusible usagé. Si le fusible grille,
vérifiez le branchement de l’alimentation et remplacez
le fusible. Si le nouveau fusible grille également, il est
possible que l’appareil soit défectueux. Dans ce cas,
consultez votre détaillant Sony le plus proche.
Installation du microphone (
)
Pour capturer votre voix durant les appels mains
libres, vous devez installer le microphone
ͫ
.
Mises en garde
ˎ
N’exposez pas le microphone à des températures
extrêmement élevées et à l’humidité.
ˎ
Veillez à ce que le cordon ne soit pas enroulé autour
du volant ou du levier de vitesses. Ceci peut s’avérer
extrêmement dangereux. Veillez à ce que le cordon
et les autres pièces ne gênent pas votre conduite.
ˎ
Si un système de coussins de sécurité gonflables ou
tout autre équipement absorbant les chocs est
présent dans votre véhicule, contactez le magasin
où vous avez acheté cet appareil ou votre
concessionnaire avant l’installation.
Ǽ
-A Fixation sur le pare-soleil
Installez les clips (non fournis) et ajustez la longueur
et la position du cordon de façon à ce qu’il ne gêne
pas la conduite.
Ǽ
-B Fixation sur le tableau de bord
Installez un clip (non fourni) et ajustez la longueur et
la position du cordon de façon à ce qu’il ne gêne pas
la conduite.
Remarques
ˎ
Avant de fixer l’adhésif double face , nettoyez la
surface du tableau de bord avec un chiffon sec.
ˎ
Réglez l’angle du microphone afin de le positionner
correctement.
A
B
Clips (not supplied)
Clips (non fournis)
Clip (not supplied)
Clip (non fourni)
English
Precautions
ˎ
Choose the installation location carefully so that the
unit will not interfere with normal driving operations.
ˎ
Avoid installing the unit in areas subject to dust, dirt,
excessive vibration, or high temperatures, such as in
direct sunlight or near heater ducts.
ˎ
Use only the supplied mounting hardware for a safe
and secure installation.
Mounting angle adjustment
Adjust the mounting angle to less than 45°.
Removing the protection collar
and the bracket (
)
Before installing the unit, remove the protection
collar
ʖ
and the bracket
ʓ
from the unit.
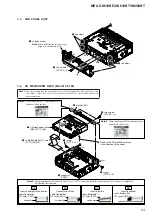
1
Remove the protection collar
ʖ
.
Pinch both edges of the protection collar
ʖ
, then
pull it out.
2
Remove the bracket
ʓ
.
ɞ
Insert both release keys
ʕ
together between
the unit and the bracket
ʓ
until they click.
ɟ
Pull down the bracket
ʓ
, then pull up the unit
to separate.
Mounting example (
)
Installation in the dashboard
Notes
ˎ
Before installing, make sure that the catches on both sides of the
bracket
ʓ
are bent inwards 2 mm (
3
/
32
in). If the catches are straight
or bent outwards, the unit will not be installed securely and may
spring out (
Ǹ
-1
).
ˎ
Bend these claws outward for a tight fit, if necessary (
Ǹ
-2
).
ˎ
Make sure that the 4 catches on the protection collar
ʖ
are
properly engaged in the slots of the unit (
Ǹ
-3
).
Mounting the unit in a Japanese
car (
)
You may not be able to install this unit in some makes
of Japanese cars. In such a case, consult your Sony
dealer.
Note
To prevent malfunction, install only with the supplied screws
ʗ
.
How to detach and attach the
front panel (
)
Before installing the unit, detach the front panel.
Ǻ
-A To detach
Before detaching the front panel, be sure to press and
hold OFF. Press the front panel release button, and
pull it off towards you.
Ǻ
-B To attach
Engage part
ʭ
of the front panel with part
ʮ
of the
unit, as illustrated, and push the left side into position
until it clicks.
Warning if your car’s ignition has
no ACC position
Be sure to set the Auto Off function. For details, see
the supplied Operating Instructions.
The unit will shut off completely and automatically in
the set time after the unit is turned off, which prevents
battery drain.
If you do not set the Auto Off function, press and hold
OFF until the display disappears each time you turn
the ignition off.
Fuse replacement (
)
When replacing the fuse, be sure to use one matching
the amperage rating stated on the original fuse. If the
fuse blows, check the power connection and replace
the fuse. If the fuse blows again after replacement,
there may be an internal malfunction. In such a case,
consult your nearest Sony dealer.
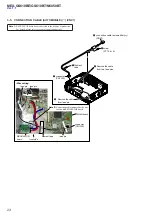
Installing the microphone
(
)
To capture your voice during handsfree calling, you
need to install the microphone
ͫ
.
Cautions
ˎ
Keep the microphone away from extremely high
temperatures and humidity.
ˎ
It is extremely dangerous if the cord becomes
wound around the steering column or gearstick. Be
sure to keep it and other parts from obstructing your
driving.
ˎ
If airbags or any other shock-absorbing equipment
is in your car, contact the store where you purchased
this unit, or the car dealer, before installation.
Ǽ
-A Installing on the sun visor
Install clips (not supplied) and adjust the length and
position of the cord so that it does not obstruct your
driving.
Ǽ
-B Installing on the dashboard
Install a clip (not supplied) and adjust the length and
position of the cord so that it does not obstruct your
driving.
Notes
ˎ
Before attaching the double-sided tape , clean the
surface of the dashboard with a dry cloth.
ˎ
Adjust the microphone angle to the proper position.
Français
Précautions
ˎ
Choisissez soigneusement l’emplacement
d’installation pour que l’appareil ne gêne pas le
conducteur pendant la conduite.
ˎ
Évitez d’installer l’appareil dans un endroit exposé à
la poussière, à la saleté, à des vibrations excessives
ou à des températures élevées comme en plein
soleil ou à proximité de conduits de chauffage.
ˎ
Pour garantir un montage sûr, n’utilisez que le
matériel fourni.
Réglage de l’angle de montage
Réglez l’inclinaison à un angle inférieur à 45°.
Retrait du tour de protection et
du support (
)
Avant d’installer l’appareil, retirez le tour de
protection
ʖ
et le support
ʓ
de l’appareil.
1
Retirez le tour de protection
ʖ
.
Pincez les deux bords du tour de protection
ʖ
, puis
sortez-le.
2
Retirez le support
ʓ
.
ɞ
Insérez les clés de déblocage
ʕ
en même
temps entre l’appareil et le support
ʓ
jusqu’au
déclic.
ɟ
Tirez le support
ʓ
vers le bas, puis tirez sur
l’appareil vers le haut pour les séparer.
Exemple de montage (
)
Installation dans le tableau de bord
Remarques
ˎ
Avant l’installation, assurez-vous que les loquets des deux côtés du
support
ʓ
sont bien pliés de 2 mm (
3
/
32
po) vers l’intérieur. Si les
loquets sont droits ou pliés vers l’extérieur, l’appareil ne peut pas
être fixé solidement et peut se détacher (
Ǹ
-1
).
ˎ
Si nécessaire, pliez ces griffes vers l’extérieur pour assurer une prise
correcte (
Ǹ
-2
).
ˎ
Assurez-vous que les 4 loquets situés sur le tour de protection
ʖ
sont correctement engagés dans les fentes de l’appareil (
Ǹ
-3
).
Montage de l’appareil dans une
voiture japonaise (
)
Cet appareil ne peut pas être installé dans certaines
voitures japonaises. Consultez, dans ce cas, votre
détaillant Sony.
Remarque
Pour éviter tout problème de fonctionnement, utilisez uniquement
les vis
ʗ
fournies pour le montage.
Retrait et fixation de la façade
(
)
Avant d’installer l’appareil, retirez la façade.
Ǻ
-A Pour la retirer
Avant de retirer la façade, n’oubliez pas de maintenir
enfoncée la touche OFF. Appuyez sur la touche de
déverrouillage de la façade, puis faites glisser la
façade vers vous.
Ǻ
-B Pour la fixer
Engagez la partie
ʭ
de la façade dans la partie
ʮ
de
l’appareil, comme illustré, puis appuyez sur le côté
gauche jusqu’au déclic indiquant que la façade est en
position.
Avertissement si le contact de
votre véhicule ne comporte pas
de position ACC
Veillez à régler la fonction Auto Off. Pour obtenir
davantage d’informations, reportez-vous au mode
d’emploi fourni.
L’appareil s’éteint complètement et automatiquement
après le laps de temps choisi une fois l’appareil arrêté
afin d’éviter que la batterie ne se décharge.
Si vous ne réglez pas la fonction Auto Off, appuyez sur
la touche OFF et maintenez-la enfoncée jusqu’à ce
que l’affichage disparaisse à chaque fois que vous
coupez le contact.
Содержание CDX-G3000UE
Страница 14: ...MEX GS610BE GS610BT N6050BT 14 MEMO ...
Страница 58: ...58 MEX GS610BE GS610BT N6050BT MEMO ...
Страница 75: ...MEMO MEX GS610BE GS610BT N6050BT 17 ...


