background image

15

EN

Additional
Information

Precautions

• If your car was parked in direct sunlight

resulting in a considerable rise in
temperature inside the car, allow the unit to
cool off before operating it.

• If no power is being supplied to the unit,

check the connections first. If everything is in
order, check the fuse.

• If no sound comes from the speakers of two-

speaker systems, set the fader control to the
centre position.

• If your car is equipped with a power aerial,

note that it will extend automatically while
the unit is operating.

If you have any questions or problems
concerning your unit that are not covered in
this manual, please consult your nearest Sony
dealer.

Notes on handling CDs

A dirty or defective disc may cause sound
dropouts while playing. To enjoy optimum
sound, handle the disc as follows.
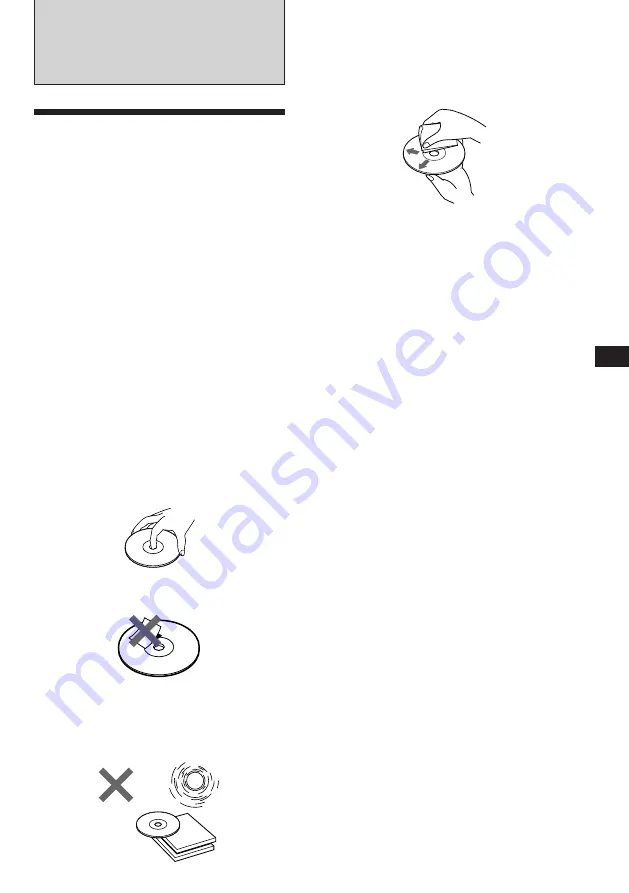
Handle the disc by its edge. To keep the disc
clean, do not touch the surface.

Do not stick paper or tape on the labelled
surface.

Do not expose the discs to direct sunlight or
heat sources such as hot air-ducts, or leave
them in a car parked in direct sunlight where
there can be a considerable rise in the
temperature inside the car.

CD/MD Changer/Additional Information

Before playing, clean the discs with an
optional cleaning cloth. Wipe each disc from
the centre out.
Do not use solvents such as benzine, thinner,
commercially available cleaners or antistatic
spray intended for analog discs.

Notes on moisture condensation

On a rainy day or in a very damp area,
moisture may condense on the lenses inside
the CD player. Should this occur, the unit will
not operate properly. In this case, remove the
disc  and wait for about an hour until the
moisture evaporates.

When you play 8 cm CDs

Use the optional Sony compact disc single
adapter (CSA-8) to protect the CD player from
being damaged.

Содержание CDX-C460 - Fm/am Compact Disc Player

Страница 1: ...y Corporation EN FM AM Compact Disc Player CDX C460 For installation and connections see the supplied installation connections manual Para obtener información sobre la instalación y las conexiónes consulte el manual de instalación conexiones suministrado ES C ...

Страница 2: ... Disc Player This unit lets you enjoy a variety of features by using either an optional rotary remote or an optional wireless remote In addition to the CD playback and the radio operations you can expand your system by connecting an optional CD MD changer ...

Страница 3: ...he label to the rotary remote 17 Location of controls 18 Specifications 20 Troubleshooting guide 21 Index 23 This Unit Only Getting Started Resetting the unit 4 Detaching the front panel 4 Setting the clock 5 CD Player Listening to a CD 5 Playing a CD in various modes 6 Radio Memorizing stations automatically Best Tuning Memory BTM 7 Memorizing only the desired stations 7 Receiving the memorized s...

Страница 4: ...ill be disabled A B Reset button OFF RELEASE Getting Started Resetting the unit Before operating the unit for the first time or after replacing the car battery you must reset the unit Press the reset button with a pointed object such as a ball point pen Notes Pressing the reset button will erase the clock and some memorized functions When you connect the power supply cord to the unit or reset the ...

Страница 5: ...er on first then set the clock SET UP SUR EQ CLOCK to go backward to go forward to go forward to go backward Elapsed playing time Track number Getting Started CD Player Labelled side up To locate succeeding tracks CD Player Listening to a CD Simply insert the CD Playback starts automatically If a CD is already inserted press SOURCE repeatedly until CD appears Note To play back an 8 cm CD use the o...

Страница 6: ...ly the items you can select light up 2 Press 3 PLAY MODE repeatedly until INTRO appears 3 Press 4 n to select INTRO ON Intro Scan starts 4 Press SHIFT To go back to the normal playback mode select INTRO OFF in step 3 above PLAY MODE SUR EQ CD INTROOFF SHIFT 1 2 3 4 5 SET UP PLAY MODE SEEK AMS To search forward To search backward Playing tracks repeatedly Repeat Play 1 During playback press SHIFT 2...

Страница 7: ...heir frequencies You can store up to 10 stations on each band FM1 FM2 and AM Caution When tuning in a station while driving use Best Tuning Memory to prevent accidents 1 Press SOURCE repeatedly to select the tuner Each time you press SOURCE the source changes as follows CD TUNER 2 Press MODE repeatedly to select the band Each time you press MODE the band changes as follows z FM1 z FM2 z AM 3 Press...

Страница 8: ...peatedly until MONO ON appears The sound improves but becomes monaural ST disappears 3 Press SHIFT To go back to the normal mode select MONO OFF in step 2 above Changing the displayed items Each time you press DSPL the item alternates between the frequency and the clock Storing the station names Station Memo You can assign a name to each radio station and store it in memory The name of the station...

Страница 9: ...splay 2 Press LIST repeatedly until you find the desired station 3 Press 5 ENTER to tune in the desired station Note Once the station name or frequency has been displayed for five seconds the display goes back to its normal mode To turn off the display press DSPL Other Functions Adjusting the sound characteristics You can adjust the bass treble balance and fader Each source can store the bass and ...

Страница 10: ...s will not appear Note The displayed item will differ depending on the source 3 Press 4 n to select the desired setting for example ON or OFF 4 Press SHIFT When the mode setting is complete the normal playback mode appears Boosting bass sound D bass You can enjoy clear and powerful bass sound The D bass function boosts the low frequency signal with a sharper curve than conventional bass boost You ...

Страница 11: ...ame is selected The track name appears when the track has changed if the track name is selected The disc or track name appears depending on the setting when you press SOURCE to select an MD SEEK AMS SEEK AMS If you press DSPL to change the display item the disc or track name of the MD is scrolled automatically whether you set the function on or off 1 Press SHIFT then press 2 SET UP repeatedly unti...

Страница 12: ... Intro Scan You can play the first 10 seconds of all the tracks on the currently selected disc 1 During playback press SHIFT then press 3 PLAY MODE repeatedly until INTRO appears 2 Press 4 n to select INTRO ON Intro Scan starts 3 Press SHIFT To go back to the normal playback mode select INTRO OFF in step 2 above Playing tracks repeatedly Repeat Play You can select REP 1 to repeat a track REP 2 to ...

Страница 13: ...he desired character The flashing cursor moves to the next space If you press 1 N the flashing cursor moves to the left 3 Repeat steps 1 and 2 to enter the entire name 3 To return to the normal CD playback mode press LIST for two seconds Tip To erase correct a name enter _ under bar for each character Displaying the disc memo Press DSPL during CD playback Each time you press DSPL during CD playbac...

Страница 14: ...you label the disc you can set the unit to skip tracks and play only the tracks you want 1 Start playing the disc and press SHIFT Then press 3 PLAY MODE for two seconds Bank edit mode Note If you have not labeled the disc the bank edit mode does not appear and the program edit mode appears To go back to the normal playback mode press SHIFT PLAY MODE ENTER SUR EQ TRACK DISC CD2 1 5 ENTER SUR EQ DIS...

Страница 15: ... follows Handle the disc by its edge To keep the disc clean do not touch the surface Do not stick paper or tape on the labelled surface Do not expose the discs to direct sunlight or heat sources such as hot air ducts or leave them in a car parked in direct sunlight where there can be a considerable rise in the temperature inside the car CD MD Changer Additional Information Before playing clean the...

Страница 16: ...s again after replacement there may be an internal malfunction In such a case consult your nearest Sony dealer Warning Never use a fuse with an amperage rating exceeding the one supplied with the unit as this could damage the unit Cleaning the connectors The unit may not function properly if the connectors between the unit and the front panel are not clean To prevent this open the front panel by p...

Страница 17: ...unit with the optional rotary remote RM X2S Several labels are supplied with the rotary remote Attach the label that matches the functions of this unit and the mounting position of the rotary remote After you mount the rotary remote attach the label as in the illustration below Additional Information ...

Страница 18: ...n Number buttons 7 8 During CD MD playback Direct disc selection buttons 11 ª D BASS dial 10 Refer to the pages for details 1 SEEK AMS seek Automatic Music Sensor manual search button 5 6 7 8 11 14 2 SOURCE source select button 5 7 8 11 3 MODE band changer select 7 8 11 4 SOUND button 9 5 Display window 6 Receptor for the optional wireless remote 7 DSPL display mode change button 5 8 9 11 13 8 6 e...

Страница 19: ... AMS button 5 PRESET DISC button You cannot do manual search and manual tuning with the remote 6 MUTE button 7 buttons 8 DSPL button 9 SOUND button When the POWER SELECT switch is set to the B position the unit cannot be operated with the wireless remote unless SOURCE on the unit is pressed or a CD is inserted to activate the unit first OFF SOURCE SEEK AMS PRESET DISC FF REW SOUND MUTE DSPL MODE D...

Страница 20: ...kHz Sensitivity 30 µV Power amplifier section Outputs Speaker outputs sure seal connectors Speaker impedance 4 8 ohms Maximum power output 40 W 4 at 4 ohms General Outputs Line outputs 2 Power antenna relay control lead Power amplifier control lead Telephone mute control lead Illumination control lead Tone controls Bass 8 dB at 100 Hz Treble 8 dB at 10 kHz Power requirements 12 V DC car battery ne...

Страница 21: ...sing the built in amplifier The beep tone is muted page 10 Cause Solution Another CD is already loaded The CD was forcibly inserted upside down or in the wrong way MD Defective MD or dusty CD The ambient temperature exceeds 50 C Press the reset button The unit is installed at an angle of more than 20 The unit is not installed in a sturdy part of the car Problem A disc cannot be loaded Play does no...

Страница 22: ...RESET NO READY HI TEMP Cause The disc magazine is not inserted in the CD MD changer No disc is inserted in the CD MD changer A CD MD cannot play because of some problem A CD is dirty or inserted upside down 2 An MD does not play because of some problem 2 No tracks have been recorded on an MD 2 The CD MD changer cannot be operated because of some problem The lid of the MD changer is open or MDs are...

Страница 23: ... H Fader 9 Front panel 4 Fuse 16 I J K Intro Scan 6 12 L List up 9 14 Local seek 8 Locating a disc 11 14 a specific point 6 11 a specific track 5 11 M N O Manual search 6 11 Manual tuning 8 MD playback 11 Monaural mode 8 Mute 9 P Q PLAY MODE BANK 14 INTRO 6 11 LOCAL 8 MONO 8 R Radio 7 Repeat Play 6 12 Reset 4 Rotary remote 10 17 S SET UP A SCRL 11 BEEP 10 CLOCK 5 DIM 10 D INFO 10 RM 10 Shuffle Pla...

Страница 24: ...s compactos de Sony Esta unidad le permitirá disfrutar de varias funciones mediante un mando a distancia rotativo o inalámbrico opcionales Además de las operaciones de reproducción de CD y la radio puede ampliar el sistema mediante la conexión de un cambiador opcional de CD MD ...

Страница 25: ...ción del sonido 9 Cambio de los ajustes de sonido y visualización 10 Equipo opcional Cambiador de CD MD Reproducción de discos compactos CD o de minidiscos MD 11 Exploración de temas Exploración de introducción 12 Reproducción repetida de temas Reproducción repetida 12 Reproducción de temas en orden aleatorio Reproducción aleatoria 12 Asignación de títulos a los discos compactos Memorando de disco...

Страница 26: ... encendido a la posición OFF sin haber extraído el panel frontal la alarma de precaución emitirá pitidos durante unos segundos sólo si el interruptor POWER SELECT está ajustado en la posición A Si conecta un amplificador opcional de potencia y no utiliza el incorporado los pitidos se desactivarán B A Procedimientos iniciales Restauración de la unidad Antes de utilizar la unidad por primera vez o d...

Страница 27: ...l de 12 horas Ejemplo Para ajustar el reloj a las 10 08 1 Pulse SHIFT y a continuación 2 SET UP 1 Pulse 4 n Los dígitos de la hora parpadean 2 Ajuste la hora 3 Pulse 4 n Los dígitos de los minutos parpadean 4 Ajuste los minutos 2 Pulse SHIFT El reloj se pone en funcionamiento 3 Pulse SHIFT Una vez finalizado el ajuste de modo aparecerá la indicación de modo de reproducción normal Nota Si el interr...

Страница 28: ...uminarán sólo los elementos que pueden seleccionarse 2 Pulse 3 PLAY MODE varias veces hasta que aparezca INTRO 3 Pulse 4 n para seleccionar INTRO ON La exploración de introducción se iniciará 4 Pulse SHIFT Para volver al modo de reproducción normal seleccione INTRO OFF en el paso 3 Reproducción repetida de temas Reproducción repetida 1 Pulse SHIFT durante la reproducción 2 Pulse 6 REP varias veces...

Страница 29: ...sora Pulse varias veces cualquier lado del botón SEEK AMS hasta recibir la emisora que desee continúa en la página siguiente n Radio Memorización automática de emisoras Memorización de la mejor sintonía BTM Esta unidad selecciona las emisoras de señal más intensa y las memoriza por orden de frecuencia Es posible almacenar hasta 10 emisoras de cada banda FM1 FM2 y AM Precaución Durante la conducció...

Страница 30: ... en la memoria El nombre de la emisora actualmente sintonizada aparecerá en el visor Usted podrá utilizar hasta ocho caracteres por emisora Almacenamiento de nombres de emisoras 1 Sintonice la emisora cuyo nombre desee almacenar 2 Mantenga pulsado LIST durante dos segundos SUR EQ FM1 SUR EQ FM1 W SUR EQ FM1 W SUR EQ FM1 3 Introduzca los caracteres 1 Pulse para seleccionar los caracteres deseados A...

Страница 31: ...ticamente el volumen cuando entre una llamada telefónica función de silenciamiento para teléfono Borrado del nombre de una emisora 1 Sintonice cualquier emisora y mantenga pulsado LIST durante dos segundos 2 Mantenga pulsado DSPL durante dos segundos 3 Pulse o para seleccionar el nombre que desee borrar 4 Mantenga pulsado 5 ENTER durante dos segundos El nombre se borrará Si desea borrar otros nomb...

Страница 32: ...do de la fuente 3 Pulse 4 n para seleccionar el ajuste que desee por ejemplo ON u OFF 4 Pulse SHIFT Una vez finalizado el ajuste de modo aparecerá la indicación de modo de reproducción normal Refuerzo de los graves D bass Es posible disfrutar de graves intensos y nítidos La función D bass refuerza la señal de frecuencias bajas con una curva más marcada que la del refuerzo de graves convencional Es...

Страница 33: ...rá durante tres segundos aproximadamente Localización de un tema específico Sensor de música automático AMS Durante la reproducción pulse cualquier lado de SEEK AMS tantas veces como temas desee omitir Para localizar temas posteriores Para localizar temas anteriores Equipo opcional Cambiador de CD MD Esta unidad permite controlar hasta 7 cambiadores de CD y de MD Reproducción de discos compactos C...

Страница 34: ...ducción repetida de temas Reproducción repetida Es posible seleccionar REP 1 para repetir un tema REP 2 para repetir un disco REP 3 para repetir todos los discos del cambiador actual 1 Durante la reproducción pulse SHIFT 2 Pulse 6 REP varias veces hasta que aparezca el ajuste que desee z REP 1 z REP 2 z REP 3 z REP OFF Se inicia la reproducción repetida 3 Pulse SHIFT Para volver al modo de reprodu...

Страница 35: ... que desee El cursor parpadeante se desplaza al espacio siguiente Si pulsa 1 N el cursor parpadeante se desplaza al lado izquierdo 3 Para volver al modo normal de reproducción de CD pulse LIST durante dos segundos Consejo Para borrar o corregir un título introduzca _ barra inferior por cada carácter Visualización del memorando de discos Pulse DSPL durante la reproducción de CD Cada vez que pulse D...

Страница 36: ...ACK DISC CD2 3 5 ENTER SUR EQ DISC 1 Localización de discos mediante el nombre Función de listado cambiador de CD con función de archivo personalizado o cambiador de MD Esta función puede utilizarse con discos a los que se ha asignado un título personalizado Para obtener más información sobre los títulos de disco consulte Asignación de títulos a los discos compactos página 13 1 Pulse LIST durante ...

Страница 37: ...a unidad se enfríe antes de utilizarla Si la unidad no recibe alimentación compruebe las conexiones en primer lugar Si todo está en orden examine el fusible Si los altavoces no emiten sonido con un sistema de 2 altavoces ajuste el control de atenuación en la posición central Si el automóvil dispone de antena motorizada observe que ésta se extenderá automáticamente durante el funcionamiento de la u...

Страница 38: ...Unidad principal Parte posterior del panel frontal No exponga los discos a la luz solar directa ni a fuentes de calor como conductos de aire caliente ni los deje en un automóvil aparcado a la luz solar directa ya que puede producirse un considerable aumento de temperatura en su interior Antes de realizar la reproducción limpie los discos con un paño opcional de limpieza desde el centro hacia los b...

Страница 39: ...rar dicha cubierta frontal Adhesión de la etiqueta al mando a distancia rotativo Esta unidad puede controlarse con el mando a distancia rotativo opcional RM X2S Con el mando rotativo se suministra una serie de etiquetas Adhiera la etiqueta que corresponda a las funciones de esta unidad y a la posición de montaje del mando a distancia rotativo Después de montar el mando a distancia rotativo adhiera...

Страница 40: ... ª Dial D BASS 10 Localización de los controles Consulte las páginas indicadas para obtener más información 1 Botón SEEK AMS búsqueda sensor de música automático búsqueda manual 6 7 8 11 12 14 2 Botón SOURCE selección de fuente 5 7 11 3 Botón MODE selección de banda cambiador 7 11 4 Botón SOUND 9 5 Visor 6 Receptor para el mando a distancia inalámbrico opcional 7 Botón DSPL cambio del modo de indi...

Страница 41: ...lizar la búsqueda manual ni la sintonización manual con el mando a distancia 6 Botón MUTE 7 Botones 8 Botón DSPL 9 Botón SOUND Si el interruptor POWER SELECT está ajustado en la posición B no será posible emplear la unidad con el mando a distancia inalámbrico a menos que pulse SOURCE en dicha unidad o que inserte un CD para que ésta se active en primer lugar OFF SOURCE SEEK AMS PRESET DISC FF REW ...

Страница 42: ...e potencia Salidas Salidas de altavoz conectores de sellado seguro Impedancia de altavoz 4 8 ohmios Salida máxima de potencia 40 W 4 a 4 ohmios Generales Saidas Saidas de línea 2 Cable de control de relé de antena motorizada Cable de control de amplificador de potencia Cable de control de silenciamiento para teléfono Cable de control de iluminación Controles de tono Graves 8 dB a 100 Hz Agudos 8 d...

Страница 43: ...onal de potencia y no utiliza el incorporado Ha silenciado los pitidos página 10 Reproducción de CD MD Causa Solución Ya hay un CD insertado Ha insertado el CD a la fuerza incorrectamente o al revés MD Disco defectuoso MD o con polvo CD La temperatura ambiental es superior a 50 C Pulse el botón de restauración Ha instalado la unidad en un ángulo superior a los 20 No ha instalado la unidad en una p...

Страница 44: ... ha insertado el cargador de discos en el cambiador de CD MD No ha insertado ningún disco en el cambiador El CD MD no se reproduce debido a algún problema Un CD está sucio o ha insertado el cuarto al revés 2 No es posible reproducir un MD debido a algún problema 2 No ha grabado ningún tema en el MD 2 No es posible emplear el cambiador de CD MD debido a algún problema La tapa del cambiador de minid...

Страница 45: ...brico 19 Mando a distancia rotativo 10 17 Memorando de discos 13 Memorización de emisoras 8 Memorización de la mejor sintonía BTM 7 Modo monofónico 8 P Q Panel frontal 4 Pitidos 10 PLAY MODE BANK 14 INTRO 6 12 LOCAL 8 MONO 8 R Radio 7 Reloj 5 Reproducción aleatoria 6 12 Reproducción de banco 14 Reproducción de CD 5 11 Reproducción de MD 11 Reproducción repetida 6 12 Restauración 4 S T U Selección ...

Страница 46: ...Sony Corporation Printed in Japan I 3 859 669 31 2 ...

Отзывы: