KDL-46NX810/55NX810/55NX811/60NX810
17
DISASSEMBLY/PART NUMBER INFORMATION
NOTE: Les composants identifies per un trame et
une marque
!
sont critiques pour la securite.
Ne les remplacer que par une piece portant le
numero specifie.
NOTE: The components identified by shading
and
!
mark are critical for safety. Replace only
with part number specified.
NOTE: The components identified by a red outline and a mark contain
confidential information. Specific instructions must be adhered to whenever
these components are repaired and/or replaced.
See Appendix A: Encryption Key Components in the back of this manual.
REF. NO.
PART NO.
DESCRIPTION
[ASSEMBLY INCLUDES]
REF. NO.
PART NO.
DESCRIPTION
[ASSEMBLY INCLUDES]
157
A-1788-127-A
BUHT BOARD, COMPLETE
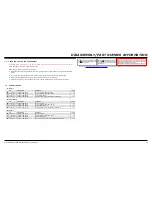
NOTE: For BUHT Board replacement, please refer to section
2-2. Adjustments after Replacing the BUHT Board or LCD Panel.
NOTE: Final software is not installed on this BUHT Board.
Install the update after replacing this board using the instructions
provided with the software.
158
4-188-665-11
BRACKET, SIDE JACK
159
4-188-666-11
BRACKET, TERMINAL
160
1-474-254-11
G10 (POWER) BOARD, COMPLETE
161
4-193-111-01
SHEET, INSULATION (G60)
162
1-474-255-11
G11 (POWER) BOARD, COMPLETE
163
4-188-691-01
SHEET, INSULATION (GS)
2-990-421-41
SCREW (+PSW) (M3X6)
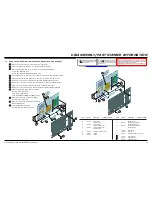
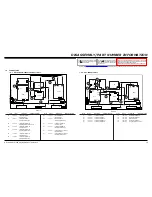
1-3-2. KDL-60NX810 ONLY
CAUTION: Refer to
”Special Handling Instructions When Replacing the LCD Panel
Assembly” on page 6.
A Gently peel-off Terminal Label to detach from LCD Panel Assembly
B Gently peel-off Side Jack Label to detach from LCD Panel Assembly
C Remove 2 screws from Wireless LAN Card to detach from LCD Panel Assembly
D Gently peel-off HLT Board and Disconnect 1 connector to detach from LCD Panel Assembly
E Gently peel-off Tape PWB (H) to detach from HLT Board
F Remove 9 screws from BUHT Board to detach from LCD Panel Assembly
G Release 2 clips to detach Side Jack Bracket from BUHT Board
H Release 2 clips to detach Terminal Bracket from BUHT Board
I Slide-out 2 Attachment GL pieces to detach from LCD Panel Assembly
J Remove 3 screws from G10 (Power) Board to detach from LCD Panel Assembly
K Gently peel-off Insulation Sheet (G60) to detach from LCD Panel Assembly
L Remove 1 screw from G11 (Power) Board to detach from LCD Panel Assembly
M Gently peel-off Insulation Sheet (GS) to detach from LCD Panel Assembly
Note: The Tape PWB (H), Side Jack Label, Terminal Label,
Insulation Sheet (G60), Insulation Sheet (GS) and
Attachment GL pieces are not included with the
LCD Panel Assembly and must be replaced
when replacing the LCD Panel Assembly.
F
E
D
G
H
K
I
J
C
B
A
L
M
157
156
155
158
159
161
160
154
153
152
151
162
163
151
NA
P-MOD/T-MOD (LCD PANEL ASSEMLY)
FOR ALL P-MOD/T-MOD (LCD PANEL ASSEMLY) PART NUMBER
INFORMATION REFER TO THE LCD PANELS SERVICE MANUAL
152
4-199-302-01
LABEL, TERMINAL (FOR US)
153
4-199-290-01
LABEL, SIDE JACK (L)
154
1-487-819-11
CARD, WIRELESS LAN
155
A-1782-538-A
HLT(STD), BOARD MOUNTED
156
4-195-059-01
TAPE, PWB (H)
Check the
Sony Electronics Service Information
website for any additional service related issues for this model.
Содержание BRAVIA KDL-46NX810
Страница 2: ...SERVICE MANUAL LCD Digital Color TV AZ1 H Chassis 9 888 349 04 SelfDiagnosis Supported model ...
Страница 27: ...KDL 46NX810 55NX810 55NX811 60NX810 22 DISASSEMBLY PART NUMBER INFORMATION 1 10 2 KDL 55NX810 55NX811 ONLY ...
Страница 28: ...KDL 46NX810 55NX810 55NX811 60NX810 23 DISASSEMBLY PART NUMBER INFORMATION 1 10 3 KDL 60NX810 ONLY ...

