background image

A-9 (E)

BDX-M1000

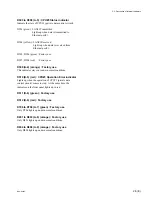
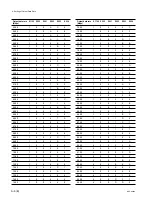
A. Setting of Output Data Rate

Output data rate

S1100

S500

S501

S502

S503

S504

(Mbps)

180.00

4

0

0

1

5

A

180.50

4

0

0

1

5

0

181.00

4

0

0

1

4

6

181.50

4

0

0

1

3

C

182.00

4

0

0

1

3

2

182.50

4

0

0

1

2

8

183.00

4

0

0

1

1

E

183.50

4

0

0

1

1

5

184.00

4

0

0

1

0

B

184.50

4

0

0

1

0

2

185.00

4

0

0

0

F

8

185.50

4

0

0

0

E

F

186.00

4

0

0

0

E

5

186.50

4

0

0

0

D

C

187.00

4

0

0

0

D

2

187.50

4

0

0

0

C

9

188.00

4

0

0

0

C

0

188.50

4

0

0

0

B

7

189.00

4

0

0

0

A

E

189.50

4

0

0

0

A

5

190.00

4

0

0

0

9

C

Содержание BDX-M1000

Страница 1: ...MPEG MULTIPLEXER UNIT BDX M1000 INSTALLATION MANUAL 1st Edition Revised 1 Serial No 10001 and Higher BDX M1000 ...

Страница 2: ...sure n effectuer que les réparations indiquées dans le mode d emploi à moins d être qualifié pour en effectuer d autres Pour toute réparation faire appel à une personne compétente uniquement For the U S A Attention when the product is installed in Rack For BDX M1000 1 Prevention against overloading of branch circuit When this product is installed in a rack and is supplied power from an outlet on t...

Страница 3: ...s 1 2 1 4 Rack Mounting 1 2 1 5 Matching Connectors and Cables 1 5 1 6 Input and Output Signal of Connector 1 6 1 7 Switch Setting of Connector Panel 1 7 1 8 Settings of Internal Switches 1 8 1 8 1 IPM 81 Board 1 8 1 8 2 OPM 25 Board 1 9 1 8 3 SY 244 Board 1 11 2 Service Overview 2 1 Cleaning of Air Filter 2 1 2 2 Description of Internal Indicators 2 2 2 2 1 IPM 81 Board 2 2 2 2 2 OPM 25 Board 2 3...

Страница 4: ......

Страница 5: ...pplied with the BDX M1000 This manual describes information that premise the service based on board replacement and parts replacement adjustments board layouts schematic dia grams parts list etc If this manual is required contact your local Sony Sales Office Service Center Contents The following is a summary of all the sections for understanding the contents of this manual Section 1 Installation E...

Страница 6: ......

Страница 7: ...ator is used for the power supply of the BDX M1000 The voltage within the range of 100 V to 240 V can be used without changing the supply voltage n As the inrush current at turn on is maximum 20 A at 100 V maximum 40 A at 240 V the capacity of the AC power must be adequate with the inrush current of maxi mum 20 A at 100 V maximum 40 A at 240 V If the capacity of the AC power is not the adequately ...

Страница 8: ...d to install a ventilation fan to prevent a temperature rise in the rack Make sure that all the units in the rack should be operated within the temperature range of 5dC to 40dC Connect the enough long cables on the rear panel considering that the BDX M1000 is pulled out An installation manual is supplied with the RMM 30 rack mount rail However follow the instructions in this manual Because the rac...

Страница 9: ... Rail If a rack mount rail other than the RMM 30 is used the BDX M1000 may be dropped by insufficient strength of the rack mount rail This may cause a injury Procedures 1 Turn the power off 2 Remove the four feet from the bottom of the BDX M1000 3 While pressing the stopper of the rail pull out the inner rail 4 Attach the inner rails to the BDX M1000 using the six screws B4x8 supplied with the BDX...

Страница 10: ...e moved smoothly tighten the screws B5x8 secured temporarily in the step 6 n When securing the front brackets to the rack by screws pull out the BDX M1000 about 20 cm 8 inches and fasten the screws of the front brackets to the rack 9 After installing the BDX M1000 in the rack secure the unit to the rack by the prepared four screws RK5x16 and four washers n When the BDX M1000 is mounted in a rack t...

Страница 11: ...BNC 75 Z male 1 569 370 12 DVB ASI 5C 2V cable 1 _ BIT STREAM OUTPUT D sub 25 pin male 1 566 356 11 Solderless type MODULATOR 1 564 747 11 Solder type PARALLEL D sub 25 pin male 1 566 356 11 Solderless type 1 564 747 11 Solder type VCD 5D cable 2 _ SPARE BNC 75 Z male _ TIME CODE INPUT XLR 3 pin male 1 508 084 00 3 TALLY INPUT Mini DIN 8 pin male _ 10BASE T RJ45 modular jack 4 _ SPARE D sub 9 pin ...

Страница 12: ...C _ 24 PBYTE CLK B I 25 GND _ 2 2 2 2 2 PARALLEL D sub 25 pin Pin No Signal I O 1 Clock A O 2 System GND _ 3 Data 7A MSB O 4 Data 6A O 5 Data 5A O 6 Data 4A O 7 Data 3A O 8 Data 2A O 9 Data 1A O 10 Data 0A O 11 DVALID A Data valid A O 12 PSYNC A Packet sync A O 13 Cable Shield _ 14 Clock B O 15 System GND _ 16 Data 7B MSB O 17 Data 6B O 18 Data 5B O 19 Data 4B O 20 Data 3B O 21 Data 2B O 22 Data 1...

Страница 13: ...Pin No Signal I O 1 TXD O 2 TXD_ O 3 RXD I 4 _ _ 5 _ _ 6 RXD _ I 7 _ _ 8 _ _ 5 5 5 5 5 SPARE D sub 9 pin RS 232C D sub 9 pin Pin No Signal I O 1 _ _ 2 RXD I 3 TXD O 4 DTR O 5 SG _ 6 _ _ 7 RTS O 8 CTS I 9 _ _ 1 7 Switch Setting of Connector Panel Set the 75 Z termination switch of REF VIDEO INPUT for your purpose When the loop through output is not used set the 75 Z termination switch to ON This sw...

Страница 14: ... the channel that is set by CPU to pass the packet through the input filter ON OFF OFF D201 to D203 indicate the channel that the input buffer overflowed 1 8 Settings of Internal Switches 1 8 1 IPM 81 Board n The addresses on the board are shown by marks For the switches described Unassigned do not change the factory setting S101 A 2 Reset switch n Do not press this switch under normal conditions ...

Страница 15: ...S902 and S901 PID Setting switch It can be converted a hexadecimal display to time in second T by the following expres sion T HD LD TD HD A number that is converted a hexadeci mal display on D900 to a decimal LD A number that is converted a hexadeci mal display on D913 to a decimal TD 20 Example When D900 indicates 02 and D913 indicates 11 HD 2 LD 17 TD 20 T 2 17 20 2 85 second S905 S904 S902 S901...

Страница 16: ...nce with the table in Appendix section 2 3 Factory use 5 to F Unassigned S500 to S504 B 1 C 1 Output Data Rate Setting switch Factory setting S500 0 S501 1 S502 D S503 8 S504 D Output data rate 30 Mbps In case of external clock mode when S1100 is set at 0 Set S500 to S504 at 0 In case of internal clock mode when S1100 is set at 1 or 4 A desired output data rate can be set by S500 to S504 To set ea...

Страница 17: ...escribed Factory use do not change the factory settings S101 A 2 S301 A 3 S501 A 4 Factory use n Do not press these switches under normal conditions S102 B 2 S302 B 4 S502 B 5 Factory use Factory setting All switch levers are set to OFF lower position S700 B 8 Factory use Factory setting All switch levers are set to OFF lower position 7 6 5 4 3 2 1 A B C D E F S301 G J L K H 8 S102 S101 S803 S802 ...

Страница 18: ......

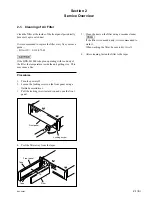
Страница 19: ...kept on operating with too dusty of the filter the temperature inside the unit getting rise This may cause a fire Procedures 1 Turn the power off 2 Loosen the locking screw on the front panel using a flatblade screwdriver 3 Pull the locking screw toward you and open the front panel 4 Peel the filter away from the tapes 5 Clean the dust on the filter using a vacuum cleaner n If the filter is too mu...

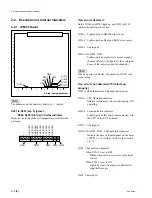
Страница 20: ...gure for the correspon dance of the indicators and the channels n When any error is detected the operation of CPU will come to stop If an error is not detected CPU starts up properly D201 to D204 indicate the following information D201 1 CPU Operation indicator Blinks at intervals of two seconds during CPU operating D201 2 Communication indicator Lights up when this board communicates with the CPU...

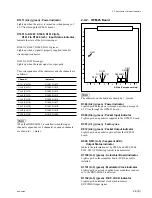
Страница 21: ...ed to 18 channels expanded channels are shown in marks 2 2 2 OPM 25 Board n The addresses on the board are shown by marks D300 A 2 green Power indicator Lights up when the power is turned on when passage of 5 V line through the OPM 25 board D500 A 6 green Packet Input indicator Lights up when a packet is supplied to the OPM 25 board D501 C 1 green Factory use D912 A 6 green Packet Output indicator...

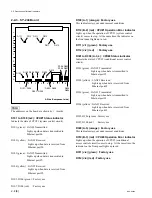
Страница 22: ...in red D111 J 1 green Factory use D112 J 2 red Factory use D301 to D308 A 3 4 CPU 2 Status indicator Indicate the state of CPU 2 conditional access control circuit D301 green LAN 2 Transmitted Lights up when data is transmitted to Ethernet port 2 D302 yellow LAN 2 Received Lights up when data is received from Ethernet port 2 D303 green LAN 3 Transmitted Lights up when data is transmitted to Ethern...

Страница 23: ... use D509 A 4 orange Factory use This indicator stays out under normal conditions D510 B 5 red CPU 3 Operation Error indicator Lights up when the operation of CPU 3 private data control circuit comes to stop At the same time the indicator on the front panel lights up in red D511 K 6 green Factory use D512 K 6 red Factory use D706 to D708 A 7 green Factory use Only D706 lights up under normal condi...

Страница 24: ......

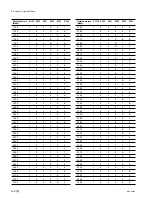
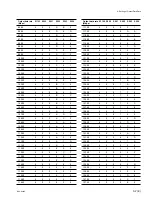
Страница 25: ...A 6 C 12 40 1 0 5 9 9 7 12 50 1 0 5 8 C 5 12 60 1 0 5 7 F 7 12 70 1 0 5 7 2 C 12 80 1 0 5 6 6 4 12 90 1 0 5 5 9 F 13 00 1 0 5 4 D E 13 10 1 0 5 4 1 F 13 20 1 0 5 3 6 3 13 30 1 0 5 2 A A 13 40 1 0 5 1 F 4 13 50 1 0 5 1 4 0 Output data rate S1100 S500 S501 S502 S503 S504 Mbps 13 60 1 0 5 0 8 F 13 70 1 0 4 F E 1 13 80 1 0 4 F 3 5 13 90 1 0 4 E 8 C 14 00 1 0 4 D E 5 14 10 1 0 4 D 4 0 14 20 1 0 4 C 9 E...

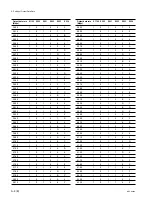
Страница 26: ... 70 1 0 3 0 8 E 20 80 1 0 3 0 4 2 20 90 1 0 2 F F 8 21 00 1 0 2 F A E 21 10 1 0 2 F 6 4 21 20 1 0 2 F 1 C 21 30 1 0 2 E D 4 Output data rate S1100 S500 S501 S502 S503 S504 Mbps 21 40 1 0 2 E 8 D 21 50 1 0 2 E 4 6 21 60 1 0 2 E 0 0 21 70 1 0 2 D B B 21 80 1 0 2 D 7 6 21 90 1 0 2 D 3 2 22 00 1 0 2 C E F 22 10 1 0 2 C A C 22 20 1 0 2 C 6 A 22 30 1 0 2 C 2 8 22 40 1 0 2 B E 7 22 50 1 0 2 B A 6 22 60 1...

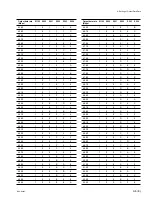
Страница 27: ... 10 1 0 1 E D C 29 20 1 0 1 E B 5 29 30 1 0 1 E 9 0 29 40 1 0 1 E 6 A 29 50 1 0 1 E 4 4 29 60 1 0 1 E 1 F 29 70 1 0 1 D F A Output data rate S1100 S500 S501 S502 S503 S504 Mbps 29 80 1 0 1 D D 5 29 90 1 0 1 D B 1 30 00 1 0 1 D 8 D 30 10 1 0 1 D 6 9 30 20 1 0 1 D 4 5 30 30 1 0 1 D 2 2 30 40 1 0 1 C F E 30 50 1 0 1 C D B 30 60 1 0 1 C B 8 30 70 1 0 1 C 9 6 30 80 1 0 1 C 7 4 30 90 1 0 1 C 5 1 31 00 1...

Страница 28: ... 50 1 0 1 5 1 7 37 60 1 0 1 5 0 0 37 70 1 0 1 4 E 9 37 80 1 0 1 4 D 2 37 90 1 0 1 4 B C 38 00 1 0 1 4 A 5 38 10 1 0 1 4 8 F Output data rate S1100 S500 S501 S502 S503 S504 Mbps 38 20 1 0 1 4 7 8 38 30 1 0 1 4 6 2 38 40 1 0 1 4 4 C 38 50 1 0 1 4 3 6 38 60 1 0 1 4 2 0 38 70 1 0 1 4 0 A 38 80 1 0 1 3 F 5 38 90 1 0 1 3 D F 39 00 1 0 1 3 C A 39 10 1 0 1 3 B 5 39 20 1 0 1 3 9 F 39 30 1 0 1 3 8 A 39 40 1...

Страница 29: ... 90 1 0 0 E E 6 46 00 1 0 0 E D 6 46 10 1 0 0 E C 7 46 20 1 0 0 E B 8 46 30 1 0 0 E A 9 46 40 1 0 0 E 9 9 46 50 1 0 0 E 8 A Output data rate S1100 S500 S501 S502 S503 S504 Mbps 46 60 1 0 0 E 7 B 46 70 1 0 0 E 6 C 46 80 1 0 0 E 5 E 46 90 1 0 0 E 4 F 47 00 1 0 0 E 4 0 47 10 1 0 0 E 3 1 47 20 1 0 0 E 2 3 47 30 1 0 0 E 1 4 47 40 1 0 0 E 0 6 47 50 1 0 0 D F 7 47 60 1 0 0 D E 9 47 70 1 0 0 D D B 47 80 1...

Страница 30: ... 50 1 0 0 5 0 0 72 00 1 0 0 4 E 0 72 50 1 0 0 4 C 1 73 00 1 0 0 4 A 2 73 50 1 0 0 4 8 4 74 00 1 0 0 4 6 6 74 50 1 0 0 4 4 9 Output data rate S1100 S500 S501 S502 S503 S504 Mbps 75 00 1 0 0 4 2 C 75 50 1 0 0 4 0 F 76 00 1 0 0 3 F 3 76 50 1 0 0 3 D 7 77 00 1 0 0 3 B B 77 50 1 0 0 3 A 0 78 00 1 0 0 3 8 5 78 50 1 0 0 3 6 A 79 00 1 0 0 3 5 0 79 50 1 0 0 3 3 6 80 00 1 0 0 3 1 D 80 50 1 0 0 3 0 4 81 00 1...

Страница 31: ...9 9 C 114 00 4 0 0 9 8 3 114 50 4 0 0 9 6 A 115 00 4 0 0 9 5 2 115 50 4 0 0 9 3 9 116 00 4 0 0 9 2 1 116 50 4 0 0 9 0 9 Output data rate S1100 S500 S501 S502 S503 S504 Mbps 117 00 4 0 0 8 F 1 117 50 4 0 0 8 D A 118 00 4 0 0 8 C 2 118 50 4 0 0 8 A B 119 00 4 0 0 8 9 4 119 50 4 0 0 8 7 D 120 00 4 0 0 8 6 6 120 50 4 0 0 8 5 0 121 00 4 0 0 8 3 A 121 50 4 0 0 8 2 4 122 00 4 0 0 8 0 E 122 50 4 0 0 7 F 8...

Страница 32: ...0 0 3 9 2 156 00 4 0 0 3 8 5 156 50 4 0 0 3 7 8 157 00 4 0 0 3 6 A 157 50 4 0 0 3 5 D 158 00 4 0 0 3 5 0 158 50 4 0 0 3 4 3 Output data rate S1100 S500 S501 S502 S503 S504 Mbps 159 00 4 0 0 3 3 6 159 50 4 0 0 3 2 A 160 00 4 0 0 3 1 D 160 50 4 0 0 3 1 0 161 00 4 0 0 3 0 4 161 50 4 0 0 2 F 7 162 00 4 0 0 2 E B 162 50 4 0 0 2 D E 163 00 4 0 0 2 D 2 163 50 4 0 0 2 C 6 164 00 4 0 0 2 B A 164 50 4 0 0 2...

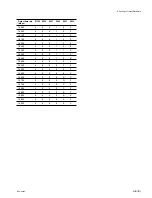
Страница 33: ...0 1 4 6 181 50 4 0 0 1 3 C 182 00 4 0 0 1 3 2 182 50 4 0 0 1 2 8 183 00 4 0 0 1 1 E 183 50 4 0 0 1 1 5 184 00 4 0 0 1 0 B 184 50 4 0 0 1 0 2 185 00 4 0 0 0 F 8 185 50 4 0 0 0 E F 186 00 4 0 0 0 E 5 186 50 4 0 0 0 D C 187 00 4 0 0 0 D 2 187 50 4 0 0 0 C 9 188 00 4 0 0 0 C 0 188 50 4 0 0 0 B 7 189 00 4 0 0 0 A E 189 50 4 0 0 0 A 5 190 00 4 0 0 0 9 C ...

Страница 34: ......

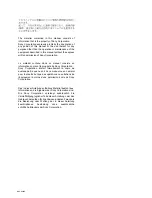
Страница 35: ... de Sony Corporation Sony Corporation interdit formellement la copie de quelque partie que ce soit de ce manuel ou son emploi pour tout autre but que des opérations ou entretiens de l équipement à moins d une permission écrite de Sony Corporation Das in dieser Anleitung enthaltene Material besteht aus Informationen die Eigentum der Sony Corporation sind Die Sony Corporation untersagt ausdrücklich ...

Страница 36: ...Printed in Japan Sony Corporation 1999 8 11 Broadcasting Professional Systems Company 1997 BDX M1000 SY J E 3 194 483 02 ...

Отзывы: