background image

Sh
ootin

g imag

es

51

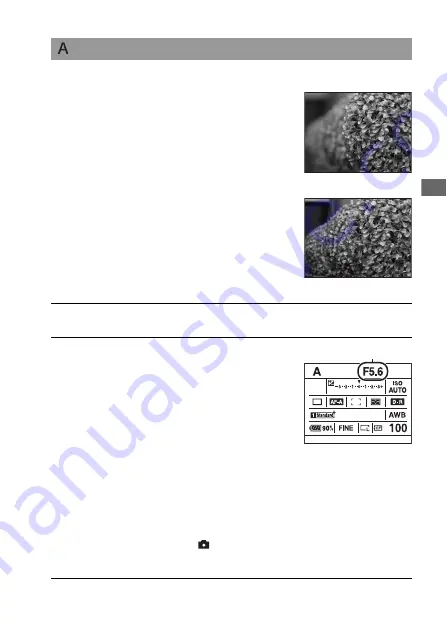
 Shooting with Aperture priority

If you set the aperture (a smaller F-
number) wider, the in-focus range 
becomes narrower. Only the main subject 
is then in focus. When the aperture is 
smaller (a larger F-number), the in-focus 
range becomes wider. The whole image 
is sharpened. The shutter speed is 
automatically adjusted.

Wide aperture

Small aperture

1

Set the mode dial to A.

2

Select the aperture value (F-
number) with the front or rear 
control dial.

• You can check the blurring of an image 

with the preview button (page 87).

• When the camera judges that the proper 

exposure is not obtained with the 
selected aperture value, the shutter 
speed flashes. In such cases, adjust the 
aperture again.

• The aperture value is adjusted in 1/3 

EV increments. You can set this 
exposure step to 1/2 EV increments 
with [Exposure step] in the 


Recording menu (page 108).

Aperture (F-number)

Содержание Alpha DSLR-A850

Страница 1: ...s product and answers to frequently asked questions can be found at our Customer Support Website Digital Single Lens Reflex Camera Instruction Manual DSLR A850 Preparing the camera Before your operation Shooting images Using the shooting function Using the viewing function Using the menu Viewing images on a computer Printing images ...

Страница 2: ...uce fire or shock hazard do not expose the unit to rain or moisture WARNING For Customers in the U S A This symbol is intended to alert the user to the presence of uninsulated dangerous voltage within the product s enclosure that may be of sufficient magnitude to constitute a risk of electric shock to persons This symbol is intended to alert the user to the presence of important operating and main...

Страница 3: ...cts of any kind into the set through openings as they may touch dangerous voltage points or short out parts that could result in a fire or electric shock Never spill liquid of any kind on the set Attachments Do not use attachments not recommended by the manufacturer as they may cause hazards Cleaning Unplug the set from the wall outlet before cleaning or polishing it Do not use liquid cleaners or ...

Страница 4: ... Adjust only those controls that are specified in the operating instructions Improper adjustment of other controls may result in damage and will often require extensive work by a qualified technician to restore the set to normal operation When the set exhibits a distinct change in performance this indicates a need for service Servicing Do not attempt to service the set yourself as opening or remov...

Страница 5: ... risks explosion fire or chemical burn Comply with the following precautions Do not disassemble Do not crush and do not expose the battery pack to any shock or force such as hammering dropping or stepping on it Do not short circuit and do not allow metal objects to come into contact with the battery terminals Do not expose to high temperature above 140 F 60 C such as in direct sunlight or in a car...

Страница 6: ...e by one or more of the following measures Reorient or relocate the receiving antenna Increase the separation between the equipment and receiver Connect the equipment into an outlet on a circuit different from that to which the receiver is connected Consult the dealer or an experienced radio TV technician for help The supplied interface cable must be used with the equipment in order to comply with...

Страница 7: ... household waste disposal service or the shop where you purchased the product Disposal of waste batteries applicable in the European Union and other European countries with separate collection systems This symbol on the battery or on the packaging indicates that the battery provided with this product shall not be treated as household waste By ensuring these batteries are disposed of correctly you ...

Страница 8: ...ou change the fuse Never use the plug without the fuse cover If you should lose the fuse cover please contact your nearest Sony service station The manufacturer of this product is Sony Corporation 1 7 1 Konan Minato ku Tokyo 108 0075 Japan The Authorized Representative for EMC and product safety is Sony Deutschland GmbH Hedelfinger Strasse 61 70327 Stuttgart Germany For any service or guarantee ma...

Страница 9: ...s in any way Do not expose the camera to direct sunlight If sunlight is focused on a nearby object it may cause a fire When you must place the camera under direct sunlight attach the lens cap Images may trail across on the LCD monitor in a cold location This is not a malfunction When turning on the camera in a cold location the LCD monitor may become temporarily dark When the camera warms up the m...

Страница 10: ...onitor Recording information display 39 Display panel 42 Viewfinder 43 Selecting a function setting 45 Selecting the functions on the Quick Navi screen 46 Shooting images Shooting with the automatic setting 47 Exposure mode 49 Shooting with Program auto 49 Shooting with Aperture priority 51 Shooting with Shutter speed priority 52 Shooting with Manual exposure 53 Shooting with BULB 54 Using the sho...

Страница 11: ...ite balance 73 Setting the color temperature and a filter effect 74 Custom white balance 75 Image processing 77 Using the D Range Optimizer 77 Using the Creative Style 78 Selecting the drive mode 81 Shooting single shot 81 Shooting continuously 82 Using the self timer 83 Shooting with Exposure bracket 83 Shooting with the white balance bracket 85 Shooting with the DRO advanced bracket 85 Shooting ...

Страница 12: ... Playback menu 2 123 Setup menu 1 124 Setup menu 2 126 Setup menu 3 129 Setup menu 4 132 Viewing images on a computer Copying images to your computer 135 Viewing images on your computer 139 Using the software 143 Printing images Printing images by connecting the camera to a PictBridge compliant printer 150 Others Specifications 154 Troubleshooting 157 Warning messages 164 Precautions 167 Index 169...

Страница 13: ...C VM10 Battery charger 1 Power cord mains lead 1 Rechargeable battery pack NP FM500H 1 Remote Commander clip 1 USB cable 1 Video cable 1 Shoulder strap 1 Body cap 1 Attached on the camera Accessory shoe cap 1 Attached on the camera Eyecup 1 Attached on the camera CD ROM Application Software for α camera 1 Instruction Manual This manual 1 ...

Страница 14: ...leted battery pack supplied at a temperature of 25 C 77 F is as follows The charging time differs depending on the remaining capacity of the battery back or charging conditions Charging the battery pack 1 Insert the battery pack on the battery charger Push the battery pack until it clicks 2 Connect the power cord mains lead Light on Charging Light off Normal charge completed One hour after the lam...

Страница 15: ... supplied with your camera Batteries other than the specified kind may leak overheat or explode if you attempt to charge them posing a risk of injury from electrocution and burns When the CHARGE lamp flashes this may indicate a battery error or that a battery pack other than the specified type has been installed Check that the battery pack is the specified type If the battery pack is the specified...

Страница 16: ...sh Type B3 Type British Type C Type CEE Type SE Type CEE Type O Type Ocean Type Countries regions Voltage Frequency Hz Plug type Austria 230 50 C Belgium 230 50 C Czech 220 50 C Denmark 230 50 C Finland 230 50 C France 230 50 C Germany 230 50 C Greece 220 50 C Hungary 220 50 C Iceland 230 50 C Ireland 230 50 C BF Italy 220 50 C Luxemburg 230 50 C Netherlands 230 50 C Norway 230 50 C Poland 220 50 ...

Страница 17: ...vador 110 60 A Guatemala 120 60 A Honduras 110 60 A Jamaica 110 50 A Mexico 120 127 60 A Nicaragua 120 240 60 A Panama 110 220 60 A Countries regions Voltage Frequency Hz Plug type Argentina 220 50 C BF O Brazil 127 220 60 A C Chile 220 50 C Colombia 120 60 A Peru 220 60 A C Venezuela 120 60 A Countries regions Voltage Frequency Hz Plug type Iran 220 50 C BF Iraq 220 50 C BF Israel 230 50 C Saudi ...

Страница 18: ... open lever open the battery cover 2 Firmly insert the battery pack all the way while pressing the lock lever with the tip of the battery Lock lever 3 Close the battery cover Turn off the camera and slide the lock lever in the direction of the arrow Be careful not to drop the battery pack Lock lever ...

Страница 19: ...s not water resistant Do not leave the battery pack in extremely hot places such as in a car or under direct sunlight Available battery packs Use only an NP FM500H battery pack Note that the NP FM55H NP FM50 and NP FM30 cannot be used The number of images that can be recorded The approximate number of images that can be recorded is 880 when you use the camera with the battery pack at full capacity...

Страница 20: ...is shorter in cold places We recommend the following to ensure longer battery pack use put the battery pack in a pocket close to your body to warm it up and insert it in your camera immediately before you start shooting Battery life The battery life is limited Battery capacity decreases little by little as you use it more and more and as time passes If the battery operating time seems shortened co...

Страница 21: ...m the camera and the rear cap from the lens 2 Mount the lens by aligning the orange index marks on the lens and camera Orange index marks 3 Turn the lens clockwise until it clicks into the locked position When attaching a lens do not press the lens release button Be sure to put the lens on straight 1 Press the lens release button all the way in and turn the lens counterclockwise until it stops Whe...

Страница 22: ... the lens away from dusty locations to keep dust or debris from getting inside the camera when attaching removing a lens If dust or debris lands on the image sensor Clean the image sensor using Cleaning mode in the Setup menu page 34 2 Replace the cap on the lens and attach the body cap to the camera Before you attach the cap remove dust from the cap ...

Страница 23: ...card If you use Memory Stick Duo media you have to switch the memory card setting page 24 1 Open the memory card cover 2 Insert a memory card sold separately from the terminal part the terminal side has a number of small holes Terminal part Set the face side with the label toward the LCD monitor For Memory Stick Duo media insert it all the way in until it clicks Terminal part 3 Close the memory ca...

Страница 24: ...he CF card eject lever After the card is ejected a little pull out the memory card Memory Stick Duo media Push the Memory Stick Duo media once Access lamp 1Press the Fn button so that the Quick Navi screen appears page 46 2Select the memory card item with v V b B on the multi selector 3Select with the front or rear control dial You can also select the card with Memory card in the Setup menu page 1...

Страница 25: ... case supplied with it Do not expose the memory card to water Do not touch the terminal section of the memory card with your hand or a metal object On the CF card Microdrive Be sure to format the CF card Microdrive using this camera when you use it for the first time Do not remove the label of a CF card Microdrive or attach a new label over the label Do not press on the label strongly On the Memor...

Страница 26: ...abel on the Memory Stick Duo media itself Do not strike bend or drop the Memory Stick Duo media Do not disassemble or modify the Memory Stick Duo media Do not leave the Memory Stick Duo media within the reach of small children They might accidentally swallow it Do not use or store the Memory Stick Duo media under the following conditions High temperature locations such as the hot interior of a car...

Страница 27: ...n the camera on To turn the camera off set it to OFF 2 Verify that OK is selected on the LCD monitor then press the center of the multi selector 3 Select each item with b B and set the numeric value with v V 4 Repeat step 3 to set other items then press the center of the multi selector When changing the sequence of YYYY MM DD first select YYYY MM DD with b B then change it with v V ...

Страница 28: ...until the indicators appear clearly in the viewfinder Turn the dial toward when you are far sighted toward when you are near sighted Training the camera on the light allows you to adjust the diopter easily Insert your fingers under the eyecup and slide it upward to remove the eyecup then adjust the diopter When attaching the FDA M1AM Magnifier sold separately or the FDA A1AM Angle Finder sold sepa...

Страница 29: ...emote Commander clip The other accessories are described in the following pages Rechargeable battery pack page 14 Battery charger Power cord mains lead page 14 Eyecup page 28 USB cable pages 101 136 151 Video cable page 99 CD ROM page 144 Attaching the shoulder strap Attach the both ends of the strap on the camera ...

Страница 30: ...ote Commander sold separately on the shoulder strap to secure it Using the Remote Commander clip 1 Open the Remote Commander clip 2 Clip the strap and the cord of the Remote Commander to the Remote Commander clip 3 Close the Remote Commander clip ...

Страница 31: ...card formatted with this camera The values may vary depending on the shooting conditions The number of recordable images Units Images Image size L 24M Aspect ratio 3 2 CF card Once you insert a memory card into the camera and set the power switch to ON the number of images that can be recorded should you continue to shoot using the current settings is displayed on the LCD monitor The number of ima...

Страница 32: ...ove However if you record an image as a RAW image the number is the same as that of the 3 2 aspect ratio Capacity Quality 1GB 2GB 4GB 8GB 16GB Standard 145 294 582 1169 2369 Fine 97 196 388 779 1579 Extra fine 42 85 168 339 687 cRAW JPEG 27 55 110 221 449 RAW JPEG 20 41 81 164 333 cRAW 38 77 154 309 627 RAW 26 52 103 208 423 ...

Страница 33: ...ally available blower If dust lands on the image sensor it may appear on the photo image Turn the camera to the cleaning mode then clean it using a blower page 34 Do not use a spray blower to clean the inside of the camera Using this may cause a malfunction Do not use a cleaning solution containing organic solvents such as thinner or benzine Clean the camera surface with a soft cloth slightly mois...

Страница 34: ...e to the shutter The cleaning should be completed quickly The use of an AC Adaptor Charger sold separately is recommended Do not use a spray blower because it may scatter vapor inside the camera body Cleaning the image sensor 1 Confirm that the battery is fully charged page 19 2 Press the MENU button then select 3 with b B on the multi selector MENU button 3 Select Cleaning mode with v V on the mu...

Страница 35: ...blower to clean the image sensor surface and the surrounding area Do not touch the image sensor with the tip of the blower Complete the cleaning quickly Hold the camera s face downward to prevent the dust from resettling in the camera When cleaning the image sensor do not put the tip of a blower into the cavity beyond the mount 7 Attach the lens and turn the camera off ...

Страница 36: ...t control dial 46 115 F AF illuminator 60 Self timer lamp 83 G Remote sensor 86 H Lens contacts I Mirror J Preview button 87 K Lens mount L Display panel illumination button 42 M Accessory shoe 63 N WB White Balance button 73 O Eyepiece shutter lever 83 86 148 P Mode dial 47 49 89 Q Flash sync terminal 66 R Lens release button 21 S Focus mode lever 56 60 Do not directly touch these parts Front sid...

Страница 37: ...or viewing Histogram button 91 J For shooting Fn Function button 46 For viewing Image rotation button 92 K Diopter adjustment dial 28 L For shooting AEL AE lock button 69 SLOW SYNC button 65 For viewing Index button 94 M Metering mode lever 67 N Display panel 42 O For shooting AF MF Auto focus manual focus button 62 For viewing Enlarge button 93 P Rear control dial 46 115 Q Access lamp 24 R Multi ...

Страница 38: ...rger sold separately to the camera turn the camera off then plug the connector of the AC Adaptor Charger to the DC IN terminal on the camera H HDMI terminal 101 I VIDEO OUT USB terminal 99 136 J Battery cover 18 K Tripod receptacle Use a tripod with a screw length of less than 5 5 mm 7 32 inch You will be unable to firmly secure the camera to tripods having screws longer than 5 5 mm 7 32 inch and ...

Страница 39: ...ode dial 47 49 1 125 Shutter speed 52 F5 6 Aperture 51 2 0 Exposure 68 AE lock 69 Display Indication Flash mode 63 Exposure compensation 68 Metered Manual 53 Flash compensation 71 EV scale 53 84 ISO AUTO ISO sensitivity 72 Display Indication Drive mode 81 Focus mode 56 AF area 58 Metering 67 D Range Optimizer 77 Creative Style 78 1 1 1 1 1 Contrast Saturation Sharpness Brightness Zone 80 ...

Страница 40: ...dication Display Indication 90 Battery remaining 19 Image quality 105 Image size 104 APS C size 132 Aspect ratio 104 Memory card 24 100 Remaining number of recordable images 31 Press the DISP button to switch between the enlarged display and the detailed display When you rotate the camera to a vertical position the display automatically rotates to adjust to the camera position DISP button Enlarged...

Страница 41: ...Before your operation 41 Note You can display the screen used for adjusting the brightness of the LCD monitor by pressing the DISP button a little longer page 124 ...

Страница 42: ... sensitivity drive mode and exposure compensation by checking the display panel on the top of the camera Shutter speed 52 Aperture 51 Exposure 68 White balance 73 ISO sensitivity 72 Drive mode 81 Display Indication Battery remaining 19 100 Remaining number of recordable images 31 Press the display panel illumination button on the top Pressing again turns off the backlight Display panel illuminatio...

Страница 43: ...atio 16 9 104 APS C size area 132 Display Indication Flash compensation 71 Flash charging 63 WL Wireless flash 64 High speed sync 65 Manual focus 60 z Focus 57 125 Shutter speed 52 5 6 Aperture 51 EV scale 53 84 AE lock 69 9 Shots remaining counter 82 Camera shake warning 44 SteadyShot scale 44 Aspect ratio 16 9 104 Display Indication ...

Страница 44: ...ork optimally when the power has just been turned on just after you aim the camera or when the shutter button has been pressed all the way down without stopping halfway Wait for the SteadyShot scale indicator scale to go down and then press the shutter button down slowly Setting the switch to ON turns on the SteadyShot scale indicator Wait until the camera shake is reduced and the scale becomes lo...

Страница 45: ...as follows When you start an operation an operation guide that indicates a function of the multi selector is displayed at the bottom of the screen To the left right for selection Up down for selection Up down to the left to the right for selection z Press the center button to execute the selection Move the multi selector by following the instructions in the operation guide to select an item Operat...

Страница 46: ...f the multi selector turns on the Exclusive disp screen to set up the selected item For details on how to set up each item see the corresponding page Selecting the functions on the Quick Navi screen 1 Press the Fn button so that the Quick Navi screen appears 2 Following the operation guide select the desired item with v V b B on the multi selector Operation guide 3 Set the item with the front or r...

Страница 47: ... as follows Switch dial buttons The switch the diopter adjustment dial the items set with the DISP button and the C button Recording menu Image size Aspect ratio Quality Exposure step Memory Custom menu Playback menu Setup menu All the items 1 Set the mode dial to 2 Hold the camera and look into the viewfinder Focus indicator 3 Press the shutter button halfway down to focus and press the shutter b...

Страница 48: ...48 The actual setting may not correspond to the positions of the focus mode lever and metering mode lever on the camera Refer to the information displayed on the LCD monitor when you take pictures ...

Страница 49: ...ting the shutter speed manually Shoots a moving subject with various expressions M Manual exposure mode page 53 Allows you to shoot after adjusting the exposure manually both the shutter speed and the aperture value If you adjust the shutter speed or aperture the effect on the picture is changed even if it is the same subject This camera has the following four modes The number positions 1 2 3 are ...

Страница 50: ...a flash sold separately attached to the camera is turned on Program Shift does not operate 1 Press the shutter button halfway down to adjust the focus The shutter speed and aperture value are indicated Shutter speed 2 Rotate the front or rear control dial to select your desired combination while the focus is achieved Rotating the front control dial sets the exposure mode indicator to PS Shutter sp...

Страница 51: ...ide aperture Small aperture 1 Set the mode dial to A 2 Select the aperture value F number with the front or rear control dial You can check the blurring of an image with the preview button page 87 When the camera judges that the proper exposure is not obtained with the selected aperture value the shutter speed flashes In such cases adjust the aperture again The aperture value is adjusted in 1 3 EV...

Страница 52: ...nnot do any further shooting during the reduction Shooting with Shutter speed priority If you shoot a moving subject at a higher shutter speed it appears as if frozen on the image At a lower shutter speed the subject appears as if it flowing Aperture value is automatically adjusted High shutter speed Slow shutter speed 1 Set the mode dial to S 2 Select the shutter speed with the front or rear cont...

Страница 53: ...ate the front control dial to adjust the shutter speed and rotate the rear control dial to adjust the aperture You can switch the functions of the front and rear control dial with Ctrl dial setup in the Custom menu page 115 Shutter speed 3 Shoot the image after the exposure is set Check the exposure value on the EV scale Toward Images become brighter Toward Images become darker The b B arrow appea...

Страница 54: ... while pressing the AEL button to select the shutter speed and aperture value combination AEL button Shooting with BULB You can shoot trails of light such as fireworks with a long exposure 1 Set the mode dial to M 2 Rotate the front control dial to the left until BULB is indicated BULB 3 Rotate the rear control dial to adjust the aperture F number ...

Страница 55: ...the SteadyShot function The longer the exposure time the more outstanding the noise on the image After shooting noise reduction Long exp NR will be done for the same amount of time that the shutter was open You cannot do any further shooting during the reduction 4 Press and hold the shutter button for the duration of the shooting As long as the shutter button is pressed the shutter remains open ...

Страница 56: ... This is useful when shooting a motionless subject A Automatic AF The AF mode is switched between Single shot AF and Continuous AF according to the movement of the subject When you press and hold the shutter button halfway down if the subject is motionless the focus is locked and if the subject is in motion the camera continues to focus In continuous shooting the second and later shots are automat...

Страница 57: ...es overlapping in the AF area A subject that is composed of repeating patterns such as the facade of a building A subject that is very bright or glittering such as the sun the body of an automobile or the surface of water To measure the exact distance to the subject Focus indicator Status z lit Focus locked Ready to shoot lit Focus is confirmed Focal point moves following a moving subject Ready to...

Страница 58: ...elect the desired mode with front or rear control dial Wide The camera determines which of the nine AF areas is used in focusing within the AF area The camera focuses on a subject using 10 supplementary ranging points in addition to the normal nine ranging points to focus with a high degree of accuracy If you press and hold the center of the multi selector AF area is temporarily set to Spot and yo...

Страница 59: ...enter of the multi selector also locks the focus on the spot AF area page 58 You can also use the AF MF button to lock the focus with AF MF button in the Custom menu page 113 Local Choose the area for which you want to activate the focus from among nine areas with the multi selector during the shooting To select the spot AF area press the center of the multi selector Shooting with focus lock 1 Pla...

Страница 60: ... illuminator of the flash is used You can deactivate the AF illuminator with AF illuminator in the Recording menu page 109 You can set the distance of a subject AF illuminator Press the shutter button halfway down a red illuminator is automatically emitted until the focus is locked according to the situation When you shoot a subject under dark conditions or when you shoot a low contrast subject th...

Страница 61: ...de AF Auto focus is automatically selected regardless of the position of the focus mode lever page 47 You can make fine adjustments after adjusting the focus in auto focus Direct manual focus You can assign this function to the A position of the focus mode lever You can quickly focus on a subject rather than using the manual focus from the beginning This is convenient in cases such as macro shooti...

Страница 62: ...th AF MF control in the Custom menu page 113 Switching the AF MF easily Press the AF MF button In auto focus mode The focus mode is switched temporarily to the manual focus Press and hold the AF MF button and adjust the focus by rotating the focusing ring In manual focus mode The focus mode is switched temporarily to the auto focus and the focus is locked AF MF button Focusing ring ...

Страница 63: ...The lens may block the light of the flash and a shadow may appear on the bottom of the image Remove the lens hood 1 Remove the accessory shoe cap and attach the flash sold separately Firmly push the flash into the accessory shoe in the direction of the arrow until it stops 2 Turn the flash on and after the flash charging is completed shoot the subject Flashing The flash is being charged Lit The fl...

Страница 64: ...play screen is used set up from the menu page 102 2 Select the flash item with v V b B on the multi selector 3 Select the desired mode with the front or rear control dial Autoflash Fires if it is dark or against light This is selectable only when the AUTO mode is selected Fill flash Fires every time the shutter is released Rear sync Fires right before the exposure is completed You can capture a fl...

Страница 65: ... In shutter speed priority mode or manual exposure mode slow sync shooting is not available using the SLOW SYNC button Since the flash sync speed restriction is removed when you use one of the HVL F58AM HVL F56AM HVL F42AM or HVL F36AM models the flash allows you to take pictures using the flash with the entire shutter speed range of the camera It also enables you to take pictures with the flash i...

Страница 66: ...speed Use a flash with a flash sync voltage of 400 V or less Before you connect the flash sync cord to the flash sync terminal turn off the power of the connected flash If the power is on it may flash when you connect the cord The flash will always be full emission Flash compensation page 71 cannot be used Using auto white balance is not recommended Use custom white balance to gain more precise wh...

Страница 67: ...t honeycomb pattern metering This metering method enables the camera to measure light in a way most similar to that of the human eye which is ideal for general shooting including shooting into direct sunlight Center weighted While emphasizing the central area of the screen this mode measures the average brightness of the entire screen Spot This mode measures light only in the spot metering circle ...

Страница 68: ...quipped with 39 honeycomb sharped metering elements and one metering element that covers the surrounding area These elements work in sync with auto focus allowing the camera to accurately measure the position and brightness of the subject in order to determine the exposure In multi segment metering if the focus is locked the exposure the shutter speed and the aperture is locked simultaneously only...

Страница 69: ... than the flash page 118 Ambient light Any light other than the flash light that shines on the scene for an extended period of time such as natural light a light bulb or a fluorescent light You can fix the exposure before deciding on the composition when taking a picture This is effective when the metering object and focusing object are different or when you want to shoot continuously while keepin...

Страница 70: ...button is released You can change the function and operation of the AEL button with AEL button in the Custom menu page 115 Hold down the AEL button and place the spot metering circle on the spot where the lighting is contrasted from the subject The metering indicator displays the degree of exposure difference zero being the locked exposure Shifting to the side makes the image brighter and shifting...

Страница 71: ... limited amount of flash light if the subject is at or around the maximum range for the flash If the subject is very close the negative effect may not be visible Exposure compensation and flash compensation Exposure compensation changes the shutter speed aperture and ISO sensitivity when AUTO is selected to perform the compensation If the flash is used the amount of flash light is also changed How...

Страница 72: ...u check the amount of noise on the image The AUTO setting is not provided in exposure mode M If you change the exposure mode to M with the AUTO setting it is switched to 200 Set the ISO according to your shooting conditions You can adjust the range of AUTO with ISO Auto Range in the Recording menu page 108 1 Press the ISO button to display the ISO screen ISO button 2 Select the desired value with ...

Страница 73: ...t source Use the flash in such cases White balance is a feature that adjusts the color tone to approximate what you see When AWB Auto WB is selected the white balance is automatically adjusted However you can use this feature when the color tone of the image did not come out as you expected or when you want to change the color tone on purpose for photographic expression WB button Weather lighting ...

Страница 74: ... white balance page 75 3 Select a preset white balance then finely adjust the color tone with b B on the multi selector if necessary Adjusting it toward turns the image reddish and adjusting it toward turns the image bluish The increment is equivalent to about 10 Mired You can use the rear control dial instead AWB Auto WB Approx 3000 to 7500K The camera automatically detects a light source and adj...

Страница 75: ...selector To set the color temperature select the value with b B To set the color filter select the compensation direction with b B 5500K 1 ColorTemperature Sets the white balance by the color temperature The higher the number the more reddish the image and the lower the number the more bluish the image The color temperature can be selected between 2500K and 9900K 0 2 Color filter Achieves the effe...

Страница 76: ...e shutter button is pressed a custom white balance is registered with the flash light taken into account Take pictures with the flash in later shootings 3 Select SET with b B on the multi selector then press the center of the multi selector 4 Hold the camera so that the white area fully covers the spot metering circle and press the shutter button down The shutter clicks and the calibrated values C...

Страница 77: ...ck Navi screen page 46 2 Select the D Range Optimizer item with v V b B on the multi selector 3 Select the desired mode with the front control dial To adjust Advanced Level use the rear control dial Off No compensation Standard When there is a high contrast of light and shadow between the subject and the background which is common when shooting into the sun the camera attenuates the contrast acros...

Страница 78: ...hese image styles as a base you can produce an image to meet your needs Using the Creative Style 1 Press the Fn button to display the Quick Navi screen page 46 2 Select a Creative Style item with v V b B the multi selector then press the center of the multi selector If you are only selecting a style box you can perform the operation on the Quick Navi screen 3 Select the desired image style with v ...

Страница 79: ...a clear tone with limpid colors in the highlighted area suitable for capturing radiant light Deep For capturing images with deep and dense color expressions suited to capturing the solid presence of the subject Light For capturing images with bright and uncomplicated color expressions suited to capturing refreshingly light ambience Portrait For capturing the skin color in a soft tone ideally suite...

Страница 80: ...nd quiet Sharpness Adjusts the sharpness The higher the value selected the more the highlighting of the contours is accentuated and the lower the value selected the more the highlighting of the contours is softened Brightness Adjusts the brightness of an entire image Zone Preventing an image from becoming overexposed or underexposed a rich tone is reproduced When a higher value is selected it prev...

Страница 81: ...for normal shooting This is also used for canceling other drive modes 1 Press the DRIVE button to display the setup screen DRIVE button 2 Select the desired mode with v V on the multi selector then select the desired setting with b B on the multi selector Single shot adv page 81 Continuous adv page 82 Self timer page 83 Bracket Cont page 83 Bracket Single page 83 WB bracket page 85 DRO adv bracket...

Страница 82: ...uous shots Media used for the measurement Sony CompactFlash Card NCFD2G 300 4GB The number of continuous shooting images obtainable has an upper limit Note When the capacity of the memory card is insufficient the camera may not continuously shoot all the images indicated in the viewfinder Shooting continuously RAW 16 images cRAW 18 images RAW JPEG 12 images cRAW JPEG 12 images Extra fine 34 images...

Страница 83: ...s from the base exposure and the camera shoots while automatically shifting the exposure You can choose an image that has the brightness you like after shooting is finished The base exposure is set at the first shot in the bracket Using the self timer After you press the shutter button the shutter will be released about ten seconds When the self timer is activated audio signals and the self timer ...

Страница 84: ...hooting is performed and the flash light is changed In flash bracket shooting single shot is automatically selected regardless of the single continuous setting Press the shutter button shot by shot The example of the EV scale in bracket shooting In ambient bracket shooting the EV scale appears in the viewfinder too but it does not appear in flash bracket shooting When the bracket shooting starts t...

Страница 85: ...lue beneath is the value currently selected Notes When DRO advanced bracket shooting is selected the D Range Optimizer setting page 77 is temporarily deactivated You cannot verify the effects of D Range Optimizer other than those of Standard if you play back and enlarge an image recorded in RAW format Moving the mirror upward before shooting prevents camera shake when the shutter is released This ...

Страница 86: ...Commander sold separately Also refer to the operating instructions supplied with the Wireless Remote Commander Focus on the subject point the transmitter of the Remote Commander to the remote sensor and shoot the image In BULB shooting the camera starts exposure when you press the SHUTTER or 2 SEC button and when you press the SHUTTER or 2 SEC button again the camera stops exposure Notes When you ...

Страница 87: ...alue displayed in the viewfinder Optical preview You can adjust the aperture during the preview Preview button 2 Release the preview button The image is displayed on the LCD monitor Intelligent preview Maintain the camera position until the image is displayed on the LCD monitor after releasing the button 3 Select an item with b B on the multi selector then adjust the value with the front or rear c...

Страница 88: ...14 Notes The image in the viewfinder will be darker during the Optical preview The auto focus does not function during an Optical preview Focus on the subject beforehand The Intelligent preview feature cannot be used during BULB shooting The Intelligent preview feature cannot be used when the buffer memory of the camera is full ...

Страница 89: ...umber position You can change the settings by following the steps above after you have recalled a saved setting Notes You cannot register the Program Shift and Manual Shift settings The actual setting will not correspond to the positions of the dials and levers on the camera Refer to the information displayed on the LCD monitor when you take pictures 1 Put the camera on the setting you want to reg...

Страница 90: ... Press the button again To switch the recording data display Press the DISP button Each time you press the DISP button the screen changes as follows 1 Press the button button 2 Select an image with b B on the multi selector Displays previous or next images up to five images With recording data With recording data Without recording data ...

Страница 91: ...o the normal playback screen Press the button again How to check the histogram Displaying the histogram Press the button The histogram and recording data of the displayed image are displayed button When the image has a bright or dark area portion that portion is flashed on the histogram display Luminance limit warning Luminance B Blue R Red G Green Flashing ...

Страница 92: ... side the histogram will shift to the other side Both ends of the histogram show a bright or dark area portion It is impossible to restore these area with a computer later Adjust the exposure if necessary and shoot again Rotating an image 1 Display the image you want to rotate then press the button button 2 Press the center of the multi selector The image is rotated counter clockwise When you want...

Страница 93: ...ton Enlarging images 1 Display the image you want to enlarge then press the button The center of the image is enlarged button 2 Scale up or down the image with the rear control dial 3 Select the portion you want to enlarge with v V b B on the multi selector Each time you press the center of the multi selector the screen changes between the enlarged screen and the whole screen You can select an ima...

Страница 94: ...aling range L Approx 1 2 19 M Approx 1 2 14 S Approx 1 2 9 4 Switching to the display of the image list 1 Press the button The screen changes to the index screen button 2 Press the DISP button repeatedly to select the desired screen format The screen changes in the following order 9 images t 25 images t 4 images DISP button 1Select the folder bar with b B on the multi selector then press the cente...

Страница 95: ...y card 23 100 0003 Folder file number 141 Protect 121 DPOF3 DPOF set 121 Image quality 105 Image size 104 APS C size 132 Aspect ratio 104 Battery remaining warning 19 1 125 Shutter speed 52 F3 5 Aperture 51 ISO100 ISO sensitivity 72 2008 1 1 10 37AM Date of recording 3 7 File number total number of images Display Indication ...

Страница 96: ...ay Indication Histogram 91 P A S M Exposure mode 47 49 1 125 Shutter speed 52 F3 5 Aperture 51 ISO100 ISO sensitivity 72 0 3 Exposure compensation 68 0 3 Flash compensation 71 Metering mode 67 35mm Focal length Creative Style 78 AWB 5500K M1 White balance Auto Preset Color temperature Color filter Custom 73 D Range Optimizer 77 2008 1 1 10 37AM Date of recording 3 7 File number total number of ima...

Страница 97: ...e that is currently displayed 1 Display the image you want to delete and press the button button 2 Select Delete with v on the multi selector then press the center of the multi selector Deleting all the images in the folder 1 Press the button 2 Select the folder bar with b on the multi selector Folder bar 3 Press the center of the multi selector then select the folder you want to delete with v V 4...

Страница 98: ...98 5 Select Delete with v on the multi selector then press the center of the multi selector ...

Страница 99: ...the input See also the operating instructions supplied with the TV 3 Turn on the camera and press the button Images shot with the camera appear on the TV screen Select the desired image with b B on the multi selector The LCD monitor on the rear of the camera does not turned on 1 To video input jack Video cable 2 To the VIDEO OUT terminal Multi selector button ...

Страница 100: ...k and the video cable The color system of the TV must match that of your digital still camera Check the following lists for the TV color system of the country or region where the camera is used NTSC system Bahama Islands Bolivia Canada Central America Chile Colombia Ecuador Jamaica Japan Korea Mexico Peru Surinam Taiwan the Philippines the U S A Venezuela etc PAL system Australia Austria Belgium C...

Страница 101: ... the operating instructions of Sony s VIDEO A compatible TV for more details Some devices may not work properly Do not connect the output connector of the device with the HDMI terminal on the camera This may cause a malfunction On PhotoTV HD This camera is compatible with the PhotoTV HD standard By connecting Sony s PhotoTV HD compatible devices using an HDMI cable whole new world of photos can be...

Страница 102: ...angeOptimizer Custom button Creative Style Color Space 2 Flash mode Flash control Flash compens Exposure step ISO Auto Range 3 AF A setup AF area Priority setup AF illuminator AF w shutter Long exp NR High ISO NR 4 Memory Rec mode reset Custom menu pages 113 to 119 1 AF MF button AF MF control AF drive speed AF area disp FocusHoldButton Auto review Preview Function 2 AEL button Ctrl dial setup Dia...

Страница 103: ...terval Setup menu pages 124 to 134 1 LCD brightness Info disp time Power save Video output HDMI output Language Date Time setup 2 Memory card File number Folder name Select folder New folder USB connection MassStrg card 3 Menu start Delete confirm Audio signals Cleaning mode AF Micro Adj amount Focusing Screen 4 APS C size capt Reset default ...

Страница 104: ...L This size is not displayed on the LCD monitor When attaching a DT lens APS C size capt is automatically selected Image size L 24M 6048 4032 pixels M 13M 4400 2936 pixels S 6 1M 3024 2016 pixels L 21M 6048 3408 pixels M 11M 4400 2472 pixels S 5 2M 3024 1704 pixels L 11M 3984 2656 pixels M 5 6M 2896 1928 pixels S 2 6M 1984 1320 pixels Aspect ratio 3 2 A normal ratio 16 9 An HDTV ratio ...

Страница 105: ...a PictBridge compliant printer You cannot verify the effects of D Range Optimizer other than those of Standard if you play back and enlarge an image recorded in RAW format For details see page 77 Quality RAW File format RAW raw data This format is not achieved by digital processing Select this format to process images on a computer for professional purposes The image size is fixed to the maximum s...

Страница 106: ...nters that do not support them may result in or print images that do not reproduce faithful color When displaying images that were recorded with Adobe RGB on the camera or non Adobe RGB compliant devices the images are displayed with low saturation Custom button You can assign a function of your choosing to the C button In the default setting Creative Style is assigned to the C button C button Cre...

Страница 107: ...ash compensations with ADI flash A wide panel is attached to the HVL F36AM flash A diffuser is used for flash shooting A filter with an exposure factor such as an ND filter is used A close up lens is used ADI flash is only available in combination with a lens that is provided with a distance encoder To determine if the lens is equipped with a distance encoder refer to the operating instructions su...

Страница 108: ...re and exposure Flash compens Exposure step 0 5 EV Changes in 1 2 EV steps 0 3 EV Changes in 1 3 EV steps ISO Auto Range 400 1600 Sets the range to 400 1600 400 800 Sets the range to 400 800 200 1600 Sets the range to 200 1600 200 800 Sets the range to 200 800 200 400 Sets the range to 200 400 ...

Страница 109: ...ails on AF illuminator see page 60 Note When AF illuminator is set to Off the AF illuminator of the flash sold separately does not function AF A setup AF area Priority setup AF The shutter cannot be released when the focus is not confirmed Release The shutter can be released even when the focus is not confirmed Select this setting if the shooting opportunity takes precedence AF illuminator Auto Au...

Страница 110: ... shutter On Adjusts the focus by pressing the shutter button halfway down Off Does not adjust the focus by pressing the shutter button halfway down You can adjust the focus by pressing the center of the multi selector This is convenient when shooting continuously at the same focus position Long exp NR On When the shutter speed is one second or slower the noise reduction process is performed for th...

Страница 111: ... adv White balance 73 AWB ColorTemperature Color filter 74 5500K Color filter 0 Custom white balance 75 5500K ISO 72 AUTO Image size 104 L 24M Aspect ratio 104 3 2 Quality 105 Fine D RangeOptimizer 77 Off Custom button 106 Creative Style Creative Style 78 Standard Color Space 106 sRGB Flash mode 64 Fill flash Flash control 107 ADI flash Flash compens 71 0 0 Exposure step 108 0 3 EV ISO Auto Range ...

Страница 112: ...112 AF w shutter 110 On Long exp NR 110 On High ISO NR 110 Normal Items Reset to default setting ...

Страница 113: ...n as the AF lock button Press the shutter button to take pictures while holding the AF MF button down AF MF control Hold AF and MF are switched only while the button is held down Toggle Press and release the button to switch between AF and MF The setting is maintained until you press the button again AF drive speed Fast Confirms the focus quickly Slow Confirms the focus slowly Has a higher probabi...

Страница 114: ... page 122 You can select the preview function For details on preview function see page 87 FocusHoldButton Focus hold Uses the button as the focus hold button Optical Preview Uses the button as the optical preview button IntelligentPrev Uses the button as the intelligent preview button Auto review 10 sec Displays the image on the LCD monitor for the amount of time you selected 5 sec 2 sec Off Deact...

Страница 115: ...ding the value while the AEL button is pressed AEL hold or holding the value until the AEL button is pressed again AEL toggle This is useful when you want to keep regular exposures on multiple images AEL toggle AEL hold The camera temporarily performs spot metering and locks the measured exposure value Select from the following two options Holding the value while the AEL button is pressed AEL hold...

Страница 116: ...the exposure with the rear control dial Exposure Mode Off Front dial Rear dial P Front control dial PS shift Exp comp PS shift Rear control dial PA shift PA shift Exp comp A Front control dial Aperture Exp comp Aperture Rear control dial Aperture Aperture Exp comp S Front control dial Shutter speed Exp comp Shutter speed Rear control dial Shutter speed Shutter speed Exp comp M Front control dial S...

Страница 117: ...r from releasing when no memory card is inserted in the camera You can set the recording information display to rotate when the camera is in a vertical position Button ops Exclusive disp Displays an exclusive screen for each mode Quick Navi Displays the Quick Navi screen of the mode selected at the time Release w oCard Enable The shutter can be released when no memory card is inserted in the camer...

Страница 118: ...not reach and the flash light range Values that change shutter speed aperture ISO only in AUTO mode amount of flash light Values that do not change none Ambient only By fixing the amount of flash light you can limit the effect of exposure compensation to the background that is illuminated only by ambient light light other than the flash Values that change shutter speed aperture ISO only in AUTO mo...

Страница 119: ...ol 113 Hold AF drive speed 113 Fast AF area disp 113 0 3 sec FocusHoldButton 114 Focus hold Auto review 114 2 sec Preview Function 87 Intelligent AEL button 115 AEL hold Ctrl dial setup 115 SS F no Dial exp comp 116 Off Ctrl dial lock 116 Off Button ops 117 Exclusive disp Release w oCard 117 Enable Rec info disp 117 Auto rotate Exp comp set 118 Ambient flash Bracket order 118 0 t t ...

Страница 120: ...the memory card may not be usable with the camera depending on the format type used Formatting may take several minutes depending on the memory card You cannot format Memory Stick Duo media that are inserted into the CF card insertion slot using an adaptor Delete Marked images Deletes the selected images 1Select the images you want to delete with b B on the multi selector then press the center of ...

Страница 121: ... multi selector All images Protects all the images or cancels the protection of all the images in the memory card After a message appears select OK with v on the multi selector then press the center of the multi selector Cancel all DPOF setup Marked images Specifies unspecifies DPOF on the selected images 1Select the image you want to specify DPOF with b B on the multi selector then select the num...

Страница 122: ... you shoot after setting the index print are not included in the index print It is recommended that you create the index print just before printing it When you play back an image recorded in the portrait position the camera detects the orientation of the image and automatically displays it in the correct position Date imprint On Imposes the date Off Does not impose the date Index print Create inde...

Страница 123: ...evious next image with b B on the multi selector To pause the slide show Press the center of the multi selector Pressing again starts the slide show again To end in the middle of the slide show Press the MENU button Slide show Interval 30 sec The image switches at the selected interval time 10 sec 5 sec 3 sec 1 sec ...

Страница 124: ... LCD monitor while you are looking into the viewfinder You can set the time to turn the camera to the power saving mode Power save Pressing the shutter button halfway down returns the camera to the shooting mode Note Regardless of the setting here the camera turns to power save mode after 30 minutes when the camera is connected to a TV or the drive mode is set to Remote Commander LCD brightness In...

Страница 125: ...ined automatically When displaying images recorded with a camera other signals may make the image clearer depending on the subject You can make the following changes Select the language to be used to display the menu items warning and messages Sets the date and time again For details see page 27 Video output NTSC Sets the video output signal to NTSC mode e g for the USA Japan PAL Sets the video ou...

Страница 126: ...ra does not reset numbers and assigns numbers to files in sequence until the number reaches 9999 Reset The camera resets numbers in the following cases and assigns numbers to files from 0001 When the recording folder contains a file a number one higher than the largest number is assigned When the folder format is changed When all the images in the folder are deleted When the memory card is replace...

Страница 127: ...nd the folder becomes the current recording folder Selects the USB mode to be used when connecting the camera to a computer etc using a USB cable Select folder New folder USB connection Mass Storage Used for copying images to the computer The camera is recognized as a USB mass storage device PTP Prints the images with a PictBridge compliant printer or copies images to PTP Picture Transfer Protocol...

Страница 128: ...storage connections you can select the displayed method on a PC MassStrg card Both cards Displays both the Memory Stick Duo media and CF card Microdrive This is supported by a PC running Windows 2000 SP3 or a later version of OS Selected card Displays only the card selected with Memory card ...

Страница 129: ...ects the sound produced when the focus is confirmed during self timer countdown etc For details see page 34 Menu start Top Displays the 1 or 1 menu screen first Previous Displays the previously selected menu screen first Delete confirm Delete first Delete is selected by default Cancel first Cancel is selected by default Audio signals On Turns on the sound Off Turns off the sound Cleaning mode ...

Страница 130: ... unregistered lens 0 is displayed If is displayed as the value then a total of 30 lenses have been registered When you want to register a new lens attach a lens for which you can delete its registered value and set that value to 0 or reset the values of all the lenses with Clear If you perform AF fine adjustment with a lens of other manufacturers the adjustment values of Sony Minolta and Konica Mi...

Страница 131: ...sure the light properly For details on how to change the focusing screen refer to the operating instructions supplied with the focusing screen Focusing Screen Type G Standard focusing screens the default one Type M Focusing screens that make it easier to check the peak of the focus and approximate sharpness This is suitable for a brighter lens F1 4 to 2 8 Type L Focusing screens that are equipped ...

Страница 132: ...set default Items Reset to default setting Recording information display 39 Detailed display Exposure compensation 68 0 0 Drive mode 81 Single shot adv White balance 73 AWB Auto white balance ColorTemperature Color filter 74 5500K Color filter 0 Custom white balance 75 5500K ISO 72 AUTO Playback display 90 Single image screen with recording data Items Reset to default setting Image size 104 L 24M ...

Страница 133: ...set to default setting AF MF button 113 AF MF control AF MF control 113 Hold AF drive speed 113 Fast AF area disp 113 0 3 sec FocusHoldButton 114 Focus hold Auto review 114 2 sec Preview Function 87 Intelligent AEL button 115 AEL hold Ctrl dial setup 115 SS F no Dial exp comp 116 Off Ctrl dial lock 116 Off Button ops 117 Exclusive disp Release w oCard 117 Enable Rec info disp 117 Auto rotate Exp c...

Страница 134: ...ms Reset to default setting LCD brightness 124 0 Info disp time 124 5 sec Power save 124 3 min HDMI output 125 HD 1080i prior File number 126 Series Folder name 126 Standard form USB connection 127 Mass Storage MassStrg card 128 Selected card Menu start 129 Top Delete confirm 129 Cancel first Audio signals 129 On AF Micro Adj 130 Off APS C size capt 132 Off ...

Страница 135: ... Macintosh OS pre installed Mac OS X v10 1 3 v10 5 USB jack Provided as standard Notes on connecting your camera to a computer Operations are not guaranteed for all the recommended computer environments mentioned above If you connect two or more USB devices to a single computer at the same time some devices including your camera may not operate depending on the types of USB devices you are using O...

Страница 136: ...AC Adaptor charger sold separately When you copy images to your computer using insufficient battery pack copying may fail or image data may become corrupted if the battery pack shuts down too soon 3 Turn on the camera and the computer 4 Check that USB connection in 2 is set to Mass Storage page 127 5 Connect the camera and your computer The AutoPlay wizard appears on the desktop 1 To the USB termi...

Страница 137: ... to view files t OK as the wizard screen appears automatically on the desktop When the wizard screen does not appear click Computer For Windows XP My Computer t Removable Disk 2 Double click DCIM In that case you can also import images using PMB 3 Double click the folder where the image files you want to copy are stored Then right click an image file to display the menu and click Copy On the stora...

Страница 138: ...ite an existing image with a new one the original file data is deleted To copy an image file to the computer without overwriting change the file name to a different name and then copy the image file However note that if you change the file name you may not be able to play back that image with your camera page 141 1 Double click the newly recognized icon t DCIM t the folder where the images you wan...

Страница 139: ...rd disk icon t the desired image file to open the image file Perform the procedures listed below beforehand when Disconnecting the USB cable Removing the memory card Turning off the camera For Windows 1 Click Start t Documents If you are using Windows 2000 double click My Documents on the desktop 2 Double click the desired image file The image is displayed For Macintosh Deleting the USB connection...

Страница 140: ...k USB Mass Storage Device t Stop Confirm the device on the confirmation window then click OK The device is disconnected x For Macintosh Drag and drop the drive icon or the icon of the memory card to the Trash icon The camera is disconnected from the computer ...

Страница 141: ...s show the folder number BYou can create a folder by date form page 126 You cannot record play back any images in the MISC folder Image files are named as follows ssss file number stands for any number within the range from 0001 to 9999 The numerical portions of the name of a RAW data file and its corresponding JPEG image file are the same JPEG files DSC0ssss JPG JPEG files Adobe RGB _DSCssss JPG ...

Страница 142: ...ick Rename Change the file name to DSC0ssss Enter a number from 0001 to 9999 for ssss If the overwrite confirmation message appears enter a different number An extension may be displayed depending on the computer settings The extension for images is JPG Do not change the extension 2 Copy the image file to the memory card folder in the following order 1 Right click the image file then click Copy 2 ...

Страница 143: ... pre installed Microsoft Windows XP 1 SP3 Windows Vista 2 SP1 1 64 bit editions and Starter Edition are not supported 2 Starter Edition is not supported CPU Memory Pentium 4 or faster is recommended RAM 1 GB or more is recommended Display 1024 768 dots or more Recommended environment for using PMB OS pre installed Microsoft Windows XP 1 SP3 Windows Vista 2 SP1 1 64 bit editions and Starter Edition...

Страница 144: ... as Administrator Installing the software 1 Turn on your computer and insert the CD ROM supplied into the CD ROM drive The installation menu screen appears If it does not appear double click Computer For Windows XP My Computer t SONYPICTUTIL t Install exe Under Windows Vista the AutoPlay screen may appear Select Run Install exe and follow the instructions that appear on the screen to proceed with ...

Страница 145: ...installed and shortcut icons appear on the desktop Sony Image Data Suite Image Data Converter SR Image Data Lightbox SR Sony Picture Utility PMB PMB Guide 1 Turn on your Macintosh computer and insert the CD ROM supplied into the CD ROM drive 2 Double click the CD ROM icon 3 Copy the IDS_INST pkg file in the MAC folder to the hard disk icon 4 Double click the IDS_INST pkg file in the copy to folder...

Страница 146: ...onverter SR x Windows Double click the shortcut of Image Data Converter SR Ver 3 on the desktop When starting up from the Start menu click Start t All Programs t Sony Image Data Suite t Image Data Converter SR Ver 3 To exit click the button on the upper right corner of the screen x Macintosh Double click Image Data Converter SR Ver 3 in the Sony Image Data Suite folder from the Application folder ...

Страница 147: ...ars x Macintosh Double click Image Data Lightbox SR in the Sony Image Data Suite folder from the Application folder To exit click Quit Image Data Lightbox SR from the Image Data Lightbox SR menu Connect the camera to your computer With Remote Camera Control you can Set up the camera or record an image from the computer Record an image directly to the computer Perform an Interval Timer Shooting Onl...

Страница 148: ...o Release To start up exit Remote Camera Control x Windows Click Start t All Programs t Sony Image Data Suite t Remote Camera Control To exit click the button on the upper right corner of the screen x Macintosh Double click Remote Camera Control in the Sony Image Data Suite folder from the Application folder To exit click Quit Remote Camera Control from the Remote Camera Control menu 2 Connect the...

Страница 149: ... desktop Or from the Start menu Click Start t All Programs t Sony Picture Utility t PMB To exit the PMB click button on the upper right corner of the screen Note The confirmation message of the Information tool appears on the screen when starting PMB for the first time Select Start This function informs you of news such as software updates You can change the setting later Using PMB With PMB you ca...

Страница 150: ...ting Even if you do not have a computer you can print images shot using your camera by connecting the camera directly to a PictBridge compliant printer PictBridge is based on the CIPA standard CIPA Camera Imaging Products Association Stage 1 Setting the camera 1 Press the MENU button and set USB connection to PTP in the Setup menu 2 with v V b B on the multi selector 2 Turn the camera off and inse...

Страница 151: ...or then press the center of the multi selector To cancel press the center again 2 Repeat step 1 if you want to print other images 3 Press the MENU button and set up each item For details on setting items see PictBridge menu 4 Select Print t OK in the menu then press the center of the multi selector The image is printed After the screen indicating that the print is completed appears press the cente...

Страница 152: ... images For details see Stage 3 Printing Set print q ty You can specify the number of prints up to 20 The same number of prints is specified on all the selected images Paper size PictBridge menu Auto Printer setup 9 13cm 3 5 5 89 127 mm Hagaki 100 147 mm 10 15cm 10 15 cm 4 6 101 6 152 4 mm A6 4 1 5 8 105 148 5 mm 13 18cm 5 7 127 178 mm Letter 216 279 4 mm A4 8 3 11 7 210 297 mm A3 11 7 16 5 297 42...

Страница 153: ...ints all the images in a memory card After the message appears select OK then press the center of the multi selector Auto Printer setup 1 up Borderless Borderless 1 image sheet 1 up 1 image sheet 2 up 2 images sheet 3 up 3 images sheet 4 up 4 images sheet 8 up 8 images sheet Index Prints all the selected images as an index print Printing layout follows the printer setup Day and time Attaches the d...

Страница 154: ...onditions and lens used Anti Dust System Charge protection coating on Low Pass Filter and image sensor Shift mechanism Viewfinder Type Fixed eye level system with pentaprism Focusing Screen Spherical Acute Matte exchangeable option Frame coverage Approx 0 98 Magnification 0 74 with 50 mm lens at infinity 1 m 1 Eye point Approximately 20 mm from the eyepiece Diopter Adjustment 3 0 to 1 0 m 1 Auto F...

Страница 155: ...ompatible Dimensions Approx 156 3 116 9 81 9 mm 6 1 4 4 5 8 3 1 4 inches W H D excluding protrusions Mass Approx 850 g 1 lb 14 oz without batteries memory card and body accessories Operating temperature 0 to 40 C 32 to 104 F When using the Microdrive 5 to 40 C 41 to 104 F Exif Exif Ver 2 21 USB communication Hi Speed USB USB 2 0 compliant BC VM10 Battery charger Input rating 100 V 240 V AC 50 60 H...

Страница 156: ... a trademark of Sony Corporation Microsoft Windows and Windows Vista are either registered trademarks or trademarks of Microsoft Corporation in the United States and or other countries HDMI the HDMI logo and High Definition Multimedia Interface are trademarks or registered trademarks of HDMI Licensing LLC Macintosh Mac OS iMac iBook PowerBook Power Mac and eMac are trademarks or registered tradema...

Страница 157: ... discharge and then charge the battery pack to correct the display The battery pack is discharged Install a charged battery pack page 18 The battery pack is dead page 20 Replace it with new one The power turns off suddenly If you do not operate the camera for given period of time the camera turns to power saving mode and nearly shuts down To cancel the power save operate the camera such as pressin...

Страница 158: ...l do one of the following Delete unnecessary images page 97 Change the memory card The shutter cannot be released when the subject is out of focus page 109 When an astronomical telescope etc is attached to the camera set the exposure mode to M and do your shooting Recording takes a long time The noise reduction function is turned on page 110 This is not a malfunction You are shooting in RAW mode p...

Страница 159: ...main on the LCD monitor This is not a malfunction These dots are not recorded page 9 The EV scale b B is flashing in the viewfinder The subject is too bright or too dark for the metering range of the camera Your camera cannot play back images The folder file name has been changed on your computer page 141 When an image file has been processed by a computer or when the image file was recorded using...

Страница 160: ...eled Do not open the memory card cover during copying When you shoot images with a memory card formatted by a computer you may not be able to copy the images to a computer Shoot using a memory card formatted by your camera page 120 Cannot insert a memory card Insertion direction of the memory card is wrong Insert it in the correct direction page 23 Cannot record on a memory card The memory card is...

Страница 161: ...nt images with the date Using PMB you can print images with date page 149 This camera does not have a feature for superimposing dates on images However because the images shot with the camera include information on the recording date you can print images with the date superimposed if the printer or the software can recognize Exif information For compatibility with Exif information consult the manu...

Страница 162: ...ery time the battery pack is charged consult your Sony dealer or local authorized Sony service facility The number of recordable images does not decrease or decreases two at a time This is because the compression rate and the image size after compression change depending on the image when you shoot a JPEG image page 105 The setting is reset without the resetting operation The battery pack was remo...

Страница 163: ...hoot but the SteadyShot function will not work Turn the camera off and on If the SteadyShot scale continues to flash consult your Sony dealer or local authorized Sony service facility E is indicated on the lower right corner of the LCD monitor Remove the memory card and insert it again If this procedure does not turn off the indication format the memory card ...

Страница 164: ... was formatted on a computer and the file format was modified or the memory card was formatted on another device Select OK then format the memory card You can use the memory card again however all previous data in the memory card is erased It may take a some time to complete the format If the message still appears change the memory card Card error An incompatible memory card is inserted or the for...

Страница 165: ...e or something similar set the exposure mode to M Unable to print You tried to mark RAW images with a DPOF mark Check the connected device A connection cannot be established Disconnect the USB cable and connect it again Camera overheating Allow it to cool The camera has become hot because you have been shooting continuously Turn the power off Cool the camera and wait until the camera is ready to s...

Страница 166: ...ate any folders if this is the case Printing canceled The print job was canceled Disconnect the USB cable or turn the camera off Unable to mark You attempted to mark RAW images on the PictBridge screen Printer error Check the printer Check if the image you want to print is corrupted Printer busy Check the printer ...

Страница 167: ...ting in extremely cold or hot places that exceed this range is not recommended On moisture condensation If the camera is brought directly from a cold to a warm location moisture may condense inside or outside the camera This moisture condensation may cause a malfunction of the camera How to prevent moisture condensation When bringing the camera from a cold place to a warm place seal the camera in ...

Страница 168: ... dirty With water sand dust salt etc left on the camera the camera may cause a malfunction Do not look at the sun or a strong light through a removed lens or the viewfinder This may cause irrecoverable damage to your eyes Or it may cause a malfunction of your camera Do not use the camera near a location that generates strong radio waves or emits radiation The camera may not be able to record or pl...

Страница 169: ...right area portion 91 BULB shooting 54 C C button 106 Center weighted 67 CF card 23 Charging battery pack 14 Cleaning mode 34 Color filter 74 Color Space 106 Color temperature 74 Compression ratio 105 Continuous AF 56 Continuous bracket 83 Continuous shooting 81 82 Contrast 78 Creative Style 78 Custom button 106 Custom white balance 75 D Dark area portion 91 Date imprint 122 Date Time setup 27 Del...

Страница 170: ...gh Speed Sync 65 Histogram 91 96 I Image Data Converter SR 146 Image Data Lightbox SR 146 Image quality 105 Image size 104 Index print 122 Index screen 94 Info disp time 124 Intelligent preview 87 ISO Auto Range 108 ISO sensitivity 72 J JPEG 105 L LCD brightness 124 LCD monitor 39 95 Lens 21 Long exp NR 110 M Manual exposure 53 Manual focus 60 Manual shift 54 Memory 89 Memory Stick Duo 23 MENU but...

Страница 171: ... mode reset 111 Rec info disp 117 Remote Camera Control 147 Remote Commander 81 86 Reset 111 119 132 Reset default 132 Rotate 92 S Saturation 78 Select folder 127 Self timer 83 Set the clock 27 Sharpness 78 Shooting 47 Shoulder strap 29 Shutter speed 49 52 Single bracket 83 Single shot AF 56 Slide show 123 Slow sync 65 Specifications 154 Spot 67 sRGB 106 SteadyShot function 44 U USB connection 127...

Отзывы: