background image

112

GB

* These items are not displayed when playing a DATA CD/DATA DVD with DivX video file.

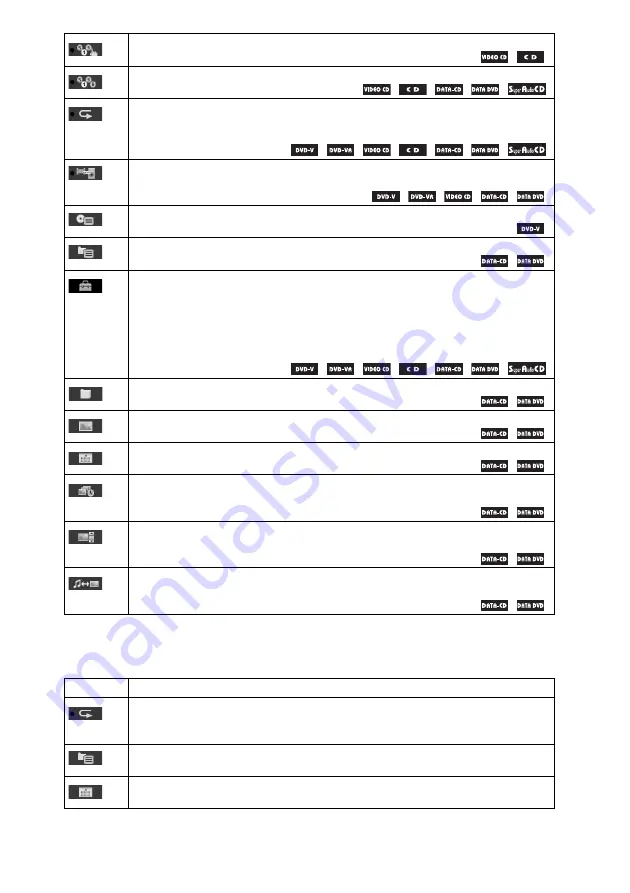
List of Control Menu Items for USB device

[PROGRAM] (page 38)

You can select the track to play in the order you want. 


[SHUFFLE] (page 39)

You can play the track/file in random order. 


[REPEAT] (page 40)

You can play the entire disc (all titles/all tracks/all folders/all files) repeatedly or one title/
chapter/track/folder/file repeatedly.


[A/V SYNC] (page 48)

You can adjust the delay between the picture and sound.


[DISC MENU] (page 41)

You can display the DVD’s menu.

[BROWSING] (page 44)

You can display the list of folders/JPEG image files.


[SETUP] (page 50)

[QUICK] (page 25)

You can make the basic adjustments. Use Quick Setup to select the desired language of the 
on-screen display, the aspect ratio of the TV, and select yes or no to start the Auto Calibration.

[CUSTOM]
In addition to the Quick Setup setting, you can adjust various other settings.


[FOLDER] (page 41)

You can select the folder to be played.


[FILE] (page 41)

You can select the JPEG image file or DivX video file to be played.


*

[DATE] (page 87)

You can display the date the picture was taken by a digital camera.


*

[INTERVAL] (page 45)

You can select the duration for which the slides are displayed on the TV screen.


*

[EFFECT] (page 45)

You can select the effects to be used for changing slides during a slide show.


*

[MODE (MUSIC, IMAGE)] (page 44)

You can select the data type; MP3 file, JPEG image file, or both to be played when playing a 
DATA CD/DATA DVD.


Item

Item Name, Function, Relevant Disc Type

[REPEAT] (page 69)

You can play the entire USB device (all folders/all files) repeatedly or one folder/file 
repeatedly.

[BROWSING] (page 68)

You can display the list of folders/JPEG image files.

[DATE] (page 70)

You can display the date the picture was taken by a digital camera.

Содержание 3-283-040-11(1)

Страница 1: ... 2008 Sony Corporation 3 283 040 11 1 DVD Home Theatre System Operating Instructions DAV DZ560 ...

Страница 2: ...therwise be caused by inappropriate waste handling of this product The recycling of materials will help to conserve natural resources For more detailed information about recycling of this product please contact your local Civic Office your household waste disposal service or the shop where you purchased the product Disposal of waste batteries applicable in the European Union and other European cou...

Страница 3: ...ng on the area DVD may be used as a general term for a DVD VIDEO DVD RW DVD R and DVD RW DVD R Measurements are expressed in feet ft for North American models The default setting is underlined About the S AIR function The system is compatible with the S AIR function which allows transmission of sound between S AIR products wirelessly The following S AIR products can be used with the system Surroun...

Страница 4: ...ations 58 Listening to the Radio 59 Using the Radio Data System RDS 61 Control for HDMI External Audio Device Using the Control for HDMI Function for BRAVIA Sync 62 Playing Back Audio Files JPEG Image Files of a USB Device 65 Storing Songs in a USB Device 71 Using the DIGITAL MEDIA PORT Adapter 74 Using an S AIR Product 75 Other Operations Getting Optimal Surround Sound for a Room 81 Calibrating t...

Страница 5: ...ing mode except for DVD R DL Super Audio CD Super Audio CD VIDEO CD VIDEO CD Ver 1 1 and 2 0 discs Super VCD CD R CD RW CD ROM in video CD format or Super VCD format CD Audio CD CD R CD RW in audio CD format DATA CD CD R CD RW CD ROM in DATA CD format containing MP3 files1 JPEG image files2 and DivX video files3 4 and conforming to ISO 96605 Level 1 Level 2 or Joliet extended format DATA DVD DVD R...

Страница 6: ...RW DVD R DVD RW DVD R DVD RW cannot be played on this system due to the recording quality or physical condition of the disc or the characteristics of the recording device and authoring software The disc will not play if it has not been correctly finalized For more information refer to the operating instructions for the recording device Note that some playback functions may not work with some DVD R...

Страница 7: ...ents the software producers designed some playback features may not be available Be sure to read the operating instructions supplied with the DVD or VIDEO CD This product incorporates copyright protection technology that is protected by U S patents and other intellectual property rights Use of this copyright protection technology must be authorized by Macrovision and is intended for home and other...

Страница 8: ...antenna aerial 1 FM wire antenna aerial 1 Speaker cords 6 red white green gray blue purple Remote commander remote 1 R6 size AA batteries 2 Calibration mic 1 Foot pads 1 set Posts 2 Bases 2 Mounting plates 2 Post covers 2 Screws large with washer 4 Screws small 6 Operating Instructions Speaker and TV connections card or ...

Страница 9: ... not drop any foreign object into the remote casing particularly when replacing the batteries Do not expose the remote sensor to direct sunlight or lighting apparatus Doing so may cause a malfunction If you do not intend to use the remote for an extended period of time remove the batteries to avoid possible damage from battery leakage and corrosion Attaching the foot pads to the subwoofer Attach t...

Страница 10: ...oor to avoid damaging the floor when you assemble the speakers Tip You can use the speaker without the speaker stand by installing it on the wall page 15 1 Thread the speaker cord through the hole in the base and post The connector and color tube of the speaker cords are the same color as the label of the jacks to be connected Use the speaker cords as follows Front speaker L White Front speaker R ...

Страница 11: ...slide the post to the end of the slot then secure the post with the mounting plate and screws Select the speaker whose jack color on its rear panel matches the color tube of the speaker cord Upper part of the post Thread the speaker cord through the hole of the post cover Screw small Speaker cord Post cover Hole Be careful the orientation of the post cover when placing the post Rear of the speaker...

Страница 12: ...t the color tube to 5 Attach the post to the base Insert the post so that the slit on the lower part of the post aligns with the projection of the base then secure the post with the two screws Note Make sure that the slot on the post aligns with the projection of the base by rotating the post slightly Rear of the speaker Color tube Front speaker L White Front speaker R Red Base Post Slit Screws sm...

Страница 13: ...djust another speaker by checking lines as a guide Note When adjusting the height of the speaker grasp the speaker so that the speaker does not fall 7 Take up any speaker cord slack Take up slack in the speaker cord by pulling from the bottom of the base Lines Loosen two screws Post Secure two screws Adjust the length of the cord Secure the speaker cord by running it through the slot ...

Страница 14: ...14GB Getting Started Fully assembled illustration White Red Front speaker L White label Front speaker R Red label ...

Страница 15: ...ty or dirty Very humid Subject to vibrations Subject to direct sunlight Use caution when placing the speakers and or speaker stands attached to the speakers on a specially treated waxed oiled polished etc floor as staining or discoloration may result Do not use any type of abrasive pad scouring powder or solvent such as alcohol or benzine Do not lean or hang on the speaker as the speaker may fall ...

Страница 16: ...at are suitable for the hole on the back of each speaker See the illustrations below 2 Fasten the screws to the wall Color tube Front speaker L White Front speaker R Red Center speaker Green Surround speaker L Blue Surround speaker R Gray 30 mm 1 3 16 inches 4 mm 5 32 inch Hole on the back of the speaker 5 mm 7 32 inch 10 mm 13 32 inch 8 to 10 mm 11 32 to 13 32 inch 145 mm 5 3 4 inches For the cen...

Страница 17: ...hem to the wall Install the speakers on a vertical and flat wall where reinforcement is applied Contact a screw shop or installer regarding the wall material or screws to be used Sony is not responsible for accident or damage caused by improper installation insufficient wall strength or improper screw installation natural calamity etc 5 mm 7 32 inch 10 mm 13 32 inch Hole on the back of the speaker...

Страница 18: ...hum and noise When you connect another component with a volume control turn up the volume of the other components to a level where sound is not distorted 4 AM loop antenna aerial 1 Subwoofer 5 AC power cord mains lead 4 FM wire antenna aerial 2 TV 1 Front speaker L 1 Center speaker 1 Front speaker R 1 Surround speaker L 1 Surround speaker R Signal flow 3 DIGITAL MEDIA PORT adapter 3 Portable audio...

Страница 19: ...r terminals When connecting to the unit insert the connector until it clicks 1 Connecting the Speakers Color tube Connector Rear of speaker CENTER SUBWOOFER DIGITAL IN COAXIAL OPTICAL FRONT R FRONT L SUR R SUR L SPEAKER TV HDMI OUT SPEAKER EURO AV OUTPUT TO TV COAXIAL 75 AM FM ANTENNA DMPORT DC5V 0 7A MAX EZW T100 SPEAKER FRONT L SUR R SUR L FRONT R SPEAKER SUBWOOFER CENTER Rear panel To the cente...

Страница 20: ...pt both digital and analog signals Digital signals have priority over analog signals COAXIAL has priority over OPTICAL If the digital signal ceases the analog signal will be processed after 2 seconds 2 Connecting the TV CENTER SUBWOOFER DIGITAL IN COAXIAL OPTICAL FRONT R FRONT L SUR R SUR L SPEAKER TV HDMI OUT SPEAKER EURO AV OUTPUT TO TV COAXIAL 75 AM FM ANTENNA DMPORT DC5V 0 7A MAX EZW T100 HDMI...

Страница 21: ...ied to the DMPORT jack For details see Using the DIGITAL MEDIA PORT Adapter page 74 3 Connecting the other components CENTER SUBWOOFER DIGITAL IN COAXIAL OPTICAL FRONT R FRONT L SUR R SUR L SPEAKER TV HDMI OUT SPEAKER EURO AV OUTPUT TO TV COAXIAL 75 AM FM ANTENNA DMPORT DC5V 0 7A MAX EZW T100 DMPORT DC5V 0 7A MAX Rear panel DIGITAL MEDIA PORT adapter not supplied Front panel To the portable audio ...

Страница 22: ...ting instructions of the S AIR product If your TV has multiple audio video inputs You can enjoy the sound with the speakers of the system through the connected TV Connect the components as follows Select the component on the TV For details refer to the operating instructions of the TV If the TV does not have multiple audio video inputs a switcher will be necessary to receive the sound from more th...

Страница 23: ...ve poor FM reception use a 75 ohm coaxial cable not supplied to connect the unit to an outdoor FM antenna aerial as shown below 4 Connecting the antenna aerial CENTER SUBWOOFER DIGITAL IN COAXIAL OPTICAL FRONT R FRONT L SUR R SUR L SPEAKER TV HDMI OUT SPEAKER EURO AV OUTPUT TO TV COAXIAL 75 AM FM ANTENNA DMPORT DC5V 0 7A MAX EZW T100 COAXIAL 75 FM ANTENNA A B Rear panel AM loop antenna aerial supp...

Страница 24: ...ess or c 4 Press X x to select a setting DEMO ON On DEMO OFF Off 5 Press The setting is made 6 Press SYSTEM MENU The system menu turns off Tip When you purchase the system from new or if the system is at its factory default settings ex after performing COLD RESET page 88 you can turn off the demonstration simply by pressing 1 on the remote 5 Connecting the AC power cord mains lead About the demons...

Страница 25: ...serting a disc The Setup Display for selecting the language used in the on screen display appears 5 Press X x to select a language The system displays the menu and subtitles in the selected language 6 Press The Setup Display for selecting the aspect ratio of the TV to be connected appears 7 Press X x to select the setting that matches your TV type x If you have a wide screen TV or a 4 3 standard T...

Страница 26: ... should face the calibration mic and there should be no obstruction between the speakers and the calibration mic 14Press C c to select YES Note Make sure that the headphones are not connected to the unit or surround amplifier You cannot operate following Steps with the headphones connected 15Press AUTO CALIBRATION starts Be quiet during the measurement Note Loud test sound is output when AUTO CALI...

Страница 27: ... connection of the TV page 20 select the type of video output of the system To select the type of video signal output from the HDMI OUT jack When you connect the unit and the TV with the HDMI cable select the type of video signals output from the HDMI OUT jack For details refer also to the operating instructions supplied with the TV projector etc 1 Press FUNCTION repeatedly until DVD appears in th...

Страница 28: ...edly until the desired function appears in the front panel display Each time you press FUNCTION the function changes as follows DVD t TUNER FM t TUNER AM t USB t TV t DMPORT t AUDIO t Function Source DVD Disc that is played by the system TUNER FM TUNER AM FM AM radio page 58 USB USB device page 65 TV TV or the component that is connected to the TV jacks on the rear panel DMPORT DIGITAL MEDIA PORT ...

Страница 29: ...using a portable audio source you can enhance the sound Press FUNCTION to select AUDIO Connect the portable audio source Select A F D STD for DEC MODE To cancel select other than A F D STD Distortion may occur when you listen to a component connected to the EURO AV T OUTPUT TO TV jack on the rear panel or to the AUDIO IN jack on the front panel Distortion is not a malfunction and will depend on th...

Страница 30: ...Depending on the source the speakers that output sound will vary A F D MULTI AUTO FORMAT DIRECT MULTI 2 channel source Sound that is recorded in 2 channel front left and right channel is also assigned to the surround left and right channel This mode outputs sound from the front left and right speakers surround left and right speakers and subwoofer The center speaker does not output any sound Multi...

Страница 31: ... to the input signal and produces five full bandwidth output channels from 2 channel sources This setting is ideal for watching videos of overdubbed or old movies This mode outputs sound from all the speakers and subwoofer Sound may not be output from all speakers depending on the source PLII MUSIC Dolby Pro Logic II MUSIC Performs Pro Logic II music mode decoding to the input signal and produces ...

Страница 32: ...while using the S AIR receiver sound from the S AIR receiver may skip Enjoying Multiplex Broadcast Sound DUAL MONO You can enjoy multiplex broadcast sound when the system receives or plays the Dolby Digital multiplex broadcast signal Note To receive the Dolby Digital signal you need to connect a TV or other component to the unit with an optical or coaxial digital cord page 20 and set the digital o...

Страница 33: ...ntinuous play 7 Adjust the volume by using VOLUME on the remote or the VOLUME control on the unit The volume level appears on the TV screen and in the front panel display Note Depending on the system status the volume level may not appear on the TV screen When you set the Control for HDMI function to on the TV that is connected to the system with an HDMI cable not supplied can be sync operated wit...

Страница 34: ...y after pause X or H Go to the next chapter track or scene1 Go back to the preceding chapter track or scene1 twice in a second When you press once you can go to the beginning of the current chapter track or scene Turn off the sound temporarily MUTING To cancel press it again or VOLUME to adjust the sound volume Stop play and remove the desired disc A on the unit Locate a point quickly by playing a...

Страница 35: ...e DVD VIDEO the choice of language varies When 4 digits are displayed they indicate a language code See Language Code List page 105 to confirm which language the code represents When the same language is displayed two or more times the DVD VIDEO is recorded in multiple audio formats x DVD VR The types of sound tracks recorded on a disc are displayed Example 1 MAIN main sound 1 SUB sub sound 1 MAIN...

Страница 36: ...X x to select the desired setting and press MULTI You can play the multi channel playback area 2CH You can play the 2 channel playback area Note You cannot change the playback area during playback To change a playback layer when playing a hybrid Super Audio CD Some Super Audio CDs consist of an HD layer and a CD layer You can change the playback layer you want to listen to Note When the Super Audi...

Страница 37: ...the VIDEO CD To go back to the menu Press O RETURN Note Depending on the VIDEO CD Press ENTER in Step 3 may appear as Press SELECT in the operating instructions supplied with the disc In this case press H Tip To play without using the PBC function press or the number buttons while the system is in stop mode to select a track then press H or The system starts playback You cannot play still pictures...

Страница 38: ...stem can store at least 10 resume playback points If MULTI DISC RESUME in SYSTEM SETUP is set to OFF page 55 the resume point is cleared when you change the function by pressing FUNCTION Tip To play from the beginning of the disc press x twice then press H Using Play Mode You can play the contents of a disc in the order you want by arranging the order of the tracks on the disc to create your own p...

Страница 39: ...rogrammed order 1 Follow Steps 1 to 3 of Creating your own program 2 Press X and select ALL CLEAR 3 Press You can play the contents on a disc in random order Subsequent Shuffle Play may produce a different playing order Note Same song may be played repeatedly when you are playing MP3 files 1 Press DISPLAY during playback The Control Menu display appears on the TV screen 2 Press X x to select SHUFF...

Страница 40: ...rent chapter x VIDEO CD Super Audio CD CD OFF Off DISC You can repeats all of the tracks on the disc TRACK You can repeat the current track x DATA CD DATA DVD OFF Off DISC You can repeat all of the folders on the disc FOLDER You can repeat the current folder TRACK MP3 files only You can repeat the current file FILE DivX video files only You can repeat the current file 4 Press The item is selected ...

Страница 41: ...rol Menu display is turned off This function is only available for DVD VRs with a playlist created 1 Press DISPLAY while the system is in stop mode The Control Menu display appears on the TV screen 2 Press X x to select ORIGINAL PLAY LIST then press The options for ORIGINAL PLAY LIST appear 3 Press X x to select a setting PLAY LIST You can play the titles created from ORIGINAL for editing ORIGINAL...

Страница 42: ...ou can search for a chapter DVD VIDEO DVD R DVD RW track VIDEO CD Super Audio CD CD or file DATA CD DATA DVD DivX video file by pressing the number buttons and To search for a scene using the time code 1 In Step 2 select TIME T playing time of the current title is selected 2 Press T changes to T 3 Input the time code using the number buttons For example to find the scene at 2 hours 10 minutes and ...

Страница 43: ...ayed its title is shaded 2 Press X x to select a folder x To play MP3 files in a folder Press H to start playing the selected folder x To select a MP3 file Press The list of files contained in the folder appears Press X x to select a file and press The system starts playing the selected file You can turn the file list off by pressing DVD MENU Pressing DVD MENU again will display the folder list To...

Страница 44: ...d on the TV screen you can rotate the JPEG image file by 90 degrees Press X x while viewing a JPEG image file Press CLEAR to return to normal view Note You cannot rotate the JPEG image file when you set JPEG RESOLUTION in HDMI SETUP to 1920 1080i HD or 1920 1080i HD page 53 To stop playback Press x 1 Press DISPLAY during playback The Control Menu display appears on the TV screen 2 Press X x to sel...

Страница 45: ...on the TV screen 2 Press X x to select INTERVAL then press The options for INTERVAL appear 3 Press X x to select a setting NORMAL You can set to the standard duration FAST You can set the duration shorter than NORMAL SLOW 1 You can set the duration longer than NORMAL SLOW 2 You can set the duration longer than SLOW 1 4 Press Note Some JPEG image files may take longer to display than the option you...

Страница 46: ...ivX format and which has the extension AVI or DIVX The system will not play files with the extension AVI or DIVX if they do not contain a DivX video Tip For details about playable MP3 audio tracks or JPEG image files on a DATA CD or DATA DVD see Playable Discs page 5 Note The system may not play a DivX video file when the file has been combined from two or more DivX video files The system cannot p...

Страница 47: ... the above file list You can select the next or previous DivX video file in the same folder by pressing You can also select the first file of the next folder by pressing during playback of the last file of the current folder Note that you cannot return to the previous folder by pressing To return to the previous folder select it from the folder list Tip If the number of viewing times is preset you...

Страница 48: ... age of the users Scenes may be blocked or replaced with different scenes You can set the playback restriction by registering a password When you set the PARENTAL CONTROL function to on you need to enter the password to play restricted discs 1 Press FUNCTION repeatedly until DVD appears in the front panel display 2 Press DISPLAY while the system is in stop mode The Control Menu display appears on ...

Страница 49: ...tering your password appears 2 Enter your 4 digit password using the number buttons then press The system starts playback Note When you play discs which do not have the PARENTAL CONTROL function playback cannot be limited on this system Depending on the disc you may be asked to change the parental control level while playing the disc In this case enter your password then change the level If the Re...

Страница 50: ...ous adjustments of items such as picture and sound Displayed items vary depending on the country model Note Playback settings stored in the disc take priority over the Setup Display settings and not all the functions described may work 1 Press FUNCTION repeatedly until DVD appears in the front panel display 2 Press DISPLAY while the system is in stop mode The Control Menu display appears on the TV...

Страница 51: ...UBTITLE DVD VIDEO only You can switch the language of the subtitle recorded on the DVD VIDEO When you select AUDIO FOLLOW the language for the subtitles changes according to the language you selected for the sound track Note When you select a language in MENU AUDIO or SUBTITLE that is not recorded on the DVD VIDEO one of the recorded languages will be automatically selected depending on the disc t...

Страница 52: ...witches to VIDEO when you turn on any connected HDMI equipment x PAUSE MODE DVD VIDEO DVD R DVD RW only You can select the picture in pause mode AUTO The picture including subjects that move dynamically is output with no jitter Normally select this position FRAME The picture including subjects that do not move dynamically is output in high resolution x HDMI RESOLUTION You can select the type of vi...

Страница 53: ...tem does not output the sound from the HDMI OUT jack ON The system outputs audio signals by converting Dolby Digital DTS or 96 kHz 24 bit PCM signals to 48 kHz 16 bit PCM Note When you connect the unit and TV with an HDMI cable and ON is selected AUDIO DRC A V SYNC DYNAMIC BASS DEC MODE and sound mode are not applied to the sound that is output from the TV When you set the function to other than D...

Страница 54: ...CK SELECTION DVD VIDEO only You can give the sound track which contains the highest number of channels priority when you play a DVD VIDEO on which multiple audio formats PCM DTS Dolby Digital or MPEG audio are recorded OFF Off AUTO The system selects the sound track automatically according to the priority Note When you set the item to AUTO the language may change The TRACK SELECTION setting has hi...

Страница 55: ...ction of the speakers and their distance from your listening position Then use the test tone to adjust the level and the balance of the speakers to the same level Note You cannot operate SPEAKER SETUP when you connect headphones to the unit or surround amplifier x CONNECTION If you do not connect center or surround speakers set the parameters for CENTER and SURROUND Since the front speaker and sub...

Страница 56: ...akers are not placed at an equal distance from your listening position set the distance according to the closest speaker Do not place the surround speakers farther away from your listening position than the front speakers Depending on the input stream the DISTANCE setting may not be effective x LEVEL FRONT You can adjust the sound level of the front speakers center speaker and subwoofer Be sure to...

Страница 57: ...C X x c repeatedly to set TEST TONE to OFF after adjusting the speaker level Note The test tone signals are not output from the HDMI OUT jack Tip To adjust the volume of all the speakers at one time turn the VOLUME control on the unit or press VOLUME on the remote To return to the default setting when changing a setting select the item then press CLEAR Note that only the CONNECTION setting does no...

Страница 58: ...stereo program appear in the front panel display 3 Press SYSTEM MENU 4 Press X x repeatedly until MEMORY appears in the front panel display 5 Press or c A preset number appears in the front panel display 6 Press X x to select the preset number you want Tip You can select the preset number directly by pressing the number buttons 7 Press COMPLETE appears in the front panel display and the station is...

Страница 59: ...panel display 2 Press D TUNING 3 Press the number buttons to select the frequencies 4 Press Tip To improve reception reorient the connected antennas aerials If an FM program is noisy If an FM program is noisy you can select monaural reception There will be no stereo effect but reception will improve 1 Press SYSTEM MENU 2 Press X x repeatedly until FM MODE appears in the front panel display 3 Press...

Страница 60: ...M MENU The system menu turns off When the system is set to TUNER FM or TUNER AM you can check the frequency using the front panel display Press DISPLAY Each time you press DISPLAY the display changes 1 t 2 t t 1 t x TUNER FM When the station name is set 1 Station name Ex SONY RADIO 2 Frequency Ex FM1 87 50 3 The FM MODE setting Ex STEREO When the station name is not set 1 Frequency Ex FM1 87 50 2 ...

Страница 61: ...ansmitting the RDS signal properly or if the signal strength is weak Not all FM stations provide RDS service nor do they provide the same type of services If you are not familiar with the RDS system check with your local radio stations for details on RDS services in your area Simply select a station from the FM band When you tune in a station that provides RDS services the station name appears in ...

Страница 62: ...e Control for HDMI function may not work if you connect a component other than Sony even if the component is compatible with the Control for HDMI function Control for HDMI Easy Setting The system is compatible with the Control for HDMI Easy Setting function If the TV is compatible with the Control for HDMI Easy Setting function you can set the system s CONTROL FOR HDMI function automatically by se...

Страница 63: ...pears in the front panel display You close the disc tray by pressing the disc tray You press DVD TOP MENU DVD MENU and H appears in the front panel display You select the DVD function by pressing FUNCTION and H appears in the front panel display Note One Touch Play does not work when you press H The system and TV work as follows e g Note Make sure the HDMI connection is correct and set the CONTROL...

Страница 64: ...ns of the TV Note If the TV is turned on before turning on the system TV sound will not be output for a moment While the TV is in PAP picture and picture mode the System Audio Control function will not work When the TV exits PAP mode the output method of the TV returns to the one before PAP mode If you select a TV program during DVD playback with the system the TV function is automatically set to ...

Страница 65: ...Connect a USB device digital music player or USB storage media to the USB port When you connect the USB device READING appears in the front panel display until the system reads all data of the USB device Note When you connect the USB device make sure that the direction of the jack is correct Do not forcibly insert the USB device as this may cause the device to be damaged Do not connect other devic...

Страница 66: ...iles or unnecessary folders on a USB device that has audio files or JPEG image files Folders that have no audio files or JPEG image files are skipped Compatibility with all MP3 WMA AAC encoding writing softwares recording devices and recording media cannot be guaranteed Incompatible USB device may produce noise or interrupted audio or may not play at all Before using the USB device make sure that ...

Страница 67: ...ss 6 Press DVD MENU The folders recorded on the USB device appear When a folder is being played its title is shaded 7 Press X x to select a folder x To play JPEG image files in a folder as a slide show Press H to start playing the selected folder The JPEG images are played as a slide show You can change the interval of the slide show page 68 and add effects to the slide show page 68 x To select a ...

Страница 68: ...an set the duration longer than NORMAL SLOW 2 You can set the duration longer than SLOW 1 4 Press Note Some JPEG image files may take longer to display than the option you selected Especially progressive JPEG image files or JPEG image files of 3 000 000 pixels or more To select an effect for JPEG image files in the slide show 1 Press DISPLAY twice The Control Menu display appears on the TV screen ...

Страница 69: ...y Press DISPLAY repeatedly until the Control Menu display is turned off Note When MODE MUSIC IMAGE is set to IMAGE page 67 you cannot select TRACK You can search a USB device by audio file JPEG image file or folder As audio files and JPEG image files are assigned unique numbers on the USB device you can select the desired audio file or JPEG image file by entering its number 1 Press DISPLAY When pl...

Страница 70: ...ppears on the TV screen If an MP3 file has the ID3 tag the system will display a folder name track file name from the ID3 tag information The system can support ID3 ver 1 0 1 1 2 2 2 3 ID3 ver 2 2 2 3 tag information display has priority when both ID3 ver 1 0 1 1 and ver 2 2 2 3 tags are used for a single MP3 file Note Characters marks may not be displayed in some languages Depending on the type o...

Страница 71: ...g copying When you are recording tracks from a CD the tracks are recorded as 128 kbps MP3 files When you are copying MP3 files from a DATA CD DATA DVD the MP3 files are recorded with the same bit rate as the original MP3 files CD text information is not recorded in the created MP3 files If you stop a recording partway an MP3 file whose recording was stopped halfway is deleted Recording stops autom...

Страница 72: ...x c to select START then press The system starts recording and the status of recording appears To cancel recording press x 1 Load a DATA CD DATA DVD 2 Press DISPLAY while the system is in stop mode The Control Menu display appears on the TV screen 3 Press X x to select USB RECORDING then press 4 Press X x to select TRACK or FOLDER then press TRACK The folders recorded on the DATA CD DATA DVD appea...

Страница 73: ...se audio files on the USB device 1 Press FUNCTION repeatedly until USB appears in the front panel display 2 Press X x to select a folder x To erase all audio files in a folder Press CLEAR x To erase an audio file Press The list of files contained in the folder appears Press X x to select the desired audio file then press CLEAR 3 Press C c to select YES then press To cancel select NO then press Not...

Страница 74: ...oth Wireless Audio Adapter may be reduced In this case place the Bluetooth transmitter as far as possible from the system or move the Bluetooth Wireless Audio Adapter closer to the Bluetooth transmitter When you use the system and the Wireless Network Audio Adapter such as TDM NC1 not supplied at the same time place the Wireless Network Audio Adapter as far as possible from the system 1 Press FUNC...

Страница 75: ...reless transmitter transceiver make sure that the AC power cord mains lead is not connected to a wall outlet mains Do not touch the terminals of the wireless transmitter transceiver To insert the wireless transmitter into the unit 1 Remove the screws and detach the slot cover Note Remove the screws from the slot cover bearing the caution mark Do not remove other screws The slot cover is no longer ...

Страница 76: ...e Control Menu display appears on the TV screen 4 Press X x to select SETUP then press The options for SETUP appear 5 Press X x to select CUSTOM then press The Setup Display appears 6 Press X x to select AUDIO SETUP then press The options for AUDIO SETUP appear 7 Press X x to select S AIR SETUP t then press Note When the wireless transmitter is not inserted in the unit S AIR SETUP cannot be select...

Страница 77: ...o not change the ID of the unit Set the ID of the S AIR receiver to the same ID as the unit When you pair the unit and another S AIR sub unit such as a surround amplifier by the pairing operation you need to perform the pairing operation between the unit and the S AIR receiver For details see Identifying the unit with a specific S AIR sub unit Pairing operation page 78 2 Press S AIR MODE on the re...

Страница 78: ...ont panel display If you turn the system off with the disc tray opened while S AIR STBY is set to ON the disc tray may not close automatically When the wireless transmitter is not inserted in the unit you cannot set S AIR STBY S AIR STBY is set to OFF automatically when the wireless transmitter is removed from the unit It is easy to set the same ID for the unit and an S AIR sub unit such as a surr...

Страница 79: ...iring select NO 11Start pairing of the S AIR sub unit x For the surround amplifier Refer to the operating instructions of the surround amplifier When sound transmission is established the confirmation display appears x For the S AIR receiver Refer to the operating instructions of the S AIR receiver When sound transmission is established the confirmation display appears Note Perform the pairing wit...

Страница 80: ...s The setting is made 5 Press SYSTEM MENU The system menu turns off 6 When you set RF CHANGE to OFF select the ID so that sound transmission is most stabilized page 76 Note When the wireless transmitter is not inserted in the unit you cannot set RF CHANGE In most cases you will not need to change this setting If RF CHANGE is set to OFF transmission between the unit and S AIR sub unit can be perfor...

Страница 81: ...ally NO CENTER Select this when you install the front and surround speakers only NO SURROUND Select this when you install the center and front speakers only FRONT ONLY Select this when you install the front speakers only ALL FRONT Select this when you install all the speakers in front of the listening position ALL FRONT NO CENTER Select this when you install the front and surround speakers in fron...

Страница 82: ...n press The options for AUTO CALIBRATION appear 7 Connect the calibration mic supplied to the A CAL MIC jack on the front panel Set up the calibration mic at the ear level using a tripod etc not supplied The front of each speaker should face the calibration mic and there should be no obstruction between the speakers and the calibration mic 8 Press C c to select YES 9 Press AUTO CALIBRATION starts ...

Страница 83: ...UBWOOFER is always YES since the system does not perform subwoofer calibration Tip You can check the distance between the listening position and each speaker See page 55 Controlling the TV with the Supplied Remote You can control the TV Sony only by using following buttons Use these buttons other than TV 1 THEATRE TV INPUT and TV VOL while pressing the TV button Note Depending on the TV you may no...

Страница 84: ...You can set the system to turn off at a preset time so you can fall asleep listening to music You can preset the time in 1 or 10 minutes increments Press SLEEP Each time you press SLEEP the minutes display the remaining time changes by 10 minutes When you set the sleep timer SLEEP flashes in the front panel display To check the remaining time Press SLEEP once To change the remaining time Press SLE...

Страница 85: ...urrent title 3 Playing time of the current chapter 4 Remaining time of the current chapter 5 Disc name 6 Title and chapter x VIDEO CD without PBC functions Super Audio CD CD 1 Playing time of the current track 2 Remaining time of the current track 3 Playing time of the disc 4 Remaining time of the disc 5 Track name 6 Track and index VIDEO CD Super Audio CD only x Super VCD 1 Playing time of the cu...

Страница 86: ...time of the current chapter x VIDEO CD with PBC functions Playing time of the current scene x VIDEO CD without PBC functions Super Audio CD CD T Playing time of the current track T Remaining time of the current track D Playing time of the current disc D Remaining time of the current disc x DATA CD MP3 file DATA DVD MP3 file T Playing time of the current track x DATA CD DivX video file DATA DVD Div...

Страница 87: ...em can support ID3 ver 1 0 1 1 2 2 2 3 ID3 ver 2 2 2 3 tag information display has priority when both ID3 ver 1 0 1 1 and ver 2 2 2 3 tags are used for a single MP3 file You can check the date information during playback when the Exif tag is recorded in the JPEG image file Press DISPLAY twice during playback The Control Menu display appears on the TV screen Exchangeable Image File Format is a digi...

Страница 88: ...s X x to select SETUP then press The options for SETUP appear 4 Press X x to select CUSTOM then press The Setup Display appears 5 Press X x to select SYSTEM SETUP then press The options for SYSTEM SETUP appear 6 Press X x to RESET and press c 7 Press C c to select YES You can also quit the process and return to the Control Menu display by selecting NO here 8 Press Do not press 1 while resetting th...

Страница 89: ...case remove the disc and leave the system turned on for about half an hour until the moisture evaporates When you move the system take out any disc If you don t the disc may be damaged If anything falls into the cabinet unplug the unit and have it checked by qualified personnel before operating it any further On adjusting volume Do not turn up the volume while listening to a section with very low ...

Страница 90: ...ably inside the car After playing store the disc in its case On cleaning Before playing clean the disc with a cleaning cloth Wipe the disc from the center out Do not use solvents such as benzine thinner commercially available cleaners or anti static spray intended for vinyl LPs This system can only play back a standard circular disc Using neither standard nor circular discs e g card heart or star ...

Страница 91: ...ing all the above items consult your nearest Sony dealer Symptom Remedy There is no picture The SCART EURO AV cord is not connected securely The SCART EURO AV cord is damaged The unit is not connected to the correct EURO AV t INPUT jack page 20 The video input on the TV is not set so that you can view pictures from the system Check the output method on your system page 20 Re connect the connecting...

Страница 92: ...udio signals are not output from the HDMI OUT jack The component connected to the HDMI OUT jack does not conform to the audio signal format in this case set AUDIO HDMI in HDMI SETUP to ON page 53 No sound is output from the HDMI OUT jack Set AUDIO HDMI in HDMI SETUP to ON page 53 The HDMI OUT jack is connected to a DVI Digital Visual Interface device DVI Digital Visual Interface jacks do not accep...

Страница 93: ... COAXIAL OPTICAL jack The sampling frequency of the input signal is more than 48 kHz Symptom Remedy Radio stations cannot be tuned in Check that the antenna aerial is connected securely Adjust the antenna aerial or connect an external antenna aerial if necessary The signal strength of the stations is too weak when tuning in with automatic tuning Use direct tuning No stations have been preset or th...

Страница 94: ... system off then on The DATA CD DATA DVD contains a DivX video file The MP3 files and JPEG image files starts playing simultaneously AUTO has been selected in MODE MUSIC IMAGE page 44 The DivX video file cannot be played The file is not created in DivX format The file has an extension other than AVI or DIVX The DATA CD DATA DVD is not created in a DivX format that conforms to ISO 9660 Level 1 Leve...

Страница 95: ...has the extension AVI or DIVX but is not in DivX format or is in DivX format but does not conform to a DivX Certified profiles The system does not work normally Disconnect the AC power cord mains lead from the wall outlet mains then reconnect after several minutes The Control for HDMI function does not work When HDMI does not light up in the front panel display check the HDMI connection page 20 Se...

Страница 96: ... supports FAT12 FAT16 and FAT32 but some USB device may not support all of these FAT For details refer to the operating instructions of each USB device or contact the manufacturer The USB device cannot be connected into the USB port The USB device is being connected backwards Connect the USB device in the correct orientation The USB device which has been used on another device does not work It may...

Страница 97: ... For audio files JPEG image files check the MODE MUSIC IMAGE setting pages 66 67 The number of folders has exceeded 200 The number of files has exceeded 150 For audio files JPEG image files the folder contains more than 150 files The JPEG image file does not have the extension JPG or JPEG The JPEG image file is larger than 3 072 width 2 048 height in normal mode or more than 2 000 000 pixels in Pr...

Страница 98: ...ructions of the USB device to format the USB device If the problem persists contact your nearest Sony dealer Audio files or folders on the USB device cannot be erased Check if the USB device is write protected The USB device was disconnected or the power was turned off during erasing Delete the partially erased file If this does not fix the problem the USB device may be broken Follow the procedure...

Страница 99: ... another wireless product Change the RF CHANGE setting page 80 Change the ID settings of the S AIR main unit and S AIR sub unit Turn off the system and S AIR sub unit then turn on them There is noise or the sound skips If you use another S AIR main unit place it more than 8 m 26 1 4 feet away from the unit Install the S AIR main unit and S AIR sub unit closer together Avoid use of equipment that g...

Страница 100: ... on the TV screen Although this is not a malfunction and for Sony service use only normal system operation will not be possible Turn off the system and then turn on the system again to operate First 3 characters of the service number Cause and or corrective action C 13 The disc is dirty Clean the disc with a soft cloth page 90 C 31 The disc is not inserted correctly Restart the system then re inse...

Страница 101: ...Antenna aerial FM wire antenna aerial Antenna aerial terminals 75 ohms unbalanced Intermediate frequency 10 7 MHz AM tuner section Tuning range North American Mexican and Latin American models 530 kHz 1 710 kHz with the interval set at 10 kHz 531 kHz 1 710 kHz with the interval set at 9 kHz European Russian and Middle Eastern models 531 kHz 1 602 kHz with the interval set at 9 kHz Australian and N...

Страница 102: ...th an expanded frequency range and a subwoofer channel for deep bass is independently provided This format is also called 5 1 with the subwoofer channel designed as the 0 1 channel since it functions only when a deep bass effect is needed All six channels in this format are recorded separately for superior channel separation Furthermore since all the signals are processed digitally less signal deg...

Страница 103: ...hese high quality media are transmitted with no deterioration Sony has developed a technology called S AIR for the radio transmission of digital audio signals with no compression and has incorporated this technology into the EZW RT10 EZW T100 This technology transfers digital audio signals with no compression using the 2 4 GHz band range of ISM band Industrial Scientific and Medical band such as w...

Страница 104: ...e it is not necessary to turn the disc over 3 To select a layer see To change a playback layer when playing a hybrid Super Audio CD page 36 4 To select an area see To select a playback area on a 2 channel Multi channel Super Audio CD page 36 Super Audio CD layer Multi channel area4 2 channel area4 ...

Страница 105: ...Malayalam 1352 Mongolian 1353 Moldavian 1356 Marathi 1357 Malay 1358 Maltese 1363 Burmese 1365 Nauru 1369 Nepali 1376 Dutch 1379 Norwegian 1393 Occitan 1403 Afan Oromo 1408 Oriya 1417 Punjabi 1428 Polish 1435 Pashto Pushto 1436 Portuguese 1463 Quechua 1481 Rhaeto Romance 1482 Kirundi 1483 Romanian 1489 Russian 1491 Kinyarwanda 1495 Sanskrit 1498 Sindhi 1501 Sangho 1502 Serbo Croatian 1503 Singhale...

Страница 106: ...pages indicated in parentheses A 1 on standby 25 88 B A open close 33 C Front panel display 108 D Play operation buttons 33 E remote sensor 9 F FUNCTION 28 G VOLUME control 33 H PHONES jack 33 I AUDIO IN A CAL MIC jack 21 25 82 J USB port 65 K Disc tray 33 Front panel ...

Страница 107: ...IGITAL MEDIA PORT jack 21 74 G HDMI OUT jack 20 H TV DIGITAL IN COAXIAL OPTICAL jacks 20 CAUTION Please do not remove the screws before installing the EZW T100 Rear panel CENTER SUBWOOFER DIGITAL IN COAXIAL OPTICAL FRONT R FRONT L SUR R SUR L SPEAKER TV HDMI OUT SPEAKER EURO AV OUTPUT TO TV COAXIAL 75 AM FM ANTENNA DMPORT DC5V 0 7A MAX EZW T100 Screws ...

Страница 108: ... effect Radio only 59 F Lights up when the S AIR transmitter not supplied is inserted in the unit and the system transmits the sound 75 G Lights up when the HDMI OUT jack is correctly connected to HDCP High bandwidth Digital Content Protection compliant device with HDMI or DVI Digital Visual Interface input 20 H Current surround format Except for JPEG image file I Lights up when an NTSC disc is lo...

Страница 109: ... TOOLS wh 83 TUNING 0 58 TV wl 83 TV INPUT w 83 TV VOL ef 83 VOLUME 8 33 Number buttons qf 37 58 83 1 on standby 1 24 25 33 TV 1 on standby ql 83 C X x c qs 24 25 36 38 58 81 REPLAY ADVANCE 9 33 wj 33 m M 0 33 STEP 9 33 SLOW 0 33 H play e 33 x stop wk 33 X pause qa 33 DISPLAY3 wh 25 36 38 81 O RETURN ea 37 83 es 83 1 This button is not available for this model 2 The ENTER button has the same funct...

Страница 110: ...t t 1 t 1 Control Menu display 1 2 Control Menu display 2 appears when available 3 Control Menu display off Note The Control Menu Display appears during the DVD USB or DMPORT function Depending on the DIGITAL MEDIA PORT adapter the Control Menu Display may not appear The Control Menu display 1 and 2 will show different items depending on the disc type For details see the pages in parentheses Contr...

Страница 111: ... one or an edited PLAY LIST TIME page 42 You can check the elapsed time and the remaining playback time Input the time code for picture and music searching The system displays the DVD Super Audio CD CD text or the MP3 file name MULTI 2CH page 36 You can select the playback area on a Super Audio CD when available SUPER AUDIO CD CD LAYER page 36 You can select the playback layer on a Super Audio CD ...

Страница 112: ...elect yes or no to start the Auto Calibration CUSTOM In addition to the Quick Setup setting you can adjust various other settings FOLDER page 41 You can select the folder to be played FILE page 41 You can select the JPEG image file or DivX video file to be played DATE page 87 You can display the date the picture was taken by a digital camera INTERVAL page 45 You can select the duration for which t...

Страница 113: ...Y LIST default setting INTERVAL page 68 You can select the duration for which the slides are displayed on the TV screen EFFECT page 68 You can select the effects to be used for changing slides during a slide show MODE MUSIC IMAGE pages 66 67 You can select the data type audio file or JPEG image file when playing a USB device USB RECORDING page 71 You can record tracks on an audio CD or copy MP3 fi...

Страница 114: ...nstant Replay 34 INTERVAL 45 68 J JPEG image file 43 65 JPEG RESOLUTION 53 L Language Code List 105 LANGUAGE SETUP 51 LINE 52 M MENU 51 MODE MUSIC IMAGE 45 66 67 MP3 file 43 65 Multi Session CD 7 MULTI DISC RESUME 55 Multiplex broadcast sound 32 N Naming preset stations 59 NIGHT 84 O ORIGINAL 41 OSD 51 P PARENTAL CONTROL 48 55 103 PAUSE MODE 52 PBC Playback 37 PICTURE NAVI 44 67 PLAY LIST 41 Playa...

Страница 115: ......

Страница 116: ... 1 Sony Corporation Printed in China ...

Отзывы: