background image


Test Instruction Repair Instruction Mechanical/   

1253-0569 Rev 1


©

 Sony Ericsson Mobile Communications AB – Company Internal    

24(25)


Tests 


2.4 Network 

Test 

This test can only be performed if the phone has got an activated SIM/USIM card (no Test 
SIM/USIM) and an available network signal! 

There are two versions of the test depending on whether a UMTS network is available or not! 

If a UMTS network is available, the network test has to be done separately for GSM and UMTS!  


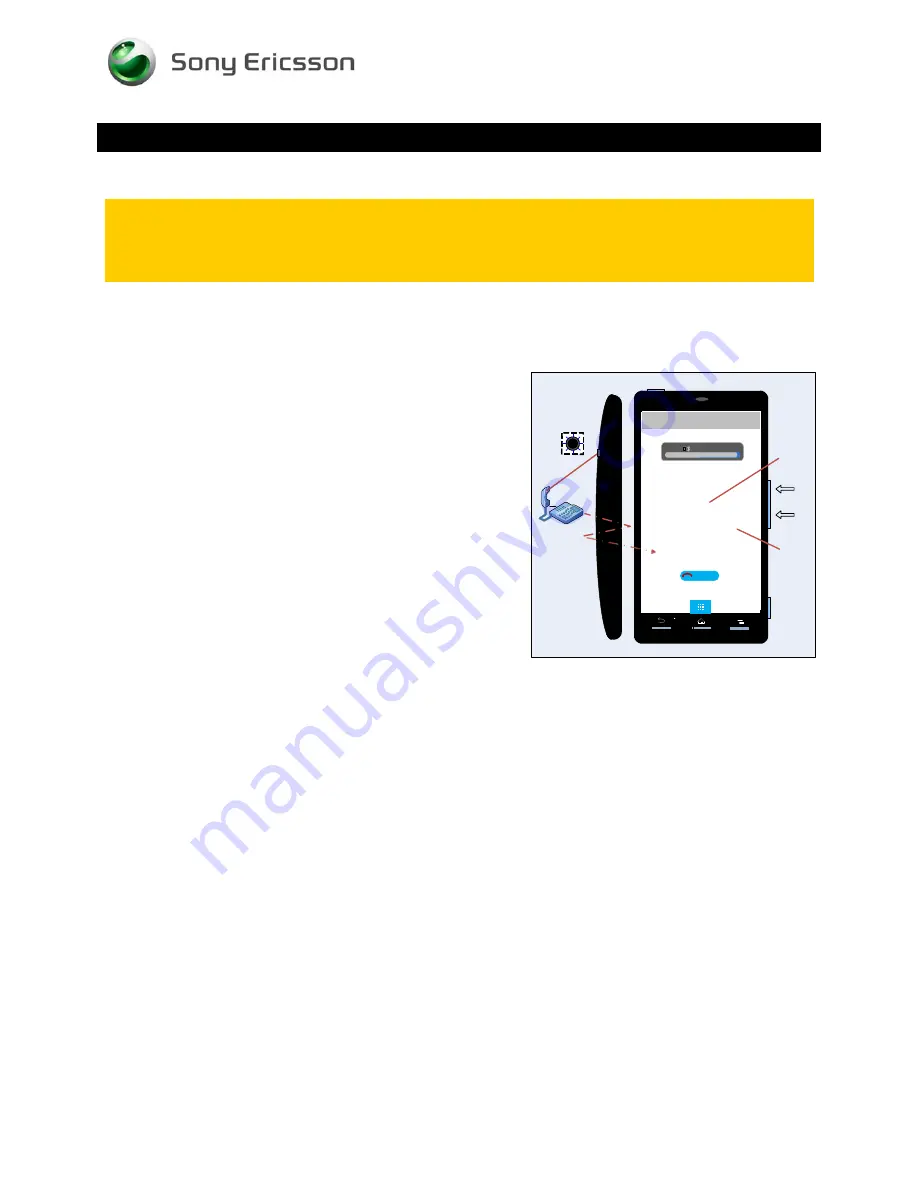
2.4.1  On-the-air call to mobile (no UMTS network available) 


To verify the radio functions (GSM) of the phone, follow the ‘2.4.1.1  Procedure’ below 


2.4.1.1 Procedure 


1. Set up a call from a landline phone (PSTN). 

2. Check that there is a ring signal. 

3. Check that the display backlight illuminates. 

4. Answer the call and check the sound quality in both 

phones. 

5. Adjust the volume up and down with the side keys and 

verify that the sound level is altered. 

6. End the call and check that the elapsed time is displayed 

and that the termination is done in a proper way. 

5

Sony Ericsson

Current call 00:01

Earphone

In-call volume

0001234567800

End Call

3

6

1

2

4

XPERIA


2.4.2  On-the-air call to mobile (UMTS network available) 


GSM 

Go to the phone menu and set: 
Press Menu key

Æ

Settings


Ö


Wireless controls

Ö

 Mobile 

Networks


Ö


Network mode


Ö


GSM only


To verify the radio functions (GSM) of the phone, follow the ‘2.4.1.1 Procedure’ above. 


UMTS 

Go to the phone menu and set: 
Press Menu key

Æ

Settings


Ö


Wireless controls

Ö

 Mobile 

Networks


Ö


Network mode


Ö


WCDMA only 

Switch off the phone and then start it up again to enable search for an available UMTS signal. 
Ensure that the UMTS/3G icon now is visible at the top of the display. 

To verify the radio functions (UMTS) of the phone, follow the ‘2.4.1.1 Procedure’ above. 

Содержание Xperia arc S LT18a

Страница 1: ...1253 0569 Rev 1 Sony Ericsson Mobile Communications AB Company Internal Test Instructions mechanical Xperia arc S LT18i LT18a...

Страница 2: ...rophone 10 2 2 9 Secondary Microphone 10 2 2 10 Vibrator 10 2 2 11 Camera 11 2 2 12 Secondary Camera N A 11 2 2 13 Flash LED 11 2 2 14 Bluetooth 12 2 2 15 WLAN 13 2 2 16 GPS 13 2 2 17 Compass 13 2 2 1...

Страница 3: ...3 3 Home key test 22 2 3 4 Charging via USB Charger or Computer 23 2 4 Network Test 24 2 4 1 On the air call to mobile no UMTS network available 24 2 4 2 On the air call to mobile UMTS network availab...

Страница 4: ...er indicator inspection 1 1 2 Liquid Intrusion indicator inspection Before starting any tests the liquid intrusion indicator has to be checked The indicator is located as shown in this picture after t...

Страница 5: ...e sure the phone is in call setup Pressing keypad combination 7378423 select Service info select Software info check the software file revisions and if needed update as described below For more inform...

Страница 6: ...keypad combination with the following order 7378423 Sony Ericsson 2 3 1 2 3 4 5 6 7 8 9 0 XPERIA select Service tests select one of the tests and follow the test instructions as described below to sto...

Страница 7: ...e drawn as you touch the Display Press Back key to return to Service Test Menu XPERIA Sony Ericsson XPERIA Touch Screen Touch Screen Sony Ericsson 2 2 3 Display Minor variations in display brightness...

Страница 8: ...off Press Back key to return to Service Test Menu XPERIA Sony Ericsson XPERIA LED illumination 2 2 5 Speaker Do not hold the phone close to your ear during this test Make sure that the sound from the...

Страница 9: ...d the phone close to your ear during this test Make sure that the sound from the Earphone port on the top of the phone is emitted loud and clear and that the test include maximum volume Press Volume u...

Страница 10: ...enu Media Volume Microphone test Microphone recording XPERIA 2 2 9 Secondary Microphone The previous test Speaker should have been successfully carried out before doing this test The phone will start...

Страница 11: ...mera module Aim the camera located back of the phone at an object and check the quality of the image shown in the display Press the R key to preview the photo s quality about auto focus Photos is take...

Страница 12: ...meters Make sure the target Bluetooth device is enabled and visible always The Bluetooth test will be done in following sequences Step 1 Enable Bluetooth wait 4 5 seconds shows OK Step 2 Searching Ste...

Страница 13: ...XPERIA WLAN Enable WLAN OK Searching Access points found Connect to Connection successfully setup Enter WEB address to connect to Connect to http Test Complete 2 2 16 GPS Enter GPS Location Test wait...

Страница 14: ...tilting the phone in various directions the X Y Z values will change in size and polarity depending on angle and direction as shown in the adjacent picture Check by tilting the phone that the X Y Z v...

Страница 15: ...rming this test When entering into the test the screen shows Proximity switch OFF and a tone is emitted Once your finger cover the proximity switch area on the right side of the receiver the screen wi...

Страница 16: ...ime clock test is displayed then followed by a message stating whether the test was OK or not Press Back key to return to Service Test Menu XPERIA Sony Ericsson XPERIA Real time clock OK 2 2 24 Total...

Страница 17: ...curity The DRM keys are shown in the display There may be some different content showed based on the different market software versions Press Back key to return to Service Test Menu XPERIA Sony Ericss...

Страница 18: ...o secure correct result NOTE The test will take several hours After the test the screen will have Green backlight and say Good if the battery is ok Red backlight and say Bad if the battery is not ok P...

Страница 19: ...Test Instruction Repair Instruction Mechanical 1253 0569 Rev 1 Sony Ericsson Mobile Communications AB Company Internal 19 25 2 2 31 Verify certificates Press Back key to return to Service Test Menu...

Страница 20: ...app doesn t exist IrDA HDMI Test Sony Ericsson 2 2 33 HDMI Test Press HDMI On HDMI Settings is usually not needed since the unit should be in automatic resolution and the HDMI TV out monitor should s...

Страница 21: ...ure your Monitor may require that you set the HDMI port you have chosen as source manually in the Monitors menus HDMI Cable HDMI TV out Sony Ericsson XPERIA Press Get HDMI Status You should now get Po...

Страница 22: ...will displayed above Time clock when phone is in Lock status If not detected the message No SIM Card in phone will be displayed above Time clock when phone is in Lock status XPERIA Sony Ericsson XPER...

Страница 23: ...ive Insert a battery but do not start the phone Connect a USB cable from a computer or charger to the system connector The phone will turn on automatically Verify that the phone is being charged by gr...

Страница 24: ...l and check the sound quality in both phones 5 Adjust the volume up and down with the side keys and verify that the sound level is altered 6 End the call and check that the elapsed time is displayed a...

Страница 25: ...Test Instruction Repair Instruction Mechanical 1253 0569 Rev 1 Sony Ericsson Mobile Communications AB Company Internal 25 25 3 Revision History Rev Date Changes Comments 1 2011 09 09 Initial release...

Отзывы: