Preparation
• Charge the device using the supplied charger.
•
Connect the sensor to the SONAPHONE using the
appropriate cable. Observe the red marking.
• If necessary, connect the headphones using the cable.
• Switch on the device: Press and hold the button on
the left of the device until the start screen appears.
Notes on your safety
Before commissioning and using the SONAPHONE and its accessories, always read all of the safety
information in the user documentation.
All applicable safety regulations for industrial facilities must be complied with without fail when carrying out
tests with the SONAPHONE and associated sensors.
The SONAPHONE and its accessories comply with the current state of the art and the safety-related
regulations. The user must ensure that safe use is not impaired.
Do not open the device or the sensors. They do not contain any parts that need to be cleaned or maintained by
the user (information on battery replacement can be found in the user documentation).
In cases of visible damage, or if malfunctions suggest that the device or sensors are no longer working
properly, they must be taken out of operation immediately.
When using the waveguides, it is essential to ensure that no injuries are caused by the tips.
• Unlock the device: Swipe the “unlock“ icon
on the display to the side.
The device shows the most important
apps that can be opened via quick access.
Important quick-access settings:
Swipe the start screen to the side
Additional apps:
Tap the icon
Start the app and log in
• Select the LevelMeter app: Tap the icon
•
Enter the user name (shown via the additional data
on the display) and press "Start" to confi rm.
Once the app has been started up, the test values can
be read off the display (see display description on the
next page). The audio output is activated at the same
time.
Top display area: Spectrogram
Switch to level record: Tap the icon in the top
left-hand corner
Middle display area: Test value output
Adapt the output for up to 5 test values:
Press and hold inside the display area or tap
the relevant output field once
Bottom display area:
Start / Stop measurements, manage folders
Flip screen: Tap the icon
Important settings
• Select application: In the additional data area,
tap the application fi eld ("No application")
•
Activate application: Select using the checkbox
The checkbox turns green and the application
automatically returns to the measurement screen
•
Defi ne a name for the current folder:
Tap the
"Folder" icon and rename an existing
folder or create a new folder
•
Tap "OK" to confirm
•
Activate a folder: Tap the checkbox (turns green)
The application returns to the measurement screen
2
!
1
The headphones are switched on at the
capsule (press and hold the button for 3 seconds
until a signal is heard). The ambient noise volume
can be adjusted by pressing the "+" and "-" buttons.
The short instructions set out the device functionality and explain the basic operating options.
Detailed descriptions can be found in the user documentation.
3
The measurements are collected in
folders and assigned consecutive numbers.
Tests with the SONAPHONE
The test data is not recorded.
To start the recording: See next page.
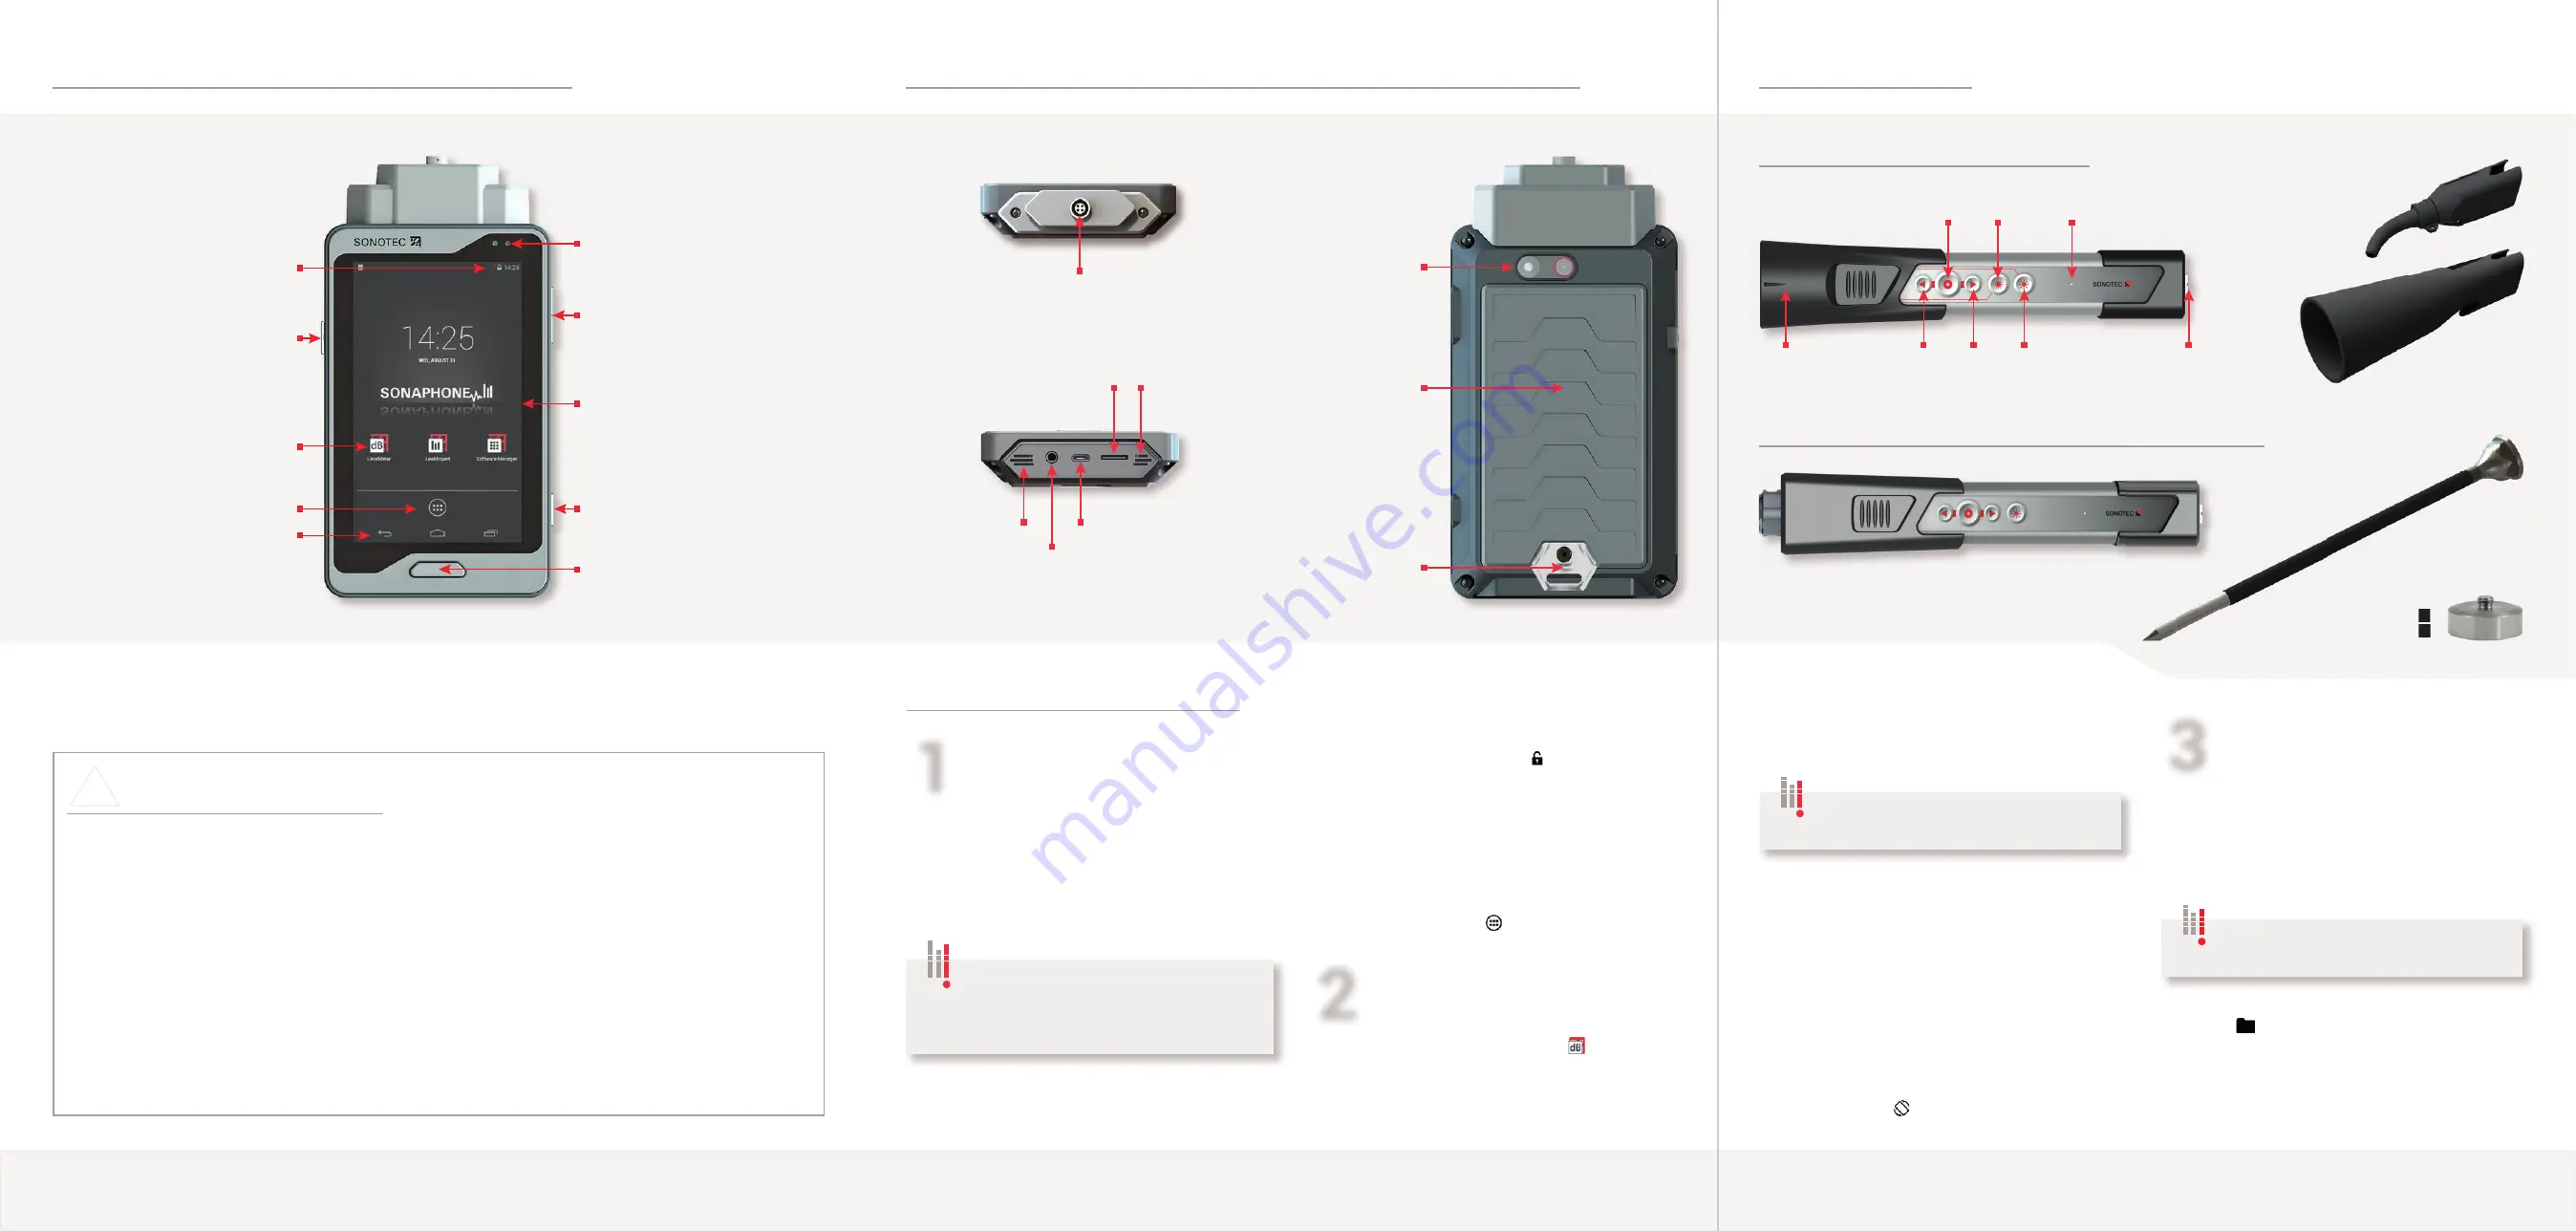
Connections, Interfaces and Additional Device Elements
Camera with flash
and auto-focus
Cover
battery compartment
Lashing lug for
carrying strap*
Speaker
Socket for
stereo headphones
Port for sensor cable
Microphone
Slot for micro-SD
memory card
USB connection for
charger / data transfer
Increase or reduce volume
Device On / Off / Standby
Trigger the camera
Device Functions, Buttons and Start Screen
Brief press: "Home" button
Longer press: Active applications
Left-hand LED: Device start display
Right-hand LED: Charge state display:
Orange – device is being charged
Green – device is charged
Sensor Operation
Adjusting the
volume
Start / Stop
recording
LED light
On / Off
Small acoustic horn
BS10-2
Long waveguide
BS20-2*
(For operating elements and connection: see airborne sound sensor)
Large
acoustic horn
BS10-3*
Airborne sound sensor BS10 with accessories*
Structure-borne sound and temperature sensor BS20 with accessories*
Switch on
target laser
Port for sensor cable
Operating signal
light (green)
Precise locator
BS10-1*
Magnetic
waveguide BS20-3*
Device status line:
Charge state, time etc.
Apps available via
quick access
Installed
apps and widgets
Display area
Back / Home /
Active applications (left to right)
*Optional accessories


