background image

Quick Start Guide for Tempo Trio (Windows Version)

12

Drive Formatting—Windows 2000

Formatting prepares a hard drive for use by dividing the data area into tracks and
sectors, enabling your computer to store and retrieve data from the drive. This
section describes the process of formatting hard drives connected to the Tempo
Trio, using the Disk Management Administrative Tool on systems running
Windows 2000. The following instructions detail the procedure to create a simple
volume (single partition); if you need to format a drive with multiple partitions,
refer to Windows Help for details. As an alternative, you may choose to format
and partition your hard drive(s) with any software that was included with the
drive, following the included instructions. 

1.

Turn on your computer and start Windows.

2.

From the taskbar, click on Start > Settings > Control Panel. 

3.

In the 

Control Panel

window, double-click Administrative Tools. 

4.

In the 

Administrative Tools

window, double-click Computer Management. 

5.

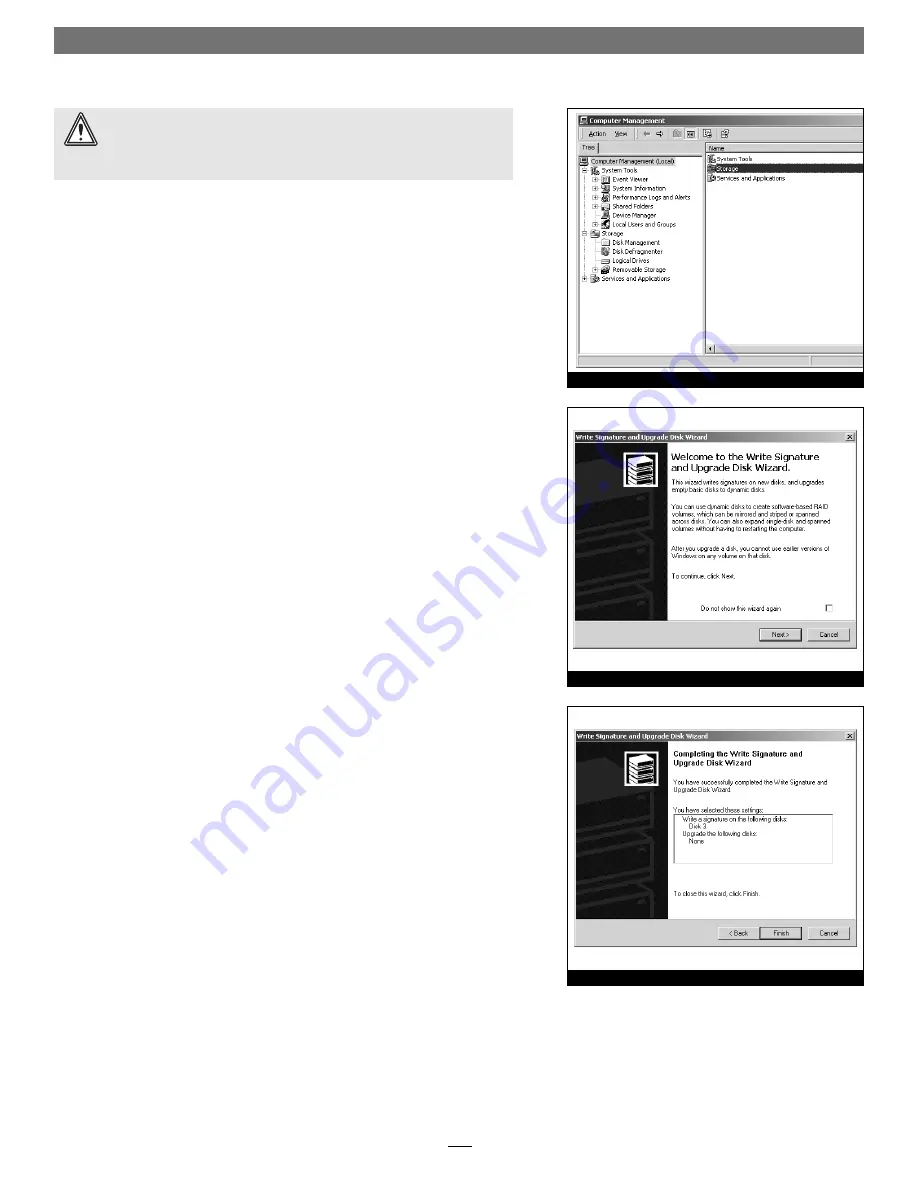
In the 

Computer Management

window, double-click Storage in the right win-

dow pane 

(Figure 11)

6.

In the right pane of the 

Computer Management

window, double-click Disk

Management (Local); the 

Write Signature and Upgrade Disk Wizard

will appear

(Figure 12)

. Click Next to continue.

7.

In the 

Select Disk to Write Signature

window, select the new disk (which

should be your only option), and then click Next to continue.

8.

In the 

Select Disk to Upgrade

window, select the new disk again (which should

be your only option), and then click Next to continue.

9.

When the next window appears (indicating the write signature was complet-
ed successfully), click Finish to close the window 

(Figure 13)

.

WARNING:

Until they have been formatted, hard drives attached to the

Tempo Trio will not appear under My Computer, and can’t be used; this 

also applies to drives with data on them, previously used in other computers.
Please be aware that 

formatting a drive erases any data present

.

Figure 11

Figure 12

Figure 13

Содержание TEMPO Trio

Страница 1: ...ion Medium Phillips screwdriver Small flat blade screwdriver Needle nose pliers Drive mounting brackets carriers or drive mounting sleds sold separately One additional Ultra ATA Cable sold separately One or more power cable Y adapters sold separately You may need the following items to connect peripherals to the Tempo Trio One or more FireWire IEEE 1394 cables sold separately One or more USB cable...

Страница 2: ...lose to restart your system and complete the installation You may now install the Tempo Trio card and the additional driver software included with this product Tempo Trio Card Installation Steps This section covers the installation of the Tempo Trio PCI combo card into your computer For information on attaching hard drives see page 8 1 Shut down your computer 2 Open your computer to access its exp...

Страница 3: ... Add New Hardware Wizard NEC USB Open Host Controller window appears click Next 8 When the next window appears select Search for best driver for your device Recommended and then click Next 9 When the next window appears click Next 10 When the message stating Windows has found an updated driver for this device click Next 11 When the message stating Windows is now ready to install the best driver ap...

Страница 4: ...ed installing the software that your new device requires appears click Finish the window will close 24 When the next Add New Hardware Wizard PCI Mass Storage Controller win dow appears click Next 25 When the next window appears select Search for best driver for your device Recommended and then click Next 26 Insert the Tempo Trio Windows Drivers diskette into your floppy drive select Specify a loca...

Страница 5: ...k Finish the window will close and then New Hardware Found windows will appear 8 When the Add New Hardware Wizard Win9x Me Promise Ultra133 tm IDE Controller window appears click Next 9 When the next window appears select Specify the location of the driver Advanced and then click Next 10 Insert the Tempo Trio Windows Drivers diskette into your floppy drive and then click Next 11 When the message s...

Страница 6: ...iles Search Results window appears select Install on of the other drivers and then click Next 6 From the list that appears select Win2000 Promise Ultra133 and then click Next 7 When the Digital Signature Not Found window appears click Yes the Mass Storage Controller driver will be installed 8 When the Completing the Found New Hardware Wizard window appears click Finish the window will close severa...

Страница 7: ...sking you to choose your search and instal lation options insert the Tempo Trio Driver diskette into your floppy drive and then select Search for the best drivers in these locations and Search removable media floppy CD ROM and then click Next 6 When the next window appears select WinXP Promise and then click Next 7 When the Hardware Installation window appears click Continue Anyway the appropriate...

Страница 8: ...ou must set the jumpers on each drive to the single setting when available or the master setting when not Figure 4 When connecting three or four drives to two Ultra ATA cables you must set the jumpers on two drives to the master setting and to the slave setting on the other drive s Figure 4 Quick Start Guide for Tempo Trio Windows Version 8 Support Note Technical knowledge may be required to gain ...

Страница 9: ...connect the slave gray connectors to the drives with jumpers set in the slave setting Figure 6 7 Locate the 4 pin power connector plugged into your computer s existing hard drive You should find at least one extra power connector near the exist ing drive if you have installed only one new drive plug the extra power con nector into it If there are no additional power connectors you must use power c...

Страница 10: ... listed assuming you ve connected only one drive at this time and then press Enter Do not accidentally choose an existing formatted drive 7 When the FDISK Options screen appears again select Create DOS Partition or Logical DOS Drive and then press Enter 8 From the Create DOS Partition or Logical DOS Drive screen select Create Primary DOS Partition and then press Enter 9 As the primary DOS partitio...

Страница 11: ...s continues a progress bar will appear at the bottom of the Format window Figure 10 19 When the drive formatting process is complete a Format Results window will appear press Enter 20 When the dialogue appears suggesting you run ScanDisk press Enter 21 A Windows Help window will appear follow the instructions to run ScanDisk Once ScanDisk is finished your installation is complete you may access yo...

Страница 12: ...w double click Administrative Tools 4 In the Administrative Tools window double click Computer Management 5 In the Computer Management window double click Storage in the right win dow pane Figure 11 6 In the right pane of the Computer Management window double click Disk Management Local the Write Signature and Upgrade Disk Wizard will appear Figure 12 Click Next to continue 7 In the Select Disk to...

Страница 13: ...ears click Finish to complete the formatting procedure Once the formatting procedure is fin ished your installation is complete you may access your newly formatted drive through your applications as well as My Computer Please note depending on the capacity of the drive you are working with the formatting procedure may take anywhere from a few seconds to a few minutes to complete WARNING By default...

Страница 14: ... Performance and Maintenance 4 In the Performance and Maintenance window click Administrative Tools 5 In the Administrative Tools window double click the Computer Management shortcut Figure 17 6 In the left pane of the Computer Management window double click Disk Management the Initialize and Convert Disk Wizard will appear Figure 18 Click Next to continue 7 In the Select Disks to Initialize windo...

Страница 15: ...click Finish to complete the formatting procedure Once the formatting procedure finishes your installation is complete you may access your newly formatted drive through your applications as well as My Computer Please note depending on the capacity of the drive you are working with the formatting procedure may take anywhere from a few seconds to a few minutes to complete WARNING By default NTFS wil...

Страница 16: ... being transferred or cause your system to hang Always stop unplug or eject any drive connected to the USB or FireWire ports before disconnecting it from its cable or the Tempo Trio card Remember to connect external power supplies to the peripherals that require them Although many peripherals may draw power directly from the Tempo Trio card other devices require an external power source When a USB...

Отзывы: