background image

2

GPU Card Installation Steps

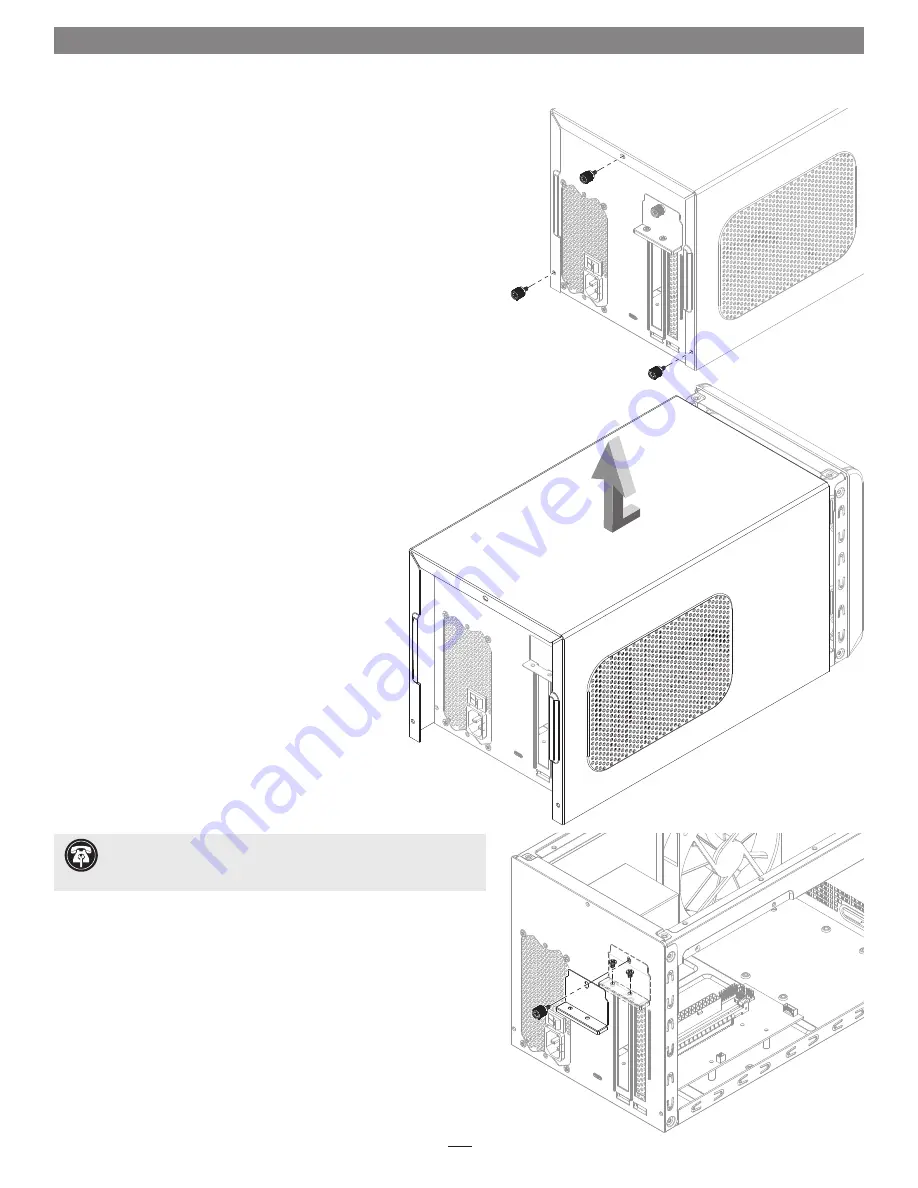
Figure 1

Figure 2


1.

 Remove the eGFX Breakaway Box (referred to as “the box” from this 

point forward in this section) from its packaging, and then set it on a 
flat, level surface. 


2.

 Remove and set aside the three thumbscrews securing the top cover to 

the inner assembly 

(Figure 1)

.


3. 

Grasping the raised sections on the back edge, slide the top cover 
toward you until it stops 

(Figure 2)

.


4.

 Lift the top cover straight up, pull the sides apart slightly, and then 

remove and set aside the cover 

(Figure 2)

.


5.

 Remove and set aside the two screws securing the PCIe card bracket 

locking plate to the inner assembly 

(Figure 3)

.


6.

 Remove and set aside the thumbscrew securing the PCIe card bracket 

locking plate, and then remove the port access cover 

(Figure 3)

.


 Support  Note:

 To avoid damaging components due to static 

electricity discharge, wear an antistatic wrist strap while working 

inside the eGFX Breakaway Box.

Figure 3

Содержание eGFX Breakaway

Страница 1: ...t the included Belkin USB hub to your computer refer to the documentation included with the hub 5 Using System Report confirm the Breakaway Box and graphics card are recognized by your computer see online user guide for details if necessary 6 Configure the card and any other settings for your setup refer to the documentation included with the Sapphire card for more information 7 1 4 185 8 202 13 3...

Страница 2: ...op cover toward you until it stops Figure 2 4 Lift the top cover straight up pull the sides apart slightly and then remove and set aside the cover Figure 2 5 Remove and set aside the two screws securing the PCIe card bracket locking plate to the inner assembly Figure 3 6 Remove and set aside the thumbscrew securing the PCIe card bracket locking plate and then remove the port access cover Figure 3 ...

Страница 3: ...rd s connector and the slot for damage and then try inserting the card again Figure 4 9 Connect the 8 pin auxiliary power connector to the card 10 Secure the card using the previously removed PCIe card bracket locking plate screws and thumbscrew Figure 5 Figure 4 Figure 5 WARNING When handling computer products take care to prevent components from being damaged by static electricity avoid working ...

Страница 4: ...gure 7 14 Connect the included Thunderbolt cable between the Thunderbolt 3 port on the box and a Thunderbolt 3 port on your computer When using a MacBook Pro 13 inch Late 2016 Four Thunderbolt 3 Ports connect to one of the left hand ports for full 40Gbps PCIe bandwidth 15 Connect the included power cord between a wall outlet or power strip and the box s power socket and then flip the power switch ...

Страница 5: ...ttez à la boîte et le Mac 4 Connectez le hub USB Belkin inclus à votre Mac Reportez vous à la documentation fournie avec le hub Utile avec casques VR 5 En utilisant System Report confirmez que le Breakaway Box et la carte graphique sont reconnues par votre Mac Consultez le guide de l utilisateur en ligne pour plus de détails si nécessaire 7 1 4 185 8 202 13 3 8 340 6 Configurez la carte et tout au...

Страница 6: ... arrête Figure 2 4 Soulever le capot supérieur vers le haut écarter légèrement les côtés puis retirer et mettre de côté le couvercle Figure 2 5 Enlever et séparer les deux vis de fixation du support plaque de fixation carte PCIe a l assemblage intérieur Figure 3 6 Retirez et mettez de côté la vis pouce fixant la plaque de verrouillage du support de la carte PCIe puis retirez le couvercle d accès d...

Страница 7: ...s puis essayez d insérer la carte à nouveau Figure 4 9 Connectez le connecteur d alimentation auxiliaire à 8 pin à la carte 10 Fixez la carte à l aide de la plaque de fixation carte PCIe précédemment retirée des vis et de la vis à oreilles Figure 5 Figure 4 Figure 5 ATTENTION Lors de la manipulation de produits informatiques veillez à éviter que les composants ne soient endommagés par l électricit...

Страница 8: ...es précédemment Figure 7 14 Connectez le câble Thunderbolt inclus entre le port Thunderbolt 3 sur la boîte et un port Thunderbolt 3 sur votre Mac Lorsque vous utilisez un MacBook Pro 13 pouces fin 2016 quatre Thunderbolt 3 ports se connecter à l un des ports à la main gauche pour la bande passante PCIe pleine 40Gbps 15 Connectez le cordon d alimentation fourni et mettez l interrupteur d alimentati...

Страница 9: ...n siehe Dokumentation die dem Hub beigefügt ist 5 Öffnen Sie den macOS Systembericht und stellen Sie sicher dass die Breakaway Box und die Grafikkarte von Ihrem Computer erkannt werden falls erforderlich siehe online Guide für mehr Informationen 7 1 4 185 8 202 13 3 8 340 6 Konfigurieren Sie die Karte sowie andere Einstellungen für ihr persönliches Setup siehe Dokumentation die der Grafikkarte bei...

Страница 10: ...bdeckung gerade nach oben greifen Sie die Seiten der Abdeckung und spreizen Sie diese etwas anschließend nehmen Sie die Gehäuseabdeckung ab Siehe Abbildung 2 5 Öffnen Sie die beiden Schrauben welche das PCIe Karten Sicherungsblech befestigen und legen Sie diese zur Seite Siehe Abbildung 3 6 Öffnen Sie die Rändelschraube welche das PCIe Karten Sicherungsblech hält und legen Sie diese zusammen mit d...

Страница 11: ...ecker und den PCIe Steckplatz auf Beschädigungen probieren Sie es anschließend erneut Siehe Abbildung 4 9 Verbinden Sie den Acht Pin Stromanschluss mit der Karte 10 Sichern Sie die Karte mit dem vormals entfernten PCIe Karten Sicherungsblech und dessen Schrauben Siehe Abbildung 5 Abbildung 4 Abbildung 5 Achtung Stellen Sie sicher dass elektrische Komponenten nicht durch statische Elektrizität besc...

Страница 12: ...Rändelschrauben um die Gehäuseabdeckung zu sichern Siehe Abbildung 7 14 Verbinden Sie das mitgelieferte Thunderbolt Kabel mit dem Thunderbolt 3 Anschluss der eGFX Box sowie mit dem Thunderbolt 3 Anschluss ihres Computers Falls Sie ein MacBook Pro 13 Zoll Ende 2016 Vier Thunderbolt 3 Anschlüsse verwenden dann schließen Sie das Thunderbolt Kabel an einem der linken Anschlüsse an um die volle 40 Gbps...

Страница 13: ... Consulte la documentación incluida con el concentrador Útil con auriculares VR 5 Utilizando el Información del Sistema confirme que el Breakaway Box y la tarjeta gráfica son reconocidas por su Mac Consulte la guía del usuario en línea para obtener más información si es necesario 7 1 4 185 8 202 13 3 8 340 6 Configure la tarjeta y cualquier otra configuración para su configuración Consulte la docu...

Страница 14: ... que se detenga Figura 2 4 Levante la cubierta superior hacia arriba separe ligeramente los lados y a continuación retire y separe la cubierta Figura 2 5 Retire y aparte los dos tornillos que fijan la placa de fijación del soporte de la tarjeta PCIe al conjunto interior Figura 3 6 Retire y ponga a un lado el tornillo de apriete que asegura la placa de bloqueo del soporte de la tarjeta PCIe y luego...

Страница 15: ...años e intente volver a insertar la tarjeta Figura 4 9 Conecte el conector de alimentación auxiliar de 8 pin a la tarjeta 10 Asegure la tarjeta usando la placa de bloqueo de la tarjeta PCIe previamente retirada los tornillos y el tornillo de mariposa Figura 5 Figura 4 Figura 5 ADVERTENCIA Cuando maneje productos informáticos tenga cuidado de evitar que los componentes sean dañados por electricidad...

Страница 16: ...tó previamente Figura 7 14 Conecte el cable Thunderbolt incluido entre el puerto Thunderbol 3 en la caja y un puerto Thunderbolt 3 en su Mac Cuando se utiliza un MacBook Pro 13 pulgadas finales de 2016 cuatro puertos Thunderbolt 3 se conectan a uno de los puertos de la mano izquierda para el ancho de banda de 40 Gbps PCIe 15 Conectar el cable de alimentación incluido y encienda el interruptor de e...

Отзывы: