Sonance BPS6 Скачать руководство пользователя страница 5

10

(4) Wall Painting  

Step 1- Clean & Check

Before  painting  the  surface,  it’s  important  to  make  sure  the 
provided paint shield is still in place.   This shield provides for a 
precise and easy way to mask the opening.  First, make sure the 
opening  is  completely  free  of  excess  drywall  mud  and  debris. 
NOTE:  no  additional  masking  tape  is  needed  over  the  paint 
shield.  Once the painting is complete, it will be discarded.    
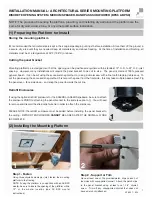
Step 2- Paint

Painting  a  wall/ceiling  with  Architectural 
Series    openings  is  no  di

erent  than 

painting any other drywall surface.   The 
paint  can  be  rolled  directly  over  the 
openings - cutting around with a brush is 
not  necessary.    Before  the  paint  is 
completely  dry,  it  is  a  good  idea  to 
clean-up  the  area  inside  the  mud  dam 
using  a  dry  mini  roller  (1”)  or  a  dry 
paintbrush.    Simply  roll  the  roller  or  run 
the  paintbrush  around  the  mud  dam 
edge  to  help  prevent  any  unnecessary 
build-up, or drips around the opening.  

5

Содержание BPS6

Страница 1: ...IOR to attaching the panel bracket to the joists see photo 1 You will need to remove and discard the strain relief wire tie in order to attach the enclosure PLEASE NOTE the retrofit enclosure must be added before installing the panel bracket to the ceiling RETROFIT ENCLOSURES CANNOT BE ADDED AFTER THE DRYWALL WORK IS COMPLETE 6 2 Installing the Mounting Platform Step 1 Fasten Using three drywall s...

Страница 2: ...or AS speaker w retrofit enclosure Prewire to this location as normal but be sure to make wire connections on the back of the retrofit enclosure prior to continuing on to the next step It is highly recommended to attach a strain relief to the speaker wire to ensure that it stays connected to the terminals during the construction process Once the drywall work is complete there is no easy access to ...

Страница 3: ...s than a level 5 finish it is highly recommended that the specification for that wall be changed to level 5 For more information about the different levels of drywall finishes visit the USG website http www usg com documents construction handbook chapter5 pdf Step 3 1st Coat Mud Coat the tape and entire Mounting Platform with joint compound This ensures all pits and valleys have been filled Before ...

Страница 4: ... The sanding shield and drywall compound should be completely flush and drywall should be smooth Step 3 Pull Once the sanding is complete push firmly on the sanding shield to break any adhesion to surrounding surfaces Next remove the screw in the center of the shield Then remove the shield using a screw and a pair of pliers or a slotted screw driver Step 5 3rd 4th Coat Mud Continue to build coats ...

Страница 5: ...Once the painting is complete it will be discarded Step 2 Paint Painting a wall ceiling with Architectural Series openings is no different than painting any other drywall surface The paint can be rolled directly over the openings cutting around with a brush is not necessary Before the paint is completely dry it is a good idea to clean up the area inside the mud dam using a dry mini roller 1 or a dr...

Отзывы: