1.
2.
3.
4.
5.
GB
solar panel colour lantern strip
solar cell a 10 lanterns • one high-power white LED in each lantern • automatic powering on and off: charges during the
daytime and illuminates at night • built-in solar cell and battery charger • up to 4 hours continuous operation • replaceable
battery • stake or wall-mountable solar cell • weather proof design
If you are not using the device for a longer time (e.g., during the winter), remove the battery, carefully clean the cover, and store it in a place where the
temperature is above the freezing point.
Assemble the parts carefully, without the use of tools. Do not use a hammer, pliers, or any other tool, as these can easily break the device’s parts. The parts
need to be pushed together until they click. At the end verify that the light is stable and parts are fastened.
The lamp will now work automatically: the battery is charged during the day, and the lamp comes on during the twilight hours and remains lit. The time the lamp
is lit depends on how long the solar panel was illuminated, and how strong the light was. You can check that the lamp works before placing it out of doors by
covering the complete top part. Keep in mind that the light was designed to work in darkness. In a light environment the lamp is lit only faintly, or not at all.
FINDING THE RIGHT LOCATION
In order for the battery to be charged as much as possible (so that it can power the LED for a long time during the night) you need to place the garden light in
sunlit place out of any shadow. The longer the solar panel is exposed to direct sunlight, the longer the lamp will work at night. Following a fully lit day, this will be
approximately 8 hours (although the battery is not fully charged even at the end of such days).
REPLACING THE BATTERY
If the lamp remains on for a significantly shorter time following an equally long sunlit period, you need to replace the battery. The offered type is between 500-
800 mAh, AA size, Ni-Mh rechargeable battery.
Replace the battery in the compartment with a new one, paying attention to the correct polarity (the negative pole should be connected to the spring).
Note: If it is possible, you can extend the battery’s lifetime by using an external charger to fully discharge and charge it three times in a row. You can repeat this
process once every month. You can also follow this procedure before you put the light away for the winter, and before you insert a new battery
.
WARNINGS
• Using a battery with a larger capacity will not extend the lamp’s working period at night.
• When the temperature is around freezing point, the cold battery will not yield enough voltage to light up the lamp correctly.
• It is recommended to remove and clean the device before the winter, and store it in a place above freezing temperature.
• Clean the cover (especially the solar panel) regularly. Be careful not to scratch with a rough cleaning agent.
• Do not press hard on the lamp head when assembling and placing the lamp.
Waste equipment must not be collected separately or disposed of with household waste because it may contain components hazardous to the environment or
health. Used or waste equipment may be dropped off free of charge at the point of sale, or at any distributor which sells equipment of identical nature and
function. Dispose of product at a facility specializing in the collection of electronic waste. By doing so, you will protect the environment as well as the health of
others and yourself. If you have any questions, contact the local waste management organization. We shall undertake the tasks pertinent to the
manufacturer as prescribed in the relevant regulations and shall bear any associated costs arising.
DISPOSING OF ALKALINE AND RECHARGEABLE BATTERIES
Batteries, whether alkaline or rechargeable, must not be handled together with regular household waste. It is the legal obligation of the product's user
to dispose of batteries at a nearby collection center or at a retail shop. This ensures that the batteries are ultimately neutralized in an environment-
friendly way.
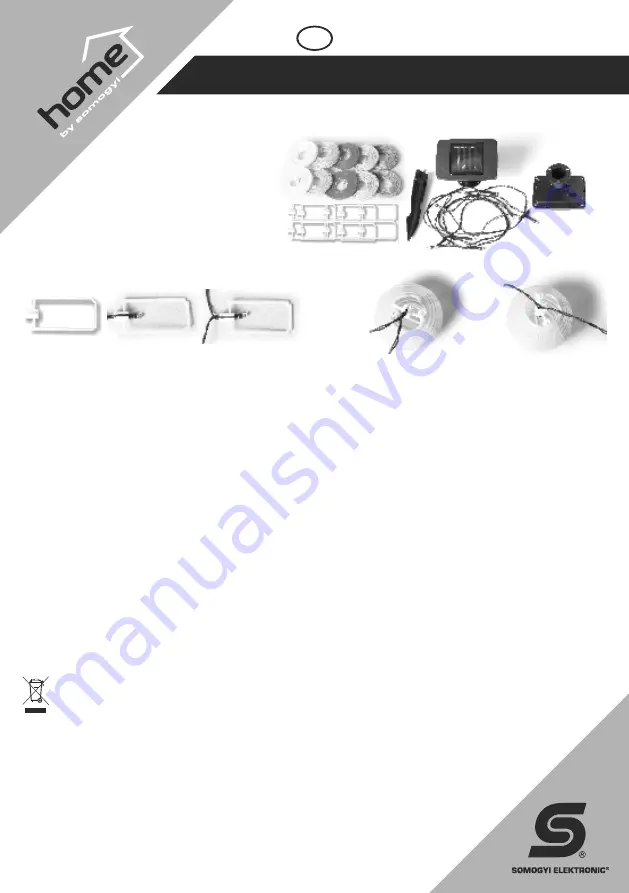
PARTS
The package contains the following
components:
1. lanterns (10 pcs)
2. plastic frame for the lanterns (10 pcs)
3. solar panel with LED light strip
4. switch
5. stake
MX 202
Insert the plastic frame into the lantern then insert the two tabs located on top
of the frame into the two plastic loops located at the top opening of the lantern.
SETUP
Uncoil the light strip. Feed each LED through the plastic holder located on
top of the plastic frame.
SPECIFICATIONS
built-in battery: ...................................................................1 x 1,2 V / 600 mAh / AA (Ni-Mh)
light source:....................................................................................10 x Ø 5 mm white LEDs
maximum operating time:...................................................................approx. 4 hours / night
size:
distance between lanterns:.....................................................18 cm
power cable:..................................................................130 cm
lantern diameter:......................................................approx. 8 cm


