background image

LED Explanation:


Name Description 

PWR 

z


Lights Red when the power is ready. 

z


Lights off means power off. 

3G 

z


Lights when 3G service is ready. 

WIFI 

z


Lights blue when the wireless connection is established. 

WAN(LAN) 

z


Lights off means there is no device linked to the corresponding port 

z


Lights blue when connected to a device through to the corresponding port. 

z


Flashes when sending/receiving data. 

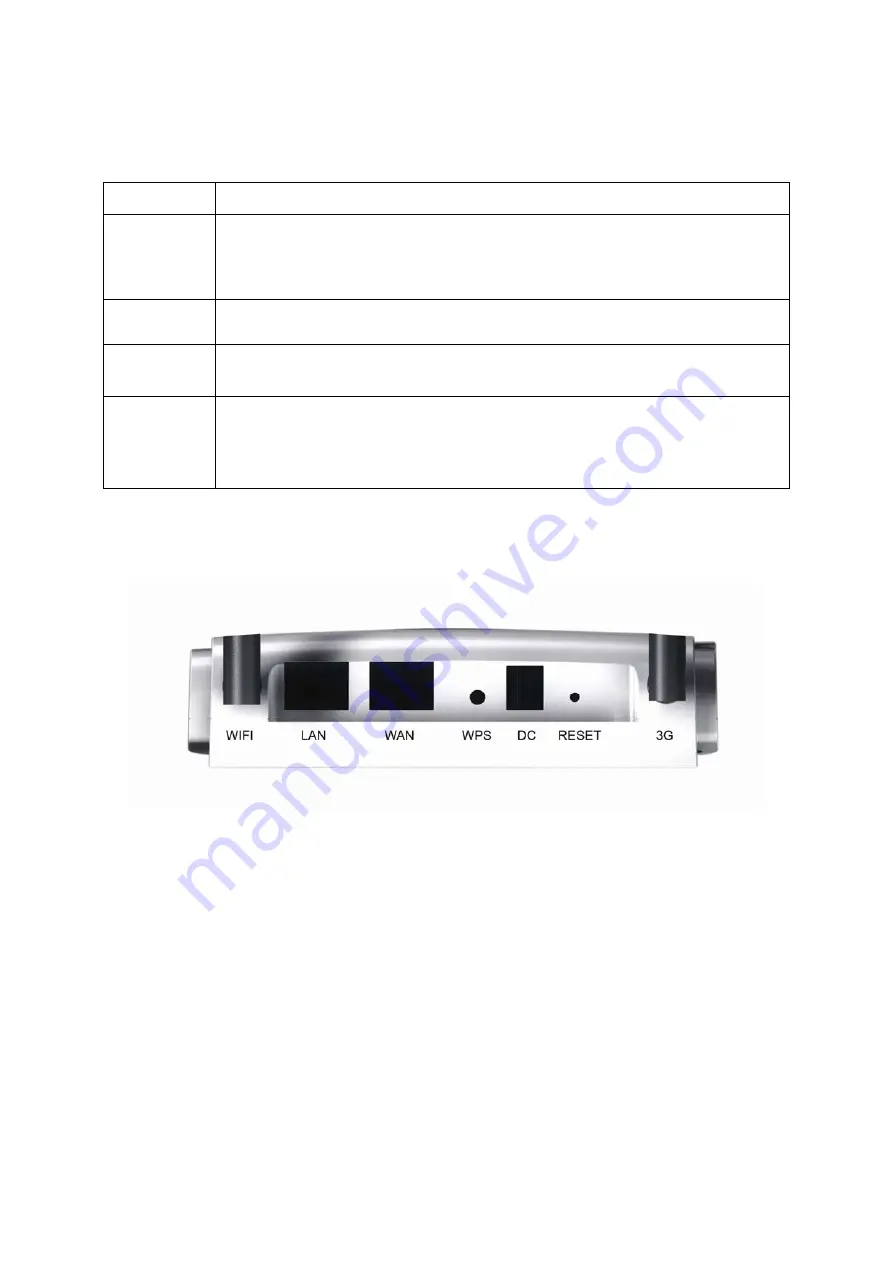
2.2 The Back Panel 


The following parts are located on the rear panel(view from left to right). 

z


WIFI:


Used for WIFI ‘s wireless operation and data transmit(The antenna length is 196MM) 

z


LAN:  

Through this port, you can connect the Router to your PCs and the other Ethernet network 

device. 

z


WAN:


RJ45 WAN port for connecting the router to a cable/DSL Modem, or Ethernet.


z


DC:


The Power plug is where you will connect the power adapter


z


RESET:


After the router is powered on, press this reset button using the 

end of paper clip or other small pointed object to reset the router and to restore it to factory default 

settings. 

z


3G:


Used for 3G wireless network signal reception(The antenna length is 157MM). 

Содержание 3G-431R

Страница 1: ...431R 3G Wireless Router User Guide VEC 1 0 1 3G 431R 3G HSUPA and Wifi Router Solwise Ltd www solwise co uk ...

Страница 2: ...Requirements 6 2 5 Installation Environment Requirements 6 Chapter 3 Software configuration 7 3 1 Login 7 3 2 System Status 7 3 3 WAN Setting 8 3 3 1 Basic Setting 8 3 3 2 MAC Clone 13 3 3 3 DDNS 13 3 4 LAN Setting 14 3 4 1 Basic Setting 14 3 4 2 DHCP Setting 15 3 4 3 DHCP Client Status 16 3 5 WLAN Setting 16 3 5 1 Basic Setting 17 3 5 2 Security 17 3 5 3 WLAN Advanced Settings 19 2 ...

Страница 3: ...3 7 Forwarding 24 3 7 1 NAT NAPT 24 3 7 2 Port Forwarding 24 3 7 3 DMZ 25 3 8 Routing Setting 26 3 8 1 Routing table 26 3 8 2 Static Routing 26 3 9 System Tools 27 3 9 1 System Time 27 3 9 2 Backup Setting 28 3 9 3 Firmware Upgrade 28 3 9 4 Reboot 29 3 9 5 Reset to Default 30 3 9 6 Password 30 3 ...

Страница 4: ... the HSUPA wireless module 1 2 Features z Built in the HSUPA wireless module just insert the service provider SIM card z High speed data connections with rate up to 7 2Mbps z NAT NAPT with VPN pass through Virtual Server z Automatic receipt of IP address with DHCP server z 5 LED Indicator x 5 PWR 3G WIFI WAN LAN z Browser based configuration z Access Control to manage users z User friendly configu...

Страница 5: ...ed on the rear panel view from left to right z WIFI Used for WIFI s wireless operation and data transmit The antenna length is 196MM z LAN Through this port you can connect the Router to your PCs and the other Ethernet network device z WAN RJ45 WAN port for connecting the router to a cable DSL Modem or Ethernet z DC The Power plug is where you will connect the power adapter z RESET After the route...

Страница 6: ...t on the router 5 Connect the AC power adapter to the AC power socket on the router and the other end into an electrical outlet The router will start to work automatically 6 Power on your PC and Cable DSL Modem 2 4 System Requirements z Broadband internet Access Service DSL Cable Ethernet z One DSL Cable Modem that has an RJ45 connector you do not need it if you connect the router to the Ethernet ...

Страница 7: ...f the main menus On the right of the web based utility there are the detailed explanations and instructions for the corresponding page To apply any settings you have altered on the page please click the save button 3 2 System Status The Status page displays the router s current status and configuration All information is read only LAN The field displays the current settings or information for the ...

Страница 8: ...here are two items within the WAN section Basic Setting and MAC Clone 3 3 1 Basic Setting You can configure the WAN port parameters on this page Firstly please choose the WAN Connection Type Static IP Address Dynamic IP Address PPP over Ethernet 3G for internet The default type is Dynamic IP If you aren t given any login parameters fixed IP address logging ID etc please select Dynamic IP If you ar...

Страница 9: ...hernet networks is 1500 Bytes For some ISPs you need to reduce the MTU But this is rarely required and should not be done unless you are sure it is necessary for you ISP connection If your ISP gives you one or two DNS addresses select these DNS servers and enter the primary and secondary addresses into the correct fields Otherwise the DNS servers will be assigned dynamically from your ISP Click th...

Страница 10: ...e normal MTU maximum Transmission Unit value for most Ethernet networks is 1500 Bytes For some ISPs you may need to modify the MTU But this is rarely required and should not be done unless you are sure it is necessary for your ISP connection Primary DNS Enter the DNS address in dotted decimal notation provided by you ISP Secondary DNS Type another DNS address in dotted decimal notation provided by...

Страница 11: ...ur ISP PPPoE Service Name The service name these should not be configured unless you are sure it is necessary for you ISP DNS IP address If you know your ISP does not automatically transmit DNS address to the router during login enter the IP address in dotted decimal notation of your ISP s primary DNS server If a secondary DNS server address is available enter it as well Click the Save Settings bu...

Страница 12: ...cate In mobile phones a Pin code locks the SIM card until you enter the correct code If required please enter your SIM card s PIN code The code will be stored here for future reference by the router and you will not have re enter this unless you change SIM cards Dial Number Enter your Dial Number provided by your ISP Username Enter the username provided by your service provider The Username associ...

Страница 13: ...e following MAC Address Enter the MAC Address provided by your ISP Click the Save Settings button to save your settings 3 3 3 DDNS The router offers a Dynamic Domain Name System DDNS feature DDNS lets you assign a fixed host and domain name to a dynamic Internet IP Address It is useful when you are hosting your own website FTP server or other server behind the router Before using this feature you ...

Страница 14: ...ton to save your settings Status The status of the DDNS service connection is displayed here 3 4 LAN Setting A Local Area Network LAN is a shared communication system to which many computers are attached and is limited to the immediate area usually the same building or floor of a building There are three items within the LAN section Basic Setting DHCP Setting and DHCP Client Status 3 4 1 Basic Set...

Страница 15: ... default as a DHCP Dynamic Host Configuration Protocol server which provides the TCP IP configuration for all the PC s that are connected to the router on the LAN The DHCP Server can be configured on the page DHCP Server Enable or Disable the DHCP server If you disable the Server you must have another DHCP server within your network or else you must manually configure the computer Start IP Address...

Страница 16: ...IP address provided by your ISP or consult your ISP Secondary DNS Optional Input the IP address of another DNS server if your ISP provides two DNS servers Click the Save Settings button to save your settings 3 4 3 DHCP Client Status The page shows IP Address Host MAC Address for each DHCP Client attached to the router IP Address The IP Address that the router has allocated to the DHCP client host ...

Страница 17: ...ut it is recommended strongly that you change your networks name to a different value The value is case sensitive For example 431R is NOT the same as 431r Channel This field determines which operating frequency will be used It is unnecessary to change the wireless channel unless you notice interference problems with another nearby access point Click the Save Settings button to save your settings 3...

Страница 18: ...ations in your network WEP Key Format You can select ASCLL or Hexadecimal Format ASCLL Code Format stands for any combination of keyboard characters in the specified length Hexadecimal format stands for any combination of hexadecimal digits 0 9 a f A F in the specified length Key Type You can select the WEP key length 64 bit or 128 bit or 152 bit for encryption Disabled means the WEP key entry is ...

Страница 19: ...te you may slightly increase the Fragmentation Threshold Setting the Fragmentation Threshold too low may result in poor network performance Only minor modifications of this value are recommended RTS Threshold This value should remain at its default setting of 2347 The range is 1 2347 bytes Should you encounter inconsistent data flow only minor modifications are recommended If a network packet is s...

Страница 20: ...irewall URL Filter MAC Filter ACL Setting Click any of them and you will be able to configure the corresponding function The detailed explanations for each submenu are provided below 3 6 1 Firewall Using the Firewall page you can turn the general firewall switch on or off The default setting for the switch is on If the general firewall switch is off even if URL Filtering MAC Filtering and ACL Sett...

Страница 21: ...t on this page URL Filter Enable or disable the URL filter Filter Mode You can just only allow URLs of the List to be accessed or deny them URL Enter your URL allow or deny Click the Save Settings button to save your settings 3 6 3 MAC Filter The MAC Filter page allows you to control access to the Internet by users on your local network based on their MAC Address 21 ...

Страница 22: ...Delete All button will delete all MAC Address in the Table of MAC Fliter Click the Save Settings button to save your settings 3 6 4 ACL Setting Access Control List ACL is an instruction list applied to Router Interface These instruction lists are used for telling router which data packets are acceptable while which ones are refused As regards the data packets accepted or refused it s determined by...

Страница 23: ...IP Address if empty means all IP Address Protocol Select the protocol of the packet Dest Port Range Select the range of the dest port Day Select the ACL working time Time Set up the ACL working Start Time and Stop Time Action Accept this packet or Drop it Click the Save Settings button to save your settings 23 ...

Страница 24: ...managemnet and range is 1025 to 65535 The default value is 8080 Click the Save Settings button to save your settings 3 7 2 Port Forwarding This page used to set Virtual server Virtual servers can be used for setting up public services on your LAN such as DNS Email and FTP A virtual server is defined as a service port and all requests from the Internet to this service port will be redirected to the...

Страница 25: ...button to add these information to the Virtual server list Click the Save Settings button to save your settings 3 7 3 DMZ The DMZ host feature allows one local host to be exposed to the internet for a special purpose service such as Internet gaming or video conferencing DMZ host forwards all the ports at the same time Any PC whose port is being forwarded must have its DHCP client function disabled...

Страница 26: ...ings button to save your settings 3 8 Routing Setting 3 8 1 Routing table The Static Route page displays the router s current static route and configuration All information is read only 3 8 2 Static Routing A static route is a pre determined path that network information must travel to reach a specific host or network You can set up the Static Routing On this page 26 ...

Страница 27: ...ting 5 Click the Save Settings button to save this settings 3 9 System Tools There are six submenus under the System tools menu System Time Backup Setting Firmware Upgrade Reboot Reset to Default Password Click any of them and you will be able to configure the corresponding function The Detailed explanations for each submenu are provided below 3 9 1 System Time The NTP Choose the time zone you are...

Страница 28: ...estore the configuration file you saved before Click the Backup button to save all configuration settings as a backup file in your local computer To restore the router s configuration follow these instructions 1 Click the Browse button to select the backup file which you want to restore 2 Click the Restore button 3 9 3 Firmware Upgrade The page allows you to upgrade the latest version firmware to ...

Страница 29: ... button 3 9 4 Reboot This page allows you to reboot the router Click the Reboot button to reboot the router Some setting of the router will take effect only after rebooting which includes z Change LAN IP Address System will reboot automatically z MAC Clone System will reboot automatically z DHCP service function z Static address assignment of DHCP server z Web Service Port of the router z Upgrade ...

Страница 30: ...min z The default Password admin z The default IP Address 192 168 0 1 z The default Subnet Mask 255 255 255 0 Click the Save Settings button to save your settings 3 9 6 Password This page allows you to change the factory default user name and password of the router It is recommended strongly that change the factory default user name and password of the router All users who try to access the router...

Отзывы: