background image

57

56

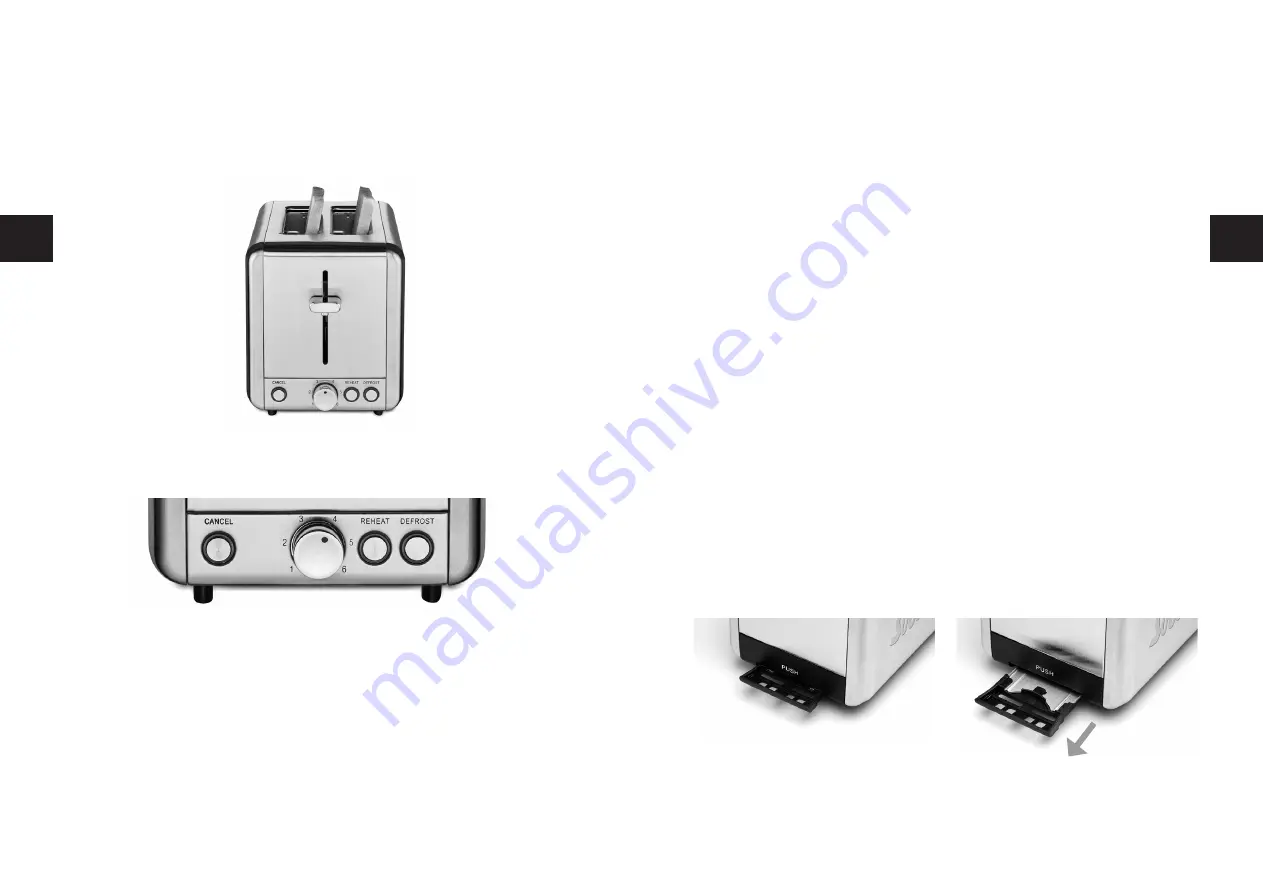
5. Once the toasting process is completed, the bread / pastry is automatically lifted 

and the 

CANCEL

 button surround goes out.

Notes:


– The toasting process can be interrupted at any time by a mere press of the 

CAN-

CEL

 button. This stops the toasting process and the bread is lifted.


– If you do not want to use the classic toasting function and use the 

DEFROST

 or 

REHEAT

 functions instead, press the respective button right after lowering the 

operating lever (E), the button surround of the button you have pushed lights up 
in blue to indicate the function, just like the 

CANCEL

 button surround.

Warning:

Never leave the toaster unsupervised while it is in use, as there is always the risk of 
the bread getting stuck in it and starting to burn. In the unlikely event of a toast, 
bread or bagel being stuck in the slot, switch the appliance off with the 

CANCEL


button. In this case, pull the power plug from the power socket and let the appliance 
cool down completely before removing the bread from the slot with a wooden tool 
(e.g. a cooking spoon). Be especially careful not to damage the heating elements 
when doing that.

CLEANING AND MAINTENANCE

1. Pull the power plug and let the toaster cool down completely.

2. To remove the bread crumbs, you have to pull the bread crumb tray (G) out of 

the appliance. To do that, briefly push against the narrow end of the bread crumb 
tray (G), underneath the inscription PUSH. A small portion of the tray springs 
out, the tray can now be pulled out. Empty the bread crumb tray and, if neces-
sary, clean it with a soft, dry towel. Then, push the bread crumb tray all the way 
back into the appliance. Do not place the bread crumb tray in the dish washer.  


STARTING UP

1. Plug the power plug into a suitable power outlet.

2. Place the bread, the slice of toast or the crumpet resp. bagel you wish to toast in 

the slot. Make sure that the slices are not too thick, long or wide and precisely fit 
into the slots. The slices should not exceed 12 x 12 cm.

3. Select the desired degree of roasting with the roasting degree control (B). In po-

sition 

1

, the roasting is lightest, in position 

6

, it is darkest. 

Note:

When using the toaster for the first time, you should start with roasting degree 3. 
Different kinds of bread and personal preference might require different roasting de-
gree settings. For instance, the setting should be lower for light, fluffy bread than for 
bread with a firm texture. Likewise, older bread requires a lower degree of roasting, 
as the bread is drier than fresh bread.

4. To start the toasting process, push the operating lever (E) down, the bread / pastry 

is moved down and simultaneously centered. The 

CANCEL

 button surround lights 

up blue and the bread / pastry is toasted.

GB

GB

Содержание STEEL 8002

Страница 1: ...S I N C E 1 9 0 8 STEEL Typ Type Tipo 8002 Bedienungsanleitung Mode d emploi Istruzioni per l uso User Manual Gebruiksaanwijzing...

Страница 2: ...3 2 s DEUTSCH 04 s FRAN AIS 18 s ITALIANO 32 s ENGLISH 46 s NEDERLANDS 60...

Страница 3: ...Fachm nnischen Rat erhalten Sie bei Ihrem Elektriker 13 Nehmen Sie keine nderungen am Ger t Kabel Stecker oder am Zubeh r vor WICHTIGE SICHERHEITSHINWEISE Bitte lesen Sie vor Gebrauch Ihres Solis Toa...

Страница 4: ...on Kindern fernhalten Erstickungsgefahr 30 Stellen Sie immer sicher dass das zu toastende Brot bzw das Geb ck in der f r die Schlitze passenden Gr sse max 12 x 12 cm pro Brotscheibe zugeschnitten ist...

Страница 5: ...7 Entfernen Sie sich niemals vom Toaster w hrend das Ger t in Betrieb ist 38 Das Ger t und das Zubeh r immer sauber halten Beachten Sie dazu die Angaben in dieser Anleitung 39 Reinigen Sie den Toaster...

Страница 6: ...rene Toasts Brotscheiben bzw Geb ck E Bedienungshebel Wenn Sie den Bedienungshebel nach unten dr cken startet der Toastvorgang erst dann kann wahlweise die Funktion DEFROST oder REHEAT aktiviert wer d...

Страница 7: ...egen Sie das gefrorene Brot den gefrorenen Toast in die Schlitze W hlen Sie den gew nschten Br unungsgrad indem Sie den R stgrad Regler in die entsprechende Position drehen Um den Auftau Vorgang zu st...

Страница 8: ...z auf das schmale Ende der Brotkr mel Schublade G unterhalb der Aufschrift PUSH Ein kleiner Teil der Schublade springt heraus und die Schublade kann nun herausgezogen werden Leeren Sie die Brotkr mel...

Страница 9: ...hen Ihnen gerne mit Rat und Tat zur Seite Die Kon taktadressen finden Sie am Ende dieser Bedienungsanleitung Bewahren Sie die Originalverpackung dieses Artikels gut auf damit Sie sie f r einen eventue...

Страница 10: ...ous conseillons d utiliser un interrupteur de s curit avec une sen sibilit diff rentielle de maximum 30 mA Demandez conseil votre lectricien CONSIGNES DE SECURITE IMPORTANTES Merci de lire ce mode d e...

Страница 11: ...aisses ou trop larges de mani re ce qu elles ne se coincent pas ou ne s accrochent pas dans les fentes et qu elles n entravent pas ou ne bloquent pas le syst me de descente ou remont e automatique 13...

Страница 12: ...ropres R f rez vous pour cela aux consignes indiqu es dans le mode d emploi 39 Ne nettoyez jamais le grille pain avec une ponge m tallique Les parties en m tal de l ponge risqueraient de se d tacher d...

Страница 13: ...eler puis griller des toasts tranches de pain ou viennoiseries congel s E Levier de mise en marche Si vous abaissez le levier l appareil se met en marche vous pouvez seulement apr s activer au choix l...

Страница 14: ...onne plus longtemps que pour griller du pain classique Placez le pain le toast congel dans la fente S lectionnez le degr de brunissage souhait en pla ant le thermostat sur la position correspondante P...

Страница 15: ...amasse miettes G situ e sous l inscription PUSH Le tiroir sort un peu et peut tre ensuite retir Videz le tiroir et nettoyez le si n cessaire avec un chiffon doux et sec Remettez ensuite le tiroir dans...

Страница 16: ...rateur Nous vous conseillons et vous aidons volontiers Les coordonn es se trouvent la fin de ce mode d emploi Gardez l emballage d origine pour un transport ou une exp dition ventuel lement n cessaire...

Страница 17: ...nte di funzionamento nominale massima di 30 mA Per la consulenza di un esperto rivolgersi ad un elettricista NORME DI SICUREZZA IMPORTANTI Prima dell uso del tostapane Steel di Solis si prega di legge...

Страница 18: ...i bambini Pericolo di soffocamento 30 Accertarsi sempre che il pane o la pasta da tostare sia tagliato alla misura appropriata per le fessure max 12 x 12 cm per fetta di pane e che le fette non sporga...

Страница 19: ...in funzione 38 Tenere sempre puliti il dispositivo e gli accessori A questo fine si prega di fare riferimento alle informazioni contenute in questo manuale 39 Non pulire mai il tostapane con spugne me...

Страница 20: ...n uno per toast fette di pane o pastic ceria surgelati E Leva di azionamento Quando si preme la leva di azionamento verso il basso inizia il processo di to statura Solo allora possibile attivare la fu...

Страница 21: ...ocare il pane toast congelato nelle fessure Selezionare il grado di doratura desiderato ruotando il regolatore di tostatura nella posizione appropriata Per avviare il processo di scongelamento premere...

Страница 22: ...l apparecchio Premere brevemente sulla parte stretta del cassetto raccoglibriciole G sotto la scritta PUSH Una piccola parte del cassetto si apre e il cassetto pu essere estratto Svuotare il cassetto...

Страница 23: ...arlo Siamo a Sua disposi zione per consigli e aiuto Gli indirizzi di contatto possono essere trovati alla fine di questo manuale Conservare la confezione originale di questo articolo in modo che Lei p...

Страница 24: ...y is assumed in the case of potential damages or injuries IMPORTANT SAFETY PRECAUTIONS Please read through this user manual thoroughly before using your Solis toaster Steel so that you become familiar...

Страница 25: ...the appliance to cool down before removing or attaching parts moving relocating or cleaning it 15 Never take hold of an appliance that has fallen into water or another liquid Always use dry rubber gl...

Страница 26: ...ance causing electric shock 40 Do not place any objects on the appliance 41 Always unwind the power cord fully before plugging the plug into the socket 42 Pull the plug after every use Only then the a...

Страница 27: ...and toasting function combined for frozen toasts slices of bread resp pastry E Operating lever When you push the operating lever down the toasting process starts only then can you activate either the...

Страница 28: ...lassical way Place the frozen bread the frozen toast in the slots Select the desired toasting degree by turning the roasting degree control to the respective position To start the defrosting process p...

Страница 29: ...ll the bread crumb tray G out of the appliance To do that briefly push against the narrow end of the bread crumb tray G underneath the inscription PUSH A small portion of the tray springs out the tray...

Страница 30: ...vice for repair We will give you all the advice and practical support you require The contact addresses can be found at the end of this manual Keep the original packaging in a safe place so that you m...

Страница 31: ...eem voor deskundig advies contact op met uw elektricien 13 Voer geen wijzigingen uit aan het apparaat het snoer de stekker en de accessoires BELANGRIJKE VEILIGHEIDSINFORMATIE Lees voor gebruik van uw...

Страница 32: ...md raken of de werking van het automatische hef en daalmecha nisme wordt belemmerd of geblokkeerd 14 Onjuist gebruik kan tot lichamelijk letsel leiden Wij zijn niet aansprakelijk voor eventueel gelede...

Страница 33: ...matie in deze gebruiksaanwijzing 39 Maak het apparaat niet schoon met een metalen schuurspons Losgelaten metaaldeeltjes van de spons kunnen in contact komen met componenten in het apparaat en een elek...

Страница 34: ...r ingevroren toast brood of broodge bak E Bedieningshendel Door de bedieningshendel omlaag te drukken wordt het roosterproces gestart Alleen daarna kan desgewenst de functie DEFROST of REHEAT worden g...

Страница 35: ...ngevroren brood toast in de sleuf Selecteer de gewenste bruiningsgraad door de bruiningsgraadregelaar naar de desbetreffende stand te draaien Om het ontdooiingsproces te starten drukt u de bedieningsh...

Страница 36: ...et apparaat Druk hiervoor kort op het smalle uiteinde van de kruimelschuiflade G onder de aanduiding PUSH Het kleinere deel van de schuiflade springt eruit en de schuiflade kan nu worden verwijderd Le...

Страница 37: ...n Wij staan u graag bij met raad en daad De contactadressen vindt u achteraan in deze gebruiksaanwijzing Bewaar de originele verpakking van dit product goed zodat u ze voor even tueel transport of ver...

Страница 38: ...mit e 12 mois Les conditions de garantie d taill es sont disponi bles sur le site www solis com SERVICE CLIENT LE Pour toute r paration les clientes et clients r si dant en Suisse renvoient directemen...

Отзывы: