background image

141

140

GB

GB

CONTROLLED VACUUMING AND MANUAL SEALING:   

THE FUNCTIONS PULSE VACUUM (A) AND MANUAL SEAL (E)

The appliance creates a fairly high vacuum pressure in the bag. If you wish to vac-
uum seal pressure sensitive foods like e.g. pastry, we recommend using the 

Pulse


Vacuum (A)

 function to evacuate the bag and then using the 

Manual Seal (E) 

function to weld it shut. This makes supervising the vacuuming process even easier, 
allowing you to prevent the foods from being damaged.
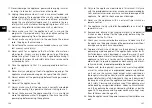
1.  Place one end of the bag in the vacuum bay. 

Caution:

 The end of the bag has 

to be pushed all the way into the bay.

2.  Now touch the 

Pulse Vacuum

 button. The blue button surround of 

Pulse Vac-

uum

 lights up. The bag end is locked into the vacuum bay and the evacuation 

process is started. The pump sucks out air for as long as you touch the 

Pulse 

Vacuum

 button.

3.  Let go of the 

Pulse Vacuum

 button once the vacuum in the bag is strong 

enough. Briefly touch the 

Manual Seal

 button to start the welding process. 

The weld is applied according to the settings (

Moist / Dry

 or 

Single / Double

), 

please refer to the chapter “Making adjustments”. You can follow the progress 
using the progress indicator 

(D)

. Wait for the button surround and the progress 

indicator to go out and the signal to sound. The process has completed.

4.  Double check the new weld to make sure it is straight and without creases. 

Should this not be the case, repeat the process after cutting off the old weld.

VACUUMING SOLIS CONTAINERS WITH LID:   

CANISTER FUNCTION (H)

Caution:

 Please use only the containers and the air extraction hose manufactured 

by Solis for this appliance. Only these containers are designed to withstand the 
negative pressure created by the Solis VertiVac vacuum sealer.

The accessories for your vacuum sealer are available from good specialist retailer or 
Solis. A contact address can be found at the end of this manual.

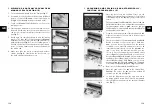
7.  The appliance now vacuums and seals the bag automatically. During the vac-

uum process, only the blue button surround of 

Vacuum & Seal (C)

 lights up. 

Once the sealing process starts, the 

Manual Seal (E)

 button surround lights up 

as well. You can follow the process with the progress indicator 

(D)


(see 

Fig. 8

)

Wait for the button surrounds and the progress indicator 

(D)

 to go out and the 

signal to sound, then the process is completed.

8.  Now, check the new weld again to make sure it is straight and without creases 

(see 

Fig. 9

)

. Should this not be the case, repeat the process after having cut off 

the weld.


Note:

 The appliance creates a fairly high vacuum pressure in the bag. Should 

this high pressure crush fragile foods, keep an eye on the vacuum pressure in 
the bag during the vacuum process and touch the 

Manual Seal (E)

 button once 

the desired vacuum has been reached. The appliance immediately deactivates 
the evacuation pump for vacuuming and starts sealing the bag.

Caution: 

Should you notice that the evacuation pump does not suck any air out of 

the bag, touch the 

Cancel

 (

B

) button and place the bag in the vacuum bay once 

again. It is important that the bag is pushed in straight and all the way to the end. 
This is to make sure that it reaches into the vacuum chamber. Proceed as described 
in steps 6. through 8.

GOOD TO KNOW:

–  In order for the appliance to perform best, it should be left for at least 1 minute 

to cool before you inserting the next bag. Wipe away potentially escaped liquid 
on the vacuum opening after each use.

–  If you perform too many sealing processes in a row you might trigger the thermo 

safety feature of the sealing bar. You have to allow the appliance to cool down 
before continuing to use it.

–  Only Solis vacuum bags or foils should be used, please do not use any other 

bags in order to achieve optimal results and prevent damage to the appliance. 
Defects caused by the use of improper accessories and supplies have to be fixed 
at the owner’s expense even within the warranty period.


There are Solis vacuum bags in different sizes or vacuum bag film with which you 
can set the bag size. Always choose a bag size appropriate for the food. Keep 
in mind that the bag should be at least 8 cm larger than the food and you will 
need an additional 2 cm for the seal.


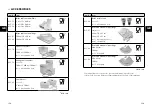
For item numbers and descriptions, please refer to the enclosed order form.  
You can find accessories for you vacuum sealer in good stores or you get them 
from Solis. You can find the contact addresses at the end of this manual.

Содержание 92234

Страница 1: ...VERTIVAC Typ Type Tipo 5704 Bedienungsanleitung Mode d emploi Istruzioni per l uso User Manual Gebruiksaanwijzing S I N C E 1 9 0 8...

Страница 2: ...3 2 DEUTSCH 04 FRAN AIS 44 ITALIANO 84 ENGLISH 124 NEDERLANDS 164...

Страница 3: ...Vakuumierger t 15 Ger t niemals so platzieren dass es ins Wasser fallen oder mit Wasser in Ber hrung kommen k nnte z B in oder neben einem Sp l becken s WICHTIGE SICHERHEITSHINWEISE Bitte lesen Sie v...

Страница 4: ...dwelche Gegenst nde oder Werkzeug in die Ger te ffnungen stecken Das Ger t k nnte besch digt wer den bzw Gefahr von Stromschlag 7 6 25 Bevor Sie Teile anbringen oder wegnehmen immer den Netz stecker z...

Страница 5: ...eschr nkten physischen sensorischen oder geistigen F higkeiten oder unwissende und unerfahrene Per sonen sowie Kinder d rfen das Vakuumierger t nicht benut zen ausser sie werden durch eine f r ihre Si...

Страница 6: ...ch gleich zeitiges Dr cken der beiden Entriegelungstasten nach hinten geklappt werden so dass man Zugang hat zu Schweiss Balken Tropfschale und Dichtungsgum mis sowie Anpressgummi 7 Luftabsaug Schlauc...

Страница 7: ...gew hlten Funktion erkennen Wenn alle sechs Punkte blau leuch ten und anschliessend erl schen ist die gew hlte Funktion abgeschlossen Dies wird zudem mit einem Signalton angezeigt E Manual Seal Taste...

Страница 8: ...ch verschweisst was bei klassischen trockenen Lebensmitteln durchaus ausreicht Double Die Schweissnaht wird doppelt verschweisst und h lt somit noch besser dicht vor allem empfehlenswert bei feuchten...

Страница 9: ...gr sser sein soll als das einzuschweissende Lebensmittel und rechnen Sie weitere 2 cm f r die Schweissnaht Hinweis Sollten Sie fertige Vakuumierbeutel verwenden k nnen Sie sofort zu Seite 19 dieser A...

Страница 10: ...C 5 Legen Sie das offene Beutelende nun in die Vakuu mier ffnung Achtung Das Beutelende muss bis zum Anschlag in die ffnung geschoben werden siehe Abb 6 6 Um die gew hlte Funktion in Gang zu setzen m...

Страница 11: ...rs D verfolgen siehe Abb 8 Warten Sie bis die Tastenumrandungen und der Fortschritts Indikator D erloschen sind und der Signalton ert nt dann ist der Vorgang komplett abgeschlossen 8 Nun pr fen Sie no...

Страница 12: ...r Luftabsaug ffnung damit der Vakuum Druck entweicht Sie k nnen an einem leichten Zischen h ren wie wieder Luft in den Beh lter dringt Dieses Zischen ist die Garantie daf r dass in dem Beh lter ein Lu...

Страница 13: ...eren da das Luftvakuum die Marinade tiefer in das Lebensmittel eindringen l sst Mit der Mari nier Funktion wird das Luftvakuum f r einige Minuten gehalten dann wird wieder Luft zugef hrt das Lebensmit...

Страница 14: ...REN 1 berf llen Sie den Beutel nicht Lassen Sie immer genug leeren Platz am offenen Beutelende damit das Beutelende problemlos in die Vakuum Kammer geschoben werden kann ohne dass Falten oder Wellen e...

Страница 15: ...nsmittel k nnen bei Zimmertemperatur aufgetaut werden In diesem Falle den Beutel aufschneiden damit der Dampf ent weichen kann In jedem Fall nach dem Auftauen sofort konsumieren und nicht wieder einfr...

Страница 16: ...ertemperatur ist Pro 10 C k hlere Lagertemperatur ver l ngert sich die Lagerf higkeit bis zu 3 4 mal WARUM HALTEN VAKUUMVERPACKTE LEBENSMITTEL L NGER 1 Chemische Reaktionen der Lebensmittel mit Luft U...

Страница 17: ...rpackt sind oder nicht Lebensmittel werden am schonendsten im K hlschrank aufgetaut 4 Konsumieren Sie keine Lebensmittel die leicht verderblich sind und einige Stunden bei Zimmertemperatur gelagert wu...

Страница 18: ...nz dicht verschweisst weil Kr mel Fett oder Fl ssigkeit in der Schweissnaht sind oder das Beutelende nicht glatt und ohne Falten war ffnen Sie den Beutel s ubern Sie die Innenseite des Beutelendes und...

Страница 19: ...auch die korrekte Position und starten Sie das Ger t erneut 2 Pr fen Sie ob der Beutel ein Loch hat Dazu verschweissen Sie den Beutel mit etwas Luft darin und tauchen ihn anschliessend unter Wasser We...

Страница 20: ...chliesshilfe Sie erhalten das Zubeh r f r Ihr Vakuumierger t im guten Fachhandel oder bei Solis Die Kontaktadresse finden Sie am Ende dieser Anleitung ZUBEH R Art Nr Artikel 922 52 922 51 922 50 Einwe...

Страница 21: ...50 Hz Leistung 130 Watt Abmessungen L x H x T ca 39 x 19 x 13 cm Gewicht ca 2 5 kg Technische nderungen vorbehalten AUFBEWAHRUNGSZEITEN Aufbewah rungsart Lebensmittel Temperatur normale Aufbewah rungs...

Страница 22: ...ben ist es mit dem Symbol eines durchgestrichenen Abfallcontainers gekennzeichnet Solis of Switzerland AG beh lt sich das Recht vor jederzeit technische und optische Ver nderungen sowie der Produktver...

Страница 23: ...euillez lire ce mode d emploi attentivement avant d utiliser votre appareil mise sous vide Solis pour la premi re fois afin de vous familiariser avec l appareil et de pouvoir l uti liser en toute s cu...

Страница 24: ...branchez le toujours de la prise secteur 47 46 26 Ne faites jamais marcher l appareil vide 27 Avant de brancher l appareil et de l utiliser v rifiez qu il soit bien assembl 28 Ne secouez pas et ne d...

Страница 25: ...toute s curit Les enfants ne sont pas autoris s nettoyer et entre tenir l appareil sans surveillance L appareil ne peut en aucun cas tre utilis ou nettoy par des enfants de moins de 8 ans Tenez l app...

Страница 26: ...simultan ment sur les deux touches de d verrouillage pour avoir acc s la barre de soudage au bac gouttoir et aux joints d tanch it ainsi qu la barre d appui en caoutchouc 7 Tuyau d aspiration de l ai...

Страница 27: ...e le statut du programme actuellement s lectionn Si les six points bleus sont tout d abord allum s puis s teignent le programme s lectionn est achev Un signal sonore retentit alors E Manual Seal Touch...

Страница 28: ...dure double et est donc plus herm tique ce qui est surtout recommand pour des aliments humides 2 Orifice de raccordement pour le tuyau d aspiration d air Pour mettre sous vide un accessoire Solis il e...

Страница 29: ...e le sachet doit tre au moins 8 cm plus grand que les aliments que vous voulez emballer sous vide et comptez 2 cm suppl men taires pour la soudure Remarque Si vous utilisez des sachets emballer sous v...

Страница 30: ...l emballage sous vide Attention L extr mit du sachet doit tre ins r e dans la fente jusqu la but e voir Fig 6 6 Pour mettre le programme s lectionn en marche vous devez appuyer bri vement sur le levi...

Страница 31: ...u programme gr ce l indicateur d avanc e D voir Fig 8 Patientez jusqu ce que les pourtours des touches et l indicateur d avanc e s teignent et qu un signal sonore retentit Le programme est alors enti...

Страница 32: ...l ou verture d aspiration afin de lib rer la pression sous vide Vous entendez alors un l ger sifflement qui vous indique que de l air p n tre dans le r cipient Ce sifflement vous garantit que le r cip...

Страница 33: ...n car la d pression permet la marinade de p n trer plus profond ment dans les aliments La fonction de mari nade permet d exercer une d pression sous vide pendant quelques minutes puis de rel cher la d...

Страница 34: ...rateur Vous aurez ainsi toujours une salade fra che sous la main pour vos repas Si vous disposez d abord du papier absorbant dans le r cipient l humidit superflue sera aspir e CONSEILS POUR UN EMBALLA...

Страница 35: ...ns les r cipients Solis condition de disposer une feuille de papier absorbant au dessus des aliments afin d viter que la poudre ou les grains soient aspir s dans la pompe ou le tuyau d aspiration 19 E...

Страница 36: ...ssous de 18 C vous pouvez y conserver des aliments Toutefois n oubliez pas la cong lation ralentit la crois sance des micro organismes mais elle ne l arr te pas enti rement 14 La conservation des alim...

Страница 37: ...r micro ondes qu ils soient emball s sous vide ou pas Placez les aliments de pr f rence dans le r frig rateur pour les d congeler 4 Ne consommez pas d aliments facilement p rissables qui ont t entrepo...

Страница 38: ...nt de soudure ou parce que le sachet n a pas t pos bien plat dans la fente de l emballage sous vide Ouvrez le sachet nettoyez la paroi int rieure de l extr mit du sachet et prenez soin d enfoncer le s...

Страница 39: ...que le sachet n est pas trou Pour cela soudez le sachet en y laissant un peu d air et plongez le dans l eau Si des bulles d air s en chappent il n est pas tanche Remplacez le 3 Le sachet n a peut tre...

Страница 40: ...il mise sous vide sont disponibles dans tous les bons magasins sp cialis s et chez Solis Les adresses sont disponibles en fin de ce mode d emploi ACCESSOIRES Mod le no Article 922 52 922 51 922 50 Fil...

Страница 41: ...e 130 Watt Dimensions l x h x p env 39 x 19 x 13 cm Poids env 2 5 kg Sous r serve de modifications techniques DUREE DE CONSERVATION Type de conservation Aliments Temp ra ture Dur e de conserva tion no...

Страница 42: ...rement l attention sur l obligation d limination r glementaire de l appareil celui ci porte un symbole repr sentant un conteneur ordures barr Solis of Switzerland SA se r serve le droit d apporter tou...

Страница 43: ...dino NORME DI SICUREZZA IMPORTANTI Prima dell uso dell apparecchio per sottovuoto di Solis si prega di leggere attentamente queste istruzioni per l uso in modo da conoscere e saper utilizzare bene l a...

Страница 44: ...arecchio L apparecchio potrebbe essere dan neggiato e vige pericolo di scossa elettrica 87 86 25 Prima di collegare o rimuovere parti scollegare il cavo di ali mentazione 26 Non mettere mai in funzion...

Страница 45: ...ne inesperte cos come bambini non devono utilizzare l apparecchio a meno che esse abbiano potuto beneficiare attraverso l intermediazione di una persona responsabile della loro sicurezza di istruzioni...

Страница 46: ...ilascio in modo da avere accesso alla barra saldante alla vaschetta raccogligocce e alle guarnizioni nonch alla gomma di pressione 7 Tubo di aspirazione dell aria In questo vano sotto il coperchio ant...

Страница 47: ...lu illuminati possibile visualizzare lo stato della funzione selezionata Se tutti i sei punti blu sono illuminati e poi si spengono la funzione selezionata completata Ci viene anche indicato da un seg...

Страница 48: ...ciente per alimenti classici e secchi Double La linea di saldatura viene effettuata doppia e quindi ha una tenuta ancora migliore particolarmente consigliata per alimenti umidi 2 Presa di collegament...

Страница 49: ...8 cm pi grande del cibo da mettere sottovuoto e prevedere altri 2 cm per la saldatura Nota se si utilizzano sacchetti sottovuoto finiti possibile passare immedia tamente alla pagina 99 di questo manua...

Страница 50: ...are l estremit aperta del sacchetto nella bocchetta di messa sottovuoto Attenzione l estre mit del sacchetto deve essere spinta nella bocchetta fino alla battuta vedi Fig 6 6 Per avviare la funzione s...

Страница 51: ...o l indicatore di avanzamento D vedi Fig 8 Attendere finch i bordi dei tasti e l indicatore di avanzamento D si spengono e viene emesso un segnale acustico quindi il processo completo 8 Ora ricontroll...

Страница 52: ...ura dell aspirazione dell aria in modo che la pressione del sottovuoto fuoriesca Lei pu avvertire un leggero fruscio come l aria rientra nel conteni tore Questo fruscio la garanzia che il contenitore...

Страница 53: ...nare effettivamente in pochi minuti la Sua carne e pesce perch il sottovuoto lascia penetrare ancora pi in fondo la mari nata nell alimento Con la funzione marinatura viene mantenuto per alcuni minuti...

Страница 54: ...e all ultimo viene posata carta da cucina sull alimento in modo che la polvere o i grani non penetrino nella pompa e nel tubo di aspirazione dell aria CONSIGLI PER LA MESSA SOTTOVUOTO OTTIMALE 1 Non r...

Страница 55: ...odo che possa fuo riuscire il vapore In ogni caso consumare subito dopo lo scongelamento e non congelare di nuovo 19 Alimenti con punte ed estremit pungenti come ossa o pasta secca dovreb bero essere...

Страница 56: ...mi la formazione di microrganismi o impurit attraverso insetti possono deteriorare gli alimenti 2 Il motivo principale perch gli alimenti perdono sostanze nutritive la loro com postezza e il loro sapo...

Страница 57: ...nde indipendentemente se sono confezionati a sottovuoto o no Lo scongelamento degli alimenti avviene in modo migliore nel frigorifero 4 Non consumare alimenti che sono facilmente deperibili e che sono...

Страница 58: ...le grasso o liquidi nella cucitura di sigillo o perch l estremit del sacchetto non era piatta e senza pieghe Aprire il sacchetto pulire la parte interna dell estremit e fare attenzione che l estremit...

Страница 59: ...taminata Esaminare anche la corretta posizione e accendere di nuovo l apparecchio 2 Controllare se il sacchetto abbia un buco A questo scopo sigillare il sacchetto con un po di aria e immergerlo poi i...

Страница 60: ...apparecchio per sottovuoto presso un rivenditore specializzato o presso Solis Gli indirizzi di contatto possono essere trovati alla fine di questo manuale ACCESSORI Art no Articolo 922 52 922 51 922...

Страница 61: ...tenza 130 Watt Dimensioni l x a x p ca 39 x 19 x 13 cm Peso ca 2 5 kg Con riserva di modifiche tecniche TEMPI DI CONSERVAZIONE Tipo di conservazione Alimento Tempera tura Tempo di conservazio ne norma...

Страница 62: ...obbligo di smaltimento regolare dell apparecchio lo stesso contrassegnato con un simbolo di un contenitore di rifiuti barrato Solis of Switzerland SA si riserva il diritto di apportare in qualsiasi mo...

Страница 63: ...gned for outdoor use The appliance must not come into contact with water or spray water Do not use in vehicles or on boats s IMPORTANT SAFETY PRECAUTIONS Please read through this user manual thoroughl...

Страница 64: ...before moving the appliance 127 126 29 Only use the appliance as described in this manual Only use with the provided accessories or accessories recommended by Solis incorrect accessories or misuse can...

Страница 65: ...ealing processes should be avoided The appliance is designed for domestic use and not for permanent operation 39 Before using always check that your hands are clean and dry 40 Use exclusively Solis va...

Страница 66: ...aneously pushing the two release buttons This allows accessing the sealing bar the drip tray the gaskets and the rubber pressure bar 7 Air extraction hose The air extraction hose is placed in this com...

Страница 67: ...the status of the currently chosen function from the number of blue lit dots When all six dots light up blue and then go out the selected function is completed This will also be reported by a sound s...

Страница 68: ...assic dry foods Double Two welds are applied meaning the seal will hold even better Recommended for vacuum sealing moist foods 2 Connection port for air extraction hose To vacuum Solis accessories one...

Страница 69: ...to seal and add another 2 cm for the weld Note If you re using ready to use vacuum bags you can jump to page 139 of this manual 136 STARTING UP Caution Always make sure that both the appliance as well...

Страница 70: ...are Gentle Dry and Single see Fig 5 4 Now touch the Vacuum Seal C button 5 Place the open end of the bag in the vacuum bay Caution The end of the bag has to be pushed all the way into the bay see Fig...

Страница 71: ...hts up as well You can follow the process with the progress indicator D see Fig 8 Wait for the button surrounds and the progress indicator D to go out and the signal to sound then the process is compl...

Страница 72: ...pening so that the vacu um pressure is released You will hear a slight hissing sound as the air passes back into the container This hiss guarantees that there was an air vacuum in the container A Vacu...

Страница 73: ...since the vacuum allows the marinade to penetrate deeper into the food The vacuum function main tains a vacuum for several minutes then releases air allowing the food to rest for several seconds This...

Страница 74: ...Do not overfill the bag Always leave enough empty space in the open end of the bag so that the bag end can be pushed into the vacuum chamber unprob lematically and without wrinkles or waves forming Ca...

Страница 75: ...s e g hamburgers cr pes or tortillas are best placed in the bag resp Solis container separated by a sheet of baking paper DEFROSTING FROZEN SOLIS VACUUM BAGS Defrosting meat fish fruit vegetables and...

Страница 76: ...hey are peeled first 5 Cabbage vegetables such as broccoli cauliflower or cabbage give off gas when vacuum packed fresh for refrigeration To preserve them they must be first blanched then frozen befor...

Страница 77: ...1 Always first pull the plug out of the socket 2 Submerge neither the appliance nor the cord or the plug in water or another liquid and do not hold it under running water 3 Do not use aggressive clean...

Страница 78: ...erhaps the bag is not completely sealed because of crumbs fat or liquid in the seal or the bag was not flat and has wrinkles or creases Open the bag clean the inside of the bag end and make sure to in...

Страница 79: ...uum bag for leaks resp the weld for contamination Also ensure correct positioning and re start the appliance 2 Check whether the bag has a hole in it To do this seal the bag with some air in it and su...

Страница 80: ...essories for your vacuum sealer in good stores or from Solis You can find the contact addresses at the end of this manual ACCESSORIES Item No Item 922 52 922 51 922 50 Disposable vacuum films 2 rolls...

Страница 81: ...ency 220 240V 50 Hz Power 130 Watt Dimensions l x h x d approx 39 x 19 x 13 cm Weight approx 2 5 kg Technical changes reserved STORAGE TIMES Storage type Food Tempera ture Normal storage time Storage...

Страница 82: ...nderline the duty to dispose of this equipment separately the product is marked with a crossed out dustbin Solis of Switzerland Ltd reserves the right to carry out technical and visual changes and mod...

Страница 83: ...5 Plaats het apparaat nooit zodanig dat het in het water kan vallen of in contact kan komen met water bijv in of naast een gootsteen s BELANGRIJKE VEILIGHEIDSINFORMATIE Lees voor gebruik van uw Solis...

Страница 84: ...voorwerpen of gereedschap in de openingen van het apparaat Het apparaat kan beschadigd raken of er kan gevaar voor elektrocutie ontstaan 167 166 25 Haal de stekker altijd uit het stopcontact alvorens...

Страница 85: ...den 169 168 35 Personen met beperkte lichamelijke zintuiglijke of geestelijke vermogens of onwetende en onervaren mensen en kinde ren mogen de vacumeermachine niet gebruiken tenzij onder toezicht van...

Страница 86: ...klapt door gelijktijdig op beide ontgrendelingsknoppen te drukken zodat u toegang heeft tot de sealstrip de lekbak het dichtingsrubber en het aandrukrubber 7 Vacu mslang Voor een eenvoudige toegang li...

Страница 87: ...hand van het aantal brandende blauwe lampjes kunt u de status van de geselecteerde functie herkennen De geselecteerde functie is voltooid zodra alle zes lampjes blauw branden en vervolgens uitgaan Dit...

Страница 88: ...droge levensmiddelen Double bij Double wordt een dubbele sealnaad gebruikt zodat een nog betere dichting wordt gegarandeerd Vooral aanbevolen bij vochtige levens middelen 2 Aansluitingsopening voor d...

Страница 89: ...zak altijd minstens 8 cm langer moet zijn dan de te vacumeren levensmiddelen en tel er 2 cm extra bij op voor de sealnaad Opmerking als u gebruiksklare vacu mzakken gebruikt gaat u verder op pagina 1...

Страница 90: ...e afb 5 4 Druk nu op de knop Vacuum Seal C 5 Leg het open uiteinde van de zak in de vacumeerope ning Let op het open uiteinde van de zak moet tot tegen de aanslag in de opening worden geschoven zie af...

Страница 91: ...de voortgangsindica tor D volgen zie afb 8 Wacht tot de knopranden en de voortgangsindicator D uitgaan en u een geluidssignaal hoort Nu is het proces helemaal voltooid 8 Controleer nu nogmaals of de...

Страница 92: ...p rechts naast de vacu mopening zodat de vacu mdruk ontsnapt Een licht sissend geluid betekent dat er weer lucht in de voorraadbus komt Dit sissen is tevens het bewijs dat in de voorraadbus een vacu m...

Страница 93: ...marineren omdat het luchtvacu m de marinade diep in de levensmiddelen laat doordringen Met de marineerfunctie wordt het luchtvacu m een paar minuten gehandhaafd waarna er weer lucht wordt toegevoerd...

Страница 94: ...laats vrij zodat de uiteinden van de zak probleemloos in de vacu mkamer kunnen worden geschoven zonder dat er plooien of golven ontstaan Neem een afstand van 8 cm in acht tussen de inhoud van de zak e...

Страница 95: ...eze levensmiddelen kunnen bij kamertem peratuur worden ontdooid Snij in dit geval de zak open zodat de damp kan ont snappen In ieder geval na het ontdooien direct consumeren en nooit opnieuw invriezen...

Страница 96: ...d van vacu m verpakte droge levensmiddelen per 10 C koudere bewaartemperatuur wordt de houdbaarheid met 3 4 keer verlengd WAAROM BLIJVEN VACU M VERPAKTE LEVENSMIDDELEN LANGER GOED 1 Chemische reacties...

Страница 97: ...cht of ze vacu m zijn verpakt Levensmiddelen kunt u het best in de koelkast ontdooien 4 Consumeer geen levensmiddelen die licht bedorven zijn en al enkele uren op kamertemperatuur zijn Dat is vooral g...

Страница 98: ...sealnaad zat of omdat het uiteinde van de zak niet helemaal glad en vouwvrij was Open de zak maak de binnenkant van het uiteinde van de zak schoon en let erop dat het uiteinde van de zak helemaal glad...

Страница 99: ...op vuil Controleer ook de correcte plaatsing en start het apparaat opnieuw op 2 Controleer of er een gat in de zak zit Om dit te controleren sealt u de zak met nog wat lucht erin en dompelt u hem verv...

Страница 100: ...res voor uw vacumeermachine bij de betere vakhandel of bij Solis Het contactadres vindt u achteraan in deze gebruiksaanwijzing ACCESSOIRES Art nr Artikel 922 52 922 51 922 50 Wegwerpvacu mfolie 2 roll...

Страница 101: ...40 V 50 Hz Vermogen 130 Watt Afmetingen b x h x d ong 39 x 19 x 13 cm Gewicht ong 2 5 kg Technische wijzigingen voorbehouden HOUDBAARHEID Bewaarplaats Levensmidde len Tempera tuur Normale houdbaar hei...

Страница 102: ...ntact avec nous Nous vous com muniquerons alors avec plaisir l adresse correspondante Ou rendez vous simplement sur www solis com s Servizio di assistenza clienti Solis Per resi di merci e spedizioni...

Отзывы: