


56
▲
▲
PREPARING THE APPLIANCE
1.
Take the air humidifier out of the box and check the appliance for completeness
and integrity. For questions, please contact Solis or a service centre authorized
by Solis.
2.
Place the air humidifier in a suitable place (refer to safety measurements).
3.
Please ensure that the steam outlet is not pointed towards people, furniture,
curtains, walls, electrical appliances or other heat resp. steam or moisture sen-
sitive objects.
4.
Remove the cover (
C
) using the removal loop (
E
) (
Fig. 2
) and check if the steam
duct (
I
) is correctly mounted and fastened to the water tank (tighten counter
clock wisely).
5.
Use a container to fill the water tank with cold tap water to the MAX marking
(
H
) (
Fig. 3
). A maximum of 2,8 liters can be filled in, the water level must not
exceed the MAX marking.
6.
Replace the cover onto the tank so that rests in the groove at the bottom and
lines up with the base.
7.
If desired, you can put a few drops of fragrant essence or aroma oil into the
aroma tray (
D
) (
Fig. 4
). Please ensure that the oil resp. the essence does not
come into contact with the surface of the cover (
C
), drip around the aroma tray
or get into the steam outlet (
F
). The essence or the oil should not get into the
tank water resp. the appliance interior.
8.
Plug the power plug into a suitable wall power outlet that is, if possible, only
accessible by grown-ups.
Содержание 7215
Страница 6: ...6 GERÄTEBESCHREIBUNG Abb 1 A B C D E F G H I J K ...
Страница 9: ...9 Abb 2 Abb 3 MAX Linie für max Wassermenge 2 8 l Abb 4 ...
Страница 11: ...11 Abb 5 EIN Taste innen AUS Taste herausstehend Abb 6 Abb 7 ...
Страница 17: ...17 ...
Страница 22: ...22 DESCRIPTION DE L APPAREIL Fig 1 A B C D E F G H I J K ...
Страница 25: ...25 Fig 2 Fig 3 MAX ligne indiquant le niveau maximum d eau 2 8 l Fig 4 ...
Страница 27: ...27 Fig 5 MARCHE touche enfoncée ARRET touche sortie Fig 6 Fig 7 ...
Страница 33: ...33 ...
Страница 38: ...38 DESCRIZIONE DEL DISPOSITIVO Fig 1 A B C D E F G H I J K ...
Страница 41: ...41 Fig 2 Fig 3 MAX Indicatore della quantità massima di acqua 2 8 l Fig 4 ...
Страница 43: ...43 Fig 5 ON Tasto dentro OFF Tasto fuori Fig 6 Fig 7 ...
Страница 49: ...49 ...
Страница 54: ...54 APPLIANCE DESCRIPTION Fig 1 A B C D E F G H I J K ...
Страница 57: ...57 Fig 2 Fig 3 MAX Line for max water amount 2 8 l Fig 4 ...
Страница 59: ...59 Fig 5 ON button pressed in OFF button standing out Fig 6 Fig 7 ...
Страница 65: ...65 ...
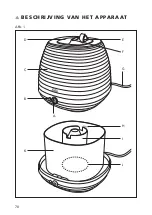
Страница 70: ...70 BESCHRIJVING VAN HET APPARAAT Afb 1 A B C D E F G H I J K ...
Страница 73: ...73 Afb 2 Afb 3 MAX De lijn die de maximale hoeveelheid water aangeeft 2 8 l Afb 4 ...
Страница 75: ...75 Afb 5 AAN knop naar binnen UIT knop naar buiten Afb 6 Afb 7 ...


