background image

Wall Mounting Continued

1

4

3

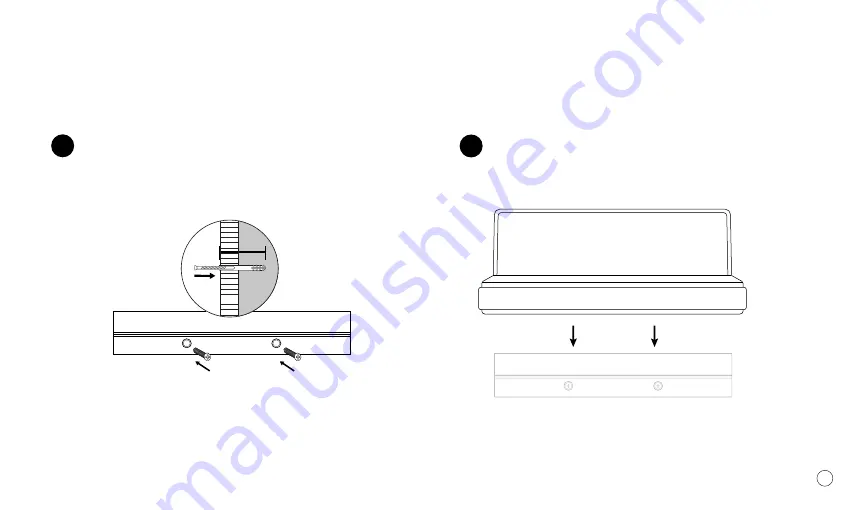
Place the wall mount on the wall, then tighten the screws 
firmly into the pilot holes till they are flush. 

Slide HomeBase into the wall mount from above until it 
hooks onto the back of the homebase ridge.

Tip:  Do not over-tighten screw. Improper tightening could 

reduce the holding power of wooden screw

55mm

wall

Содержание HomeBase

Страница 1: ...HomeBase WELCOME TO ...

Страница 2: ...Product Detail Safety Instructions Package Contents Installation Guide Setup Guide Charging Detail Specifications Warranty Important FCC Warning 1 2 3 4 5 6 7 8 9 1 Index ...

Страница 3: ...phone cases accessories will interfere with wireless charging technology These must be removed before charging these include a metal cases LED Lights USB C Charging Port 2 x 3 Coil Pads 1 2 3 AC Adapter Magneticv Acoustic Chamber 4 5 6 Magneticv Acoustic Chamber 5 6 Product Detail 1 1 1 1 1 ...

Страница 4: ...3 Please use the original charger to charge or other adapter with output over 30W 4 Avoid placing metal objects in the working area when charging and do not let the charger drop off or put heavy objects on it Install HomeBase according to instructions provided We are not responsible for injury or damage resulting from incorrect installation or use Our products are for use only as wall mounted shel...

Страница 5: ...all Mount 1x Charger 3x International Adapters 2x Screws Washers 1x Expansion Bolt 1x Apple Watch Puck 1x Cable Tie 1x User Manual Pencil Level Tools suggested for this installation not included Power Drill Screwdriver Package Contents ...

Страница 6: ...rks on the wall through the two oval holes on the wall mount Using a power drill Screwdriver drill holes into the wall at the pencil marks and insert the drywall anchors with a hammer until they are securely in place flush with the face of the wall 1 Tip Use a pencil and level Tip Ensure the holes are level 2 ...

Страница 7: ...tighten the screws firmly into the pilot holes till they are flush Slide HomeBase into the wall mount from above until it hooks onto the back of the homebase ridge Tip Do not over tighten screw Improper tightening could reduce the holding power of wooden screw 55mm wall ...

Страница 8: ...with mutli national adapters Select your adapter and attach to the underside of the plug and enter the plug into an electrical outlet Plug the power cord into the side of your HomeBase Once power is connected the two LEDs on the shelf will illuminate for several seconds Once these turn off you are now ready to start charging Connect The Adapter Setup Guide Power Cord ...

Страница 9: ...wn the wall 1 Using The Key Magnets Using Solarbank Speaker Grill Mention there are magnets on either side Keep organised when returning home with the magnetic hook for keys and a home for your everyday tech HomeBase includes a built in amplifier when the Solar Boombox plays into the shelf it amplifies the sound for an enriched audio experience Setup Guide ...

Страница 10: ...e HomeBase can power up to four devices at once Two wirelessly and two wired To charge wirelessly simply place your device flat on the fabric and it will begin charging 1 Homebase is equiped with 6 premium copper coils for maximum charging These are separated into sets of two on either side of the shelf LEDs indicate the charging state Charging Wirelessly LEDs Breathing LEDs Solid Wireless Charing...

Страница 11: ... do not need to configure any settings Getting your phone to full battery wirelessly is faster than ever HomeBase is equiped with fast charging for when you need accelrated power in times of need This is accessible on most modern smartphones but require specific cables in order to function usually USB C to your device port If a standard cable is used Homebase will use 2 4A output ...

Страница 12: ...r authorized dealer MODIFICATION Any change or modification of this device will void the warranty Exclusion Damages dont cover those resulting from abuse not correctly maintained alteration or misuse including disassemble drops abnormal wear and tear cosmetic damages that do not affect the functionality Rated Input Voltage Rated Input Current Transmission Distance Transfer Efficiency Operating Tem...

Страница 13: ... reception which can be determined by turning the equipment off and on the user is encouraged to try to correct the interference by one or more of the following measures Reorient or relocate the receiving antenna Increase the separation between the equipment and receiver Connect the equipment into an outlet on a circuit different from that to which the receiver is connected Consult the dealer or a...

Страница 14: ...d out more information at www solgaard co Reduce Plastic Polution Save our oceans Share your pictures with us solgaard homebase Have any further questions Please contact the Solgaard Customer Support Team by emailing support solgaard co ...

Отзывы: