background image

Setting the Others

44

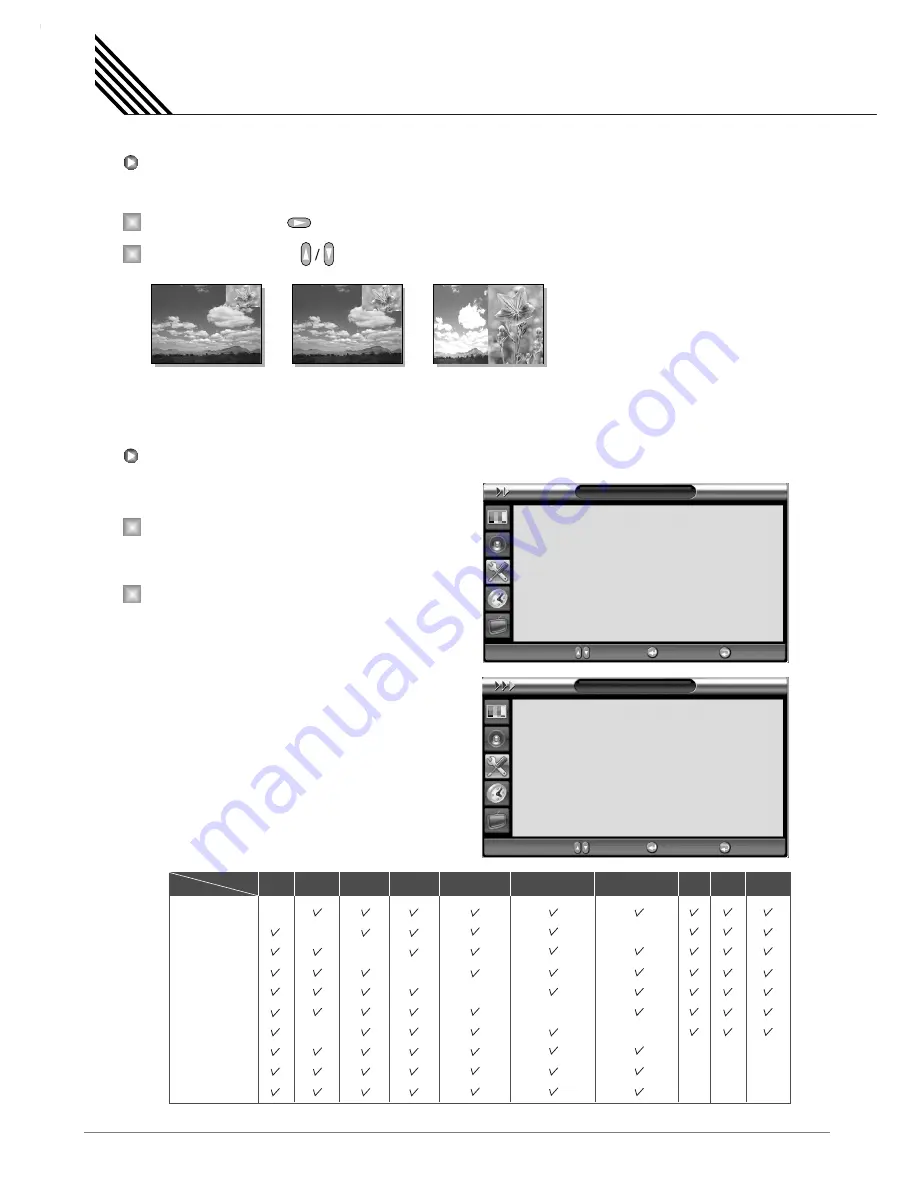
Change the size of the PIP window. There are 3 sizes: Small, Large, Twin.

Select 

Size

and press         button.

Adjust size function with            button and press Menu/Set button. 

Change the source of the PIP window.

Select 

Source

and press Menu/Set button to  

enter the sub menu. Then the PIP sub menu 
appear.

The available sources will be displayed.
Select the source and press Menu/Set button.

1

2

1

2

Changing the Size in PIP

Changing the Source in PIP

Small

Large

Twin

PIP

Size

Source

Picture Swap

Position

Small

VIDEO

Right Down

¥

¥

¥

Š

Š

Š

Move           Enter        

Exit

Source

VIDEO

COMPONENT1

COMPONENT2

PC RGB

DVI

HDMI

Move           Select       

Exit

TV
HDTV
VIDEO1
VIDEO2
S-VIDEO/AV
COMPONENT1
COMPONENT2 
PC
DVI
HDMI

Main TV

PIP

HDTV VIDEO1

S-VIDEO/AV COMPONENT1 COMPONENT2 PC

DVI

HDMI

VIDEO2


Содержание SPTV42AS1D

Страница 1: ......

Страница 2: ...ication 26 Basic Operation 27 OSD Menu Structure 28 Choosing the Channel Type 29 Storing Channels Automatically 29 Adding or Deleting the Channels 30 Fine Tuning the Channel Reception 30 Editing the C...

Страница 3: ...nced 48 Front Key Lock in Advanced 48 Film Mode 49 Burn Protect in Advanced 49 Burn Clear in Advanced 49 HDTV Setup HDTV Mode 50 Time Zone in HDTV Setup HDTV Mode 50 Daylight in HDTV Setup HDTV Mode 5...

Страница 4: ...ause harmful interference to radio or television reception which can be determined by turning the equipment off and on the user is encouraged to try to correct the interference by one or more of the f...

Страница 5: ...plug does not fit into your outlet consult an electrician for replacement of the obsolete outlet 10 Protect the power cord from being walked on or pinched particularly at plugs convenience receptacles...

Страница 6: ...d requirements for the grounding electrode Precaution 5 Setting CAUTION Follow all operating and use instructions Do not use the TV where contact with or immersion in water is a possibility such as ne...

Страница 7: ...tilation to protect it from overheating Do not block these openings with any object and do not place the TV on a bed sofa rug or other similar surface Do not place it near a radiator or heat register...

Страница 8: ...TYPE NO Protect the power cord Power supply cords should be routed so that they won t be walked on or pinched by objects placed on or against them Pay particular attention to cords at plugs convenienc...

Страница 9: ...by the manufacturer or those that have the same characteristics as the original part Unauthorized substitutions may result in additional damage to the unit If you make adjustments yourself adjust onl...

Страница 10: ...wise it can cause personal injury Keep the batteries out of reach of children when exchanged Seek urgent medical advice if child swallows a battery When moving the TV assembled with speakers do not ca...

Страница 11: ...multiple input sources such as TV HDTV VIDEO1 VIDEO2 S VIDEO AV COMPONENT1 COMPONENT2 PC DVI and HDMI VOL CH HP XXXXV OR VOL CH HP XXXXVP To change the CHANNEL press button first and change the channe...

Страница 12: ...the TV HP XXXXVP HP XXXXV DVI D Sub PC Sound DVI HDMI RS 232C D Sub PC COMPONENT1 2 COMPONENT Sound1 2 VIDEO1 VIDEO OUTPUT2 VIDEO2 12 11 13 14 15 16 17 18 19 9 10 1 2 3 4 5 6 7 8 SPDIF Optical Line O...

Страница 13: ...3 port RF Cable Connect 16 and 17 port S Video Cable Connect 14 port AC Power Cord Connect 19 port Audio Input Composite Video Input Composite Video Output S VIDEO Input Component Video Input Analog R...

Страница 14: ...urce list Menu Set Display the main OSD menu Activate your choice in the OSD menu Exit EPG Return to the previous OSD menu Sub CH Change channels of the sub window by pressing the Sub CH button and CH...

Страница 15: ...10 min 20 30 60 90 120 150 180 TIME Display the current time on the screen DIGEST DTV INFO Display 16 TV programs at the same time CH ADD Add the current channel to memory CH ERASE Erase the current c...

Страница 16: ...ge Twin MODE button Change the PIP window mode OFF Small Large Twin SOURCE button Change the source of the PIP window The available sources are shown as below TV HDTV VIDEO1 VIDEO2 S VIDEO AV COMPONEN...

Страница 17: ...that the and ends face the correct direction Close the cover until it clicks Viewing the Remote Control 16 Loading the Batteries Reception Range of Remote Control 1 2 3 CH ADD CH ERASE V CHIP 100 CH A...

Страница 18: ...nto the Stand Base as shown below 2 Secure with Screw A 8 x 18 3 Insert a Table Stand as below 4 Secure with Screw B 4 x 30 Screws 2 8 x 18 A Screws 2 4 x 30 B Table Stand Insert Insert Stand Hole Sta...

Страница 19: ...wall as the picture above Install this TV a only in a location where adequate ventilation is available Installation 18 Wall Mount Installation Optional 1 18 inch Min 3cm 4 inch 10 16cm 2 36 inch 5 99c...

Страница 20: ...gative wire to the input Connect left TV input to left speaker and right TV input to right speaker Any extra speaker wire length remaining can be bunched into the wire holders provided Caution Once in...

Страница 21: ...election Press Pre CH button on the remote control to tune the previous program Also you can tune to cable service provided programs using the cable box For further information regarding cable TV serv...

Страница 22: ...noise interference leave an adequate distance over 3m between the VCR and TV When connecting the TV with external equipment match the colour of connecting ports e g Video Yellow Audio L White Audio R...

Страница 23: ...io cable to the DVD player s audio L White and R Red jacks and to the L and R audio jacks beside the component jacks on the TV Connect the HDMI cables to the DVD player s and to the HDMI cables on the...

Страница 24: ...B PB B Pr R Y Cr PR PR HDMI or high definition multimedia interface is a next generation interface that enables the transmission of digital audio and video signals using a single cable without compre...

Страница 25: ...Connect a three separate component cables to the component jacks of the STB and the TV Connect L White and R Red sound cables Composite to the sound jacks of the STB and the TV With HDMI Connect a HD...

Страница 26: ...reen in Position menu See 38 page 1 2 3 HP XXXXV D Sub 15pin VGA from PC DVI from PC HP XXXXVP 1 2 3 4 5 6 7 8 9 10 11 12 13 14 15 Red R Green G Blue B Grounding Grounding DDC Red R Grounding Green G...

Страница 27: ...Hz Notes Synchronization input form separate The TV recognizes 640 x 480 60Hz signal as 480p DTV signal So the signal is expanded please try other signals like 640 x 480 75Hz The TV operates abnormal...

Страница 28: ...on the source list Use CH CH button or numeric button to change TV program you want Press Pre CH button on the remote control to watch the previous program Also you can tune the cable service provide...

Страница 29: ...button on the remote control Sub Menu Each menu item has its own sub menu items to set Sub Menu Items A If there is no part the item has an sub menu You can enter the sub menu and adjust an item you n...

Страница 30: ...Menu Set button to display the main OSD menu Select the TV main menu Press Menu Set button to enter the sub menu Select Auto Scan with buttons and press Menu Set button on the remote control Then the...

Страница 31: ...ine Tune with button and press Menu Set button Then you can see the adjust bar Adjust the Fine Tune with button Notes You can enter the TV menu and HDTV menu in TV mode only When you watch a TV progra...

Страница 32: ...e channel to skip or set as the favorite channels Select CH and set the values with button on the remote control You can add or erase the current channel by the remote control Editing the Channels 1 2...

Страница 33: ...de only Press the DIGEST button on the remote control You can make off the Digest Function by pressing DIGEST button again 16 side windows are renewed clockwise Next memorized program appear in the re...

Страница 34: ...ast Brightness Color Sharpness and Tint according to personal preference in User mode The function for Tint adjustment is activated when NTSC signal is input Select the item to adjust with button Pres...

Страница 35: ...rt Adjust brightness of the screen Adjust deep and light color of the screen Adjust vividness of the screen Adjust the balance between green and yellow Contrast Brightness Color Sharpness Tint Distinc...

Страница 36: ...or on the picture will enhance while others areas remain unchanged Press Menu Set button to display the main OSD menu Select the Picture main menu item Press button to enter the sub menu Select Color...

Страница 37: ...in menu Press button to enter the picture menu Select Screen Form and press button to enter the sub menu Then the screen form under menu appear Select the Screen Form you want and press button and Exi...

Страница 38: ...y 4 3 16 9 video The image is suppressed 4 3 video No expansion There are gray areas besides the image This will enhance the black level the contrast of the picture The dark regions of the picture are...

Страница 39: ...tion and press Menu Set button to enter the under menu Then the picture position under menu will appear Select the item to adjust with button Press Menu Set button Then the cursor moves on the bar and...

Страница 40: ...r Off condition and 1366 x 768 under On when 1366 x 768 signal input Move to 1366 Mode with cursor indicating On Off mode Choose On or Off by cursor H Position V Position Phase Mismatch Match 1 2 Pict...

Страница 41: ...rsonalized sound settings Press Menu Set button to display the main OSD menu Select the Sound main menu Press Menu Set button to enter the sub menu Select Sound Mode and press Menu Set button to enter...

Страница 42: ...and press VOL button Turn on or off Spatial Effect function with button and press Exit button This function adjust sound volume level automatically depending on the source Press Menu Set button to dis...

Страница 43: ...olby Digital and press Exit button MTS Multichannel Television Sound Digital Output HDTV Mode Only 1 2 3 4 5 Notes Optional The available sound formats are displayed Usually you can see Mono and Stere...

Страница 44: ...time And Setup PIP size and position Press Menu Set button to display the main OSD menu Select the Setup main menu with button on the remote control Press Menu Set button to enter the sub menu Select...

Страница 45: ...Then the PIP sub menu appear The available sources will be displayed Select the source and press Menu Set button 1 2 1 2 Changing the Size in PIP Changing the Source in PIP Small Large Twin PIP Size S...

Страница 46: ...et button to display the main OSD menu Select the Setup main menu with button on the remote control Press Menu Set button to enter the sub menu After enter the password the V Chip sub menu appear V Ch...

Страница 47: ...enter the sub menu Then the Movie Block sub menu appear You can independently lock the TV ratings The locked TV FCC ratings are indicated by the symbol Press buttons and the Menu Set button to activa...

Страница 48: ...main OSD menu Select the Setup main menu with button on the remote control Press Menu Set button to enter the sub menu Select Advanced and press Menu Set button to enter the advanced menu Then the Ad...

Страница 49: ...from children s power On Off or other operation by miss Select Front Key Lock Then the cursor moves into the parts Turn the function on or off with button and press Exit button 1 2 1 2 Set ID in Advan...

Страница 50: ...utton Then the cursor moves into the parts Turn the function on or off with button and press Exit button This function will be used for removing sticking image on the screen Select Burn Clear Turn the...

Страница 51: ...o the part Choose the Time Zone with button and press Exit button Use this menu to adopt Daylight Saving Time Select Daylight menu and press button to enter the part Then the cursor moves into the par...

Страница 52: ...DCCD Setup Font Style Font Type Text Color Back Color Edge Type Edge Color Display Type Default Normal Black Black None Black Origin Move Enter Exit Daylight On Off Auto Move Enter Exit HDCCD Setup Fo...

Страница 53: ...ribed previously Press Menu Set button to display the main OSD menu Select the Time main menu with button on the remote control Press Menu Set button to enter the sub menu Select On Time with button a...

Страница 54: ...menu Select the Time main menu with button on the remote control Press Menu Set button to enter the sub menu Select On Volume Then the cursor moves into the parts Adjust the sound volume level with b...

Страница 55: ...ased therefore Setup again The time period runs from OFF 0 min to 180 min OFF 10 min 20 30 60 90 120 150 180 Press Menu Set button to display the main OSD menu Select the Time main menu with button on...

Страница 56: ...Sound Mode Spatial Effect AVC MTS Standard Movie Music News Temperature Color Enhancer Video NR Screen Form Black Enhancer 1366 Mode WARM2 WARM1 NORMAL COOL1 COOL2 Color Enhancer On Off Video NR On Of...

Страница 57: ...n V Chip TV Block Movie Block Change Password V Chip Blocking National Selections Blue Back On Off English French Spanish Front Key Lock On Off Film Mode On Off Burn Protect On Off Advanced Set ID Blu...

Страница 58: ...me Channel Type On Channel On Volume Off Time Sleep On Time On Off TV Selection 1 100 Off Time On Off Off 10 20 30 60 90 120 150 180 min Time Channel Type ATV TV Air Cable Channel Type DTV Auto Scan A...

Страница 59: ...reen Form Black Enhancer 1366 Mode WARM2 WARM1 NORMAL COOL1 COOL2 Color Enhancer On Off Video NR On Off 16 9 PANORAMA ZOOM1 ZOOM2 4 3 Black Enhancer On Off 1366 On Off This menu is not displayed on 42...

Страница 60: ...nal Selections Blue Back On Off English French Spanish Front Key Lock On Off Film Mode On Off Burn Protect On Off Advanced Set ID Blue Back Language Front Key Lock Film Mode Burn Protect Burn Clear Ti...

Страница 61: ...he TV s power cord was plugged in Press the VOL button Check the audio input signal Check to see if there is any object between the Plasma Display and the remote control causing obstruction Check to s...

Страница 62: ...ith Stand 1046mm W X 702mm H X 299mm D 38 9 kg With Stand and Speaker 1246mm W X 702mm H X 299mm D 41 5 kg Miscellaneous Audio Built in amplifier and two speaker 7Watt Typ systems optional Selectable...

Страница 63: ...W X 645mm H X 87mm D 30 kg With Stand 1220mm W X 708 4mm H X 305mm D 31 5 kg Miscellaneous Audio Built in amplifier and two speaker 7Watt Typ systems optional Selectable fixed variable audio output op...

Страница 64: ...ith Stand 1046mm W X 702mm H X 299mm D 38 9 kg With Stand and Speaker 1246mm W X 702mm H X 299mm D 41 5 kg Miscellaneous Audio Built in amplifier and two speaker 7Watt Typ systems optional Selectable...

Страница 65: ...W X 645mm H X 87mm D 30 kg With Stand 1220mm W X 708 4mm H X 305mm D 31 5 kg Miscellaneous Audio Built in amplifier and two speaker 7Watt Typ systems optional Selectable fixed variable audio output op...

Страница 66: ...h Stand 1216mm W X 798mm H X 299mm D 55 kg With Stand and Speaker 1416mm W X 798mm H X 299mm D 59 kg Miscellaneous Audio Built in amplifier and two speaker 7Watt Typ systems optional Selectable fixed...

Страница 67: ...37 8mm H X 82mm D 45 5 kg With Stand 1390mm W X 801 2mm H X 305mm D 47 kg Miscellaneous Audio Built in amplifier and two speaker 7Watt Typ systems optional Selectable fixed variable audio output optio...

Страница 68: ...Stand 1366 8mm W X 864 8mm H X 305mm D 67 kg With Stand and Speaker 1566 8mm W X 864 8mm H X 305mm D 72 kg Miscellaneous Audio Built in amplifier and two speaker 7Watt Typ systems optional Selectable...

Страница 69: ...Stand 1503mm W X 927mm H X 400mm D 98 kg With Stand and Speaker 1703mm W X 927mm H X 400mm D 104 7 kg Miscellaneous Audio Built in amplifier and two speaker 7Watt Typ systems optional Selectable fixed...

Отзывы: