background image

24

E20

 /

 E25

 ELLIPTICAL

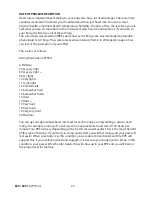
RATE OF PERCEIVED EXERTION

Heart rate is important but listening to your body also has a lot of advantages. There are more

variables involved in how hard you should workout than just heart rate. Your stress level,

physical health, emotional health, temperature, humidity, the time of day, the last time you ate

and what you ate, all contribute to the intensity at which you should workout. If you listen to

your body, it will tell you all of these things.

The rate of perceived exertion (RPE), also know as the Borg scale, was developed by Swedish

physiologist G.A.V. Borg. This scale rates exercise intensity from 6 to 20 depending upon how

you feel or the perception of your effort.

The scale is as follows:

Rating Perception of Effort

6 Minimal

7 Very,very light

8 Very,very light +

9 Very light

10 Very light +

11 Fairly light

12 Comfortable

13 Somewhat hard

14 Somewhat hard +

15 Hard

16 Hard +

17 Very hard

18 Very hard +

19 Very,very hard

20 Maximal

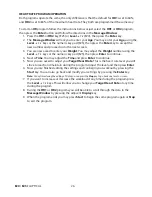
You can get an approximate heart rate level for each rating by simply adding a zero to each

rating. For example a rating of 12 will result in an approximate heart rate of 120 beats per

minute. Your RPE will vary depending up the factors discussed earlier. That is the major benefit

of this type of training. If your body is strong and rested, you will feel strong and your pace will

feel easier. When your body is in this condition, you are able to train harder and the RPE will

support this. If you are feeling tired and sluggish, it is because your body needs a break. In this

condition, your pace will feel harder. Again, this will show up in your RPE and you will train at

the proper level for that day.

Содержание E20

Страница 1: ...OWNER S MANUAL E20 E25 Elliptical Trainer Please carefully read this entire manual before operating your new elliptical ...

Страница 2: ...DS THIS WARRANTY IN ITS ENTIRETY Product Registration Important Safety Instructions Important Electrical Information Important Operation Instructions Transport Instructions E20 Assembly Instructions E25 Assembly Instructions Elliptical Features Operation of Your New Elliptical Programmable Features Using Heart Rate Monitor General Maintenance Manufacturer s Limited Warranty ...

Страница 3: ...n about Sears service To contact Sears for any service issues call 1 800 4 MY HOME 1 800 469 4663 Please take a moment at this time to record below the name of the dealer their telephone number and the date of purchase for easy contact in the future We appreciate your confidence in SOLE and we will always remember that you are the reason that we are in business Please complete and mail your regist...

Страница 4: ... and other caution areas that can cause harm Keep hands away from all moving parts Never operate the elliptical if it has a damaged cord or plug If the elliptical is not working properly call your dealer Keep the cord away from heated surfaces Do not operate where aerosol spray products are being used or where oxygen is being administered Sparks from the motor may ignite a highly gaseous environme...

Страница 5: ...e plug must be plugged into an appropriate outlet that is properly installed and grounded in accordance with all local codes and ordinances DANGER Improper connection of the equipment grounding conductor can result in a risk of electric shock Check with a qualified electrician or serviceman if you are in doubt as to whether the product is properly grounded Do not modify the plug provided with the ...

Страница 6: ...er will obey the command gradually NEVER use your elliptical during an electrical storm Surges may occur in your household power supply that could damage elliptical components Unplug the elliptical during an electrical storm as a precaution Use caution while participating in other activities while using your elliptical such as watching television reading etc These distractions may cause you to los...

Страница 7: ...KLIST HARDWARESTEP1 1 144 3 8 x 23 x 2T Curved Washer 4 pcs 139 3 8 x 19mm x 1 5T Flat Washer 4 pcs 119 M5 x 10mm Phillips Head Screw 4 pcs 142 3 8 x 2T Split Washer 8 pcs 113 3 8 x 3 4 Socket Head Cap Bolt 4 pcs 112 3 8 x 3 3 4 Hex Head Bolt 4 pcs ...

Страница 8: ...oc Nut 6 pcs HARDWARE STEP4 E20 4 120 M5 x 15mm Phillips Head Screw 4 pcs 122 Ø3 5 x 12mm Sheet Metal Screw 6 pcs 138 Ø8 5 26mm 2T Flat Washer 4 pcs 106 5 16 x 1 3 4 Hex Head Bolt 6 pcs 143 5 16 x 23mm x 1 5T Curved Washer 4 pcs 100 Switch Wire Cap 2 pcs HARDWARE STEP4 E25 4 120 M5 x 15mm Phillips Head Screw 7 pcs 122 Ø3 5 x 12mm Sheet Metal Screw 8 pcs ...

Страница 9: ... Carefully remove all parts from carton and inspect for any damage or missing parts If damaged parts are found or parts are missing contact your dealer immediately 3 Locate the hardware package Remove the tools first Remove the hardware for each step as needed to avoid confusion The numbers in the instructions that are in parenthesis are the item number from the assembly drawing for reference PRE ...

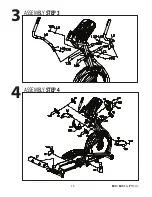
Страница 10: ...ONSOLE MAST 1See Page 9 for Illustration 1 Attach the Lower Swing Arms L and R 12 and 13 on each side of Console Mast shaft and secure with two Hex Head Bolts 104 and two Flat Washers 138 by using the Wrench 152 2 Insert the shaft of the left Connecting Arm 10 through the bushing on left Pedal Arm 7 and secure with a Button Head Socket Bolt 115 together with a Flat Washer 138 by using M5 L Allen W...

Страница 11: ...E20 E25 ELLIPTICAL 9 ASSEMBLY STEP2 2 ASSEMBLY STEP1 1 ...

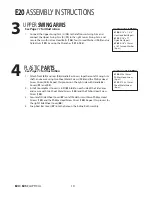
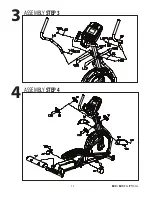
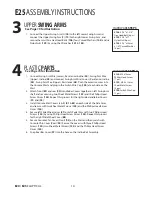
Страница 12: ...w Driver 150 Repeat this process for the right Slide Wheel Cover 88 4 Snap Rear Bar Cover 97 into the hole on the Incline Rail Assembly PLASTIC PARTS 4 HARDWARE STEP 4 1 Connect the Upper Swing Arm L 18 to the left Lower Swing Arm and connect the Upper Swing Arm R 19 to the right Lower Swing Arm and secure them with six Hex Head Bolts 106 four Curved Washers 143 and six Nyloc Nuts 129 by using the...

Страница 13: ...E20 E25 ELLIPTICAL 11 ASSEMBLY STEP4 4 ASSEMBLY STEP3 3 ...

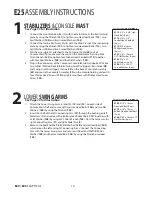
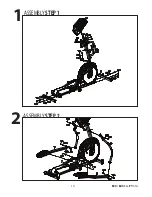
Страница 14: ... Bolts 112 two Split Washers 142 and two Curved Washers 144 2 Connect the Incline Rail Assembly 3 with the Main Frame at the rear joining plate by using the Wrench 151 to tighten two Hex Head Bolts 112 two Split Washers 142 and two Curved Washers 144 3 Pull the wire which is attached to the Computer Cable 38 out of Console Mast 15 and secure the mast on the Main Frame by using M8 L Allen Wrench 15...

Страница 15: ...E20 E25 ELLIPTICAL 13 ASSEMBLY STEP2 2 ASSEMBLY STEP1 1 ...

Страница 16: ... the Phillips Head Screw Driver 150 4 Secure left Slide Wheel Cover 87 on left Pedal Arm with two Phillips Head Screws 120 by using Phillips Head Screw Driver 150 Repeat this process for the right Slide Wheel Cover 88 5 Secure Console Chin Cover Front 93 on the Mast and then match with Console Chin Cover Rear 94 Secure the covers with three Phillips Head Screws 120 two Sheet Metal Screws 122 and t...

Страница 17: ...E20 E25 ELLIPTICAL 15 ASSEMBLY STEP4 4 ASSEMBLY STEP3 3 ...

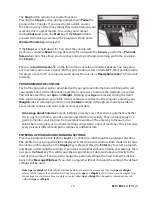
Страница 18: ...ich means you are involving more muscle fibers due to the increased range of motion The E20 and E25 have a computer controlled power incline The power incline is controlled by buttons on the console and swing arms E25 Only and will automatically adjust via the incline motor during the built in workout program ELLIPTICAL FEATURES QUICK KEYS The E25 features Quick Incline and Level keys When in a pr...

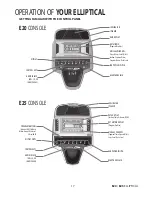
Страница 19: ...e Program Name Data Scan FAN POWER SWITCH HEADPHONE JACK DISPLAY CONTROL KEYS AUDIO IN JACK MP3 CD OR SMARTPHONE COOLING FAN SPEAKER DOT MATRIX DISPLAY Program Profiles MESSAGEWINDOW SegmentTime Speed Watts Laps Level Data Scan FAN POWER SWITCH HEADPHONE JACK DISPLAYVIEW PROGRAM BUTTONS Manual Hill Fat Burn Cardio Strength Interval 2 User 2HR CONTROL KEYS AUDIO IN JACK MP3 CD OR SMARTPHONE DATA DI...

Страница 20: ...t travels around the track BASIC INFORMATION The Message Window will initially display Laps completed for the E25 elliptical Each time the Display button is pressed the next set of information will appear The order of information displayed on the E25 will be Speed in mph Level Watts Segment Time and Data Scan mode In Data Scan mode the displayed information will change every 4 seconds in the Messa...

Страница 21: ...rrect Calorie reading Although we cannot provide an exact calorie count we do want to be as close as possible A message about Calories Calorie readings on every piece of exercise equipment whether it is in a gym or at home are not accurate and tend to vary widely They are meant only as a guide to monitor your progress from workout to workout The only way to measure your calorie burn accurately as ...

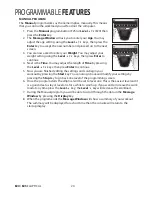
Страница 22: ... keys then press Enter to continue 5 Now you are finished editing the settings and can begin your workout by pressing the Start key You can also go back and modify your settings by pressing the Stop key to go back one level of the programming screen 6 Once the program starts the elliptical will be set to level one This is the easiest level and it is a good idea to stay at level one for a while to ...

Страница 23: ...endurance This is exercise for your heart and lungs It will build up your heart muscle and increase blood flow and lung capacity This is achieved by incorporating a higher level of exertion with slight fluctuations in work Strength The Strength program is designed to increase muscular strength in your lower body This program will steadily increase in resistance to a high level and forces you to su...

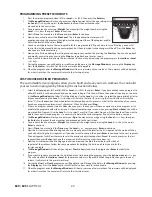
Страница 24: ... will switch to letter Z Press Enter when the desired letter is displayed Repeat this process until all of the characters of your name have been programmed maximum 7 characters When finished press Stop 2 If there is a program already stored in User when you press the key you will have an option to run the program as it is or delete the program and build a new one At the welcome message screen when...

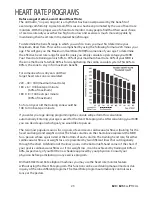
Страница 25: ... 180 x 6 108 beats per minute 60 of maximum 180 X 8 144 beats per minute 80 of maximum So for a 40 year old the training zone would be 108 to 144 beats per minute If you enter your age during programming the console will perform this calculation automatically Entering your age is used for the Heart Rate programs After calculating your MHR you can decide upon which goal you would like to pursue The...

Страница 26: ...erception of Effort 6 Minimal 7 Very very light 8 Very very light 9 Very light 10 Very light 11 Fairly light 12 Comfortable 13 Somewhat hard 14 Somewhat hard 15 Hard 16 Hard 17 Very hard 18 Very hard 19 Very very hard 20 Maximal You can get an approximate heart rate level for each rating by simply adding a zero to each rating For example a rating of 12 will result in an approximate heart rate of 1...

Страница 27: ... to maintain good strong reliable readings Wearing the transmitter immediately against bare skin assures you of proper operation If you wish you may wear the transmitter over a shirt To do so moisten the areas of the shirt that the electrodes will rest upon Note The transmitter is automatically activated when it detects activity from the user s heart Additionally it automatically deactivates when ...

Страница 28: ...ric key pad E25 then press Enter to continue 4 Next is Time You may adjust the Time and press Enter to continue 5 Now you are asked to adjust your Target Heart Rate This is the heart rate level you will strive to reach and maintain during the program Adjust the level and then press Enter 6 Now you are finished editing the settings and can begin your workout by pressing the Start key You can also g...

Страница 29: ...ou to change the console settings from English to Metric and turn off the beeping of the speaker when a key is pressed for example To enter the Maintenance Menu may be called Engineering Mode depending on version press and hold down the Start Stop and Enter keys keep holding the keys down for about 5 seconds and the Message Window will display Engineering Mode Press the Enter button to access the ...

Страница 30: ...authorized SOLE service companies use of parts other than original SOLE parts or external causes such as corrosion discoloration of paint or plastic alterations modifications abuse misuse accident improper maintenance inadequate power supply or acts of God 4 Products with original serial numbers that have been removed or altered 5 Products that have been sold transferred bartered or given to a thi...

Страница 31: ...s 1 800 827 6655 U S A 1 800 361 6665 Canada Para pedir servicio de reparación a domicilio y para ordenar piezas 1 888 SU HOGAR 1 888 784 6427 Get it fixed at your home or ours Registered Trademark TM Trademark SM Service Mark of Sears Brands LLC Marca Registrada TM Marca de Fábrica SM Marca de Servicio de Sears Brands LLC 2 YEARS FULL WARRANTY If this Sears Sole exercise equipment date of purchas...

Страница 32: ......
Отзывы: