


April 2021
|
Solar Stik
®
, Inc.
40
|
24VDC HyPR 3000 Operator and Maintenance Manual
PRELIMINARY DRAFT
Operator Instructions
Specific, detailed Operator Instructions depend on the System into which the HyPR 3000 is
integrated. Each HyPR 3000 I-Plate is customized with an abbreviated version of the System-
specific HyPR 3000 Operator instructions. A detailed set of System-specific Operator instructions is
available in the System Setup and Operation Manual. For these reasons, the HyPR 3000 Operator
instructions presented in this manual are brief and general in nature.
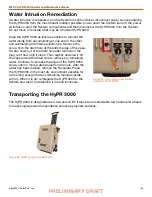
HyPR Setup and Operation
Before starting ensure that generators (if using) are serviced and in operating condition The
Operator must understand how to operate the generator connected to the System
Turn off all breaker switches on the HyPR 3000 including the POWER SWITCH on the front
exterior
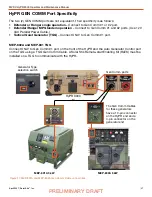
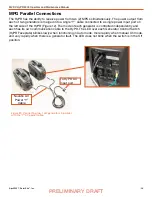
1. Connect the System according to the Connection Diagram on the HyPR 3000 I Plate.
2. Connect AC and / or DC loads to HyPR.
• Ensure load power switches are OFF.
• Load power requirements must not exceed rated output of their respective connections.
3. Toggle HyPR POWER SWITCH to ON.
This switch, located on the front exterior of the HyPR, allows current to flow from connected
batteries into the HyPR, energizing the internal DC bus (Figure 1 on page 7). At this point the
DC Interface will power up.
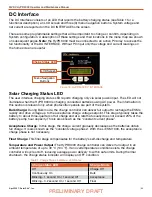
4. Check/Confirm/Program total Ah capacity in HyPR DC User Interface (typically programmed at
Solar Stik for the application illustrated on the HyPR 3000 I Plate.)
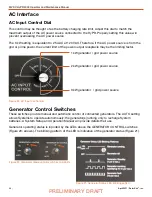
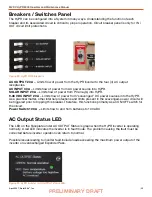
5. Set HyPR AC INPUT CONTROL to match output limit of generator(s) or shore power.
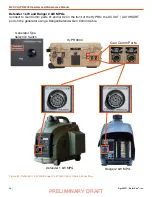
6. Toggle HyPR GENERATOR TYPE switch to choose generator type (if applicable).
7. Toggle HyPR AC INPUT breaker switch to ON.
8. Toggle HyPR GENERATOR CONTROL Switch(es) to ON position to start connected generator(s).
• Allow generator(s) to warm up (~5 minutes).
• Charge function begins only after generator is at operating temperature. This may require
several minutes of operation.
9. Rapidly toggle HyPR GENERATOR CONTROL switch(es) to AUTO.
• Allow generator(s) to run and charge ESMs until generator stops automatically.
• Generator operation will stop when ESMs achieve full-charge voltage (~29.0 VDC).
10. Toggle breaker switch(es) for circuits in use to ON.
11. Turn on loads.


