31
31HA
11304
4: WALL FRAME
65004 66646
7
1
65004
65923 65103
65923
65103
CADRE MURAL
MARCO DE PARED WANDRAHMEN
Страница 1: ...construction see page 14 15 SJDEN85 Model No Base Size 96 3 4 x 60 5 16 245 7 cm x 153 2 cm Exterior Dimensions Roof Edge to Roof Edge Width Depth Height Interior Dimensions Wall to Wall Width Depth Height Door Opening Width Height Approx Size Storage Area 8 x 5 38 Sq Ft 239 Cu Ft 96 3 4 73 9 16 83 5 8 94 3 8 57 5 16 80 13 16 56 3 4 69 2 4 m x 1 5 m 3 5 m 2 6 8 m3 245 7 cm 186 8 cm 212 4 cm 239 7 ...
Страница 2: ...EN FR SP GE 02HO GB FR SP DE ...
Страница 3: ... cm 212 4 cm 239 7 cm 145 6 cm 205 3 cm 141 1 cm 175 3 cm Dimensiones exteriores borde a borde del techo Ancho Profundidad Altura Dimensiones interiores pared a pared Ancho Profundidad Altura Abertura de la puerta Ancho Altura Tamaño aproximado Área de almacenaje 8 x 5 38 Sq Ft 239 Cu Ft 96 3 4 73 9 16 83 5 8 94 3 8 57 5 16 80 13 16 56 3 4 69 2 4 m x 1 5 m 3 5 m 2 6 8 m3 245 7 cm 186 8 cm 212 4 cm...
Страница 4: ...les distractions et les accidents potentiels No permita entrar a niños ni animales domésticos en el lugar de trabajo durante la construcción y hasta que la estructura esté completamente montada Esto ayudará a evitar distracciones y cualquier accidente que pueda producirse Your building MUST be anchored to prevent wind damage La estructura DEBE estar anclada para evitar daños por vientos NEVER conc...
Страница 5: ...os corrosivos como fertilizantes pesticidas y herbicidas de las superficies interiores y exteriores El óxido causado por daños químicos no está cubierto por la garantía Rust protection precautions Des mesures de protection contre la rouille Las precauciones de protección contra el óxido Avoid nicking or scraping the coating surface inside and out Éviter d entailler ou de rayer le revêtement de surf...
Страница 6: ... DE PIEZAS KLEINTEILELISTE Hex Nut 8 32 Écrou hexagonal 8 32 Tuerca hexagonal N º 8 32 Sechskantmutter 8 32 Small Bolt 8 32 x 3 8 10 mm Petit boulon 8 32 x 3 8 10 mm Perno pequeño color arena N º 8 32 x 3 8 10 mm Kleine Maschinenschraube 8 32 x 3 8 10 mm Small Screw 8AB x 5 16 8 mm Petite vis 8AB x 5 16 8 mm Tornillo pequeño color arena N º 8AB x 5 16 8 mm Kleine Blechschraube 8AB x 5 16 8 mm Flat...
Страница 7: ...ornillo de Plástico Kunststoff Schraubenkappen 44 16 30035 Mid Cap Capuchon médian Tapa de la Mitad Mittlere Kappe 2 17 30036 Corner Cap Coin bouchon Tapa de esquina Dachleisten Abschlusskappe 4 18 30016 Gutter End Cap Right Capuchon d extrémité de Gouttière Droit Tapa Derecha del Extremo del Canalón DachrinnenEndkappe Rechts 1 19 30017 Gutter End Cap Left Capuchon d extrémité de Gouttière Gauche T...
Страница 8: ... VISSERIE LISTA DE PIEZAS KLEINTEILELISTE Key No Part No Part Description Qty Part Views Rep N º de refe rencia Réf pièce N º de pieza Description de la pièce Descripción de la pieza Qté Cant Profils de pièces Vistas desde un extremo Lfd Nr Art Nr Menge Vor handen Bezeichnung Nameplate Plaque signalétique Placa de identificación Typenschild 25 66646 Washer Sheet Plaque de rondelles Plancha de arande...
Страница 9: ... Corner Panel Panneau Coin Latéral El Panel de la Esqui na Lateral Seitliche Eckverkleidung 4 8 11309 Front Corner Panel Panneau Coin Avant El Panel de la Esqui na delantera Vordere Eckverkleidung 2 9 11305 Wall Panel Panneau de mur Panel de la pared Wandblech 7 10 80197 Wall Frame Rear Left Cadre Mural Arrière Gauche Marco de pared posterior izquierdo WandrahmenHinten Links 1 11 11303 Wall Frame ...
Страница 10: ...Fenêtre Vertical Abrazadera de Ventana Vertical Vertikale Fensterführung 6 30 11318 Window Channel Upper Middle Canal de Fenêtresupérieur Milieu Canal de Ventana de la Mitad Superior FensterführungOben Mitte 1 31 11322 Window Support Angle Upper Middle Angle de Support de Fenêtresu périeur Milieu Angulo de Soporte de Ventana medio Superior Fen sterstützwinkelOben Mitte 1 32 Wall Frame Front Right ...
Страница 11: ...recho Dachrinne Rechts 40 80233 1 Gutter Left Gouttière Gauche Canalón Izquierdo Dachrinne Links 41 11326 1 Door Panel Front Right Panneau de Porte avant Droit Panel de Puerta delantero derecha Türfüllung Vorne Rechts 42 11327 1 Door Panel Back Right Panneau de Porte arrière Droit Panel de Puerta Posterior Derecha Türfüllung Hinten Rechts 43 80205 1 Door Panel Front Left Panneau de Porte avant Gau...
Страница 12: ...12 8 5 6 2 3 1 9 1 7 2 4 7 12 10 11 6 3 4 7 7 8 9 9 9 9 9 9 12 13 13 14 14 15 15 16 17 18 12HA 3 ASSEMBLY BY KEY NO PIÈCES PAR N DE REPÈRE MONTAJE POR N º DE REFERENCIA MONTAGE NACH LFD NR ...
Страница 13: ...7 28 29 30 31 31 32 32 33 34 34 35 36 36 36 37 38 38 13HA 26 28 28 28 28 28 38 38 39 40 41 42 43 44 45 45 45 45 46 46 46 46 47 47 47 47 48 ASSEMBLY BY KEY NO PIÈCES PAR N DE REPÈRE MONTAJE POR N º DE REFERENCIA MONTAGE NACH LFD NR 21 21 ...
Страница 14: ... flat free of bumps ridges etc to provide good support for the building The necessary materials may be obtained from your local lumber yard OPTION 3 Concrete Slab The slab should be at least 4 10 2 cm thick IMPORTANT La base DOIT être plate et de niveau pour fournir un support adéquat à votre bâtiment sinon les trous PRÉ PERCÉS NE S ALIGNERONT PAS ET ILS NE POURRONT PAS ÊTRE ASSEMBLÉS Quelque que s...
Страница 15: ...eden obtener de su aserradero local OPCIÓN 3 Losa de hormigón La losa debe tener al menos 4 10 2 cm de espesor CONSTRUYENDO UNA FUNDACIÓN Der Sockel MUSS flach und eben sein um eine angemessene Unterstützung für Ihr Gebäude zu gewährleisten Andernfalls werden die VORGEBOHRTEN LÖCHER NICHT AUSGERICHTET UND ES KANN NICHT ZUSAMMENGEBAUT WERDEN Unabhängig davon für welche der nachfolgend genannten Mögl...
Страница 16: ...95 1 11302 1 11301 1 30011 2 11301 80195 11302 11301 80195 80195 11301 30011 30011 95 3 8 242 3 cm 65923 65103 8 65923 66646 65103 10 CADRE MURAL PRÉ ASSEMBLAGE MARCO DE PARED PRE ENSAMBLE REAR ARRIÈRE ATRÁS FRONT AVANT FRENTE WANDRAHMEN VORMONTAGE VORNE HINTEN Länge nach Montage Finished Length Longueur finie Longitud terminada Länge nach Montage 65923 66646 65103 ...
Страница 17: ...17 17HA 11308 11307 X2 11309 11308 X2 65923 66646 65103 16 1 PRE ASSEMBLY PRÉ ASSEMBLAGE PRE ENSAMBLE 11307 2 11308 4 11309 2 65923 66646 65103 11308 11307 65923 66646 65103 11309 11308 VORMONTAGE ...
Страница 18: ...brir el borde del gablete ANTES de realizar CUALQUIER trabajo con los gabletes No hacer esto podría ocasionar lesiones Para evitar un accidente en el borde filoso el recuadro del borde debe quedar en su lugar en el borde superior del frontón hasta que los paneles izquierdo y derecho están colocados 69835 1 PRE ASSEMBLY PRÉ ASSEMBLAGE PRE ENSAMBLE 65923 66646 65103 4 11414 1 80225 1 5971 2 69835 2 V...
Страница 19: ...5103 65923 65103 Appliquer du silicone sur la partie interne de la gouttière 11331 droite comme indiqué Aplique silicón a la parte interna del Canalón derecho 11331 como se muestra VORMONTAGE Länge nach Montage Tragen Sie Silikon auf die Innen seite von 11331 Dachrinne Rechts auf wie abgebildet 30014 1 11331 30014 NOTE DO NOT TIGHTEN AT THIS TIME REMARQUE NE PAS SERRER À CE MOMENT CI NOTA NO TENSI...
Страница 20: ...h Longueur finie Longitud terminada 30016 1 11331 80233 65923 66646 65103 6 65923 66646 65103 80233 11331 65923 66646 65103 1 2 3 30017 1 30016 30017 30016 30017 65923 65103 65923 65103 4 11331 80233 VORMONTAGE Länge nach Montage Front Avant Frente Vorne Rear Arrière Atrás Hinten ...
Страница 21: ...4 12 80193 2 11298 2 11299 2 11298 80193 80193 11298 65004 65004 FRONT AVANT FRENTE REAR ARRIÈRE ATRÁS HINTEN 95 3 8 242 3 cm Finished Length Longueur finie Longitud terminada Länge nach Montage 95 3 8 242 3 cm Finished Length Longueur finie Longitud terminada Länge nach Montage VORNE BODENRAHMEN ...
Страница 22: ...FLOOR FRAME CADRE DE PLANCHER MARCO DE PISO 65004 24 11300 2 11298 11299 80193 1 80193 11299 11298 1 8397 4 80193 11298 11299 80193 11298 11299 65004 65923 65103 4 65103 65923 65004 X4 BODENRAHMEN Front Avant Frente Vorne Front Avant Frente Vorne ...
Страница 23: ... Mesurer en diagonale d un coin à l autre Lorsqu elles sont égales le cadre de plancher est d équerre NOTAS NO fije los tirantes del piso a la base en este momento Anclará la estructura después de que esté erguida El tirante del piso debe estar TANTO cuadrado COMO nivelado o los orificios no se alinearán correctamente Mida diagonalmente de esquina a esquina Cuando las medidas diagonales son iguales ...
Страница 24: ...11308 11305 1 11305 2 65004 66646 11305 1 11308 11305 1 11305 2 11305 2 1 Front Avant Frente 65923 66646 65103 4 65923 66646 65103 Vorne ALWAYS COVER THE ARROW NOTE REMARQUE TOUJOURS COUVRIR LA FLÈCHE DEBE CUBRIRSE SIEMPRE LA FLECHA NOTA HINWEIS IMMER DEN PFEIL ABDECKEN WANDBLECHE 11309 ...
Страница 25: ...25 25HA 65004 66646 2 3 WALL PANELS PANNEAUX DE MUR PANELES DE LA PARED 11307 11308 1 66646 11305 1 11308 1 65923 66646 65103 2 65923 65103 WANDBLECHE 11305 11308 65004 66646 Rear Arrière Atrás Hinten ...
Страница 26: ...4 66646 11305 2 11305 3 11307 11308 1 11305 1 11307 11307 Two or more people are required Rear wall needs to be supported NOTE REMARQUE Deux personnes ou plus sont nécessaires La paroi arrière doit être supportée NOTA Se requieren dos o más personas Se requiere poner apoyos en la pared posterior HINWEIS ZweiodermehrPersonensinderforderlich Die Rückwand muss gestützt werden ...
Страница 27: ...27 27HA 65004 66646 6 3 WALL PANELS PANNEAUX DE MUR PANELES DE LA PARED 66646 11308 65923 66646 65103 4 65923 65103 WANDBLECHE 11305 Rear Arrière Atrás Hinten 1 65004 66646 11305 2 11305 2 11305 1 11308 ...
Страница 28: ...28 28HA 65004 66646 1 3 WALL PANELS PANNEAUX DE MUR PANELES DE LA PARED 11308 11309 1 11308 1 11305 65004 66646 Front Avant Frente 65923 66646 65103 2 65923 66646 65103 Vorne WANDBLECHE 11305 1 11308 ...
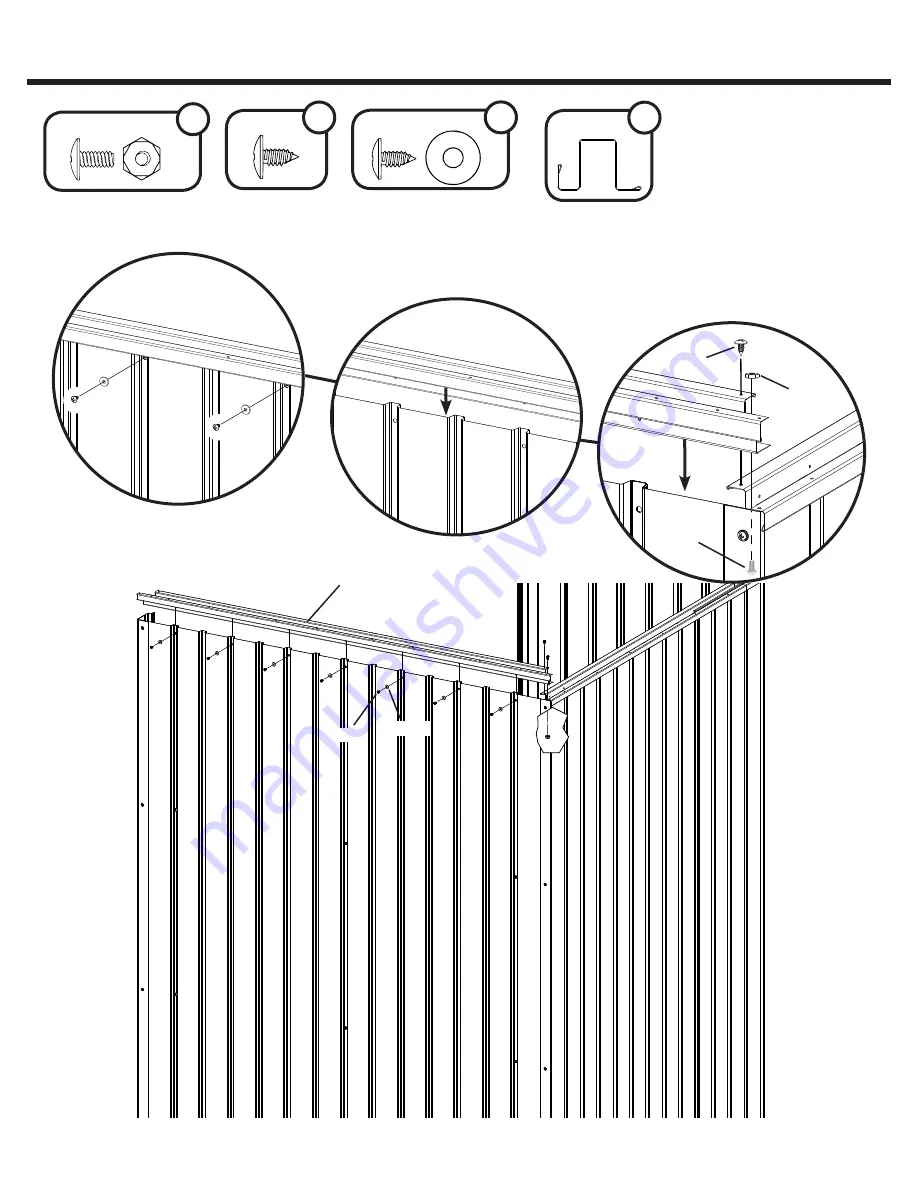
Страница 29: ...29 29HA 80197 11303 11299 4 WALL FRAME CADRE MURAL MARCO DE PARED WANDRAHMEN 11303 11299 80197 1 65004 66646 12 65004 66646 Rear Arrière Atrás Hinten ...
Страница 30: ...30 30HA 11304 4 WALL FRAME 65004 66646 7 11304 1 65004 1 65923 65103 1 65923 65103 65004 65004 66646 Front Avant Frente Vorne CADRE MURAL MARCO DE PARED WANDRAHMEN ...
Страница 31: ...31 31HA 11304 4 WALL FRAME 65004 66646 7 11304 1 65004 1 65923 65103 1 65923 65103 65004 65004 66646 CADRE MURAL MARCO DE PARED WANDRAHMEN ...
Страница 32: ...ANELS AVANT PANNEAUX DE MUR FRENTE PANELES DE LA PARED VORNE WANDBLECHE 65004 66646 6 65923 66646 65103 4 11306 2 Front Avant Frente Vorne 65004 66646 65103 65923 66646 11306 1 11309 11306 1 11309 11306 1 11306 1 11309 11309 ...
Страница 33: ... DE PORTE JAMBA DE LA PUERTA 65004 66646 2 65923 66646 65103 4 TÜRPFOSTEN 11314 2 11310 2 11314 11314 11310 11314 65923 66646 65103 65004 66646 Front Avant Frente Vorne 11314 1 11306 1 11314 1 11306 11314 1 11306 11306 11306 11306 11306 11306 2 2 1 1 1 1 2 2 ...
Страница 34: ...34 34HA 80195 11301 65004 66646 8 6 DOOR JAMB JAMBAGE DE PORTE JAMBA DE LA PUERTA TÜRPFOSTEN 11301 11302 80195 2 30011 1 Front Avant Frente Vorne 11302 65004 66646 65923 65103 2 65923 65103 ...
Страница 35: ...35 35HA 11314 11314 11314 11314 6 DOOR JAMB JAMBAGE DE PORTE JAMBA DE LA PUERTA TÜRPFOSTEN 65923 65103 4 65004 4 65103 65923 65103 65923 65004 65004 Rear Arrière Atrás Hinten ...
Страница 36: ...36 36HA 8397 8397 7 CORNER BRACE CORNIÈRES ABRAZADERA DE ESQUINA ECKENVERSTEIFUNG 65004 16 8397 4 Front Avant Frente Vorne ...
Страница 37: ...37 37HA 80233 8 GUTTER ASSEMBLY ASSEMBLAGE DE LA GOUTTIÈRE MONTAJE DEL CANALÓN DACHRINNEN MONTAGE 11331 80233 30016 30017 1 80233 11331 65004 Rear Arrière Atrás Hinten 65004 66646 4 66646 ...
Страница 38: ...HA 9 GABLE ROOF BEAM PIGNON POUTRE DE TOIT GABLETE VIGA DEL TECHO DACHGIEBEL DACHTRÄGER 65004 8 11414 5971 69835 1 80225 5971 69835 1 Front Avant Frente Vorne Front Avant Frente Vorne 80225 11414 65004 65004 ...
Страница 39: ...23 65103 Rear Arrière Atrás Hinten 11315 11315 9 GABLE ROOF BEAM PIGNON POUTRE DE TOIT GABLETE VIGA DEL TECHO DACHGIEBEL DACHTRÄGER NOTE DO NOT TIGHTEN AT THIS TIME REMARQUE NE PAS SERRER À CE MOMENT CI NOTA NO TENSIONE EN ESTE MOMENTO HINWEIS NOCH NICHT FESTZIEHEN ...
Страница 40: ...LA FENÊTRE MONTAJE DE LA VENTANA FENSTER MONTAGE 65923 65103 4 11316 1 Front Avant Frente Vorne 65103 65923 11317 2 11317 11317 11317 11320 11316 Front Avant Frente Vorne Front Avant Frente Vorne 11320 1 11316 1 2 3 65004 2 65004 11317 65004 4 11317 65004 ...
Страница 41: ...10 WINDOW ASSEMBLY 65004 18 65004 Front Avant Frente Vorne TOP VIEW VUE D EN HAUT VISTA DE ENCIMA DRAUFSICHT 11317 11321 11321 2 11321 11321 11321 ASSEMBLAGE DE LA FENÊTRE MONTAJE DE LA VENTANA FENSTER MONTAGE 11321 11320 ...
Страница 42: ... 10 Front Avant Frente Vorne 11324 11324 X2 65103 65103 65923 65923 ASSEMBLAGE DE LA FENÊTRE MONTAJE DE LA VENTANA FENSTER MONTAGE 11324 11324 11324 11324 11324 11324 11324 11324 2 1 4 5 72 cm Finished Length Longueur finie Longitud terminada Länge nach Montage ...
Страница 43: ...0009 30010 10 WINDOW ASSEMBLY 30009 1 30010 2 11316 11320 Front Avant Frente Vorne 11317 11321 65923 65103 2 Front Avant Frente Vorne 11318 1 11318 11318 65923 65103 ASSEMBLAGE DE LA FENÊTRE MONTAJE DE LA VENTANA FENSTER MONTAGE ...
Страница 44: ...44 44HA 10 WINDOW ASSEMBLY 65923 65103 4 11319 11319 11319 Front Avant Frente Vorne 65923 65103 11319 11319 11319 1 ASSEMBLAGE DE LA FENÊTRE MONTAJE DE LA VENTANA FENSTER MONTAGE ...
Страница 45: ...Front Avant Frente Vorne 30010 11323 2 65004 66646 10 65004 66646 11323 11319 11319 11322 1 11322 11318 11322 30009 Front Avant Frente Vorne 11318 Front Avant Frente Vorne 65004 66646 ASSEMBLAGE DE LA FENÊTRE MONTAJE DE LA VENTANA FENSTER MONTAGE ...
Страница 46: ...S PANNEAU DE TOIT PANEL DEL TECHO DACHBLECH 11312 1 65004 66646 6 65923 66646 65103 10 11312 65923 66646 65103 80199 1 80199 65004 66646 80199 11312 Front Avant Frente Vorne Front Avant Frente Vorne 11312 69835 69835 80199 ...
Страница 47: ...47 47HA 11 ROOF PANELS PANNEAU DE TOIT PANEL DEL TECHO DACHBLECH 65004 66646 30 11311 11311 3 11311 65004 66646 11311 80199 11311 80199 11312 1 3 2 1 11311 1 11311 2 11311 2 11311 3 11311 3 11312 ...
Страница 48: ...RIM GARNITURE DE TOIT CONTRAMARCO DEL TECHO DACHABSCHLUSSLEISTE 30036 4 65004 66646 4 11325 4 65004 66646 11325 Front Avant Frente Vorne 65004 8 11325 11325 11325 30036 65004 65004 30035 30035 30035 2 30036 30036 30036 ...
Страница 49: ...49 49HA 13 RIGHT DOOR ASSEMBLY POSE DE LA PORTE DE DROITE MONTAJE DE LA PUERTA DERECHA RECHTE TÜRHÄLFTE 11328 2 65004 11327 65004 6 11327 1 11328 11328 ...
Страница 50: ...face il NE PEUT PAS être enlevé Una vez que la cinta se pega a una superficie NO SE PUEDE quitar Sobald das Klebeband auf einer Oberfläche haftet kann es NICHT entfernt werden Once tape sticks to a surface it CAN NOT be removed 13 1 2 34 3 cm Press tape firmly along the door braces DO NOT peel the backing off at this time Appuyer fermement le ruban adhésif le long des contrevents de porte NE PAS enlev...
Страница 51: ...51 51HA 13 RIGHT DOOR ASSEMBLY POSE DE LA PORTE DE DROITE MONTAJE DE LA PUERTA DERECHA RECHTE TÜRHÄLFTE 66609 3 66783 65103 9 11326 1 11326 66609 66783 65103 X3 ...
Страница 52: ...rior Ausrichtung der Türverriegelung Draufsicht Porte extérieure Puerta exterior Außentür Outside Door Porte extérieure Puerta exterior Außentür Orientation correcte Orientation incorrecte Orientación correcta Orientación incorrecta Richtige Ausrichtung Falsche Ausrichtung If door latch is in wrong orientation push tab up Push latch in and rotate to correct orientation CC CC Si la serrure de la po...
Страница 53: ...ec la boîte d assemblage 6PP30006 de la poignée Utilice la herramienta sumi nistrada con la caja de ens amblaje del asa 6PP30006 para esta página Verwenden Sie für diese Seite die mit dem Mon tagekasten 6PP30006 gelieferten Beschläge A 2 D 2 E 2 CC 1 A A E E D D CC Make sure holes line up S assurer que les trous s alignent Asegúrese de que los agujeros estén alineados Stellen Sie sicher dass die L...
Страница 54: ...ur le bord du panneau avant avec la mortaise Pour cela il faut l intervention d au moins deux personnes Coloque el panel frontal sobre una superficie plana Con al menos 2 personas coloque el borde del pan el posterior en el borde del panel frontal con la muesca 2 Legen Sie die Vorderpaneele auf eine ebene Fläche Legen Sie die Kante der Rückwand mit mindestens 2 Per sonen auf den Rand der Vorderpa n...
Страница 55: ...E LA PUERTA DERECHA RECHTE TÜRHÄLFTE 11397 2 65004 65004 22 11397 65004 66646 6 11397 66611 3 30011 1 Bracket supplied with 6PP30011 66611 1 2 3 11329 11329 11329 2 65004 66646 Support fourni avec 6PP30011 Soporte suministrado con 6PP30011 Halter geliefertmit 6PP30011 ...
Страница 56: ...56 56HA 14 LEFT DOOR ASSEMBLY POSE DE LA PORTE DE GAUCHE MONTAJE DE LA PUERTA IZQUIERDA LINKE TÜRHÄLFTE 11328 2 65004 80207 65004 6 80207 1 11328 11328 ...
Страница 57: ...Sobald das Klebeband auf einer Oberfläche haftet kann es NICHT entfernt werden Once tape sticks to a surface it CAN NOT be removed 13 1 2 34 3 cm Press tape firmly along the door braces DO NOT peel the backing off at this time Appuyer fermement le ruban adhésif le long des contrevents de porte NE PAS enlever la pellicule de protection à ce moment là Presione la cinta firmemente a lo largo de los refue...
Страница 58: ...58 58HA 14 LEFT DOOR ASSEMBLY POSE DE LA PORTE DE GAUCHE MONTAJE DE LA PUERTA IZQUIERDA LINKE TÜRHÄLFTE 30007 1 66658 2 65923 65103 4 A B C C 30008 1 30008 A B C C 30008 66658 66658 65923 65103 ...
Страница 59: ... with handle assembly box 6PP30006 for this page Pour cette page utiliser le matériel fourni avec la boîte d assemblage 6PP30006 de la poignée Utilice la herramienta sumi nistrada con la caja de ens amblaje del asa 6PP30006 para esta página Verwenden Sie für diese Seite die mit dem Mon tagekasten 6PP30006 gelieferten Beschläge A A E D E D EE A A E D E D EE 66783 65103 9 ...
Страница 60: ...60 60HA 14 LEFT DOOR ASSEMBLY POSE DE LA PORTE DE GAUCHE MONTAJE DE LA PUERTA IZQUIERDA LINKE TÜRHÄLFTE 30032 1 2 2 30032 ...
Страница 61: ...au arrière sur le bord du panneau avant avec la mortaise Pour cela il faut l intervention d au moins deux personnes Coloque el panel frontal sobre una superficie plana Con al menos 2 personas coloque el borde del pan el posterior en el borde del panel frontal con la muesca 2 Legen Sie die Vorderpaneele auf eine ebene Fläche Legen Sie die Kante der Rückwand mit mindestens 2 Per sonen auf den Rand de...
Страница 62: ...611 11329 2 65004 14 LEFT DOOR ASSEMBLY POSE DE LA PORTE DE GAUCHE MONTAJE DE LA PUERTA IZQUIERDA LINKE TÜRHÄLFTE Support fourni avec 6PP30011 Soporte suministrado con 6PP30011 Halter geliefertmit 6PP30011 11330 1 11330 30041 2 30041 65004 11329 30041 11329 65004 11329 30041 11329 30041 ...
Страница 63: ...63 63HA 65004 66646 6 1 2 65004 66646 14 LEFT DOOR ASSEMBLY POSE DE LA PORTE DE GAUCHE MONTAJE DE LA PUERTA IZQUIERDA LINKE TÜRHÄLFTE ...
Страница 64: ...he Ensamblaje de la puerta derecha Right Door Assembly Ensemble de porte droite 66783 65103 Door Porte Puerta 66609 15 DOOR ASSEMBLY PORTE ASSEMBLÉE ENSAMBLAJE DE LA PUERTA MONTAGE DER TÜRE Tür Tür Montage der linken Tür Montage der rechten Tür Door Porte Puerta Tür 66783 65103 18 66609 Door Porte Puerta Tür ...
Страница 65: ... ASSEMBLÉE ENSAMBLAJE DE LA PUERTA MONTAGE DER TÜRE 30011 2 NOTE TIGHTEN FROM PAGE 18 19 39 AT THIS TIME NOTA SERRER DE LA PAGE 18 19 39 À CE MOMENT NOTA APRIETE DE LA PÁGINA 18 19 39 EN ESTE PASO HINWEIS JETZT VON SEITE 18 19 39 FESTZIEHEN ...
Страница 66: ... B 2 Use Allen wrench to tighten set screw Post goes in all the way B B J I H G F AA K L DO NOT lose keys Replacement keys are not available Utiliser une clé Allen pour serrer la vis de réglage Le poteau va jusqu au bout La entrada va en todo el trayecto Utilice una llave Allen para apretar el torillo de fijación Der Pfosten geht bis zum Ende durch Verwenden Sie einen Inbusschlüssel um die Stellsch...
Страница 67: ...ly box 6PP30006 for this page Pour cette page utiliser le matériel fourni avec la boîte d assemblage 6PP30006 de la poignée Utilice la herramienta sumi nistrada con la caja de ens amblaje del asa 6PP30006 para esta página Verwenden Sie für diese Seite die mit dem Mon tagekasten 6PP30006 gelieferten Beschläge C 2 BB 1 C C BB ...
Страница 68: ...ÉRATIVEMENT être solidement ancré une fois que l abri est assemblé OPCIONES DE ANCLAJE Si tiene puertas vaivén estas deben colgar y moverse en forma pareja antes de sujetar el cobertizo Ancle su edificio en este momento Use una herramienta apropiada de 1 4 6 mm X 1 1 2 38 1 mm de longitud Dedique unos minutos a asegurarse de que la estructura está instalada de acuerdo con estas instrucciones y con ...
Страница 69: ... 2 16 WINDOW TRIM GARNITURES DE FENÊTRES ACABADO DE LA VENTANA FENSTERVERKLEIDUNG 30022 2 30023 1 30024 1 30005 30005 X8 30023 30024 30022 30022 30022 30022 30023 30024 30005 30005 30005 30018 30018 30018 30018 30018 30018 ...
Страница 70: ...70 70HA 17 Ramp Seuil Rampa Türschwelle 11313 65004 65004 10 11313 1 11313 ...
Страница 71: ...71 71HA 18 Screw Cap Capuchons à Vis Tapas de Punta de Tornillo Kunststoff Schraubenkappen 30015 44 30015 ...
Страница 72: ......