background image

14

Using the Vacuum/Blower

m

WARNING!

 This equipment incorporates parts such 

as switches, motors or the like that tend to produce arcs or 

sparks that can cause an explosion. Do not pick up flammable, 

combustible, or hot materials. Do not use around explosive 

liquids or vapors, as electrical devices produce arcs or sparks 

which can cause a fire or explosion – do not use at filling 

stations or anywhere gasoline is stored or dispensed.
VACUUM MODE

1. 

Make sure the filter and dust tank are installed before 

starting.

2.  Make sure the vacuum hose is installed properly and 

locked securely in the air inlet (Fig. 7). 

3.  Install the desired cleaning accessory onto the end of the 

hose (Fig. 9). 

4.  Check that the electrical supply voltage and frequency 

(Volt/Hz) correspond to those specified on the 

rating plate. 

If the power supply is correct, you may now plug the 

vacuum into the power outlet (Fig. 11).

5. 

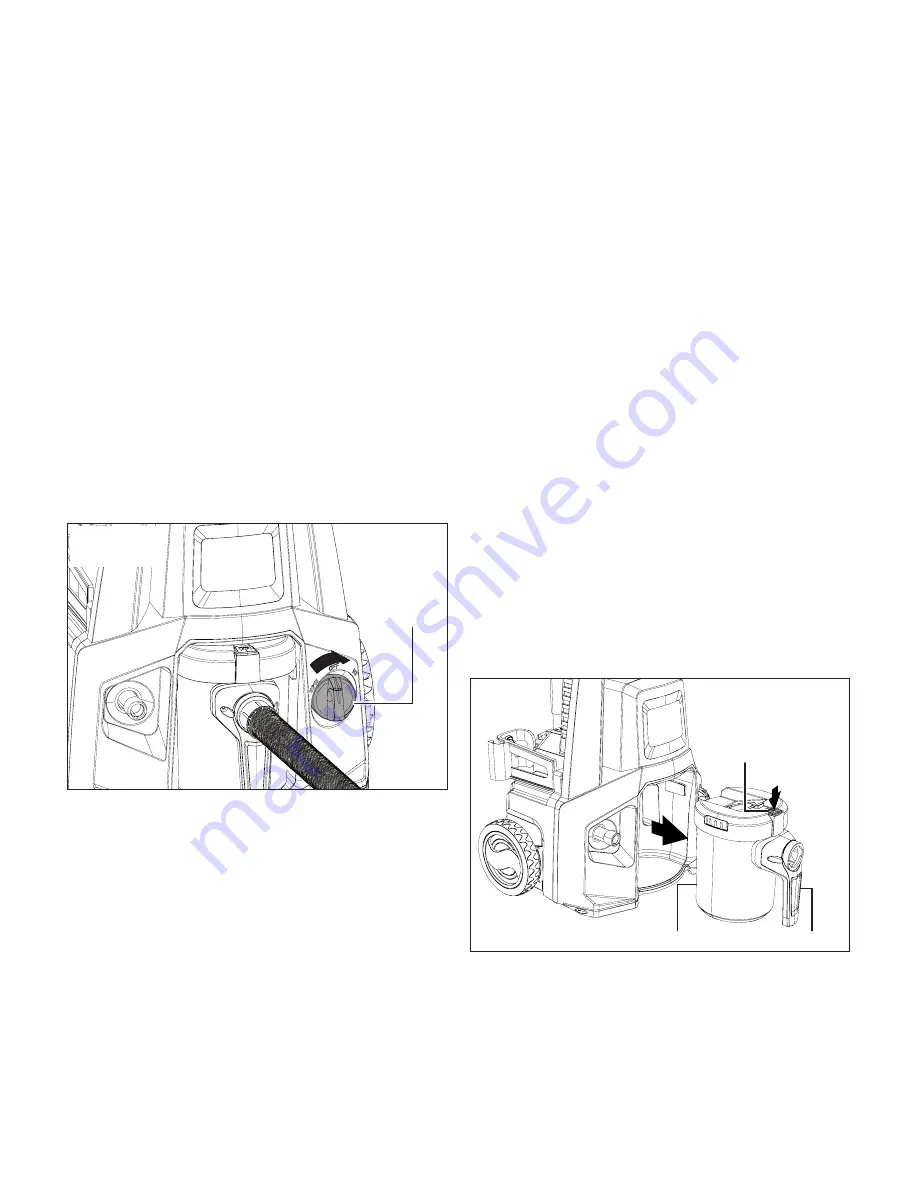
Turn the On/Off dial to the VC mark (Fig. 18).

6.  During vacuuming, always use the suction hose. Hold the 

suction hose at a distance of approximately 0.4 in. (1 cm) 

above the material to be vacuumed. 

7.  When the vacuuming job is done, return the switch to the 

OFF(O) position and unplug the power cord. Disassemble 

and store all the accessories.  

m

WARNING!

 When vacuuming large quantities of liquids, 

do not immerse the nozzle attachment completely in the liquid; 

leave a gap at the tip of the nozzle opening to allow air inflow. 

The machine is fitted with a float valve that stops the suction 

action when the collection tank reaches its maximum capacity. 

You will notice a decrease in motor speed. When this happens, 

turn off the machine, unplug the unit, and drain the liquid into a 

suitable receptacle or drain.

BLOWER MODE

m

WARNING!

 Keep children and bystanders away from 

the working area.

m

WARNING!

 Wear a dust mask if blowing creates dust 

that might be inhaled.

1.  Make sure the vacuum hose is installed properly and 

locked securely in the air outlet (Fig. 8).  

2.  Install the desired cleaning accessory onto the end of the 

hose (Fig. 9). 

3.  Check that the electrical supply voltage and frequency 

(Volt/Hz) correspond to those specified on the 

rating plate. 

If the power supply is correct, you may now plug the unit 

into the power outlet (Fig. 11).

4. 

Turn the On/Off dial to the VC mark (Fig. 18).

 NOTE: 

During the whole blowing process, keep the air 

inlet clear to maintain stable air flow.

5. 

After the job is done, turn the On/Off dial to the OFF 

position, unplug the power cord. Disassemble and store all 

the accessories. 

Drain the Dust Tank

The dust tank needs to be emptied every time after using to 

avoid deterioration and obstructing air flow, which will reduce 

the performance of the vacuum. Follow the instructions below 

to clean the dust tank.

1. 

Switch off and unplug the unit. 

2.  Press the dust tank lock and pull out the dust tank at the 

same time (Fig. 19).

3.  Grab the dust tank cap and turn it counterclockwise, the 

dust tank cap with filter can now be removed from the 

dust bin (Fig. 20).   

Fig. 18

On/Off dial

Fig. 19

Dust tank Dust tank handle

Dust tank lock

Содержание Sunjoe SPX7001E-RM

Страница 1: ...TIONS A Division of Snow Joe LLC OPERATOR S MANUAL Model SPX7001E RM Form No SJ SPX7001E RM 880E M V1 R 2 IN 1 ELECTRIC PRESSURE WASHER WET DRY VAC 2000 PSI MAX PRESSURE AT INITIAL DISCHARGE PER CSA I...

Страница 2: ...oroughly familiarize yourself with the controls Keep bystanders away All visitors and pets should be kept a safe distance away from the work area Use the right product Do not use this machine for any...

Страница 3: ...ly of water Check the water temperature This pressure washer is not meant to pump hot water NEVER connect it to a hot water supply as it will significantly reduce the life of the pump Do not direct th...

Страница 4: ...set values The spray gun features a locking device When the lock is activated the spray gun cannot be operated 1 Thermal sensor A thermal sensor protects the motor against overloading The machine will...

Страница 5: ...port the unit Do not lift the machine by the dust compartment handle Product Description Purpose This electric high pressure washer is intended for residential use only It is designed for medium to he...

Страница 6: ...working position the machine is equipped with a spray wand and a non slip handle grip whose shape and configuration comply with applicable regulations Do not cover or modify the spray wand or the spra...

Страница 7: ...arning or a danger WEAR EYE AND HEARING PROTECTION For protection against injury wear ear defenders and safety goggles Double Insulation When servicing use only identical replacement parts WARNING Do...

Страница 8: ...22 23 24 25 26 27 28 29 30 1 Adjustable nozzle 2 Spray wand 3 Spray wand holder 4 Foamer cannon holder 5 Water outlet 6 Wheel 2 7 Telescopic handle lock 8 Trigger safety lock 9 Trigger 10 Trigger gun...

Страница 9: ...ve the pressure washer wet dry vacuum and check to see that all of the above items are supplied 2 Inspect the product carefully to make sure no breakage or damage occurred during shipping If you find...

Страница 10: ...rden hose adapter Fig 5 The garden hose must have an internal diameter of at least 13 mm 1 2 in and must be reinforced The water supply must be at least equal to the washer delivery capacity NOTE The...

Страница 11: ...PORTANT This pressure washer is equipped with a micro switch sensitive to water flow This Total Stop System TSS senses water flow in the pump When the trigger is released water stops flowing through t...

Страница 12: ...high pressure by turning the pressure adjustment knob The nozzle tip can be adjusted from pencil spray narrow tip to fan spray wide open tip by turning the nozzle tip adjustment knob Fig 14 mWARNING D...

Страница 13: ...water When working on a vertical surface wash from the bottom up then rinse from the top down to avoid streaking Hold the nozzle 6 8 inches away from the work surface at a 45 angle mIMPORTANT NEVER U...

Страница 14: ...machine is fitted with a float valve that stops the suction action when the collection tank reaches its maximum capacity You will notice a decrease in motor speed When this happens turn off the machin...

Страница 15: ...as shown Fig 22 mCAUTION The use of a pump protector is recommended to prevent cold weather damage during storage over the winter months Winterizing long term storage If you must store your pressure w...

Страница 16: ...ment parts or accessories for the Sun Joe SPX7001E RM electric pressure washer wet dry vacuum please visit sunjoe com or contact the Snow Joe Sun Joe customer service center at 1 866 SNOWJOE 1 866 766...

Страница 17: ...roundwater and get into the food chain damaging your health and well being Service Support If your Sun Joe SPX7001E RM electric pressure washer wet dry vacuum requires service or maintenance please ca...

Страница 18: ...5 minutes to cool down Clean the nozzle Install a fuse with a higher amp rating than the amp consumption of the machine Try the unit without an extension cord Allow machine to run by holding the trig...

Страница 19: ...n Hose to Pressure Washer Adapter SPX 25H SPX UQC Model Accessories Item 2 1 3 Sun Joe House Deck All Purpose Pressure Washer Rated Concentrated Cleaner Sun Joe Premium Snow Foam Pressure Washer Rated...

Страница 20: ...20 NOTES...

Страница 21: ...21 NOTES...

Страница 22: ...22 NOTES...

Страница 23: ...all be construed as obligating Snow Joe Sun Joe to incorporate such design changes into previously manufactured products nor shall such changes be construed as an admission that previous designs were...

Страница 24: ...sunjoe com...

Отзывы: