Lit. No. 86834, Rev. 00
11
November 15, 2018
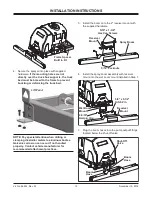
2. Lift the main assembly using the four corner lift
point brackets, and position onto the vehicle.
Center the sprayer system left to right, and then
slide the unit forward until the boom mount just
makes contact with the vehicle.
3.
Construct Sill Spacer:
Measure the distance
from the front end of the sprayer frame to the front
of the vehicle bed and construct a spacer from
2" x 8" lumber to
fi
t that area.
Failure to install this
spacer could result in damage to the sprayer.
ASSEMBLY / INSTALLATION
During assembly, check and test completed assembly
as directed in this manual. Serious injury could result
from chemical leaks if sprayer is improperly assembled.
IMPORTANT: DO NOT modify sprayer design.
NOTE: To prevent leaks, use a thread-sealing
compound on all threaded connections. Do
not use Te
fl
on
®
tape, as fragments will clog the
spray nozzles. Clamped connections may require
periodic retightening.
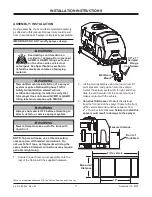
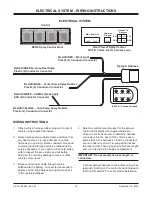
1. Secure the wet boom mount assembly onto the
rear of the frame with the supplied hardware.
INSTALLATION INSTRUCTIONS
Te
fl
on
®
is a registered trademark of E. I. du Pont de Nemours and Company.
WARNING
Always shut vehicle OFF before attempting to
attach, detach, or service sprayer system.
WARNING
Never attempt to take a unit off a truck with
liquid in it.
WARNING
Overloading could result in an
accident or damage. Do not exceed
GVWR or GAWR ratings as found
on the driver-side vehicle door
cornerpost. See Speci
fi
cations section to
determine maximum volumes of spraying
material.
WARNING
New untitled vehicle installation of a sprayer
system requires National Highway Traf
fi
c
Safety Administration altered vehicle
certi
fi
cation labeling. Installer to verify that
full sprayer does not exceed GVWR or GAWR
rating label and complies with FMVSS.
1/2" x 1"
Serrated
Flange
Cap Screws
Wet Boom
Mount
Front of
Truck Bed
Measure distance.
18"
Fit to vehicle.
Measured
Distance

