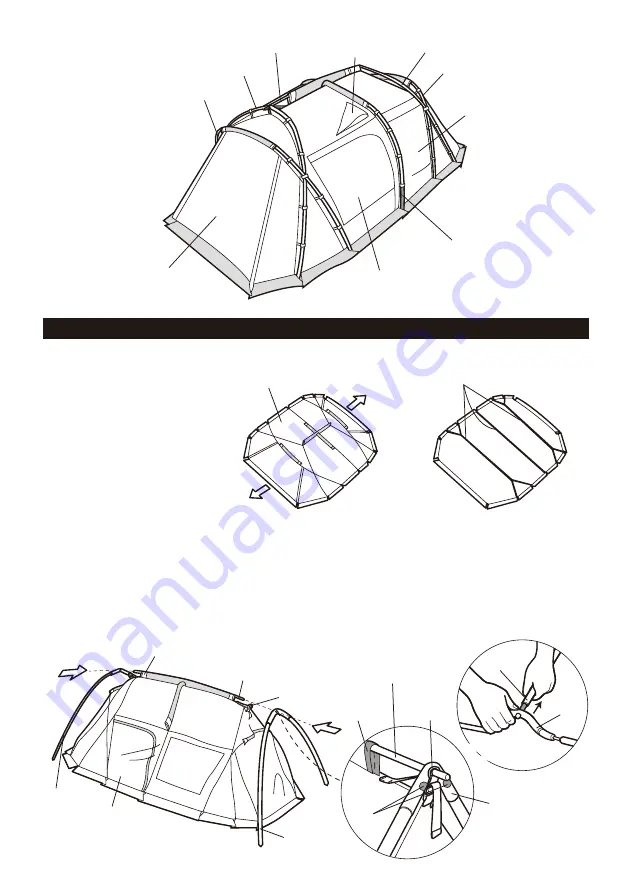
A pole Ridge pole
A pole
A pole
C pole
C pole
ベンチレーション
Mesh window
Center Pole
Side door panel
Door panel
■
Part Names
Setup procedure
Ridge pole
A pole
Set A pole on the Ridge pole
in a disassembled state
Set A pole on the Ridge pole
in a disassembled state
①
Spread the main body on a flat
area. Consider the orientation of
the two doorway panels.
Note: Make sure all three building
tapes are buckled. If it is
disconnected, make sure to
connect them before setup.
②
First, put the dark blue tip of the ridge pole into the sleeve of the dark blue tape in the center. Next, insert the ridge
pole so that the two dark blue stickers on the A ridge joint part outward. Confirm that the edge of the ridge pole is
firmly inserted into the end of the A pole joint part, and then insert the center ring as if pushing it all the way in and
hook it. (Figure A) At this point, please loosen the tape of the center ring without applying tension. Next, insert the
ridge pole into the A pole on the opposite side.
Note: When setting the A pole on the ridge pole, do not set it after connecting all the A poles, and set it on the ridge pole
while leaving the left and right upper ones apart. (Figure B) By setting it and then starting to raise the A pole, you can
reduce the stress on the joint and set it up easily.
Make sure that two or more people take part in the setup.
Land Lock main body
Door panel
(Entrance / Exit)
Door panel
(Entrance / Exit)
Three building tapes attached to the hem of the main body
Ridge pole
Ridge pole
A pole
Sleeve (dark blue)
Sleeve
(dark blue)
Dark blue
seal
Main body
A: Pole joint section
A pole
Center ring
Center ring
(Figure A)
(Figure B)
19
Содержание FES-195
Страница 1: ...Ver 1 00 M FES 195...
Страница 2: ...1...
Страница 3: ...2 1 6 1 1 1 1 1 3 5m 6 2 5m 4 1 5m 2 1 1 1 27...
Страница 4: ...3 1 C C A B...
Страница 5: ...4 C A C...
Страница 6: ...5 C A O 7m V 3 5m 3 5m 2 5m 1 5m 2 5m C A O...
Страница 7: ...6 Y Y...
Страница 8: ...7 O 2 O O O O...
Страница 9: ...8 O...
Страница 10: ...9 C A A...
Страница 11: ...10 2 C A 2 C C C A C...
Страница 12: ...11 I I...
Страница 13: ...12...
Страница 14: ...13 60 PU PU...
Страница 15: ...14 1 2 1 2 3 4 5 6 7 8 9 10...
Страница 17: ...Product Manual Ver 1 00 Land Lock M Ivory Option Set FES 195 16...


