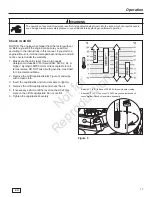
background image

Start the Engine

WARNING

The electric starter is equipped with a three-

wire power cord and plug designed to operate 

on AC household current. The power cord 

must be properly grounded at all times to avoid 

the possibility of electric shock.

If your house does not have a three-wire grounded system, do 

not use this electric starter. Contact a licensed electrician for 

installation of a three-wire grounded system.

WARNING

Always connect the power cord first to the switch box located 

on the equipment and then plug the other end into a grounded 

receptacle. After starting, disconnect the power cord from the 

grounded receptacle first.

Be sure that engine oil is at FULL mark on the oil fill cap/

dipstick. The snowthrower engine is equipped with an AC 

electric starter and recoil starter. Before starting the engine, 

be certain that you have read the following information.
If engine floods, set the choke to the OPEN/RUN position 

and crank until the engine starts.

Start the engine as follows: 

 1.  Check the oil level. See the Check/Add Oil section.
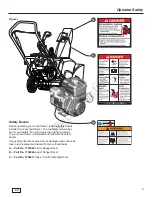
 2.  Make sure auger control is disengaged.
 3.  Insert the ON/OFF key (

A

, Figure 5) and turn to the ON 

position or insert the Push/Pull key, if equipped.

 4.  Turn the choke knob (

B

) fully clockwise if engine is cold.


NOTE:

 Do not use the choke to start a warm engine.

 5.  Push the primer button (

C

) two times. 


NOTE:

 Do not use the primer to start a warm engine.

13

en

Operation

B

C

A

D

Figure 5

WARNING

Rapid retraction of the starter cord (kickback) 

will pull your hand and arm toward the engine 

faster than you can let go. 

Broken bones, fractures, bruises, or sprains could result. 

When starting engine, pull the starter cord slowly until 

resistance is felt and then pull rapidly to avoid kickback.
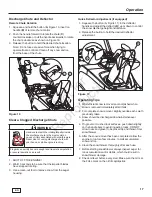
 6. 

Rewind Start:

 Firmly hold the starter cord handle 

(

D

, Figure 5). Pull the starter cord handle slowly until 

resistance is felt, then pull rapidly.


NOTE:

 If the engine does not start after three attempts, 

see the Troubleshooting section in the Engine Manual.

Not 

for  

Reproduction

Содержание 1695881

Страница 1: ...gle Stage Snowthrower 8 00 TP 22 Inch Souffleuse à neige mono étagée Modèle n Description 1695881 Souffleuse à neige mono étagée électrique 8 00 C B 22 pouces 1750864 A Revision A en Operator s Manual fr Manual de l opérateur N o t f o r R e p r o d u c t i o n ...

Страница 2: ... contacting your authorized dealer for replacement parts service or information you MUST have these numbers Record your model name number manufacturer s identification numbers and engine serial numbers in the space provided for easy access Product Identification Tag Model Modéle Model xxxxxxxx Serial Sèrie Serie xxxxxxxxxx Briggs Stratton Power Products Group L L C Milwaukee WI 53201 USA PRODUCT R...

Страница 3: ...the Engine 14 Operate the Snowthrower 15 Stop the Snowthrower 16 Snowthrower Safety Test 16 Discharge Chute and Deflector 17 Clear a Clogged Discharge Chute 17 Operating Tips 17 Maintenance 18 Snowthrower Maintenance 18 Engine Maintenance 18 Emissions Control Statement 18 Change the Oil 18 Access the Spark Plug 19 Auger Cable Adjustment 20 Storage 21 Troubleshooting 22 Warranty 23 Emission Stateme...

Страница 4: ...ting and safety instructions Shutoff engine and remove key before performing maintenance and repair work Thrown Objects Hazard Fire Hazard Rotating Auger Amputation Hazard Carbon Monoxide Poisoning Hazard Keep safe distance Electric Shock Rotating Impeller Amputation Hazard Keep Children Away 4 Operator Safety Hazard Symbols and Meanings Control Symbols on Equipment www snapper com N o t f o r R e ...

Страница 5: ...s and feet and throwing objects Read and observe all the safety instructions in this manual Failure to do so could result in death or serious injury WARNING Read understand and follow all the instructions on the snowthrower and in the operator s manual before operating this unit Failure to observe the safety instructions in this manual could result in death or serious injury Be thoroughly familiar...

Страница 6: ... while performing an adjustment or repair Always be aware of the direction the snow is being thrown Nearby pedestrians pets or property may be harmed by objects being thrown Be aware of your environment while operating the snowthrower Don t run over items such as gravel doormats newspapers toys and rocks hidden under snow as they can all be thrown from the chute or jam in the auger Use extreme cau...

Страница 7: ...e or explosion WHEN TRANSPORTING EQUIPMENT Transport with fuel tank EMPTY or with fuel shut off valve OFF WHEN STORING GASOLINE OR EQUIPMENT WITH FUEL IN TANK Store away from furnaces stoves water heaters or other appliances that have pilot light or other ignition source because they can ignite fuel vapors WARNING Safe operation of the snowthrower requires the proper care and maintenance of the en...

Страница 8: ...oughly inspect the area where the snowthrower will be used and remove all doormats sleds boards wires and other foreign objects Do not operate the snowthrower without wearing adequate winter clothing Wear footwear that will improve footing on slippery surfaces Use caution to avoid slipping or falling especially when operating the snowthrower in reverse Never operate the snowthrower without good vi...

Страница 9: ...id a personal injury or damage to your snowthrower understand and follow all the safety decals If any safety decals become worn or damaged and cannot be read order replacement decals from your local dealer A Part No 1737865 Chute Danger Decal B Part No 1739966 Auger Danger Decal C Part No 279655 Choke Control Warning Decal A B C Figure 1 N o t f o r R e p r o d u c t i o n ...

Страница 10: ...le F Starting Instructions Steps 1 3 G Starting Instructions Step 4 5 Engine Controls H Choke Control Knob I Fuel Tank and Cap J Oil Fill Cap Extended Dipstick K Primer Button L ON OFF or Push Pull Key As equipped M Starter Cord Handle N Oil Drain 1739977 Features and Controls Figure 2 E D F G I H J K L M N A C B www snapper com N o t f o r R e p r o d u c t i o n ...

Страница 11: ... oil fill cap dipstick A Figure 3 and wipe with a clean cloth 3 Insert the cap dipstick and turn clockwise to tighten 4 Remove the oil fill cap dipstick and check the oil 5 If necessary add oil until the level reaches the FULL mark on the oil fill cap dipstick Do not overfill 6 Tighten the cap dipstick securely WARNING The operation of any snowthrower can result in foreign objects being thrown int...

Страница 12: ... cause decreased performance increased fuel consumption and increased emissions See a Briggs Stratton Authorized Dealer for high altitude adjustment information Operation of the engine at altitudes below 2 500 feet 762 meters with the high altitude kit is not recommended Add Fuel WARNING Fuel and its vapors are extremely flammable and explosive Fire or explosion can cause severe burns or death Whe...

Страница 13: ... to the OPEN RUN position and crank until the engine starts Start the engine as follows 1 Check the oil level See the Check Add Oil section 2 Make sure auger control is disengaged 3 Insert the ON OFF key A Figure 5 and turn to the ON position or insert the Push Pull key if equipped 4 Turn the choke knob B fully clockwise if engine is cold NOTE Do not use the choke to start a warm engine 5 Push the...

Страница 14: ...short starting cycles five seconds maximum Wait one minute between starting cycles NOTE If the engine does not start after three attempts see the Troubleshooting section in the Engine Manual E F G Figure 6 Stop the Engine WARNING Gasoline and vapors are extremely flammable and explosive Fire or explosion can cause severe burns or death DO NOT choke the carburetor to stop the engine Before stopping...

Страница 15: ...rection and angle of the discharge chute A Figure 8 See Discharge Chute and Deflector in this section 3 Fully press and hold the auger control B to engage the auger rotation Releasing the auger control lever will disengage the auger 3 Push the unit into the snow Note When clearing wet heavy snow reduced your speed maintain full throttle and clear less than the full width of the unit 4 Tip the hand...

Страница 16: ...6 C Avoid these areas DO NOT allow children to operate or be near snowthrower while it is operating 1 Release the auger control A Figure 9 2 Turn the ON OFF switch B to the OFF position and remove or pull out PUSH PULL key A B Figure 9 Snowthrower Safety Test WARNING Never run engine indoors or in an enclosed poorly ventilated area The discharge chute contains a rotating auger to throw snow Never ...

Страница 17: ... out tool to remove snow from the auger housing Quick Deflector Adjustment if equipped 1 Squeeze the button A Figure 11 in the deflector handle and adjust the deflector B up or down to control the snow discharge height and distance 2 Release the button to hold the desired deflector adjustment B A B Figure 11 Operating Tips 1 Most efficient snow removal is accomplished when snow is removed immediat...

Страница 18: ... performed by any non road engine repair establishment or individual However to obtain no charge emissions control service the work must be performed by a factory authorized dealer See the Emissions Warranty Maintenance Change the Oil Remove Oil Used oil is a hazardous waste product and must be disposed of properly Do not discard with household waste Check with your local authorities service cente...

Страница 19: ...h or Push Pull key Keep the key away from children 2 Grasp the choke control B and pull up to remove 3 Remove the mounting screws C 4 Carefully remove the top part of the snow hood D DO NOT disconnect the primer hose E or the key wire F 5 Remove the spark plug G and replace See Specifications A C D E F G B I H Figure 15 6 Before installation of the snow hood make sure the primer hose and the key w...

Страница 20: ...ther use Inspection 1 Start the engine 2 Engage the auger control The auger should turn 3 Release the auger control The auger should stop within 5 seconds If the auger does not turn or stop as indicated above perform the adjustment procedure or take the unit to your local authorized dealer for repair Adjustment 1 Turn off the engine and remove the key Wait for all moving parts to stop 2 Slide the ...

Страница 21: ...is added according to the instructions Run the engine for 2 minutes to circulate the stabilizer throughout the fuel system The engine and fuel can be stored up to 24 months If gasoline in the engine has not been treated with a fuel stabilizer it must be drained into an approved container Run the engine until it stops from lack of fuel The use of a fuel stabilizer in the storage container is recomm...

Страница 22: ...s Plug in cord or replace defective cord reset circuit breaker Engine starts hard or runs poorly Fuel mixture too rich Move choke to OPEN position Spark plug faulty fouled or gapped incorrectly Clean and re gap spark plug or see authorized dealer Fuel cap vent is blocked Clear vent Excessive vibration Loose parts or damaged auger Stop engine immediately See authorized dealer Scraper bar does not c...

Страница 23: ...ce is requested the manufacturing date of the product will be used to determine warranty eligibility ABOUT YOUR WARRANTY We welcome warranty repair and apologize to you for being inconvenienced Warranty service is available only through servicing dealers authorized by Briggs Stratton or BSPPG LLC Most warranty repairs are handled routinely but sometimes requests for warranty service may not be app...

Страница 24: ...24 www snapper com N o t f o r R e p r o d u c t i o n ...

Страница 25: ...odels is labeled in accordance with SAE Society of Automotive Engineers code J1940 Small Engine Power Torque Rating Procedure and rating performance has been obtained and corrected in accordance with SAE J1995 Revision 2002 05 Torque values are derived at 3060 RPM horsepower values are derived at 3600 RPM Actual gross engine power will be lower and is affected by among other things ambient operati...

Страница 26: ...our le déneigement et n est destinée à aucune autre utilisation C est important que vous lisez et comprenez ces instructions complètement avant d essayer de mettre en marche ou de faire fonctionner cet équipement Sauvegardez ces instructions pour votre référence Étiquette d identification de produit Données de référence du produit Quand vous contactez votre revendeur agréé pour des pièces détachée...

Страница 27: ... Arrêter le moteur 14 Utilisation de la souffleuse à neige 15 Arrêter la souffleuse à neige 16 Test de sécurité de la souffleuse à neige 16 Goulotte d éjection et déflecteur 17 Débloquer une goulotte d éjection bouchée 17 Conseils d utilisation 17 Entretien 18 Entretien de la souffleuse à neige 18 Entretien du moteur 18 Déclaration sur le contrôle des émissions 18 Vidanger l huile 18 Accéder à la ...

Страница 28: ...ets Risque d incendie Tarière rotative danger d amputation Danger d empoisonnement au monoxyde de carbone Gardez une distance de sécurité Décharge électrique Turbine rotative Danger d amputation Tenir les enfants à distance Clé de contact MARCHE ARRÊT Fermez le starter pour démarrer Fermez le starter pour démarrer Appuyez 2 fois sur l amorceur Branchez la rallonge Appuyez sur le bouton de démarrag...

Страница 29: ... toutes les instructions de sécurité dans ce manuel Ne pas s y conformer peut entraîner de sérieuses blessures voire la mort AVERTISSEMENT Lisez comprenez et suivez toutes les instructions sur la souffleuse à neige dans le manuel de l opérateur avant de faire fonctionner cette machine La faillite d observer les instructions de sécurité dans ce manuel peut résulter à la mort ou une blessure grave F...

Страница 30: ... vigilance et arrêter la machine si des enfants pénètrent dans la zone Ne jamais laisser les enfants se servir de la machine Prenez bien soin lorsque vous approché des coins sans visibilités les arbustes les arbres ou les autres objets qui vous cachent la vue Les enfants peuvent être présents DANGER Les objets peuvent être ramassés par la tarière et projetés du conduit Ne rejetez jamais de la neig...

Страница 31: ...t peut s écouler et peut résulter en feux ou explosion LORS DE LA TRANSPORTATION D ÉQUIPEMENT Transportez lorsque le réservoir est VIDE ou lorsque la soupape d arrêt est fermée AVEC LE CARBURANT DANS LE RÉSERVOIR Entreposez loin des fournaises des poêles des chauffe eaux ou autres appareils qui ont une flamme d allumage ou autre source d allumage qui peut allumer les vapeurs de carburant AVERTISSE...

Страница 32: ... neige sera utilisée et retirez tous les tapis luges planches fils de fer et autres objets inopportuns N utilisez pas la souffleuse à neige sans porter de vêtements d hiver adéquats Portez des chaussures permettant d avoir une meilleure prise sur les surfaces glissantes Faites preuve de prudence pour éviter de glisser ou de tomber lorsque vous faites fonctionner la souffleuse à neige en marche arr...

Страница 33: ... votre souffleuse à neige veuillez comprendre et suivre les directives de sécurité sur les décalcomanies Si n importe quelle décalcomanie de sécurité devient usée ou endommagée et ne peut être lu commandez des décalcomanies de remplacement de votre concessionnaire agréé A Pièce N 1737865 Étiquette autocollante Danger goulotte B Pièce N 1739966 Étiquette autocollante Danger tarière C Pièce N 279655...

Страница 34: ...n F Instructions de démarrage Étapes 1 à 3 G Instructions de démarrage Étapes 4 et 5 Commandes du moteur H Bouton de commande de starter I Réservoir de carburant et bouchon J Bouchon d huile de remplissage jauge d huile allongé K Bouton d amorceur L Clé MARCHE ARRÊT ou à tirette si la machine en est équipée M Poignée du cordon de démarreur N Vidange d huile Fonctions et commandes 1739977 Figure 2 ...

Страница 35: ...uchon ou la jauge d huile et tournez le dans le sens des aiguilles d une montre pour le resserrer 4 Retirez le bouchon jauge d huile et vérifiez l huile 5 Le cas échéant ajoutez de l huile jusqu à ce qu elle atteigne le niveau PLEIN sur le bouchon ou la jauge d huile Ne pas remplir de trop 6 Resserrez bien le bouchon ou la jauge d huile AVERTISSEMENT L utilisation de toute souffleuse à neige peut ...

Страница 36: ...tion des émissions Consultez un revendeur agréé Briggs Stratton Authorized pour avoir des informations sur les réglages de haute altitude Il n est pas recommandé de faire fonctionner le moteur à des altitudes inférieures à 762 mètres 2 500 pieds avec le kit haute altitude Ajouter du carburant AVERTISSEMENT Le carburant et ses vapeurs sont extrêmement inflammables et explosifs Les incendies ou les ...

Страница 37: ...tre en marche le moteur 1 Contrôlez le niveau d huile Consultez la section Vérification et adjonction d huile 2 Assurez vous que la commande de tarière soit débrayée 3 Insérez la clé de contact MARCHE ARRÊT A Figure 5 et tournez la sur la position MARCHE ou insérez la clé à tirette si la machine en est équipée 4 Tournez le bouton de starter B complètement dans le sens des aiguilles d une montre si...

Страница 38: ...Attendre une minute entre les cycles de démarrage REMARQUE Si après trois tentatives le moteur ne démarre pas consultez la section Dépannage dans le manuel du moteur E F G Figure 6 Arrêter le moteur AVERTISSEMENT L essence et les vapeurs sont extrèmement flammables et explosifs Un incendie ou une explosion peut provoquer des brûlures graves voire la mort NE PAS étouffer pas le carburateur pour arr...

Страница 39: ...ection et l angle de la goulotte d éjection A Figure 8 Voir Goulotte d éjection et déflecteur dans cette section 3 Appuyez à fond sur le levier de commande de tarière et maintenez la position B pour embrayer la rotation de la tarière Relâcher le levier de commande de tarière forcera la tarière à se désembrayer 3 Poussez la machine dans la neige Remarque Quand vous déblayez de la neige humide et lo...

Страница 40: ...lisée d une manière négligente N utilisez jamais la souffleuse à neige sans que les protections caches et éléments protecteurs soient en place Veuillez ne pas projeter la neige vers les fenêtres ou permettre les spectateurs près de la machine pendant son fonctionnement Arrêtez le moteur lorsque vous éloigner de la machine Déconnectez la bougie d allumage avant de débloquer le boîtier d impulseur o...

Страница 41: ...rêté de tourner 3 Utilisez un outil de nettoyage pour retirer la neige de la tarière Réglage rapide du déflecteur si équipé 1 Serrez le bouton A Figure 11 de la poignée du déflecteur et ajustez le déflecteur B vers le haut ou vers le bas pour fixer la hauteur et la distance d éjection de la neige 2 Relâchez le bouton pour maintenir la position voulue du déflecteur B A B Figure 11 Conseils d utilis...

Страница 42: ... systèmes de contrôle des émissions peuvent être effectués par tout établissement de réparation de moteurs non routiers ou particulier Cependant pour obtenir un service après vente gratuit du contrôle des émissions le travail doit être effectué par un revendeur agréé de l usine Voir la Garantie concernant le contrôle des émissions Entretien Vidanger l huile Retirer l huile L huile vidangée est un ...

Страница 43: ...la clé à tirette Maintenir la clé en dehors de la portée des enfants 2 Saisissez la commande de starter B et tirez la pour la retirer 3 Retirez les vis de montage C 4 Retirez avec précaution la partie supérieure du capot à neige D NE PAS déconnecter le tuyau de l amorceur E ou le câble de clé F 5 Retirez la bougie d allumage G et remplacez la voir spécifications A C D E F G B I H Figure 15 6 Avant...

Страница 44: ...sation Inspection 1 Démarrez le moteur 2 Embrayez la commande de tarière La tarière devrait tourner 3 Relâcher la commande de tarière La tarière devrait s arrêter dans les 5 secondes Si la tarière ne tourne pas ou s arrête comme indiqué ci dessus effectuez la procédure de réglage ou bien emmenez la machine chez votre revendeur agréé local pour sa réparation Ajustement 1 Coupez le moteur et retirez...

Страница 45: ...vapeurs sont extrêmement inflammables et explosifs Les incendies ou les explosions peuvent entraîner de graves brûlures voire la mort Entreposer du carburant ou de l équipement ayant du carburant dans le réservoir Entreposez en tenant à l écart de chaudières poêles chauffe eau ou autres appareils ménagers ayant une veilleuse ou une autre source d allumage pouvant enflammer les vapeurs d essence Ci...

Страница 46: ...initialisez le coupe circuit Le moteur démarre difficilement ou tourne mal Mélange trop riche Mettez le starter sur la position OUVERT Bougie défaillante encrassée ou dont l écartement des électrodes est mal réglé Nettoyez et vérifiez l écartement des électrodes de la bougie ou bien consultez un revendeur agréé La calotte d aération est bloquée Dégagez les orifices de ventilation Vibrations excessiv...

Страница 47: ...u moteur Garantie BRIGGS STRATTON POWER PRODUCTS GROUP L L C GARANTIE DU PROPRIÉTAIRE POLITIQUE GARANTIE LIMITÉE Si une pièce de cet équipement présente un vice de matériau ou de fabrication Briggs Stratton Power Products Group LLC la réparera ou la remplacera gratuitement Si une pièce du moteur Briggs and Stratton si équipé présente un vice de matériau ou de fabrication Briggs Stratton Corporatio...

Страница 48: ... pour les modèles de moteurs à essence individuels répondent au code J1940 Small Engine Power Torque Rating Procedure de la SAE Society of Automotive Engineers et la performance nominale a été obtenue et corrigée conformément à SAE J1995 Révision 2002 05 Les valeurs de couple sont dérivées à 3 060 tr min les valeurs de puissance sont dérivées à 3 600 tr min La puissance de moteur brute réelle peut...

Страница 49: ...Notes Remarques N o t f o r R e p r o d u c t i o n ...

Страница 50: ...Notes Remarques N o t f o r R e p r o d u c t i o n ...

Страница 51: ...N o t f o r R e p r o d u c t i o n ...

Страница 52: ...Snapper Inc P O Box 702 Milwaukee WI U S A 1 800 935 2967 www snapper com Copyright 2010 Briggs Stratton Power Products Group LLC Milwaukee WI EU Tous droits réservés N o t f o r R e p r o d u c t i o n ...

Отзывы: