background image

13

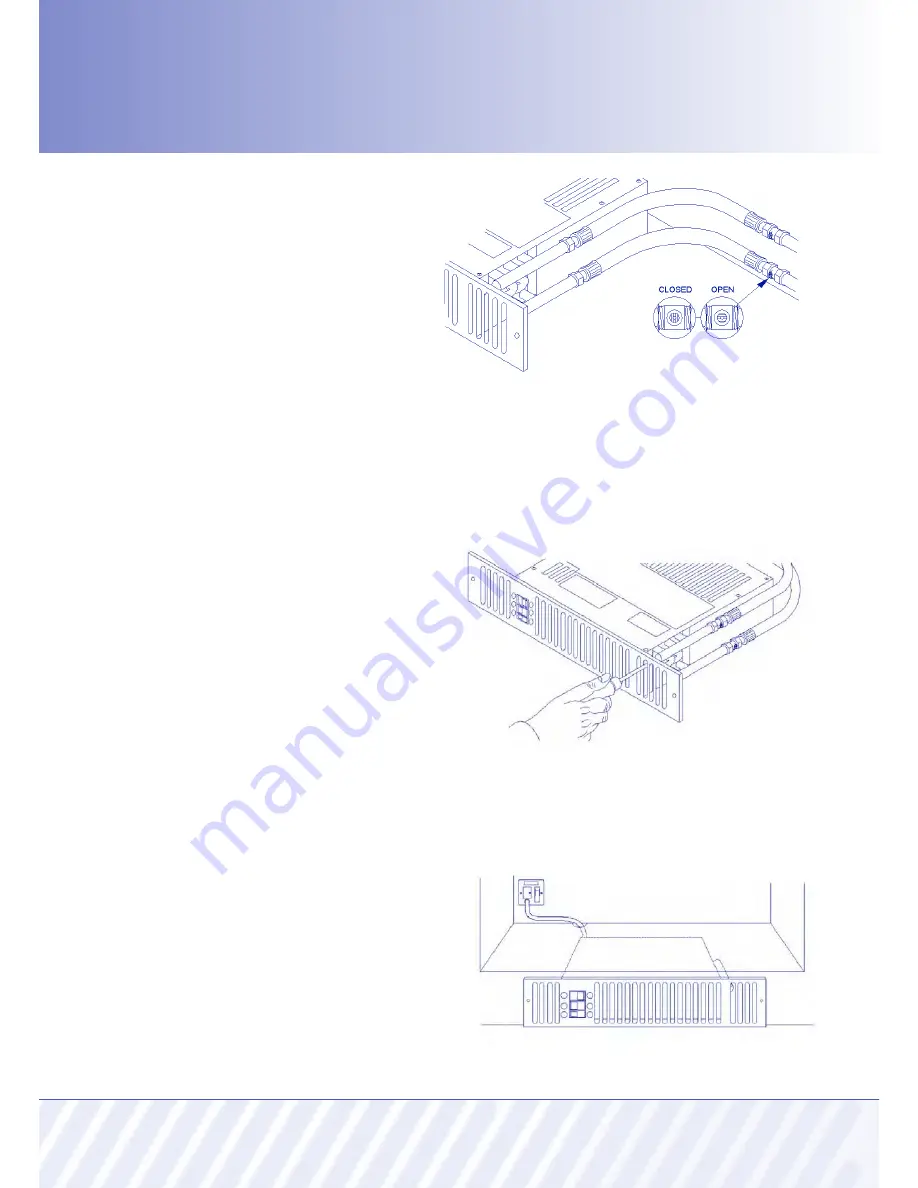
2. Fit isolating valves (not supplied) to the

system flow and return pipes. Failure to fit
isolating valves may mean that the product is
not serviceable in the event of failure.
Connect the flexible hoses between the
system pipework and heater. Open the
isolating valves and check for leaks.

3. Vent air through the bleed screw.

4. Isolate electrical supply and connect the

heater electric cable to the fused spur (5A).
Ensure the fused spur is not directly above
the heater and is accessible after installation
is complete.

Содержание Hydronic SS2E W

Страница 1: ...Space Saver Discover the hidden benefits Installation and User Guide New Space Saver...

Страница 2: ...S7 W SS9 W Hydronic Low Voltage 7 SS5 W 12V Hydronic Electric 11 SS5 W Dual Electric 16 SS2E W Remote Room Thermostat 22 Part No RT002 Hydronic Hydronic Low Voltage 18 SS3 W SS5 W SS7 W SS9 W SS5 W 12...

Страница 3: ...of 20mm between the top of the product and any shelving is essential To avoid the possibility of vibration this product must be installed on a flat even surface There must be no rear access to the pro...

Страница 4: ...e after installation is complete 2 Fit isolating valves not supplied to the system flow and return pipes Failure to fit isolating valves may mean that the product is not serviceable in the event of fa...

Страница 5: ...e Commissioning 5 Position heater making sure the flexible hoses are not kinked and the electrical cable is not snagged 6a Fit overlay grille if supplied over fixed grille 6b Fix heater to plinth uppe...

Страница 6: ...S5 W 1 3 1 7 1 1 1 4 SS7 W 1 6 1 9 1 3 1 6 SS9 W 2 2 2 4 1 9 2 1 1 Fan does not run on any switch setting a Check the power supply is switched ON b Check fuse in the fused spur c Check the wiring conn...

Страница 7: ...the top of the product and any shelving is essential To avoid the possibility of vibration this product must be installed on a flat even surface There must be no rear access to the product after comp...

Страница 8: ...96mm The overall height of the grille is 100mm Use care when cutting the opening 2 Fit isolating valves not supplied to the system flow and return pipes Failure to fit isolating valves may mean that t...

Страница 9: ...urn on the electrical supply at the fused spur 2 Set the upper control switch on the fascia grille to BLUE and lower switch to either I or II the fan will run 3 Turn on the central heating system 4 Se...

Страница 10: ...eat output I enabling the boost setting II to be used for faster heat up 6 Position heater making sure the flexible hoses are not kinked and the electrical cable is not snagged Model Heat Output t 60...

Страница 11: ...on Card with the owner of the property SS5 W Dual In the event of any difficulty please contact us on 01245 324560 It will be more helpful if you do not remove the product from the central heating sys...

Страница 12: ...ter completion of the installation If the pre wired mains cable is damaged it must be replaced by either the manufacturer its service agent or similarly qualified persons The appliance must be earthed...

Страница 13: ...e event of failure Connect the flexible hoses between the system pipework and heater Open the isolating valves and check for leaks 3 Vent air through the bleed screw 4 Isolate electrical supply and co...

Страница 14: ...g the fan speed will not increase the heat output in the electric heating mode 4 Turn on the central heating system 5 Set any room thermostat s to maximum Commissioning 6 Set the upper rocker switch t...

Страница 15: ...upply is switched ON b If fitted ensure the room thermostat is calling for heat c Balance the central heating system if installed on the same circuit as panel radiators and increase the circulating pu...

Страница 16: ...fter completion of the installation If the pre wired mains cable is damaged it must be replaced by either the manufacturer its service agent or similarly qualified persons The appliance must be earthe...

Страница 17: ...to ON the fan will run 4 Set the middle 1kW switch to ON heat will flow immediately 1kW Commissioning 5 Set the lower 2kW switch to ON additional heat will flow 2kW 6 When the installation is working...

Страница 18: ...drawn in by the fan and heated as it passes through the heat exchanger before being discharged gently back into the room This not only gives a more even temperature spread but will heat a room up in...

Страница 19: ...lt Finding section on page 6 page 11 for 12V models for advice In the event of difficulty please contact us on 01245 324560 It will be helpful if you do not disconnect the Space Saver from the central...

Страница 20: ...se the heat output Moving the upper rocker switch to its centre position will turn off the Space Saver For your safety this Space Saver heater is fitted with automatic overheat protection If the heate...

Страница 21: ...ower 2kW switch to ON To turn the heater off set the fan switch to OFF Please note all switches must be in the ON position to achieve 2kW heat output For your safety this Space Saver heater is fitted...

Страница 22: ...avoided Recommended height is 1 5m above floor level Fixing Remove the front cover by depressing the cover fixing lug whilst simultaneously prising the base and the cover apart Remove the terminal cov...

Страница 23: ...23...

Страница 24: ...es E mail sales smiths env com General Information E mail info smiths env com Web www smiths env com 04 0250 0109 As part of the policy of continuous product improvement Smith s Environmental Products...

Отзывы: