


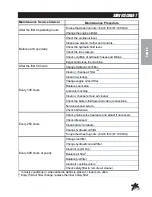


11
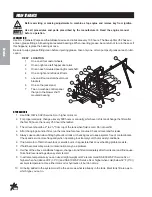
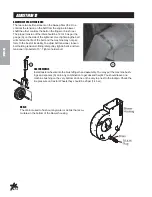
TAILGATE ADJUSTMENT
V62 TAILGATE LEVELING
If the tailgate is not sitting level against the hopper it can be leveled by loosening the
3
/
8
inch bolts that hold the
pivot bracket to the upper lift arms then rotate the pivot brackets until tailgate level then tighten. Once it is level it
must be readjusted using steps 1, 2 and 3.
V62 TAILGATE ADJUSTMENT PROCEDURE
1. Open tailgate approximately 10 inches and shut off engine. Locate the
3
/
8
inch bolts that connect the
lower lift arm to the tailgate (Connected by springs). Loosen them about 1½ turns.
2. Find at top corners of the tailgate the
1
/
2
inch bolt that connects the upper lift arms to the tailgate. Loosen
both sides then push the tailgate in towards the hopper. The bolts will slide in the slots of the brackets on
the end of the lift arms when pushed tight against the hopper. Tighten the outside nut just tight enough to
hold it from moving in the slot, repeat on other side. (Do not over tighten).
3. Start the machine move the valve handle to the lower position and close the tailgate, as the tailgate comes
in contact with the hopper it will push the top of the tailgate outward in the slots in the top lift arm as the
bolts slide outward in the slots. As the bolts slide outward in the slots the tailgate will also glide down-
ward approximately ½ inch. Check to see that the tailgate fits tight against the hopper. Then tighten the
nuts together on both of the top corners of the tailgate using two ¾ inch wrenches. Then tighten the nuts
on the
3
/
8
inch bolts on the lower sides of the tailgate using two
9
/
16
inch wrenches.
STORAGE
When storing, remove the key from the key switch to avoid unauthorized persons from operating machine.
1. Before storing clean machine thoroughly.
2. Check bolts and nuts, tighten as necessary.
3. Make all repairs that are needed and remove any debris.
4. Remove the battery, adjust the electrolyte level and recharge it. Store the battery in a dry, dark place.
5. Store in a clean and dry area, but NOT near a stove, furnace or water heater which uses a pilot light or any
device that can create a spark.
6. Engines stored over 30 days need to be protected or drained of fuel to prevent gum from forming in a fuel
system or on essential carburetor parts. Check the engine manual and follow the instructions for the
storage of the engine.
Содержание 78-200
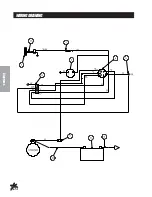
Страница 14: ...12 Diagrams WIRINGDRAWING...
Страница 16: ...14 Diagrams HYDRAULICDRAWING...
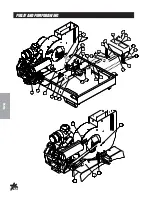
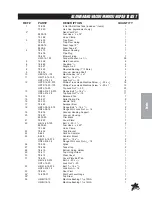
Страница 18: ...16 Parts BODYANDFRAMEDRAWING...
Страница 20: ...18 Parts ENGINEANDCONTROLSDRAWING...
Страница 22: ...20 Parts PULLEYANDPUMPDRAWING...
Страница 24: ...22 Parts BLOWERANDVACUUMHOUSINGDRAWING...
Страница 26: ...24 Parts FINGERREELDRAWING...
Страница 28: ...26 Parts BRUSHREELDRAWING...
Страница 30: ...28 Parts REEL HYDRAULICPUMPDRAWING...
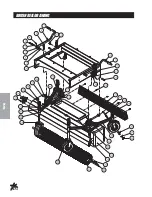
Страница 32: ...30 Parts HOPPERDRAWING...
Страница 34: ...32 Parts HOPPERDRAWING...
Страница 36: ...34 Parts 78 4152 BANKVALVEDRAWING...
Страница 38: ...36 Parts REAR AXLE ELECTRIC BRAKE PARTS LIST...
Страница 40: ...38 Accessories 78 201 REPLACEMENTBRUSHREELDRAWING 78 202REPLACEMENTFINGERREELDRAWING...
Страница 42: ...40 Accessories 78 205REMOTEVACUUMHOSEDRAWING...
Страница 44: ...42 Accessories 78 2045TH WHEELHITCHDRAWING Do not tow on public roads...
Страница 46: ...44 Accessories 78 206CLEVISHITCHDRAWING...
Страница 48: ...46 Accessories 78 209BALLHITCHDRAWING...
Страница 50: ...48 Accessories 78 207HYDRAULICLIFTKITDRAWING...
Страница 52: ...50 Accessories 78 4163 BANKHYDRAULICVALVEDRAWING...
Страница 54: ...52 Accessories 78 208FILTERSYSTEMDRAWING...
Страница 56: ...54 Accessories 78 210 78 211REELANDHYDRAULICPUMPDRAWING...
Страница 58: ...56 Accessories 78 210NYLONBRUSHHEADDRAWING...
Страница 60: ...58 Accessories 78 211RUBBERFINGERHEADDRAWING...
Страница 62: ...60 NOTES...