


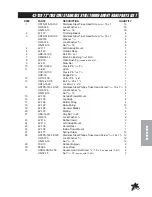


81
Accessories
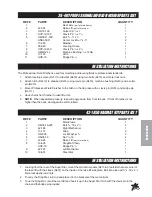
INSTALLATION INSTRUCTIONS
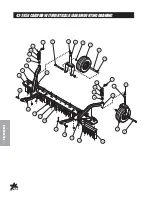
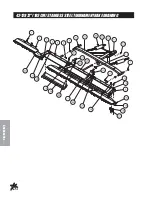
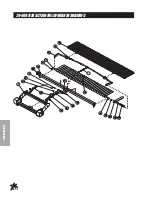
1. Attach drawbar (Ref 9) to hitch (Ref 11) using clevis pin (Ref 10) and cotter pin (Ref 12).
2. Attach rubber bumper (Ref 29) using cap nut and lock washer (Ref 21). Attach the rubber inserts (Ref 23)
to the inside mounts (Ref 24 and 26).
3. Attach the left outside mount (Ref 4), the left inside mount (Ref 24), the outside trowel mount (Ref 15), and
the inside trowel mount (Ref 26) to the outside and center rakes (Ref 5 and 25) as shown. Use the 1
1
/
4
"
stainless steel truss head screws (Ref 14) on the outside hole of each rake.
4. Use the spring holder (Ref 27) and the 1
1
/
4
" stainless steel truss head screws (Ref 28) to attach rake
springs (Ref 18) to the rakes.
5. Slide a machine bushing onto outside rake frames then slide the outside rake frames (Ref 5) into the
tubing on the end of the drawbar. Hold in place with another machine bushing and a roll pin (Ref 6).
6. Attach center rake (Ref 25) to draw bar (Ref 9) as shown, using the
1
/
4
- 20 - 1
3
/
4
bolt and lock nut (Ref 13)
with the shaft of the center rake between the tabs on the bottom of the drawbar.
7. Attach the matting (Ref 20) and the top strap (Ref 16) to the inside and outside mounts using stainless
steel truss head screw
5
/
16
- 18 x 1 (Ref 1). Attach four finishing blades (Ref 2) to the matting on the inside
and outside mounts with the stainless steel truss head screw
5
/
16
- 18 x 1 (Ref 1) going through the
finishing blade, matting, and bottom strap (Ref 17).
8. Place the three groomer blades (Ref 19) under the three rake assemblies as shown, using (Ref 3).
9. Attach the rake hitch (Ref 11) to the trap rake hitch.
10. The end links of chain on the drawbar are to be hooked to the hooks of the trap rake lift.
11. With the rake on the ground pull the rake to the right side until it is 2-3 inches from the tire.
12. Using the adjustment screw (Ref 31) on the right side of hitch, adjust the screw until it hits the trap rake
hitch, located on rear axle. Lock nut so adjustment will not change.
13. Repeat steps 8 and 9 on left side.
14. Turn machine on and test for operation of rake assembly by raising and lowering the rake assembly. Also
with rake down, turn sharp corners to check that rake does not touch wheels.
NOTE: Test rake in sand to assure tire tracks are covered by the rake when turning sharp corners in either
direction. If there are tire tracks, readjust using the adjusting screws on the hitch, so the rake comes
closer to the tire.
Содержание 43-000-B
Страница 16: ...14 Diagrams HYDRAULICDRAWING...
Страница 18: ...16 Parts MAINFRAMECOMMONDRAWING...
Страница 20: ...18 Parts FRONTFORKDRAWING...
Страница 22: ...20 Parts LINKAGEDRAWING...
Страница 24: ...22 Parts LINKAGEDRAWING...
Страница 26: ...24 Parts GASTANKDRAWING...
Страница 28: ...26 Parts OILTANKDRAWING...
Страница 30: ...28 Parts ENGINEDRAWING...
Страница 32: ...30 Parts ENGINEDRAWING...
Страница 34: ...32 Parts Torque To 120 ft lbs 156Nm REARAXLEDRAWING...
Страница 36: ...34 Parts RAKELIFTDRAWING...
Страница 38: ...36 Parts 13 729 2 BANKHYDRAULICVALVEDRAWING...
Страница 40: ...38 Parts 76 238FRONTWHEELMOTORDRAWING 14 5CI...
Страница 42: ...40 Parts 13 615REARWHEELMOTOR 7 5C I DRAWING...
Страница 44: ...42 Accessories 43 003 HYDRAULICSANDPLOWDRAWING HYDRAULICVALVEPLUMBINGDRAWING...
Страница 46: ...44 Accessories 43 003 HYDRAULICSANDPLOWDRAWING HYDRAULICVALVEPLUMBINGDRAWING...
Страница 48: ...46 Accessories 42 011 ABALUMINUMSANDPLOWDRAWING 42 011 SBSTEELSANDPLOWDRAWING...
Страница 50: ...48 Accessories 42 13660 SANDPLOWDRAWING...
Страница 52: ...50 Accessories 42 223ADJUSTABLEDISCEDGERDRAWING...
Страница 54: ...52 Accessories 42 008SANDCULTIVATORDRAWING...
Страница 56: ...54 Accessories 42 340SANDCULTIVATORWITHSPRINGTINESDRAWING...
Страница 58: ...56 Accessories 42 341FIELDSCARIFIERWITHTINES ANDCASTORWHEELSDRAWING...
Страница 60: ...58 Accessories 42 010CONSTRUCTIONLEVELINGBLADEDRAWING...
Страница 62: ...60 Accessories 42 210GRADERBLADEDRAWING BLADECLIPDRAWING...
Страница 64: ...62 Accessories 42 178INFIELDSCARIFIERWITHVERTICALBLADESDRAWING...
Страница 66: ...64 Accessories 42 178SCARIFIERMOUNTINGDRAWING...
Страница 68: ...66 Accessories 42 179INFIELDSCARIFIERWITHCHISELBLADESDRAWING...
Страница 70: ...68 Accessories 42 179SCARIFIERMOUNTINGDRAWING...
Страница 72: ...70 Accessories 42 285SCARIFIERWITHVERTICALBLADES...
Страница 74: ...72 Accessories 42 285SCARIFIER WITHVERTICALBLADESMOUNTINGDRAWING...
Страница 76: ...74 Accessories 42 02684 213CM STAINLESSSTEELTOURNAMENTRAKEDRAWING...
Страница 78: ...76 Accessories 42 02684 213CM STAINLESSSTEELTOURNAMENTRAKEDRAWING...
Страница 80: ...78 Accessories 42 12872 183CM STAINLESSSTEELTOURNAMENTRAKEDRAWING...
Страница 82: ...80 Accessories 42 12872 183CM STAINLESSSTEELTOURNAMENTRAKEDRAWING...
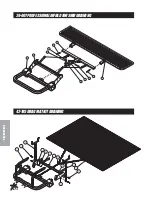
Страница 84: ...82 Accessories 13 438RAKEASSEMBLYWITHFINISHINGBLADESDRAWING...
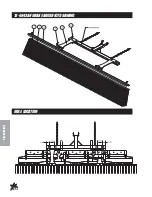
Страница 86: ...84 Accessories 13 684SANDRAKEBRUSHKITDRAWING HOLE LOCATION...
Страница 88: ...86 Accessories 13 298FANRAKEATTACHMENTDRAWING 13 319FANRAKEKIT...
Страница 90: ...88 Accessories 26 007PROFESSIONALINFIELDFINISHERDRAWING 42 185DRAGMATKITDRAWING...
Страница 92: ...90 Accessories 43 002 FLEXACTIONFIELDFINISHERWITH BRUSHDRAWING...
Страница 94: ...92 Accessories 43 002 FLEXACTIONFIELDFINISHERWITH BRUSHDRAWING...
Страница 96: ...94 Accessories 26 008FLEXACTIONFIELDFINISHERDRAWING...
Страница 98: ...96 Accessories 26 008FLEXACTIONFIELDFINISHERDRAWING...
Страница 100: ...98 Accessories 43 043 FINISHINGBRUSHKITDRAWING HOLELOCATION...
Страница 102: ...100 Accessories 42 582 GREEN STAR RBS SPIKER SET 3 DRAWING...
Страница 104: ...102 Accessories 42 586GREENSTARRBSMAINFRAMEDRAWING...
Страница 106: ...104 Reference NOTES...