background image

10

Introduction

Introduction

SET UP

The Model 3000 Prime Mover arrives from 

 setup and ready for service.

The spray system is normally shipped attached to the 3000 Prime Mover. If a spray system is to be retrofitted to
a 3000 Prime Mover by a dealer or owner, assemble and attach the components in accordance with the parts
drawings in the Spray Star 3000 Parts/Service Manual.

1. Set park brake.

2. Check the tire pressure. The front tires are 20 PSI (1.4bar) and the rear tires are 18 PSI (1.25bar).

3. Check the installation of battery, which is located on the

left side of the machine. The battery should be in the
battery box with the posts to the outside. This is a
negative grounding system.

Connecting battery cables to the wrong post
could result in personal injury and/or damage to
the electrical system. Make sure battery and
cables do not interfere or rub on any moving
part. Connect the red positive (+) cable (A) to
the battery first. When disconnecting remove
the black negative (-) cable (B) first.

4. Check the engine oil and add as necessary. The dip stick is located under the seat directly behind the

control panel. Oil fill is located on top of valve cover, use SAE 10W-40 API Service SG motor oil. DO NOT
OVERFILL
.

5. Fill fuel tank, located on right side, with Unleaded 87 Octane gasoline (minimum).

Gasoline is flammable, caution must be used when storing or handling it. Do not fill fuel tank
while engine is running or an enclosed area, fumes are explosive and dangerous to inhale.
DO NOT SMOKE while filling the fuel tank. DO NOT OVERFILL.

6. Check hydraulic fluid level in tank located on the left side. Remove cap and add SAE 10W-40 API Service

SG motor oil if necessary. Fluid level should be about 4" (102mm) from the top of the fill tube when cold.

7. Check the rear axle fill plug located on the back side of the differential housing. This should be filled with

SAE 80W-90 Gear Lube API Service GL-5, GL-4 so that the level is even or a little below the bottom of the
fill hole.

8. Machine should be greased before starting. refer to Spray Star 3000 Parts/Service Manual for location.

9. Attach the Spray Boom to the rear of the sprayer, in accordance with instructions in the Spray Star 3000

Parts/Service Manual if not already installed. The nozzles must be the correct distance above the turf as
described in Spraying Procedure of this manual. The spray boom must operate properly and the outer
sections must break away safely if an object is struck by them, they must then return to normal operation
position.

10. Be sure to double check boom heights, nozzle spacing and displacement before spraying.

11. Fill tank with water and retighten the eight bolts on metal bands, used to hold the tank in place. Do NOT

over tighten bolts tank may collapse

12. Read operating instructions before starting.

Never allow pump to run dry! The valve on the suction side of the pump (between the pump
and tank) must be fully open whenever the pump is operated.

Содержание 3002

Страница 1: ...OPERATOR S MANUAL Spray Star 3000 Model 3002 January 1999 SMITHCO PRODUCT SUPPORT 1 800 891 9435 Hwy SS and PoplarAvenue Cameron WI 54822 E mail productsupport smithco com ...

Страница 2: ...nsole Setup 23 Console Field Test 24 Spray Operation 24 25 Schematics 26 Wiring Schematic 26 Hydraulic Schematic 26 Spraying Procedure 27 33 Spraying Introduction 27 Turf Management 27 Hose Handgun Spraying 28 Nozzles 28 29 Calibration Introduction 30 The Nozzle Chart Method of Calibration 31 32 The 128 Method of Boom Sprayer Calibration 32 33 Nozzle Charts 34 39 Nozzle Performance Chart 1 34 Nozz...

Страница 3: ...nance instructions Failure to do so could result in personal injury or equipment damage Keep manuals in a safe place after operator and maintenance personnel have read them Right and left sides are from the operator s seat facing forward All machines have a Serial Number and Model Number Both numbers are needed when ordering parts The serial number plate on the Spray Star is located on the front l...

Страница 4: ...c Oil Level Choke Open Choke Closed Hand Throttle Hour Meter Hour Meter Fuse Glow Plug Glow Plug Off Glow Plug On RPM Gasoline Diesel Water Temperature Temperature Light Engine Oil Engine Stop Engine Start Engine Run No Electrical Power Electrical Power Read Operator s Manual ...

Страница 5: ... Parts Manual Operation Pinch Point Step Hot Surface Hydraulic Fluid Penetration Lift Arm Tractor Engage Disengage PTO Ground Speed Fast Slow H High L Low F Forward R Reverse N Neutral Warning Danger Caution Up Raise Down Lower Up Down Arrow ...

Страница 6: ...brake before starting the engine 12 Never use your hands to search for oil leaks Hydraulic fluid under pressure can penetrate the skin and cause serious injury 13 This machine demands your attention To prevent loss of control or tipping of the vehicle A Use extra caution in backing up the vehicle Ensure area is clear B Do not stop or start suddenly on any slope C Reduce speed on slopes and in shar...

Страница 7: ...harge line may whip 9 Periodically inspect the pump and the system components 10 Check hoses for weak or worn condition before each use Make certain that all connections are tight and secure 11 Do not operate unit with leaks frayed kinked hoses or tubing Repair or replace immediately 12 Use only pipe hose and fittings rated for maximum pressure or pressure at which pressure relief valve is set at ...

Страница 8: ...nning under high power let it run at slow idle speed a few minutes to cool the engine down before turning the ignition switch to the OFF position Never leave the vehicle unattended with the engine running Always bring the vehicle to a complete stop engage park brake turn key off and remove key To avoid abrupt stop place foot on treadle pedal before disengaging speed control All testing and calibra...

Страница 9: ...e more suitable depending on operational needs and technical competence of the operator When selecting a new nozzle size refer to the Discharge Rate Column on the nozzle charts The Discharge Rate gpm or lpm multiplied by the number of nozzles should not exceed 75 of the actual discharge volume of the sprayer pump i e if you need to use nozzles which discharge 0 8 gpm 3 0 lpm and the spray boom is ...

Страница 10: ...diator 12 quart 11 35 L 7 psi 0 5bar cap pressure Displacement 79 CID 1 3L Bore Stroke 2 91 x 2 97 73 94 x 75 44mm Governor Variable speed Belt Tension Alternator New 79 101 lb 36 46kg Used 56 75 lb 25 34kg Governor New 75 lb 34kg Used 50 lb 23kg Lubrication System Pressure type Valve Clearance Intake Lash 0 22mm Exhaust Lash 0 32mm Distributorless Type Coil Output 37 0 KV Min Primary Resistance a...

Страница 11: ... Front intake fresh air induction with replaceable charcoal filter Blower 2 Speed blower dual wheel 600 cfm 12 volt directional air flow control Doors 2 front hinged Lexan doors with steel frames Frame Tubular steel frame and foam rubber head liner Roll Bar Roll bar inside of cab Electrical Wired into fuse block Interior Light Interior dome light with ON OFF switch SPRAY TANK Material Polypropylen...

Страница 12: ...o not fill fuel tank while engine is running or an enclosed area fumes are explosive and dangerous to inhale DO NOT SMOKE while filling the fuel tank DO NOT OVERFILL 6 Check hydraulic fluid level in tank located on the left side Remove cap and add SAE 10W 40 API Service SG motor oil if necessary Fluid level should be about 4 102mm from the top of the fill tube when cold 7 Check the rear axle fill ...

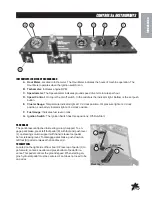
Страница 13: ... Low battery indicator light at 4 o clock position F Fuel Gauge Indicates fuel level in tank G Ignition Switch The Ignition Switch has three positions Off Run Start PARKBRAKE The park brake is attached to steering column support To en gage park brake press left foot pedal K with foot and push lever J on steering column support with hand release foot pedal before releasing lever To disengage park b...

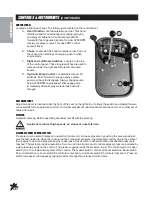
Страница 14: ...the seat on the right side It allows the seat to be adjusted forward or backwards for the operator s comfort For further adjustment unbolt seat from seat panel move to other set of holes and re bolt STEERING Hydraulic steering Before operating acquaint yourself with the steering Avoid sharp turns at high speeds on slopes or unsafe terrain ELECTRONICSPRAYCONTROLSYSTEM Pressure must be set with spra...

Страница 15: ...tighten if loose 4 Check hardware for loose or missing nuts bolts screws etc and tighten or replace as needed 5 Inspect hydraulic lines for damage or leaks Never use hands to inspect for leaks 6 Check the hydraulic fluid level 7 Inspect the steering throttle and shift linkages for good hookups and clear travel 8 Check controls for smooth proper working operation Lubricate as needed STARTINGTHEENGI...

Страница 16: ... desired speed with foot pedal 3 Push Set button to lock speed To avoid abrupt stop place foot on traction pedal before disengaging speed control TREADLEPEDAL The hydrostatic drive provides infinite speeds from 0 to 12 mph in forward and 0 to 4 mph in re verse Press top of pedal to go forward center is neutral and press bottom of pedal for reverse This controls the ground speed HANDTHROTTLECONTROL...

Страница 17: ...n prime If your Spray Star is fitted with a hose reel there is a second ball valve on the discharge system to supply mate rial to the hose reel The Quadrajet agitation system operates with four venturi jets in the tank bottom These jets have replaceable orifice discs which discharge the following amounts of spay material Input to Input to Agitator Agitator Agitator Agitator Nozzle Agitator Agitato...

Страница 18: ...s key is also used to select an area base measurement of US acres SI Hectares or TU 1 000 sq ft H ENTER Used only to enter the data into the Console Calibration Keys Top Row Used to enter Function Keys Bottom Row Used to display data data into console to calibrate the system BOOM 1 CAL Length of Boom 1 TOTALAREA Total Area Sprayed BOOM 2 CAL Length of Boom 2 FIELDAREA Field Area Sprayed BOOM 3 CAL...

Страница 19: ...imeters by multiplying the number of tips times the spacing Write these boom widths down for future reference when programming the Console computer The Console is capable of controlling up to three 3 booms CALCULATING SPEEDCAL 1 Enter Speed Cal in key of 688 2 Place Master and Boom 1 switches to on 3 Enter 0 in key 4 Drive 1 mile Do not use vehicle odometer to determine distance use section lines ...

Страница 20: ... See definitions below Valve Backlash Controls the time of the first correction pulse after a change in correction direction is detected Incr to Decr or Decr to Incr Range 1 to 9 1 Short Pulse 9 Long Pulse Valve Speed Digit Controls the Speed of the Control Valve motor Running the Control Valve too fast will cause the system to oscillate Range 1 to 9 1 slow 9 Fast Brake Point Digit Percent Sets th...

Страница 21: ...y from US acres to SI b Depressing momentarily Steps the DATA display from SI Hectares to TU c Depressing momentarily Steps the DATA display from TU 1000 sq ft to US 2 Selecting US SI or TU a To select US SI or TU step until the desired code is displayed in DATA display b Momentarily depress the DATA display will now display SP1 3 Displaying SP1 or SP2 a Depressing momentarily steps the DATA displ...

Страница 22: ... the estimated total Volume in Tank when you start spraying in key labeled Each time the tank is refilled this number must be reentered 14 Enter the TIME of day in the key labeled This is a 24 hour clock Therefore all time after 12 59 pm add 12 hours Thus 8 30 am is entered as 8 30 but 1 30 pm is entered as 13 30 in the keyboard OTHERDISPLAYFEATURES 1 To display TOTAL AREA covered momentarily depr...

Страница 23: ...y displayed SELFTESTFEATURE SELF TEST allows speed simulation for testing the system while the vehicle is not moving Enter the simulated operating speed in the key labeled If 6 MPH 10km h is desired enter 6 0 10 0 Verify speed by de pressing key labeled SPEED The SELF TEST speed will clear itself when motion of vehicle is detected by the Speed Sensor A SPEED CAL Value of 900 230 or greater is reco...

Страница 24: ...Enter new delay time 0 to 200 days using the same procedure as that for entering other data In the event of console power loss the power down delay time will default to 10 days CONSOLEALARMFEATURE Console alarm sounds if application rate is 30 or more away from target application rate for 5 seconds ALARMMENU Depress for 5 seconds until DATA display shows A on Depressing momentarily key steps the D...

Страница 25: ...LCONSOLESETUP 1 Fill tank with water only If positive displacement type pump is used fully open pressure relief valve PRV Open gate valve between the tank and pump 2 Place MASTER On Off to On and Boom On Off switches to Off 3 Place MAN RATE 1 RATE 2 switch to MAN 4 Place POWER On Off switch to On 5 Verify correct boom widths speed calibration meter calibration valve calibration 2123 RATE 1 calibra...

Страница 26: ...e chemical manufacturer a Liquids may be poured directly into tank b Wettable powder chemicals must be pre mixed with water in a container to form a slurry The mixture is then added to the tank through the fillwell strainer c Chemical in soluble packs are place into the fillwell strainer basket and dissolved by adding water through the basket The balance of the water required for the spray operati...

Страница 27: ... rinse tank interior thoroughly 4 Rinse exterior of sprayer thoroughly with clean water 5 Remove clear bowl from sprayer filter on operators left hand side of the spray tank Remove stainless steel screen Wash bowl and screen thoroughly Apply thin layer of petroleum jelly to O ring or gasket Replace screen and bowl taking care to position O ring or gasket properly Hand tighten FOAMMARKER Located to...

Страница 28: ...26 Schematics WIRINGSCHEMATIC HYDRAULICSCHEMATIC ...

Страница 29: ...at they get into the soil below the plant leaves This is called soil appli cation In order to do this they are best applied with a large volume of water They are often then watered in using the irrigation system This type of chemical material includes systemic chemicals and chemicals designed to destroy pests which live in the thatch and the soil Other materials must be applied to reach a problem ...

Страница 30: ... Obviously the larger the opening the greater the rate of flow volume Volume is expressed in Gallons Per Minute gpm or Liters Per Minute lpm Do not confuse the term volume with application rate which will be covered later As pressure increases the flow volume in a given nozzle also increases For example an average size nozzle which discharges 0 52 gpm 1 4 lpm at 30 psi 2bar will discharge 0 73 gpm...

Страница 31: ... larger do not require screens SPACING Turf spray nozzles are normally 20 51 cm apart Some cases 40 101 cm depending on the type of spray boom and type of area to be sprayed Very fine level areas golf greens and tees bowling lawns tennis courts etc may be sprayed with nozzles spaced every 10 25 cm BOOMHEIGHT Height is very important in permitting spray nozzles to develop their proper spray pattern...

Страница 32: ...ferent types of spray patterns of various nozzles and made our selection of type accord ingly We now have to choose a size which will provide the correct application rate Sizes are available for all requirements Consult the nozzle chart in this manual for your nozzle type in order to select the correct size TRAVELSPEED Increased travel speed decreases the application rate gpa gpt or lph Travel spe...

Страница 33: ...6 mph 7 10 kph The vehicle which carries or tows the sprayer should be equipped with a precise low speed speedometer If it is not exact ground speed at a given engine speed must be determined by timing the travel of the sprayer over a measured distance 4 Determine Nozzle Size Refer to the appropriate nozzle chart in the back of this manual for your nozzle TYPE the type of nozzle you have or type y...

Страница 34: ...allon Per Acre rates to Imperial Gallons per acre Imp gpa multiply by 0 83 To convert any of the Liter Per Hectare rates to Imperial Gallons Per Hectare Imp GPH multiply by 0 22 8 Checking the Actual Application Rate After the combination of ground speed nozzle size and operating pressure has been selected the sprayer should be operated with water only to determine if the target application rate i...

Страница 35: ... rate adjustments must be made 7 Minor adjustments in application rate may be made by increasing or decreasing the spraying pressure Lowering spraying pressure decreases application rate Increasing spraying pressure increases application rate This procedure normally does not apply to spray systems controlled by an Electronic Spray Control System which governs flow rate 8 Adjustments in application...

Страница 36: ... 0 49 21 0 26 0 30 0 36 0 16 6 21 0 24 0 29 0 13 9 17 3 19 8 24 0 11 9 14 9 17 0 21 0 0 98 1 20 1 40 1 70 0 64 0 80 0 91 1 10 0 48 0 60 0 68 0 84 0 38 0 48 0 55 0 67 Brown XR8005 DG8005 20 30 40 60 0 35 0 43 0 50 0 61 26 0 32 0 37 0 45 0 21 0 26 0 30 0 36 0 17 3 21 0 25 0 30 0 14 9 18 2 21 0 26 0 1 20 1 50 1 70 2 10 0 80 0 98 1 10 1 40 0 60 0 73 0 85 1 00 0 48 0 59 0 68 0 83 Gray XR8006 20 30 40 6...

Страница 37: ... 236 272 142 165 202 233 Red XR8004 DG8004 1 5 2 0 3 0 4 0 1 12 1 29 1 58 1 82 336 387 474 546 269 310 379 437 224 258 316 364 192 221 271 312 Brown XR8005 DG8005 1 5 2 0 3 0 4 0 1 39 1 61 1 97 2 27 417 483 591 681 334 386 473 545 278 322 394 454 238 276 338 389 Gray XR8006 1 5 2 0 3 0 4 0 1 68 1 94 2 37 2 74 504 582 711 822 403 466 569 658 336 388 474 548 288 333 406 470 White XR8008 1 5 2 0 3 0 ...

Страница 38: ...0 69 21 0 26 0 16 9 20 0 14 1 17 1 12 1 14 6 48 59 Blue TF VS5 20 30 0 71 0 87 26 0 32 0 21 0 26 0 17 6 22 0 15 1 18 5 60 74 Green TF VS7 5 20 30 1 06 1 30 39 0 48 0 31 0 39 0 26 0 32 0 22 0 28 0 90 1 11 Black TF VS10 20 30 1 41 1 73 52 0 64 0 42 0 51 0 35 0 43 0 30 0 37 0 1 20 1 47 Nozzle Type Spacing Calibration Color Size Pressure psi Nozzle Capacity Gal Min Application Rate GPA Speed MPH Appli...

Страница 39: ...6 White TF VS4 1 5 2 0 2 23 2 57 335 386 223 257 167 193 112 129 Blue TF VS5 1 5 2 0 2 79 3 22 419 483 279 322 209 242 167 193 Green TF VS7 5 1 5 2 0 4 19 4 83 629 726 419 484 314 363 251 290 Black TF VS10 1 5 2 0 5 58 6 45 837 968 558 645 419 484 335 387 Nozzle Capacity l min Application Rate l ha Speed km h Application Rate GPT Speed MPH Turbo FloodJet 40 inch 100cm Liters Per Hectare Nozzle Typ...

Страница 40: ...39 45 50 28 31 36 40 23 26 30 33 1 1 1 2 1 4 1 5 80 88 1 0 1 1 64 71 82 91 53 59 68 76 White 1 4 TTJ08 VS 25 30 40 50 63 69 80 89 62 68 79 88 47 41 59 66 37 41 48 53 31 34 40 44 1 4 1 6 1 8 2 0 1 1 1 2 1 4 1 5 86 94 1 1 1 2 71 78 91 1 0 L Blue 1 4 TTJ10 VS 25 30 40 50 79 87 1 00 1 12 78 86 99 111 59 65 74 83 47 52 59 67 39 43 50 55 1 8 2 0 2 3 2 5 1 3 1 5 1 7 1 9 1 1 1 2 1 4 1 5 90 99 1 1 1 3 L Gr...

Страница 41: ...118 Gray 1 4 TTJ06 VS 1 0 1 5 2 0 3 0 1 37 1 68 1 94 2 37 206 252 291 356 137 168 194 237 103 126 146 178 82 2 101 116 142 White 1 4 TTJ08 VS 1 0 1 5 2 0 3 0 1 82 2 23 2 57 3 15 273 335 385 473 182 223 257 315 137 167 193 236 109 134 154 189 L Blue 1 4 TTJ10 VS 1 0 1 5 2 0 3 0 2 28 2 79 3 22 3 95 342 419 483 593 228 279 322 395 171 209 242 295 137 167 193 237 L Green 1 4 TTJ15 VS 1 0 1 5 2 0 3 0 3...

Страница 42: ...LUME 1 US Gallon x 128 Fluid Ounces 1 US Gallon x 3 785 Liters 1 US Gallon x 0 83267 Imperial Gallons 1 US Gallon x 8 34 Pounds Water 1 Gallon Per Acre 2 9 Fluid Ounces per 1 000 Square Feet 9 35 Liters Per Hectare 1 Gallon Per 1 000 Square Feet 43 56 Gallons Per Acre 1 Gallon 128 Fluid Ounces 8 Pints 4 Quarts 3 79 Liters 0 83 Imperial Gallons gpa 5940 GPM per nozzle MPH Nozzle Spacing Width inche...

Страница 43: ...ealth requirements of the Directive 89 392 EEC if applicable and to the requirements of the other Directives EN292 1 EN292 2 EN294 EN349 92 59 89 392 Title and or number and date of issue of the other Directives if applicable For the relevant implementation of the safety and health requirements mentioned in the Directives the following standard s and or technical specification s has have been resp...

Страница 44: ...ot covered under this warranty nor is any loss of income and or other loss resulting from the failure of the product to function due to a warranty defect The following items are not covered under the SMITHCO warranty and are warranted by their respective manufacturer a Engine and engine parts including starters generators alternators and filters b Transaxle differentials gear boxes and mechanical ...

Страница 45: ......

Отзывы: