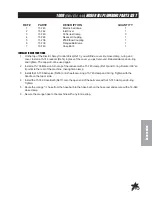
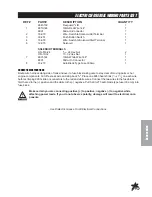
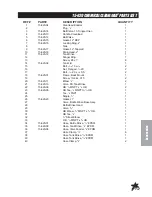
75
Accessories
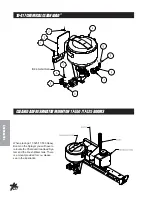
10-417 CHEMICAL CLEANLOAD
®
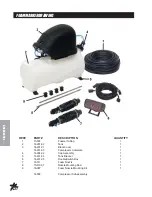
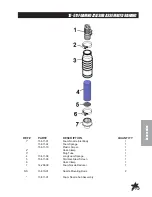
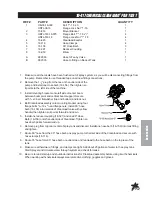
PART LIST
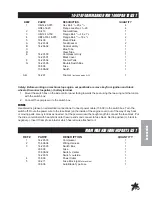
REF#
PART #
DESCRIPTION
QUANTITY
1
HB-38-16-300
Bolt
3
/
8
-16 x 3
1
HNTL-38-16
Flange Lock Nut
3
/
8
-16
1
2
15-816
Mount Bracket
1
3
HBFL-516-18-075
Flange Bolt
5
/
16
-18 x
3
/
4
4
HNFL-516-18
Flange Lock Nut
5
/
16
-18
4
4
15-620
Cleanload Eductor
1
5
18-116
Hose Clamps
4
6
16-156
90° Hose Barb
3
7
18-391
Reducer Coupling
1
8
16-972
Elbow
1
A
8897-80
Hose to Tee by Valve
1
B
8897-35
Hose to fitting on Back of Tank
1
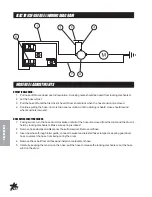
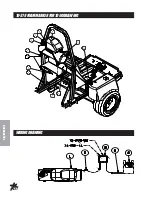
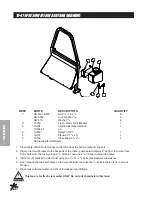
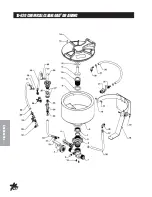
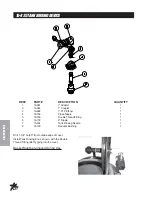
1. Make sure all chemicals have been flushed out of spray system, as you will be disconnecting fittings from
the pump. Remember to use threaded tape on all new fitting connections.
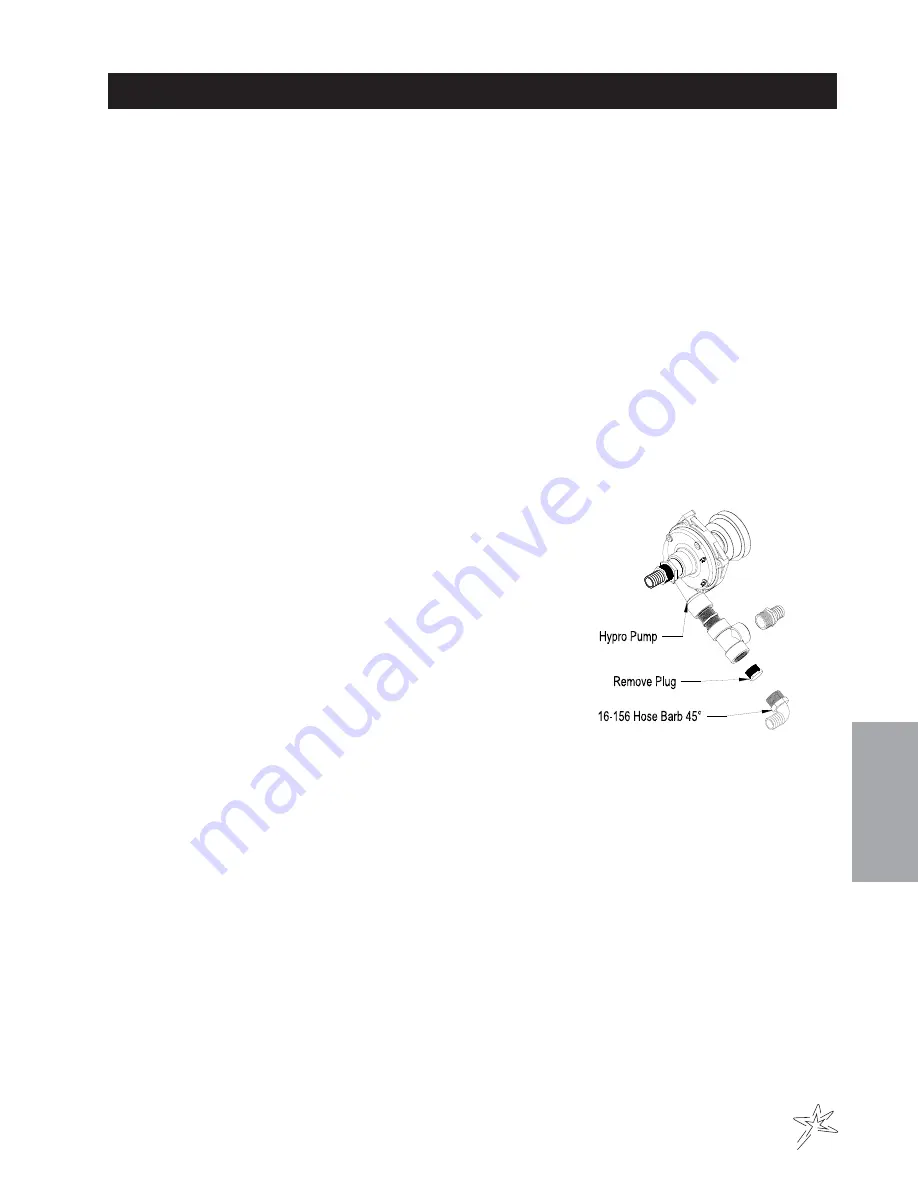
2. Remove the 1
1
/
4
" plug from the tee on the outlet side of the
pump and install one Hose barb (16-156). Then tighten so
it points to the left side of the machine.
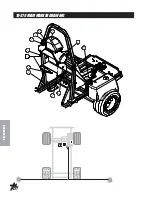
3. Install mounting brackets onto left side of center boom
between boom pivot and vertical boom support. Secure
with
3
/
8
x 3 bolt, flatwasher (top and bottom) and lock nut.
4. Bolt Cleanload assembly onto mounting bracket using four
flange bolts
5
/
16
-18 x
3
/
4
and flange nuts. Install 90° hose
barb (16-156) into inlet side of Cleanload (valve with yellow
handle) then tighten so it points forward and down.
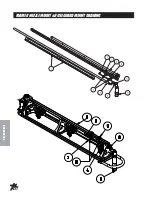
5. Install one reducer coupling (18-391) and one 90° Hose
Barb (16-156) onto the outlet side of Cleanload. Tighten so
hose barb points forward and up.
6. Remove plug from top rear center of spray tank and discard. Install one hose barb (16-159) into tank fitting
and tighten.
7. Route 80" hose from the 90° hose barb on spray pump to the inlet side of the Cleanload and secure with
hose clamps (18-116).
8. Route 35" hose form 90° hose barb on outlet side on Cleanload to the hose barb on the top rear of the
tank.
9. Make sure all hardware, fittings, and clamps are tight. Add about 25 gallons of water to the spray tank.
Start Sprayer and circulate water through system and check for leaks.
10. Be sure to read start up and shutdown instructions for Cleanload assembly before using it with chemicals.
When working with chemicals always wear protective clothing, goggles and gloves.
Содержание 10-100-C
Страница 10: ...8 Service END USER S SERVICE CHART Duplicate this page for routine use...
Страница 13: ...NOTES...
Страница 14: ...12 Diagrams WIRING DIAGRAM...
Страница 16: ...14 Diagrams HYDRAULIC DIAGRAM...
Страница 18: ...16 Parts BODY FRAME DRAWING...
Страница 20: ...18 Parts NOSECONEDRAWING...
Страница 22: ...20 Parts FRONTAXLEDRAWING...
Страница 24: ...22 Parts SEATCONSOLEANDROPSDRAWING...
Страница 26: ...24 Parts FUELTANKDRAWING...
Страница 28: ...26 Parts OILTANK OILFILTER OILCOOLERDRAWING...
Страница 30: ...28 Parts FOOTPEDALLINKAGE DRAWING...
Страница 32: ...30 Parts ENGINE PUMPSANDEXHAUSTDRAWING...
Страница 34: ...32 Parts PARKBRAKEANDREARAXLEDRAWING...
Страница 36: ...34 Parts TANKDRAWING TURBO QUADAGITATORDRAWING...
Страница 38: ...36 Parts 15 301ORBITROLDRAWING...
Страница 40: ...38 Parts 10 117 HYDRAULIC PUMP DRAWING...
Страница 42: ...40 Parts 16 998HYPROPUMPDRAWING...
Страница 44: ...42 Parts 10 116WHEELMOTOR 14 0 CI DRAWING...
Страница 50: ...48 Accessories 16 524 MOTORIZEDCONTROLVALVEDRAWING 15 737STRAINER...
Страница 52: ...50 Accessories 17 575 SMITHCOSUPERBOOM...
Страница 56: ...54 Accessories 16 906ELECTRICHOSEREELDRAWING...
Страница 58: ...56 Accessories 16 129MANUALHOSEREELDRAWING...
Страница 60: ...58 Accessories 10 422HOSEREELMOUNT FOR17 525 17 550BOOMS...
Страница 62: ...60 Accessories 1008 RAVEN 440 HOSE REEL PLUMBING DRAWING...
Страница 66: ...64 Accessories 10 378FOAMMARKERFOR1000DRAWING WIRINGDRAWING...
Страница 68: ...66 Accessories 10 378FOAMMARKER DRAWING...
Страница 70: ...68 Accessories FOAMER NOZZLEMOUNT HOSEGUARDMOUNTDRAWING...
Страница 78: ...76 Accessories 15 620CHEMICALCLEANLOAD DRAWING...


