background image

7

8

smithandnoble.com 

800.248.8888 

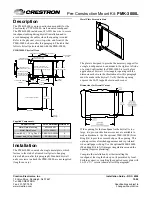
For treatments using rings

Attach the finial to one end of the rod 
by sliding it on and attaching it using 
the set screw 

(1)

 .

Place the required number of rings on 
the rod, and then cap the opposite end 
with the elbow and attach it using the 
set screw . When placing the rod on the 
bracket,  if  Drapery  is  opening  from 
the center, leave one ring between the 
finial/elbow and bracket on each side . 
If the drapery is opening from one side 
only,  put  the  ring  between  the  finial/
elbow and the bracket on the opposite 
side of where you are opening from 

(2)

 .


This will prevent drapery to be 

pulled all the way to one side or the 
other when opening and closing it .

Cont . on pg 9

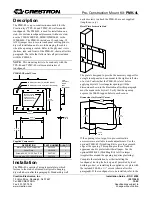
Depending  on  your  order,  you  may 
have received a rod connector .  A rod 
connector is the short piece of metal 
tubing placed inside each end of the 
rods in a multi-segment system to 
join them together .

STEP 3 - ATTACHING THE ROD CONNECTOR

STEP 4 - ATTACHING THE FINIALS & RINGS

STEP 2:


Now slide the second rod segment 
over the exposed end of the 
connector,  making  sure  there  is  no 
gap between the two segments . 

STEP 1:


On the open end of one-rod segment, 
slide  the  connector  halfway  inside, 
leaving the other half exposed . 

ROD CONNECTOR

ROD 

SEGMENT

ROD 

SEGMENT

ROD 

CONNECTOR

1

2

ATTACH FINIAL

PLACE ONE RING

BETWEEN FINIAL 

AND BRACKET

Содержание Marrakesh Hardware

Страница 1: ...STEP BY STEP INSTALLATION INSTRUCTIONS Wall Mount Single Bay Rod Set Marrakesh Hardware...

Страница 2: ...to love your new hardware and that includes having a smooth installation experience We suggest saving this guide If you encounter any difficulties or questions please reach out to us for help It s wh...

Страница 3: ...RD OR PLASTER Hollow wall applications Use a secure fastener designed specifically for this purpose METAL Prepare by pre drilling holes and then using the included screws CONCRETE STONE BRICK OR TILE...

Страница 4: ...the circles are level aligned with each other Mounting the Brackets Remove mounting plate and center it inside of the circle outline on wall Mark the screw hole locations for all brackets See Figure...

Страница 5: ...are opening from 2 This will prevent drapery to be pulled all the way to one side or the other when opening and closing it Cont on pg 9 Depending on your order you may have received a rod connector A...

Страница 6: ...d rod by sliding it on and attaching it using the set screw 5 Place the required number of rings on the rod and then cap the opposite end with the elbow attached to the middle rod and attach it using...

Страница 7: ...ce you re sure the tieback is in the perfect location use your pencil to mark the spot to install it Measure the distance from the bottom or top of the window to the tieback to mark the other side and...

Страница 8: ...ocations and lightly draw a circle around the base of the tieback onto wall see Figure A Remove tieback post and cover from mounting plate Center mounting plate inside of the circle outline on wall At...

Страница 9: ...to the original owner requires a proof of purchase hang on to your receipt and covers defects in material or craftsmanship Hardware must have been properly installed We reserve the right to determine...

Отзывы: