Home Healthcare
User Manual
200ml
100ml
50ml
300ml
RENASYS™ GO
Negative Pressure Wound
Therapy
*smith&nephew
RENASYS GO device 66801496 only
Страница 1: ...Home Healthcare User Manual 200ml 100ml 50ml 300ml RENASYS GO Negative Pressure Wound Therapy smith nephew smith nephew RENASYS GO Negative Pressure Wound Therapy RENASYS GO device 66801496 only...
Страница 2: ...Healthcare provider s name Healthcare provider s telephone number Healthcare provider s mobile number...
Страница 3: ...know if the device is working 17 Battery operation 18 smith nephew RENASYS GO Negative Pressure Wound Therapy 5 System setup 19 Device setup 19 Connecting your dressing 20 Attaching a new canister 21...
Страница 4: ...Negative Pressure Wound Therapy NPWT System This system is prescribed to you by a trained and licensed healthcare provider This Home Healthcare User Manual will help you operate and monitor your devi...
Страница 5: ...and can be plugged into an electrical outlet or can operate on its internal battery How many hours a day do you need to use the therapy To receive the full benefit of the therapy we recommend that th...
Страница 6: ...your dressings needs to be changed All dressing changes must be performed by a trained healthcare provider Will the dressing changes hurt Some people may experience slight discomfort during dressing c...
Страница 7: ...ls Examples of appropriate wound types include Chronic Acute Traumatic Sub Acute and dehisced wounds Ulcers such as pressure or diabetic Partial thickness burns Flaps and grafts When the device should...
Страница 8: ...nd Troubleshooting section of this Home Healthcare User Manual 6 If the dressing feels or appears to be loose consult the system setup section of this Home Healthcare Use Manual or contact your health...
Страница 9: ...in very hot or cold temperatures let it return to room temperature before powering it on to avoid damage to the device 3 To provide proper delivery of your prescribed therapy the tubing that connects...
Страница 10: ...head and neck and be aware of tubing placement around children and animals 6 This device has been tested for use in hospital and home settings regarding interference with other devices Your cell phone...
Страница 11: ...must run the device on it s internal battery power Contact your heathcare provider for a replacement power supply and cord 8 The RENASYS GO device is only to be used with Smith Nephew authorized comp...
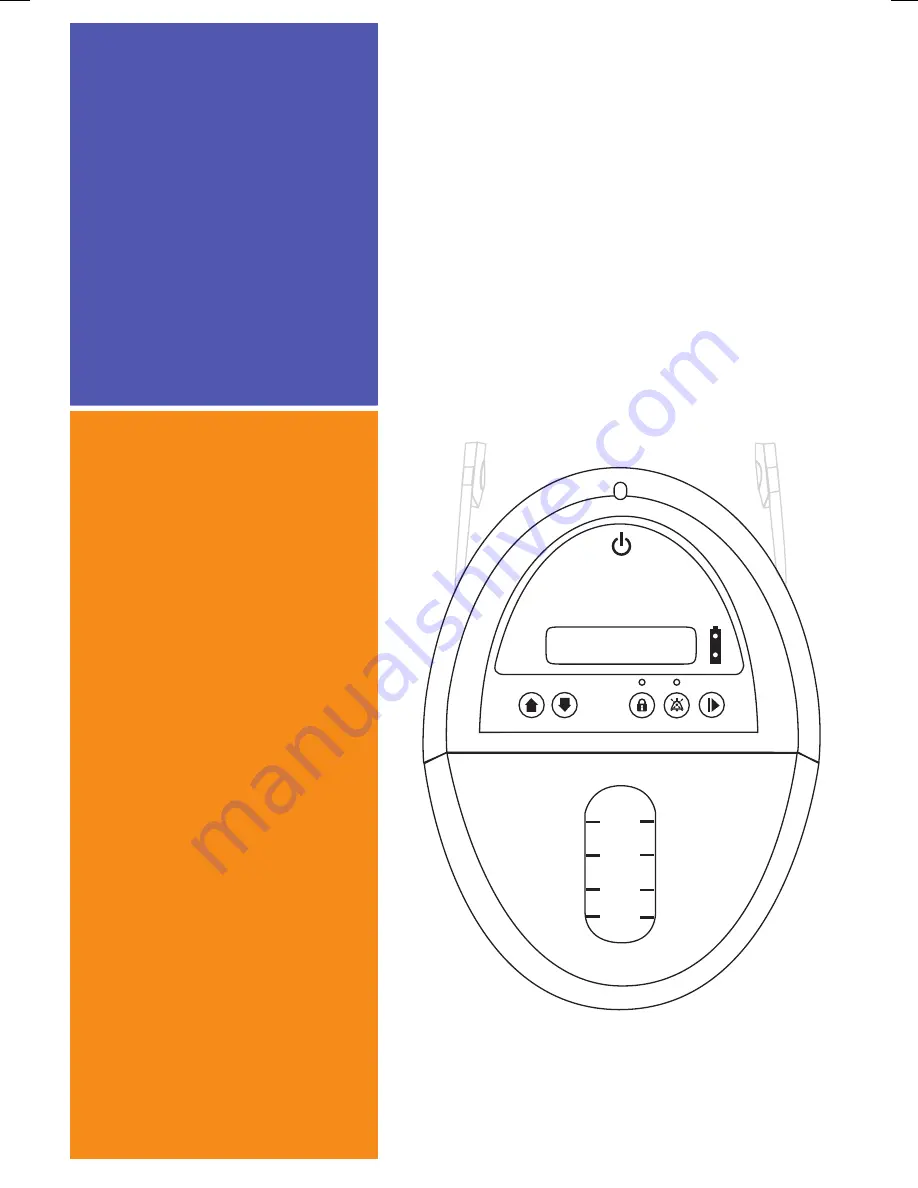
Страница 12: ...ttery status indicator Start pause therapy Audio pause Inlet port Keypad lock Up and Down selectors O ring Note When the device is powered on the Status Alarm indicator will illuminate green to indica...
Страница 13: ...nister is shown Canister tube Orange quick click connector Note There are two types of dressing and canister connectors One with white quick click connectors and one with orange quick click connectors...
Страница 14: ...herapy s mit h n eph ew REN ASY S G O Negati ve Pressu re Wound Therap y X X sm ith neph ew RENA SYS GO Negative Pressure Wound Therapy s mith ne phe w REN ASY S G O Negativ e Pressu re Wound Therap y...
Страница 15: ...15 EN sm ith n ep he w RE NA SY S G O Nega ti v e Pres sure Wou nd Ther apy Power jack Power Power cord inlet DC cord Power supply...
Страница 16: ...here is a lock on the device that will be set by your healthcare provider to avoid changes to your prescribed therapy All buttons will be locked except the Power and Audio Pause buttons Do not change...
Страница 17: ...d therapy The second line on the display will indicate the therapy setting In CONTINUOUS mode the device will deliver therapy constantly In INTERMITTENT mode the device will provide therapy for 5 minu...
Страница 18: ...lthcare provider The amount of fluid in the canister If the canister is 2 3 full of fluid or greater it needs to be replaced The device display and indicator lights on the front of the device For an e...
Страница 19: ...g tubing are water resistant You can shower or wash with dressings in place as long as you do not soak them The following sections walk you through the steps to setting up various components of the sy...
Страница 20: ...e exudate does not leak from the tubing 2 Power off the device 3 Disconnect the canister tubing from the dressing tubing by applying pressure to the connectors as shown 4 Close the tethered caps on bo...
Страница 21: ...en the orange canister clips on either side of the canister and gently pull the canister away from the device 4 Disposal of used canisters should follow facility protocols or local guidelines relating...
Страница 22: ...orange quick click connector White connector Note If you have orange quick click connectors Do not cover the aeration disc located near the orange connector on your dressing tubing X Note If you have...
Страница 23: ...lows the pressure setting to be increased and scroll through menu options Down selector Allows the pressure setting to be decreased and scroll through menu options Keypad lock Locks the keypad to rest...
Страница 24: ...harged and has up to 20 hours therapy time remaining Device is not plugged into an electrical outlet and battery has up to 10 hours therapy time remaining Device is not plugged into an electrical outl...
Страница 25: ...ce is operating normally N A Battery Status Top Indicator Solid Green Device is operating normally N A Battery Status Top Indicator Flash Green Device is operating normally N A Battery Status Top Indi...
Страница 26: ...ice status Device is not plugged into an electrical outlet and battery is low Device is not plugged into an electrical outlet and battery is very low y R A H C E R E G w o L V r e t t a B t n e t t A...
Страница 27: ...d will stop operating once the battery is fully discharged Plug the device into an electrical outlet Therapy will continue to be delivered while the device battery is charging Status Indicator Solid Y...
Страница 28: ...fter 2 minutes in an extremely low charge state the device will power off Device is plugged into an electrical outlet and battery is not charging Note Device display and indicator lights will only pre...
Страница 29: ...o be delivered while the device battery is charging Status Indicator Solid Yellow Battery Status Bottom Indicator Solid Yellow The audible alarm will sound The audible alarm cannot be paused Device mu...
Страница 30: ...el is higher than the prescribed therapy and device has stopped delivering therapy Over Vacuum Alarm Device vacuum exceeds a pressure of 235mmHg and device has stopped delivering therapy P A R E H T P...
Страница 31: ...e audible alarm will sound The audible alarm cannot be paused Device will stop delivering therapy Contact your healthcare provider Status Alarm Indicator Solid Yellow The audible alarm will sound The...
Страница 32: ...32 EN Alarm Indicator Device status High Flow Leak Alarm Device detects a significant air leak N I N R A W G K A E L O I D U A D E S U A P K A E L...
Страница 33: ...rescribed therapy Press down around the edges of your dressing If your dressing begins to recompress you have resealed your dressing and addressed the air leak Check the connectors on the tubing betwe...
Страница 34: ...34 EN Alarm Indicator Device status Low Vacuum Alarm Device vacuum level is lower than the prescribed therapy N I N R A W G A V W O L M U U C O I D U A D E S U A P A V W O L M U U C...
Страница 35: ...llow The audible alarm will sound The audible alarm can be paused by pressing the Audio Pause button When pressed the light above the button will illuminate Device will continue to operate but may not...
Страница 36: ...EN Alarm Indicator Device status Blockage Canister Full Alarm The canister is full or there is a blockage in the system L N I N R A W G A K C O L B L U F E G L O I D U A D E S U A P A K C O L B L U F...
Страница 37: ...er If it is full replace the canister see image on page 21 If you have white quick click connectors on the tubing between your dressing and the canister ensure that no connector has been capped off an...
Страница 38: ...evice user interface has been placed in Home Healthcare Mode Device Failed Alarm Device will not operate Device Not Calibrated Alarm Device will not operate d a p y e K d e k c o L m 0 0 1 g H m E C I...
Страница 39: ...l therapy is required The light above the Keypad Lock button will illuminate Solid Cyan Device is operating normally Device has been locked for home use Status Alarm Indicator Solid Yellow Device will...
Страница 40: ...ce they can be joined together to make the short carry strap The short carry strap can be used to attach the device to a wheelchair or IV pole Shoulder and extension straps The strap can be extended t...
Страница 41: ...evice and feed both parts of one zipper together 4 Close the zipper on the other side of the bag 5 Once fitted ensure the canister tubing can move freely 6 Excess tubing can be coiled and placed in th...
Страница 42: ...care provider will ensure the device has been properly maintained prior to use Your device should last the duration of your therapy If a replacement is needed your healthcare provider will provide the...
Страница 43: ...Contact your healthcare provider Use only the AC power cord provided with the device to prevent the potential for electrical shock hazard If the power supply or power cord is damaged wires are frayed...
Страница 44: ...t your healthcare provider If you have experienced a problem with your device please feel free to send this information through your healthcare provider or report the issue directly to Smith Nephew 24...
Страница 45: ...ria Australia PO Box 442 Shortland Street T 61 3 8540 6777 Auckland 1140 New Zealand F 61 3 9544 5086 T 64 9 828 4059 www smith nephew com australia F 64 9 820 2867 24 Hour Emergency Support T 1800 06...