background image


IndiGO


10 


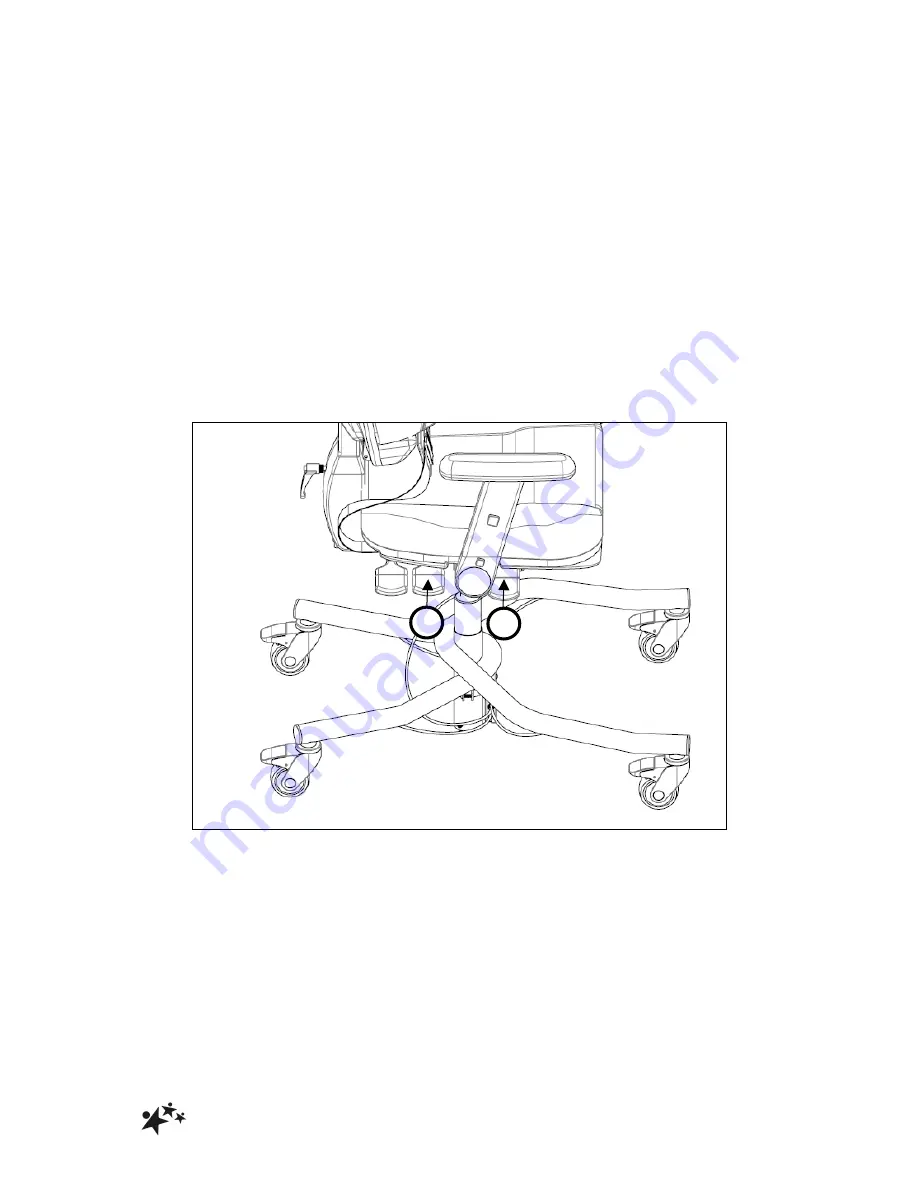
5.1.2 HEIGHT 

To raise or lower the seat: 

§


To raise the seat height, lift the hand lever (2) on the right hand-side of the seat and 

allow the seat to rise under the gas assist – in order for the seat to rise, the user weight 

must be removed. 

§


To  lower  the  seat  height,  lift  the  hand  lever  (2)  whilst  sat  in  the  seat  and  release  the 

lever once at the desired height setting. 


5.1.3 TILT 

To adjust the tilt angle of the seat: 

§


Lift the hand lever (3) to unlock the tilt mechanism. 

§


Adjust the seat tilt to the desired angle. 

§


Lock the hand lever (3) to secure the seat into the desired position.


Содержание INDIGO 11114

Страница 1: ...7 17 INDIGO INSTRUCTIONS FOR USE Codes 11114 11225...

Страница 2: ...IC SUPPORT 14 5 4 USER OPERATED BRAKE SYSTEM 15 5 4 1 USER OPERATION 15 5 4 2 CARER OPERATION 16 5 4 3 BRAKE SYSTEM ADJUSTMENT 16 5 5 PELVIC LAP STRAP 17 6 0 OPTIONAL ACCESSORIES FITMENT AND ADJUSTMEN...

Страница 3: ...igh back or low back option A range of accessories are available including a pommel pelvic lap strap 4 point harness flat headrest height depth and angle adjustable a Multi grip headrest height depth...

Страница 4: ...2 0 ILLUSTRATION OF YOUR INDIGO SEATING SYSTEM A Backrest B Seat C Castors with brakes D Brake lever E Arm rest may differ as of serial no 118817 F Lumbar prompt G Thoracic support H Lap strap B A C E...

Страница 5: ...rone 87 100 87 100 87 100 Seat depth range mm 340 420 340 420 390 470 Seat width mm 390 440 490 Back angle Supine Prone 90 105 90 105 90 105 High Back range mm 490 550 560 640 560 640 Low Back range m...

Страница 6: ...rer is in attendance The carer should be familiar with the methods of adjustment and have completed all adjustments appropriately to meet the needs of the child before transferring the child onto the...

Страница 7: ...the chair is used to ensure they are fitted as prescribed by the clinician take account of the users clothing and are tightened so that the user cannot sustain injury Checking the fit of lap straps a...

Страница 8: ...hand wheels levers and screws clockwise to tighten or anti clockwise to loosen When delivered the product will be supplied with the back rest J removed Unwind lever K and insert back rest J into the b...

Страница 9: ...pplied with these factory fitted Alternatively please refer to Section 6 0 for details of how to fit and adjust your accessories prior to use STOP If you believe this product to be faulty DO NOT USE C...

Страница 10: ...hten or anti clockwise to loosen 5 1 SEAT ADJUSTMENTS 3 adjustments can be made to the seat depth height and tilt 5 1 1 DEPTH To move seat forwards or backwards Loosen the 3 hand wheels on the undersi...

Страница 11: ...or the seat to rise the user weight must be removed To lower the seat height lift the hand lever 2 whilst sat in the seat and release the lever once at the desired height setting 5 1 3 TILT To adjust...

Страница 12: ...4 to lock Repeat on opposite side as necessary 5 2 2 ROTATION To swing the armrest away for ease of transfer Press and hold button 5 Rotate armrest rearwards To restore the armrest to the vertical pos...

Страница 13: ...5 3 1 BACK RECLINE ANGLE To set the angle Lift the hand lever 6 to unlock the tilt mechanism Adjust the back recline to the desired angle Lock the hand lever 6 to secure the back into the desired pos...

Страница 14: ...red height there are a series of back height steps that be selected To lower the backrest Raise the backrest by lifting to the maximum setting the backrest will then slide to the minimum setting permi...

Страница 15: ...o set the depth of lumbar support required for your client s need 5 3 4 THORACIC SUPPORT To set the level of thoracic support Insert the hex key into the adjustment sockets 9 and turn clockwise or ant...

Страница 16: ...n be locked in the on position by parking the lever simply push the lever away from the seat cushion when it has reached its fully downward position To release the brakes pull the lever toward the sea...

Страница 17: ...the unbraked position as shown below A 5 4 3 BRAKE SYSTEM ADJUSTMENT Adjustment of the brake mechanism is possible by rotating the adjustment knob 11 that can be found underneath the seat cushion circ...

Страница 18: ...e plug A into the female receiver B To release the buckle press both sides of the male plug To alter the length of the pelvic strap simply adjust the amount of strap that is fed through the cam lock f...

Страница 19: ...IndiGO 18 6 0 OPTIONAL ACCESSORIES FITMENT AND ADJUSTMENT Product Code Item 13 HT028 Flat head rest 13 HT029 Multi grip head rest 14 PL035 Pommel 15 FR055 Flip up footrest 13 15 14...

Страница 20: ...9 and into the head rest stem to secure in place 6 1 2 HEADREST HEIGHT Loosen the M6 x 20mm screw 17 and slide the head rest to desired height Tighten the M6 x 20mm screw 17 to secure in place 6 1 3 H...

Страница 21: ...cate and unzip the cover of the headrest Using the hex key loosen the bolts that secure the individual headrest elements 21 Position shape the headrest elements to suit your client s needs Tighten the...

Страница 22: ...eady be fitted to the underside of the seat by the factory Using the hex key provided ensure the four screws fitted to the underside of the seat are loose and then offer up the foot rest Slide the foo...

Страница 23: ...eight The footrest assembly can be adjusted for height position by loosening the lever 23 Ensure lever 23 is securely tightened before using the chair Each foot plate can be stored vertically flipped...

Страница 24: ...IndiGO 23 6 3 POMMEL 6 3 1 FITMENT Insert the Pommel through the slot on the front face of the seat 24 and secure in place on the underside of the chair using the grip knob 25 24 25...

Страница 25: ...further information please refer to your regional healthcare cleaning guidelines 7 1 DAILY CHECKS Check for signs of wear tear or damage Check for missing parts Check that all screws are present and...

Страница 26: ...manufactured to high levels of safety and quality and will meet requirements of normal use when maintained in line with our servicing recommendations STOP If the product has been out of use for an ex...

Страница 27: ...mponents are no longer available 7 5 DOCUMENTATION RECORDS It is the responsibility of the current equipment owner to ensure the Instructions for Use manual and any further manuals for accessories fit...

Страница 28: ...seek ADVICE IMPORTANT REMINDER DO NOT fit parts or accessories of other manufacturers to this product unless authorized to do so in writing by Smirthwaite Any servicing or repairs required must be ca...

Страница 29: ...ed to us Should a repair not be possible within the guarantee period we will replace the product for new or nearest equivalent product In the unlikely event that we cannot repair or exchange we will r...

Страница 30: ...our product design department using info smirthwaite co uk Smirthwaite reserves the right to change the specification or material without prior notice For catalogues help and further information on o...

Страница 31: ...IndiGO 30 10 0 SERVICE INSPECTION 10 1 Product Information Model Size Date of Manufacture Serial Number Final Inspection 10 2 Service inspection record form Date Procedure Service Personnel...

Страница 32: ...IndiGO 31 Smirthwaite 16 Wentworth Road Heathfield Newton Abbot Devon TQ12 6TL T 44 0 1626 835552 F 44 0 1626 835428 E enquiries smirthwaite co uk www smirthwaite co uk...

Отзывы: