


Operator’s Manual
HP21 Pellet Stove
~ 25 ~
2.In the
“
Weekly Schedule
”
screen, you can begin with setting
the operation times for Sunday. Press ENTER to highlight
the hour and use the SCROLL UP and SCROLL DOWN
buttons until you reach your desired hour of start time.
Press ENTER again to highlight the minutes and use
SCROLL UP and SCROLL DOWN until you
’
ve reached
your desired minute of start. SEE FIGURE 23.
NOTE: Your stove controller uses military time to set
your weekly schedule.
3. Pressing ENTER again will allow you to set the stop
time of your stove. Use the same procedure for
setting your stove's start time for selecting when
you would like the stove to stop. Once you
’
ve
selected the stop time, press ENTER.
4. Next you will have the opportunity to set the desired
temperature. Use the SCROLL UP or SCROLL DOWN
keys until you
’
ve reached the appropriate temperature for
the times you have selected. Press ENTER.
5.
”
Yes
”
will now be highlighted. If you have set this particular
time correctly, press ENTER. This will take you out of your
first set time.
If you wish to erase a scheduled time, use your ENTER key
to highlight Yes on the screen for that scheduled time.
Select “No” using your SCROLL UP OR SCROLL DOWN
key. With“No” highlighted, press ENTER to erase the
data.
6.To set another time for that particular day, press SCROLL
DOWN and continue by repeating steps 2-5 as
appropriate.
NOTE: You must set your times in chronological order. The
first schedule slot of one day MUST be earlier in the day than
the second schedule slot on your weekly schedule list, etc.
7.Once you have set all times for Sunday, SCROLL DOWN
to “Next”. Pressing ENTER once will highlight “Next”.
Pressing
Figure 23
ENTER again will take you to the following day. Proceed with
setting a schedule for the rest of the week using the preceding
instructions.
NOTE: Along with the
“
Next
”
option on the screen, there
is also an
“
All
”
Option. After you have set a particular
time for a day, if you wish to set that time for every day of
the week, scroll down to
“
Next
”
and press ENTER.
Press the SCROLL DOWN key to select and highlight
“
All
”
.
Pressing ENTER will then select that scheduled time and
apply it to each day of the week.
TIP: If at any point you need to leave the weekly schedule
screen or once you have finished with setting
All of your times, select the EXIT button
to return
to the previous menu.
8.Once you
’
ve finished setting your schedule, without any of
the options highlighted, press the EXIT button. This will
save your schedule.
9. With a schedule set, make sure that the main display
screen on the controller reads ‘Weekly” (for operating in
the Weekly Mode) and that the unit is turned on. The schedule
will not take effect unless the unit is turned on in the Weekly
Mode. (See button 13 on Figure 19.)
SETTING OTHER DATA ON YOUR CONTROLLER
SETTING THE TIME AND DATE
1. Press and hold the ENTER button. This will take
you to the “Set Data” screen.
2. Press ENTER again to enter the“Set Clock” screen.
SEE FIGURE 24.
3.To change the hour, press ENTER. This will
highlight the hour. Use your SCROLL UP and
SCROLL DOWN buttons to choose the appropriate
time. Press ENTER to select the correct hour, and
then press ENTER a second time to begin setting the
minutes.
4. Continue this process for selecting and setting the
day, month, date and year.
5. When finished, and with nothing highlighted on the
screen, press the EXIT button.
Figure 24
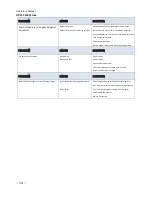
SET WEEKLY
Sun. Weekly Set
1: 01:15~ 07:00 67
°
F Yes
2: 17:00~ 23:45 72
°
F Yes
3: - - : - -~ - -: - - - -
°
F No
4: - - : - -~ - -: - - - -
°
F No
5: - - : - -~ - -: - - - -
°
F No
Next All
SET CLOCK
10:45 Fri . May 20, 2011
Содержание ComfortBilt HP21
Страница 17: ...Operator s Manual HP21 Pellet Stove 17 CLASS A CHIMNEY RETROFIT Figure 13 Class A Chimney Retrofit ...
Страница 18: ...Operator s Manual HP21 Pellet Stove 18 MASONRY FIREPLACE HEARTH STOVE Figure 14 Masonry Fireplace Hearth Stove ...
Страница 20: ...Operator s Manual HP21 Pellet Stove 20 FREESTANDING MASONRY CHIMNEY Figure 16 Freestanding Masonry Chimney ...