Smeg SDP20UL Скачать руководство пользователя страница 15

Remote control

17

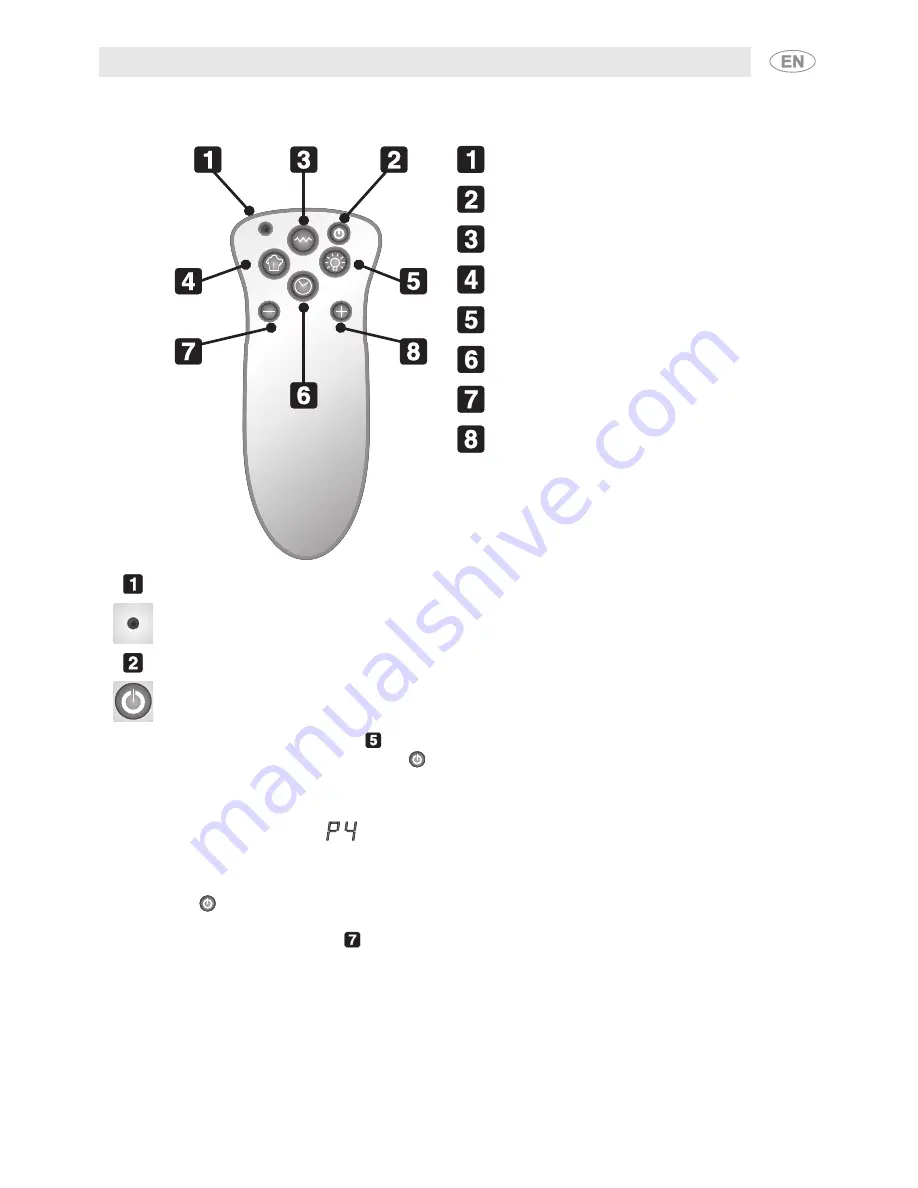
9. THE REMOTE CONTROL

(Fig. 9)  

RED LED

STANDBY KEY

“CUTTINGS” KEY

HUMIDIFIER KEY

INTERNAL LIGHT KEY

CLOCK DISPLAY/SETTING KEY

VALUE DECREASE KEY

VALUE INCREASE KEY

9.1 Red led

This led switches on whenever any key is pressed to confirm that the signal has been sent to the control
panel.

9.2 Standby key

This key activates the appliance’s circuitry when it is in standby. When it is reconnected to the power
supply, or after a lengthy power shutdown, the Home Garden will start up with the settings it had when it
was switched off. In particular, when first switched on, the Home Garden will be in standby, as shown by
the display described in point 

, page 16. To activate automatic operation, simply point the remote

control at the appliance and press the 

 key.

Once automatic operation has been activated, the appliance’s circuitry will run a check of the displays
and all control panel leds will light up.
Once this check has terminated, the system will ask you to select one of the 3 pre-set programs or the
manual setting program 

. For selection of the right program and how to activate it, refer to "10.3

Selecting the program".
Once the program has been selected, the appliance will prompt you to set the time. For instructions for
setting the time, see "9.6 Clock display/setting key".
The 

 key is also used for unlocking the Home Garden’s settings: Ten minutes after any button has

been pressed for the last time, the Home Garden enters the "lock" mode and a dot lights up on the
humidity display (see point 

 page 16). This is a precaution against misuse, accidental or in play, by

children, who may attempt to change the settings and thus affect the growth of the plants.
To unlock the settings, point the remote control at the Home Garden and hold this key down for a few
seconds until the point on the display disappears. It is now possible to use the other keys on the remote
control again.

Содержание SDP20UL

Страница 1: ...8 8 Internal light ON symbol 16 8 9 Cuttings function on symbol 16 8 10 Remote control sensor 16 9 THE REMOTE CONTROL 17 9 1 Red led 17 9 2 Standby key 17 9 3 Cuttings function on key 18 9 4 Humidifie...

Страница 2: ...ld lose your life or be seriously injured if you do not immediately follow the instructions WARNING means you could lose your life or be seriously injured if the instructions are not followed CAUTION...

Страница 3: ...arden stand HOUSEHOLD HOME APPLIANCE FOR HOUSEHOLD USE ONLY THIS FURNISHING HAS NOT BEEN EVALUATED FOR FLAMMABILITY OR CIGARETTE IGNITION RESISTANCE DO NOT ATTEMPT TO MOVE THE DEVICE BY PULLING ON THE...

Страница 4: ...VOID ACCIDENTAL COLLISIONS IT SHOULD BE PLACED ON A SUITABLE AND STABLE SURFACE TO AVOID IT FALLING ACCIDENTALLY SAVE THESE INSTRUCTIONS OUR HOME GARDENS ARE PACKAGED ONLY WITH NON POLLUTANT ENVIRONME...

Страница 5: ...ECLINES ALL LIABILITY FOR USES OTHER THAN THOSE STATED ABOVE NEVER LEAVE PACKAGING RESIDUES UNATTENDED IN THE HOME SEPARATE WASTE PACKAGING MATERIALS BY TYPE AND CONSIGN THEM TO THE NEAREST SEPARATE D...

Страница 6: ...REGULARLY IRRIGATE MANURE TRIM THEM AND CLEAN THEIR LEAVES AND TAKE ALL THE FURTHER MEASURES NECESSARY FOR THEIR CARE THESE MEASURES ARE NOT RENDERED UNNECESSARY BY THE USE OF OUR PRODUCT BUT ARE IND...

Страница 7: ...all dimensions 5 1 1 Home Garden s overall dimensions The drawing below shows the Home Garden s maximum overall dimensions with the glass panels and trays open Fig 1 5 1 2 Pot overall dimensions The d...

Страница 8: ...PORTING SURFACE AS THIS MAY BLOCK THE AIR INTAKES BENEATH IT The Home Garden may be placed on a pedestal optional available from your service center Completely unscrew the feet and fit the studs into...

Страница 9: ...ube in its central seat as shown by movement C in Figure 5 5 4 Electrical connection Connect the appliance s power supply lead to a mains socket installed in accordance with electrical safety regulati...

Страница 10: ...al Filling The Home Garden s tank is empty when purchased It must be filled for the appliance to operate For filling instructions see 11 1 Filling the tank on page 22 IT IS ADVISABLE TO FILL THE TANK...

Страница 11: ...ures required to start up the Home Garden when using it for the first time 1 switch on the Home Garden by pressing the button on the remote control see Section 9 2 Standby key 2 select the program dep...

Страница 12: ...our appliance 14 7 GETTING TO KNOW YOUR APPLIANCE FIG 7 HUMIDIFIER WATER TANK CONTROL PANEL SLIDING TRAYS PLANT POTS VAPOR DELIVERY TUBE LED LAMP HUMIDITY AND INTERNAL TEMPERATURE SENSOR TANK FILLER C...

Страница 13: ...2 Internal clock setting display symbol This symbol indicates that the key on the remote control has been pressed to show the current time on the displays For instructions for setting the time see 9 6...

Страница 14: ...ontrol has not been used for ten minutes consecutively the Home Garden locks its current setting and commands are not accepted from the remote control This is a precaution against misuse accidental or...

Страница 15: ...run a check of the displays and all control panel leds will light up Once this check has terminated the system will ask you to select one of the 3 pre set programs or the manual setting program For s...

Страница 16: ...CTION ARE ON DO NOT TOUCH THESE PANELS WITH YOUR BARE HANDS BEFORE ALLOWING THEM SUFFICIENT TIME TO COOL DOWN 9 4 Humidifier key This key manually delivers a few jets of water vapor into the Home Gard...

Страница 17: ...n the selected program During normal operation and when the Home Garden is not locked press the key once to display the time For the preset programs see 10 2 Automatic regulation of the internal micro...

Страница 18: ...OF GLASS PROCEED GENTLY AND WITH CARE WHEN HANDLING 10 2 Automatic regulation of the internal micro climate The Home Garden is equipped with three sensors humidity light and temperature which allow i...

Страница 19: ...rden has a manual program in which the operating parameters temperature and humidity can be modified To do this select program as described in point 10 3 Selecting the program To modify the preset pro...

Страница 20: ...s WHEN THE SYMBOL STARTS FLASHING SOME AMOUNT OF WATER IS STILL LEFT IN THE TANK BUT IT CANNOT BE USED Extract the sliding trays and pots as described in paragraph 10 1 Removing and placing the pots i...

Страница 21: ...eaning the ultrasound vaporizer If it is necessary to clean the internal vaporizer for example because vapor is not delivered even after you have thoroughly cleaned the hose contact your nearest Autho...

Страница 22: ...as been exceeded The tank has been filled beyond the maximum level Wait a few minutes and try again Empty the tank with a syringe or similar device as described in paragraph 11 1 Filling the tank The...

Отзывы: