background image

EN 

Instructions for the User 


29 

13  OVEN CLEANING 


Warning!

  Cleaning  should  be  done  with  the  oven  power  switched  off. 

Take the plug out of the socket or switch off the oven’s power circuit. 


Warning!

 Do not use aggressive or abrasive cleaning products, scourers 

that scratch surfaces or sharp objects, since stains may appear. To clean 
stainless steel parts, please use suitable detergent which does not contain 
abrasive or acid substances or chlorine. 


Warning!

 Never use high pressure or steam jet cleaning appliances. 

13.1  Front surface 

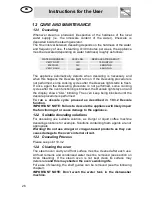
Normally  you  just  need  to  clean  the  oven  with  a  damp  cloth.  If  it  is  very 
dirty,  add  a  few  drops  of  dishwashing  liquid  to  the  cleaning  water. 
Afterwards, wipe the oven with a dry cloth. 

In  an  oven  with  a  finger  print  proof  treatment  front

,  use  a  mild  glass 

cleaning  product  and  a  soft  cloth  that  does  not  release  any  fibres  or 
threads.  Wipe  from  side  to  side  without  exerting  any  pressure  on  the 
surface. 
Immediately  remove  limescale,  fat,  starch  or  egg  white  stains.  Corrosion 
can occur under these stains. 
Do not let any water get inside the oven. 

13.2  Oven interior 

After  use,  remove  any  water  on  the  bottom  of  the  cooking  space  with  a 
soft  cloth.  Leave  the  appliance  door  open  so  that  the  cooking  space  can 
cool down. 
To  remove  dirt  that  is  harder  to  shift,  use  a  non-aggressive  cleaning 
product. 

Do  not  use  oven  sprays  or  other  aggressive  or  abrasive 

cleaning products. 
Always  keep  the  door  and  the  oven  front  very  clean  to  ensure  that 
the door opens and closes properly. 

Make sure water does not enter the oven ventilation holes. 
The glass lamp cover is located on the oven ceiling and can be removed 
easily  for  cleaning.  For  this  you  just  need  to  unscrew  it  and  clean  it  with 
water and dishwashing liquid. 

13.3  Accessories 

Clean the accessories after each use. If they are very dirty, soak them first of 
all  and  then  use  a  brush  and  sponge.  The  accessories  can  be  washed  in  a 
dish washing machine except the water tank. 

Содержание SC45VK

Страница 1: ...Instructions for Use Steam oven Guide d utilisation Four vapeur ...

Страница 2: ...s to install commission and test the appliance 1 PRECAUTIONS FOR USE 1 2 DISPOSAL INSTRUCTIONS OUR ENVIRONMENT POLICY 2 3 SAFETY PRECAUTIONS 3 4 GET TO KNOW YOUR OVEN 6 5 ACCESSORIES AVAILABLE 6 6 BEFORE INSTALLATION 7 7 DESCRIPTION OF FRONT PANEL CONTROLS 8 8 USING THE OVEN 10 9 WATER FEEDING 11 10 SELECTING THE FUNCTION 12 11 RECOMMENDED COOKING TABLES 21 12 CARE AND MAINTENANCE 26 13 OVEN CLEAN...

Страница 3: ...Y IF YOU LEND THE STEAMER TO SOMEONE ELSE GIVE THEM THE MANUAL AS WELL NEVER USE THIS APPLIANCE FOR HEATING ROOMS NEVER LEAVE PACKAGING RESIDUES UNATTENDED IN THE HOME SEPARATE THE VARIOUS PACKAGING MATERIALS BY TYPE AND CONSIGN THEM TO THE NEAREST SEPARATE DISPOSAL CENTRE THIS APPLIANCE IS TAGGED UNDER EUROPEAN DIRECTIVE 2002 96 EC ON WASTE ELECTRICAL AND ELECTRONIC EQUIPMENT WEEE THIS DIRECTIVE ...

Страница 4: ...e packaging lying around Packaging parts and especially plastic bags may represent a suffocation hazard for children Your old appliance must also be disposed of properly Important deliver the appliance to your local organisation authorised to collect scrapped appliances Proper disposal allows the intelligent recovery of valuable materials Before scrapping your appliance it is important to remove d...

Страница 5: ...S PROVIDED LATER IN THIS MANUAL IF THE APPLIANCE FAILS TO OPERATE DISCONNECT IT FROM THE ELECTRICAL MAINS AND CONTACT YOUR NEAREST SERVICE CENTRE NEVER ATTEMPT TO REPAIR THE APPLIANCE WARNING NEVER LEAVE THE OVEN UNSUPERVISED WARNING IF YOU SEE SMOKE OR FIRE KEEP THE DOOR CLOSED IN ORDER TO SMOTHER THE FLAMES SWITCH OFF THE OVEN AND TAKE THE PLUG OUT OF THE SOCKET OR CUT OFF THE OVEN POWER SUPPLY ...

Страница 6: ...N THE HOME FOR PREPARING FOOD NO LIABILITY IS ASSUMED FOR ANY DAMAGE CAUSED BY IMPROPER OR INCORRECT USE AVOID DAMAGING THE OVEN OR OTHER DANGEROUS SITUATIONS BY FOLLOWING THESE INSTRUCTIONS Do not cover or obstruct the ventilation openings Do not keep any inflammable object inside the oven as it may burn if the oven is switched on Do not use the oven as a pantry Do not pour spirits e g brandy whi...

Страница 7: ... to ensure the oven functions correctly Please follow the instructions regarding cleaning in the section Oven Cleaning and Maintenance REPAIRS If the power cable is damaged it should be substituted by the manufacturer authorised agents or technicians qualified for this task in order to avoid dangerous situations Furthermore special tools are required for this task Repair and maintenance work espec...

Страница 8: ...king fresh or deep frozen vegetables meat and poultry Non perforated container suitable for steaming sensitive foods e g compotes and dumplings You can use it with the perforated container to catch the water Rack used when cooking with small containers as for example dessert bowls and to regenerate plate dishes Oven accessories which may come into contact with foods are made from materials complia...

Страница 9: ...dues unattended in the home Separate waste packaging materials by type and consign them to the nearest separate disposal centre The inside of the appliance should be cleaned to remove all manufacturing residues For further information about cleaning see point CARE AND MAINTENANCE ...

Страница 10: ...onvenience it will be referred to as PT1 Function switch on knob This knob allows access to the oven s three operating settings and is also used to select a cooking function see point 8 2 Operating settings Current time Duration display This display shows the current time or the cooking duration Also visible are the function cut out light Clock Adjusting the cooking time Child lock out function Ch...

Страница 11: ...xisting water quantity in the tank see point 9 2 Water levels indication Function display This display shows illuminated all the cooking functions available for selection For instructions on how to select a cooking function see point 10 Selecting a cooking function The table below provides a list of the functions available Please see chapter 10 for a more detailed description of the functions STEA...

Страница 12: ...me has been confirmed with DSP1 on and showing the current time from the standby setting press PT2 once All the displays and knobs light up from the ON setting press PT2 once Only the symbol on DSP1 remains on 8 3 First Use At first use or after a power failure the oven s left hand display DSP1 will show a flashing symbol The oven will not operate until the clock the water hardness parameter and t...

Страница 13: ...ures on DSP1 flash Now repeat the operations described in point 8 3 1 Setting the current time and water hardness level 8 3 4 Changing the current water hardness level It might become necessary to change the current water hardness level To do this please refer to point 10 3 3 changing the water hardness level 9 WATER FEEDING All functions require the water tank to be full Fill the water tank up to...

Страница 14: ...y the water tank 2 Dry the water tank and introduce it back into the slot located above the cavity Clean and dry the cooking space 3 Leave the appliance door open so that the cooking space can cool down and dry completely IMPORTANT NOTE It is advisable to remove the water tank and empty it after a cooking cycle This prevents the formation of bacteria and limestone inside the appliance Don t wash t...

Страница 15: ...the food s type but can be changed by pressing PT1 Turn PT1 to the right or left to change the preset cooking duration Press PT2 to immediately start the cooking process or otherwise press PT1 to set a different time for the cooking process start please refer to point 10 1 7 Delayed Start Time The temperature will be automatically set to achieve the best results The following table shows the progr...

Страница 16: ...ype displayed on DSP2 The cooking duration is calculated based on the food s type but can be changed by pressing PT1 Turn PT1 to the right or left to change the preset cooking duration Press PT2 to immediately start the cooking process or otherwise press PT1 to set a different time for the cooking process start please refer to point 10 4 7 Delayed Start Time The temperature will be automatically s...

Страница 17: ...electing this function press PT1 to modify the preset cooking duration and the DSP1 starts to blink Turn PT1 to the right or left to change the preset defrosting duration Please consider the information on the defrosting table see point 10 Press PT2 to immediately start the defrost process or otherwise press PT1 to set a different time for the defrost process start please refer to point 10 1 7 Del...

Страница 18: ... water cools down in the boiler The cavity walls and the water tank are still very hot Danger of burning The timer stops and the display shows the remaining amount of operating time If you wish at this time you can Turn or stir the food to ensure it will be evenly cooked Modify the process parameters Cancel a cooking cycle End of a cooking cycle To restart the process close the door and press PT2 ...

Страница 19: ...he DSP1 shows the message PUMP If the display shows FULL it means that the water has to match water inside Please empty the tank and place it again When the display shows the word DEP this means that the water was pumped and that the water tank can be removed Remove the water tank and dry it thoroughly Let the cooking space cool down for a moment and then clean and dry it with a cloth or sponge Th...

Страница 20: ...cycle that takes about 30 minutes When the display shows 1 0L flashing and the oven emits a beep remove and empty the water tank Fill the water tank with 1 0 litres of cold water and put the water tank back Press PT2 to start the first rinsing cycle When the display again shows 1 0L flashing and the oven emits a new beep remove and empty the water tank Fill the water tank with 1 0 litres of cold w...

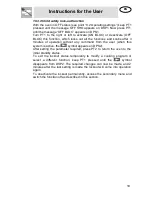
Страница 21: ...of operation without any command from the user when this system is active the symbol appears on DPS2 After setting the parameter required press PT2 to return the oven to the initial standby status To exit the lockout status temporarily to modify a cooking program or select a different function keep PT1 pressed until the symbol disappears from DSP2 The required changes can now be made and 2 minutes...

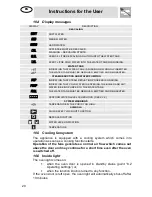
Страница 22: ...D TO THE WATER TANK FULL THE WATER TANK MUST BE REMOVED EMPTIED AND REINSERTED PERFORM WATER LEVEL CALIBRATION SEE 8 3 2 SYSTEM WARNINGS TEMPERATURE IN THE PCB IS TOO HIGH SYMBOLS CHILD SAFETY LOCK OUT FUNCTION DESCALE FUNCTION WATER LEVEL INDICATION TEMPERATURE 10 5 Cooling fan system The appliance is equipped with a cooling system which comes into operation as soon as a cooking function starts O...

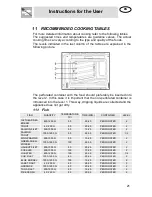
Страница 23: ...ted and the appliance does not get dirty 11 1 Fish FISH QUANTITY TEMPERATURE ºC TIME MIN CONTAINER LEVEL GILTHEAD SEA BREAM 800 1200 G 80 30 40 PERFORATED 2 TROUT 4 X 250 G 80 20 25 PERFORATED 2 SALMON FILET 500 1000 G 80 15 25 PERFORATED 2 SALMON TROUT 1000 1200 G 80 25 35 PERFORATED 1 2 KING PRAWNS 500 1000 G 80 15 20 PERFORATED 2 GREEN SHELL MUSSEL 1000 1500 G 100 25 35 PERFORATED 2 HALIBUT FIL...

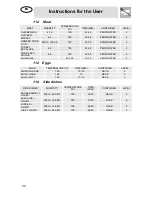
Страница 24: ...2 PORK FILET WHOLE 4 8 100 20 30 PERFORATED 2 SAUSAGES 80 100 10 15 PERFORATED 2 11 3 Eggs EGGS TEMPERATURE ºC TIME MIN CONTAINER LEVEL EGGS IN GLASS 100 10 15 RACK 2 EGGS HARD 100 15 RACK 2 EGGS SOFT 100 10 12 RACK 2 11 4 Side dishes SIDE DISHES QUANTITY TEMPERATURE ºC TIME MIN CONTAINER LEVEL PEARL BARLEY LIQUID 200G 400 ML 100 30 35 RACK 2 SEMOLINA LIQUID 200G 300 ML 100 10 20 RACK 2 LENTILS LI...

Страница 25: ...ITH SKIN WHOLE VERY SMALL 100 20 25 PERFORATED 2 POTATOES WITH SKIN WHOLE VERY BIG 100 45 50 PERFORATED 2 POTATOES WITHOUT SKIN IN PIECES 100 20 25 PERFORATED 2 TURNIP IN STICKS 100 20 25 PERFORATED 2 SNOW PEAS 100 15 20 PERFORATED 2 CARROTS IN SLICES 100 25 30 PERFORATED 2 CORN COBS 100 50 60 PERFORATED 2 BELL PEPPERS IN STRIPES 100 12 15 PERFORATED 2 HOT PEPPER 100 12 15 PERFORATED 2 MUSHROOMS I...

Страница 26: ... RACK 2 STEWED PEACHES 500 1500 G 100 15 20 NOT PERFORATED 2 11 8 Fruit Sterilising Boiling down FRUIT QUANTITY TEMPERATURE ºC TIME MIN CONTAINER LEVEL PEARS 4 6 1L GLASSES 100 30 35 RACK 1 CHERRIES 4 6 1L GLASSES 80 30 35 RACK 1 PEACHES 4 6 1L GLASSES 80 30 35 RACK 1 PLUMS 4 6 1L GLASSES 80 30 35 RACK 1 11 9 Regenerate WARMING UP QUANTITY TEMPERATURE ºC TIME MIN CONTAINER LEVEL PLATE DISHES 1 2 1...

Страница 27: ...oking with two levels the accessories should be always inserted in the 2nd or 3rd level and in the 1st level Different cooking times are controlled this way Foods that need a longer cooking time should be placed in the upper area of the oven Foods with a shorter cooking time should be placed on the 1st level One example Vegetables potatoes and fish Place the vegetables and potatoes in any suitable...

Страница 28: ... Descale light stays on and the display shows CAL blinking The oven keep being blocked until the descale procedure is performed To run a descale cycle proceed as described in 10 3 2 Descale function IMPORTANT NOTE Failure to descale the appliance will likely impair the functioning of or cause damage to the appliance 12 2 Suitable descaling solutions For descaling use suitable solution as Durgol or...

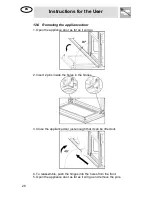
Страница 29: ...osen the knurled nuts 2 in the back of the shelf guides in an anti clockwise direction Do not completely remove these nuts 3 Pull the shelf guides to the inside of the cavity and remove from the front To put them back insert the shelf guides into the knurled nuts 2 in the back and position on the screws in the front Screw the knurled nuts 1 and 2 in a clockwise direction till tight ...

Страница 30: ... appliance door as far as it will go 2 Insert 2 pins inside the holes in the hinges 3 Close the appliance door just enough that it can be lifted out 4 To reassemble push the hinges into the holes from the front 5 Open the appliance door as far as it will go and remove the pins ...

Страница 31: ...om side to side without exerting any pressure on the surface Immediately remove limescale fat starch or egg white stains Corrosion can occur under these stains Do not let any water get inside the oven 13 2 Oven interior After use remove any water on the bottom of the cooking space with a soft cloth Leave the appliance door open so that the cooking space can cool down To remove dirt that is harder ...

Страница 32: ...lug is correctly fitted in the socket Check if the oven power is switched on When the oven is operating I can hear some strange noises It has to do with the operating noises that can occur during the cooking process e g by the water pumps in the steam generator The steam inside the cavity produces a pressure build up and sometimes the cavity walls may produce noise when they react to the pressure ...

Страница 33: ...heck that the input voltage indicated on the characteristics plate is the same as the voltage of the power outlet you are going to use Open the oven door and take out all the accessories and remove the packing material Warning The front surface of the oven may be covered in a protective film Before using the oven for the first time carefully remove this film starting on the inside Make sure that t...

Страница 34: ...umber and mark is in a visible position on the oven door frame The nameplate must never be removed The appliance must be connected to earth in compliance with electrical system safety regulations If a permanent connection is used the appliance s power supply line must be fitted with an omnipolar breaking device with contact gap of at least 3 mm located in an easily accessible position close to the...

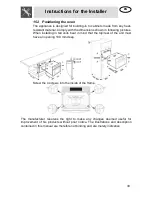
Страница 35: ...ng pictures When installing in tall units bear in mind that the top rear of the unit must have an opening 100 mm deep Screw the 4 screws into the inside of the frame The manufacturer reserves the right to make any changes deemed useful for improvement of his products without prior notice The illustrations and description contained in this manual are therefore not binding and are merely indicative ...

Отзывы: