background image

Installation

43

EN

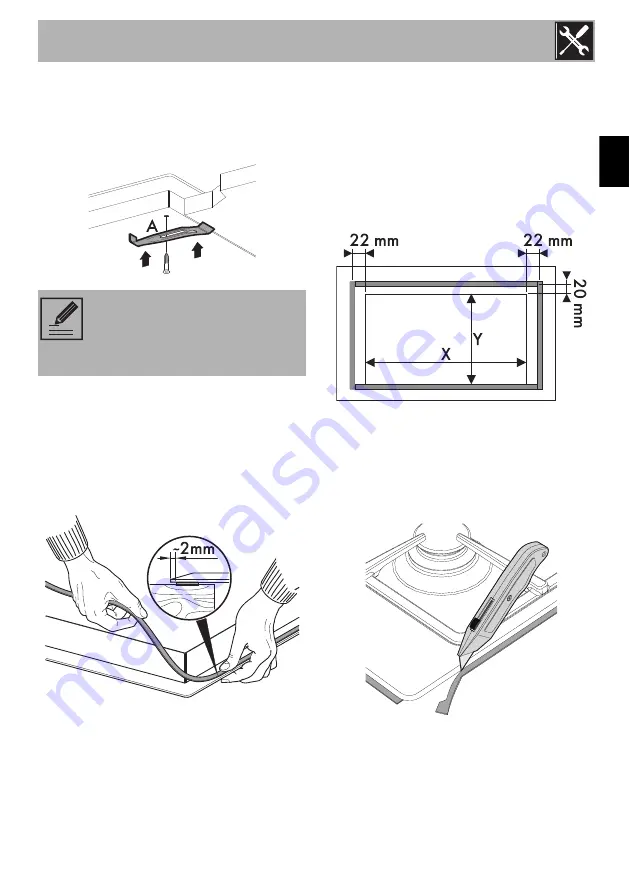
Fixing brackets

Screw the fixing brackets (

A

) into the holes 

on the sides of the bottom casing to 
properly fasten the hob to the structure.

Hob seal

With glass hob

To prevent leakage of liquid between the 
frame of the hob and the countertop, place 
the adhesive seal provided along the entire 
outer edge of the hob before assembly.

With steel hob

To prevent leakage of liquid between the 
frame of the hob and the work surface, put 
the insulating seal provided in position 
before assembly.
1. Refer to the dimensions in the figure, 

bearing in mind that the long front side 
must brush against the hole.

2. Use light pressure to make the seal stick 

to the edge around the hole cut in the 
worktop.

3. Carefully trim the surplus edge away 

from the seal.

Do not use silicone to secure the 
hob. This would make it impossible 
to remove the hob, if necessary, 
without damaging it.

Содержание PVL675LCN

Страница 1: ...ce 39 4 1 Instructions 39 4 2 Cleaning the appliance 39 5 Installation 41 5 1 Safety instructions 41 5 2 Section cut from the countertop 41 5 3 Mounting 42 5 4 Gas connection 44 5 5 Adaptation to different types of gas 46 5 6 Electrical connection 53 We advise you to read this manual carefully which contains all the instructions for maintaining the appliance s aesthetic and functional qualities Fo...

Страница 2: ... carry out installation and assistance interventions according to the standards in force Do not modify this appliance Do not insert pointed metal objects cutlery or utensils into the slots in the appliance Do not try to repair the appliance yourself or without the intervention of a qualified technician If the power supply cable is damaged contact technical support immediately and they will replace...

Страница 3: ...isposed of separately from other waste Directives 2002 95 EC 2002 96 EC 2003 108 EC The appliance does not contain substances in quantities sufficient to be considered hazardous to health and the environment in accordance with current European directives To dispose of the appliance Cut the power supply cable and remove it along with the plug Deliver the appliance to the appropriate recycling centr...

Страница 4: ...before using the appliance 1 7 How to read the user manual This user manual uses the following reading conventions 1 Sequence of instructions for use Standalone instruction Instructions General information on this user manual on safety and final disposal Description Description of the appliance and its accessories Use Information on the use of the appliance and its accessories cooking advice Clean...

Страница 5: ...Description 33 EN 2 Description 2 1 General Description 60 cm 75 cm ...

Страница 6: ...ar left Central Rear right Central right Front right Burner knobs Useful for lighting and adjusting the hob burners Press and turn the knobs anti clockwise to the value to light the relative burners Turn the knobs to the zone between the maximum and minimum setting to adjust the flame Return the knobs to the position to turn off the burners ...

Страница 7: ...ot leave the appliance unattended during cooking operations where fats or oils could be released Do not spray any spray products near the appliance Do not touch the appliance s heating elements when it is running Leave them to cool before cleaning Keep children under the age of eight away from the appliance when it is in use Improper use Risk of damage to surfaces Do not use aluminium foil to cove...

Страница 8: ...y go out when the knob is released In this case the thermocouple has not heated up sufficiently Wait a few moments and repeat the operation Keep the knob pressed in longer Correct positioning of the flame spreader crowns and burner caps Before lighting the hob burners make sure that the flame spreader crowns are correctly positioned in their housings with their respective burner caps Make sure tha...

Страница 9: ...hob For better burner efficiency and to minimise gas consumption use pans with lids and of suitable size for the burner so that the flames do not reach up the sides of the pan Once the contents come to the boil turn down the flame far enough to ensure that the liquid does not boil over To prevent burns or damage to the hob or the counter top during cooking all pans or griddles must be placed insid...

Страница 10: ...urner on maximum power for no more than 10 minutes It is recommended you reduce the power during cooking Do not allow the burner flames to extend beyond the edge of the griddle Leave a gap of at least 150 mm between the edge of the griddle and the side wall Do not place the griddle over more than one burner at the same time ...

Страница 11: ...n them in lukewarm water and non abrasive detergent Make sure to remove any encrustations Dry them thoroughly and return them to the hob Improper use Risk of damage to surfaces Do not use steam jets to clean the appliance Do not use cleaning products containing chlorine ammonia or bleach on parts made of steel or that have metallic surface finishes e g anodizing nickel or chromium plating If it co...

Страница 12: ...dle Flame spreader crowns and burner caps For easier cleaning the flame spreader crowns and the burner caps can be removed Wash them in hot water and non abrasive detergent Carefully remove any encrustation then wait until they are perfectly dry Refit the flame spreader crowns making sure that they are correctly positioned in their housings with their respective burner caps In case of a malfunctio...

Страница 13: ...ation Risk of fire Check that the carcase material is heat resistant Check that the carcase has the required openings The minimum clearance between a ventilation hood and the cooking surface must be at least the distance indicated in the ventilation hood installation instructions The following operation requires building and or carpentry work and must therefore be carried out by a competent trades...

Страница 14: ...en unit or drawers If there are other pieces of furniture lateral walls drawers etc dishwashers or fridges under the hob a double layer wooden base must be installed at least 20 mm from the bottom of the hob to avoid any accidental contact It must only be possible to remove the double layer base using suitable equipment 150 x 150 mm required for gas connection opens on bottom opens on rear If inst...

Страница 15: ... assembly With steel hob To prevent leakage of liquid between the frame of the hob and the work surface put the insulating seal provided in position before assembly 1 Refer to the dimensions in the figure bearing in mind that the long front side must brush against the hole 2 Use light pressure to make the seal stick to the edge around the hole cut in the worktop 3 Carefully trim the surplus edge a...

Страница 16: ...nection to the gas mains using a continuous wall steel hose whose specifications comply with the applicable standard Carefully screw the connector 3 to the gas connector 1 of the appliance placing the seal 2 between them Gas leak Danger of explosion After carrying out any operation check that the tightening torque of gas connections is between 10 Nm and 15 Nm If required use a pressure regulator t...

Страница 17: ...n force The supply pressure must comply with the values indicated in the table in Gas types and Countries Room ventilation The appliance should be installed in rooms that have a permanent air supply in accordance with the standards in force The room where the appliance is installed must have enough air flow for the regular combustion of gas and the necessary air change in the room itself The air v...

Страница 18: ...taller must issue a certificate of conformity 1 Extraction using a hood 2 Extraction without a hood A Single natural draught chimney B Single chimney with extractor fan C Directly outdoors with wall or window mounted extractor fan D Directly outdoors through wall Air Combustion products Extractor fan 5 5 Adaptation to different types of gas If other types of gas are to be used the nozzles must be ...

Страница 19: ...he flame spreader crowns and relative burner caps 3 Pull the knobs and the knob bezels upwards to remove them 4 For each burner unscrew the three screws that fix the burner support rings to the hob top Between knob and the knob bezel there is a spring that is not shown in the figure ...

Страница 20: ...ll go 2 Use a spanner to remove the nozzles C and install the new ones for the required gas supply following the indications given in the relevant table see Gas types and Countries 3 Adjust the air flow by moving the air regulator B to obtain the distance D given in the corresponding table see Gas types and Countries 4 After adjusting each burner reassemble the appliance correctly The nozzle tight...

Страница 21: ...ot go out 5 Repeat the operation on all gas cocks Adjusting the minimum setting for LPG Tighten the screw located at the side of the tap rod clockwise all the way Lubricating the gas cocks Over time the gas taps may become difficult to turn and get blocked Clean them internally and replace the lubrication grease Following adjustment to a gas other than the one originally set in the factory replace...

Страница 22: ...as G25 G25 20 mbar 4 LPG G30 31 G30 31 28 37 mbar G30 31 30 37 mbar G30 31 30 30 mbar 5 LPG G30 31 G30 31 50 mbar 6 Town gas G110 G110 8 mbar 7 Town gas G120 G120 8 mbar It is possible to identify the available gas types based on the country the appliance is to be installed in Refer to the heading number to identify the correct values in the Burner and nozzle characteristics tables ...

Страница 23: ...city kW 1 0 1 6 2 4 2 9 3 5 Nozzle diameter 1 100 mm 75 94 115 128 138 Reduced flow rate W 400 500 900 900 1100 Primary air mm 10 10 2 2 2 Marking on nozzle F4 X S S S 4 LPG G30 31 30 37 mbar AUX SR RR R UR Rated heating capacity kW 0 9 1 6 2 5 2 9 3 5 Nozzle diameter 1 100 mm 48 62 76 81 90 Reduced flow rate W 400 500 900 900 1100 Primary air mm 10 10 10 10 10 Marking on nozzle Rated flow rate G3...

Страница 24: ...zzle diameter 1 100 mm 130 165 215 245 280 Reduced flow rate W 400 500 900 900 1100 Primary air mm OPEN OPEN 4 4 4 Marking on nozzle H2 H3 H1 7 Town gas G120 8 mbar AUX SR RR R UR Rated heating capacity kW 1 0 1 6 2 4 2 9 3 4 Nozzle diameter 1 100 mm 125 160 200 220 260 Reduced flow rate W 400 500 900 900 1100 Primary air mm OPEN OPEN 4 4 4 Marking on nozzle H2 H2 H1 H1 ...

Страница 25: ... should be located near the appliance and in an easily reachable position Connection with plug and socket Make sure that the plug and socket are of the same type Avoid using adapters and shunts as these could cause overheating and a risk of burns Power voltage Danger of electrocution Have the electrical connection performed by authorised technical personnel Use personal protective equipment The ap...

Страница 26: ......

Отзывы: