background image


         EN


15 

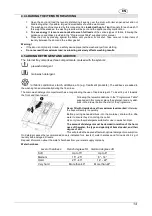
4.6 POWDER DETERGENT DOSES  


Laundry with normal dirt 

1.      Choose a programme without prewash. 
2.      Pour the total  amount  of  detergent shown  on the  pack into the main  wash  compartment of the  detergent 

drawer. 

Very dirty laundry 

1.      Choose a programme with prewash. 
2.      Place ¼ of the recommended amount of detergent in the prewash compartment of the detergent drawer and 

¾ of the detergent in the wash compartment. 


Warning! 


    If no recommended doses are provided, for delicate items in synthetic fibre use from ½ to 2/3 of the recom-
mended dose for washing tough cotton fabrics. 


    Only neutral detergents recommended for wool should be used on the wool programme. 


    Use the doses recommended by the detergent producer. 


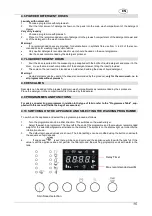
4.7 LIQUID DETERGENT DOSES  


1.      Pour the dose required into the measuring cap supplied with the bottle of liquid detergent and place it in the 

drum, or use the main wash compartment of the detergent drawer, fitting the insert provided. 

2.      The scale on the red insert is intended as an aid when deciding the dose of liquid detergent. 


Warning! 


    Liquid detergents can be used, at the doses recommended by the producer, 

only for the main wash, i.e. in 

all programmes without prewash. 


4.8 DESCALERS 


Descalers can be added to the prewash and main wash compartments as recommended by their producers. 
Place the detergent in the compartments first, followed by the descaler. 


4.9 PROGRAMMES AND FUNCTIONS 


For advice on selecting programmes in relation to the type of fabric, refer to the "Programmes Table", sup-
plied with this manual (Inside the bag of accessories).


4.10 SWITCHING ON THE APPLIANCE AND SELECTING THE WASHING PROGRAMME 


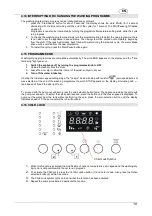
To switch on the appliance and select the programme, proceed as follows: 
 
1.      Turn the programmes knob in either direction. This switches on the washer-dryer. 
2.      Select the washing programme. The time left to the end of the programme and the maximum recommended 

weight for the selected programme alternate on the display. The symbols on the display light up to identify the 
information shown. 

3.      The default spin speed values are shown. The initial settings can be modified using the button underneath 

the sequence of spin speeds.  

4.   

If spin speed 

 is set, there will be no spin cycle and the appliance will stop with the tank full. If this 

value


is set the appliance does not perform the final spin and the washing programme ends with water in the 

tank. 


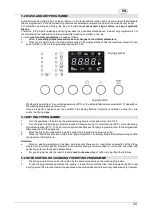
Delay Timer 

Max recommended weight 

Spin Speed selection 

Содержание LSTA127

Страница 1: ...ER VOLLWASCHTROCKNER LAVADORA SECADORA M QUINA DE LAVAR E SECAR ROUPA LAVE LINGE S CHANT INSTRUCTION MANUAL EN GEBRAUCHSANLEITUNG DE MANUAL DE INSTRUCCIONES ES MANUAL DE INSTRU ES PT MANUEL D INSTRUCT...

Страница 2: ...it on the appliance or its packaging indicates that the product must be disposed of separately from other waste at the end of its life cycle The user is thus obliged to consign scrapped appliances to...

Страница 3: ...ing facility Environmental protection Use the whole of the maximum recommended capacity Never exceed the maxi mum permitted load Do not use the prewash function for lightly or normally soiled items Fo...

Страница 4: ...supplied through an external switching de vice such as a timer or connected to a circuit that is regularly switched on and off by a utility The appliance must be installed using new sets of hoses supp...

Страница 5: ...ng machine washer dryer must be used by adults Use of the appliance by children aged from eight years and a person with reduced physical sensory or mental capabilities or lack of experience and knowle...

Страница 6: ...ully and follow all the instructions before putting it into operation The manual provides the correct instructions for installation use and maintenance as well as giving useful advice For Great Britai...

Страница 7: ...vice having a gap between contacts of at least 3 5mm After installation the disconnection device has to be easy to reach The connection to the mains must be carried out by a qualified technician in ac...

Страница 8: ...ave been removed the power supply lead can be used 1 Undo all the screws with a 10 mm spanner 2 Remove all the screws A from the rear 3 Remove all the plastic spacers B WARNING It is absolutely necess...

Страница 9: ...ar feet note that the rear of the appliance rests on skids and not on the feet Before inserting the appliance into its place between the kitchen units check that the rear feet are screwed fully in to...

Страница 10: ...moving or generating excessive noise during use If the appliance is installed on a carpeted floor take care to ensure that the openings in the bottom of the washer dryer are not obstructed Also check...

Страница 11: ...amount of water to flow out before connecting the intake hose This prevents any sand or other dirt from fouling the filters installed in the appliance to protect the water intake valves The new intake...

Страница 12: ...ppropriate type Warning The power plug must be accessible after the appliance has been installed It is absolutely essential to connect the appliance to earth Connect the plug to a socket with an earth...

Страница 13: ...n be turned in ei ther direction Does not turn while programmes are in pro gress Start Pause button For starting and stopping working cycles Display shows the settings spin speed cycle status flexi ti...

Страница 14: ...enerally sufficient to remove stains from fabrics However some difficult stains such as grass fruit egg blood rust ballpoint pen etc should be dealt with before washing Depending on the type of fabric...

Страница 15: ...tives etc e g treatment products The additives are added to the washing tank automatically during the final rinse The main wash detergent compartment has a tang allowing the use of liquid detergent To...

Страница 16: ...er only for the main wash i e in all programmes without prewash 4 8 DESCALERS Descalers can be added to the prewash and main wash compartments as recommended by their producers Place the detergent in...

Страница 17: ...ogramme Once the option has been selected the cycle duration can be further reduced to an intermediate setting and a minimum setting and then returned to the initial duration by repeated pressing of t...

Страница 18: ...r function keep pressing the button repeatedly until the display shows 0 4 The Start Pause symbol flashes on and off until the cycle starts After the cycle starts the symbol remains constantly lit 4 1...

Страница 19: ...o OFF 2 Unload the laundry from the drum 3 Leave the door ajar to allow the interior of the washer dryer to dry out 4 Turn off the water intake tap If during the initial spin speed setting stage the n...

Страница 20: ...ol blend fabrics which will be shrunk by the heat very delicate fabrics such as silk and synthetic curtains fabrics which may easily lose threads such as woollen yarn padding and loose pile mats or ar...

Страница 21: ...RY ONLY PROGRAMME 1 Turn the appliance off by turning the washing drying programmes selector knob to OFF 2 Turn the knob to the drying programme required Intensive drying for normal drying 90 C or Gen...

Страница 22: ...to warn that this programme needs to be run The warning light remains on until the CLEAN programme is carried out The light goes out at the end of the programme 2 To perform the CLEAN programme procee...

Страница 23: ...tances because they damage the surfaces For reasons of safety never spray the washer dryer with jets of water 6 2 CLEANING THE DRUM Remove any rust marks from the drum using a stainless steel cleaner...

Страница 24: ...pull it upward to re move it completely 3 Extract the drain hose A Warning if the hose is hot the water is hot or boiling hot Place a shallow container on the floor and remove the plug B to drain off...

Страница 25: ...AKE FILTERS The machine is fitted with a filter which protects the water intake valves The filter is in the fitting on the intake hose which is connected to the tap The filter must be cleaned if the w...

Страница 26: ...e water to achieve the same washing and rinsing results 4 Water not pumped out Check that drain hose is not kinked drain pump not fouled 5 Water not pumped out after last rinse in delicate fabrics and...

Страница 27: ...ance still does not dry the laundry call the Service Centre to have the fan and drying ducts cleaned to remove any fluff deposits 16 Washing results unsatisfac tory Probably too little detergent or un...

Страница 28: ...ms with light dirt 30 600 2 Wash at 30 rinses and final spin at the selected speed Rinse and spin Max 7 Rinse and pump out only or pump out and final spin at the selected speed Pump out and spin Max 7...

Страница 29: ...NTAGE DES LAVE LINGE INT GRABLES FR INSTRUCCIONES DE INSTALACI N DE LAS LAVADORAS INTEGRABLES ES INSTRU ES DE MONTAGEM DAS M QUINAS DE LAVAR ROUPA INTEGR VEIS PT MONTAGEINSTRUCTIES VAN INTEGREERBARE W...

Страница 30: ...the panel removing all the hinge and locking elements from the front make sure the wash ing machine is totally disconnected from the mains power supply Warning To fix the panel on the right hand side...

Страница 31: ...ate for the magnet lock on the side opposite the hinges fig 7 5 Fix the panel to the washing machine following the instruc tions shown in fig 8 Adjusting the hinges If after applying the panel to the...

Страница 32: ...rain pump to be cleaned if necessary In some cases the baseboard is not continuous but limited to the width of the washing machine In this case the kitchen baseboard can be fixed to the washing machin...

Страница 33: ...ca 82kg 820mm 16mm 560mm 596mm 150mm 58mm 820mm 1 9 A B 2...

Страница 34: ...2 2 3 3 12 12 11 11 7 7 10 10 8 8 9 9 2 2 1 1 3 3 4 4 6 6 5 5 4 5 4 1 1 2 3 2 3 C C 6 6 5 5 7 7 8 8 C A B A B C 9 D D 2 2 1 1 3 3 4 4 A B 3 A 3 B 3...

Страница 35: ...mm 35mm 35mm 13mm 13mm 592 595mm 16 21mm 592 595mm e e e e e e e e Unterkante Lower edge C t inf rieur Lato inferiore Lado inferior Onderkant Unterkante Lower edge C t inf rieur Lato inferiore Lado in...

Страница 36: ...1 1 2 2 3 3 1 1 2 2 3 3 1 1 7 8 9 2 1 2 4 3 5 6...

Страница 37: ...9 10 11...

Отзывы: